
Configuring a Cisco Router for the first time with GNS3 may seem difficult. Especially if you are new to network management, this job might scare you. But setting up powerful devices does not need to be hard. In fact, it is pretty simple if you follow the proper steps.
In our guide, I will explain the basic steps and commands for routers. I will also show you everything step by step to help you run your Cisco device smoothly.
Furthermore, we will begin by changing the name of your routing network device. Next, we will set up the safety features. Thus, you will establish a solid foundation for your network.
You might also need to set IP addresses. Or you might need to control user access. Luckily, our complete guide will help you set up your Cisco device correctly.
How to Set Up a Cisco Router from Scratch for the First Time Using GNS3
Before you add your Cisco networking device to the network, you must set up the basic settings. For instance, you must give an IP address to its port. Also, I recommend that you make a new user.
Also, if you are setting up a Cisco Router for the first time, you will see the auto-setup screen. This tool lets you set up your device at a basic level.
But pick the CLI instead of the auto-setup tool. If you use the command line, you will get better skills.
I would like to remind you that you can also use the SDM application to configure the Router for the first time. You can manage your settings using the GUI interface without needing the CLI.
Basic Cisco Commands
Please follow the steps in order to configure your Cisco networking device. By following these steps, you will be able to set up your network smoothly and start using it safely!
Step 1: Changing the Cisco Router Name
For the first step, you can change your router’s name (hostname). To do this, you can use the Hostname command in your device’s config mode.
R1# configure terminal
R1(config)#hostname ISTANBUL
ISTANBUL(config)#exit
ISTANBUL#
Step 2: Assigning an IP Address to the Router’s Interface
Giving IP addresses to the ports of your Cisco network devices in GNS3 is easy. Turning on the correct port is also very simple.
In short, enter the config mode of the interface you are configuring. Then, use the “ip address [address] [subnet mask]” prompt.
Then, use “no shutdown” when enabling the relevant port. In this case, your port will be ready for use immediately.
The “no shutdown” command opens the closed interface. However, if you want to close the interface, type “shutdown” and press Enter.
ISTANBUL#conf t
ISTANBUL(config)#interface fastethernet 0/0
ISTANBUL(config-if)#ip address 192.168.8.1 255.255.255.0
ISTANBUL(config-if)#no shutdown
ISTANBUL(config-if)#exit
ISTANBUL(config)#exit
ISTANBUL#
Step 3: Enable Password Configuration in GNS3
Set an Enable password to stop unwanted entry to your Router. By doing so, you will keep bad people from getting into your network device.
The Enable Password controls full access to the Cisco device. The password protects entry into admin mode. So, you stop unwanted users from changing the setup.
To add a password to your Cisco Router, run the “enable password [password]” command. This command secures access to your routing device.
ISTANBUL#conf t
ISTANBUL(config)#enable password cisco123
ISTANBUL(config)#exit
ISTANBUL#disable
ISTANBUL>enable
Password:
ISTANBUL#
Remember to give the password you made only to people allowed to set up the network.
When you look at the picture below, you can see the change to privileged mode from the User Execute Mode area. During the transition, the system will ask you for a password.

When you use the “show running-config” command, the enable password will show up. You can clearly see the status in the image below.
Cisco routing hardware stores passwords you create as “cleartext.” So, “show running-config” shows the password as plain text.
To encrypt the password, you should use the “enable secret” command. This way will let you fix the “cleartext” security hole.

Step 4: Enable Secret Configuration
To encrypt the enable password, go to config mode. Then, type the “enable secret” command. The system will not display the password in the running-config.
There is a critical point to note here. If you turn on Enable Secret on your Router, Enable Password will turn off by itself.
ISTANBUL#
ISTANBUL#conf t
ISTANBUL(config)#enable secret cisco123456
ISTANBUL(config)#end
ISTANBUL#disable
ISTANBUL>enable
Password: ⇒ I tried the password cisco123 here, and it did not work.
Password: ⇒ Here I entered the password cisco123456 and logged in successfully.
ISTANBUL#
If you want to turn off the enable password, you can type the correct command in the CLI.
ISTANBUL(config)#no enable password
Run the “show running-config” command on your Cisco network equipment. So, this will show you that the system has hidden your password. The following picture shows this clearly.

Step 5: Viewing a Message from Unauthorized Persons
You can show a warning note when someone tries to get into your Router without permission. That is, it lets you tell users about possible security problems.
The note tells the user they are using the device without permission. It also informs them that they should not change the Router settings.
We create the routing device unauthorized access message on GNS3 using the “banner motd #” command. The # character here defines the start and end boundaries of the message.
ISTANBUL#conf t
ISTANBUL(config)#banner motd # ⇒ # karakterini koyduktan sonra Enter tuşuna basınız.
Enter TEXT message. End with the character '#'.
***********************************************************************
***** WARNING ! ***** Unauthorized Access Prohibited ! *********
***********************************************************************#
ISTANBUL(config)#exit
ISTANBUL#
After making the banner note, type the “exit” command. You will then be able to see the message on the Router interface.

Step 6: Disabling CLI Notifications
When setting up a Router in GNS3, you get command-line hints. These hints can sometimes be unclear or annoying. So, you can turn off CLI prompts if needed.
Setting up messages on Cisco network equipment can be hard. But messages do not change commands. Really, they add needless trouble.
For example, you will get a notification when you turn off and on the FastEthernet port. You can see the note about the port in the picture below.
Go into global setup mode to turn off the messages. Right after, you can type the “logging synchronous” command. You will now keep your terminal screen neat.

Step 7: Disabling Domain Lookup
Furthermore, if you type a wrong command on your Router, you will start a DNS lookup. At this point, you will leave your network device idle for a while and wait.
Actually, if you have a DNS server on your network, you won’t experience this issue. But if you have set up your Router right in a tool like GNS3, it will run with no problems.
If your network does not have a DNS server, don’t worry. Run the “no ip domain-lookup”command in config mode. So, this will disable the DNS lookup setting.
ISTANBUL#conf t
ISTANBUL(config)#no ip domain-lookup
ISTANBUL(config)#end
ISTANBUL#
Step 8: Configuring the Router’s Console Interface
When getting a Cisco Router ready for use in a real environment or using GNS3, you should use a Console connection. This method provides direct access to your device. Therefore, you should complete this before adding it to the network.
We use a rollover cable to connect to the Router. One end of the cable has an RJ-45 connector. The other end has a DB-9 connector.
Rollover cable;

You can reach the Router for first-time setup with a rollover cable.
First, we plug the RJ-45 end into the output labeled Console on the routing hardware. Next, we connect the DB-9 end to the serial port, typically found on the back panel of desktop computers.
Additionally, there are two types of DB-9 cables: male and female.
Rollover cable adapters also exist. For instance, we can change a DB-9 plug to a USB slot. Then, we can easily make a console link from your laptop to the Router.
You can set a password when linking to your network device’s Console port. By doing so, it will help you make your equipment’s entry safer with the following commands.
ISTANBUL#conf t
ISTANBUL(config)#line console 0
ISTANBUL(config-line)#password cisco123
ISTANBUL(config-line)#login
ISTANBUL(config-line)#exit
ISTANBUL(config)#exit
ISTANBUL#
When you connect to the Router through the console again, you need to type a password. In short, this safety step helps stop unwanted entry.

Step 9: Telnet Configuration
After you link to your Router with a console cable, enable Telnet or SSH. Thus, it will allow you to manage your device from both the local and remote networks.
Go into global config mode to allow control using Telnet. After that, you should use the “line vty 0 4” command.
ISTANBUL#
ISTANBUL#conf t
ISTANBUL(config)#line vty 0 4
ISTANBUL(config-line)#password cisco321
ISTANBUL(config-line)#login
ISTANBUL(config-line)#exit
ISTANBUL(config)#exit
ISTANBUL#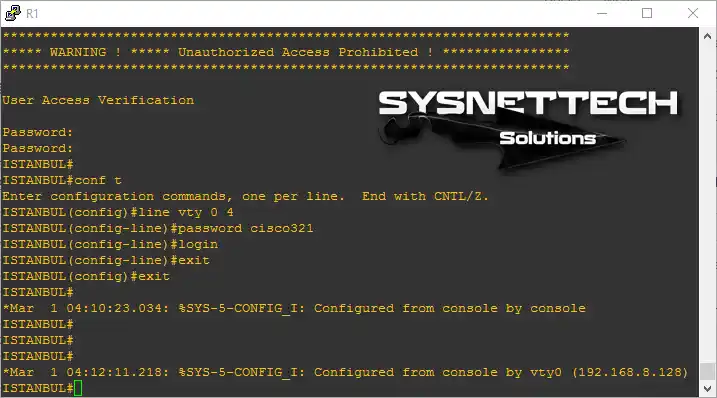
We can use the Putty program from any computer on the network. Now, enter the interface’s IP address to access the Router via Telnet from the VM or your host PC.
Next, select Telnet from the Connection Type section. Then click the Open button to establish the connection.

When you reach the Router through Telnet, you will see the unauthorized access we made before. We made a note to stop unwanted entry.

After you connect using Telnet, you will get a message. The message says there is action on the Router.
ISTANBUL#
*Mar 1 04:12:11.218: %SYS-5-CONFIG_I: Configured from console by vty0 (192.168.8.128)
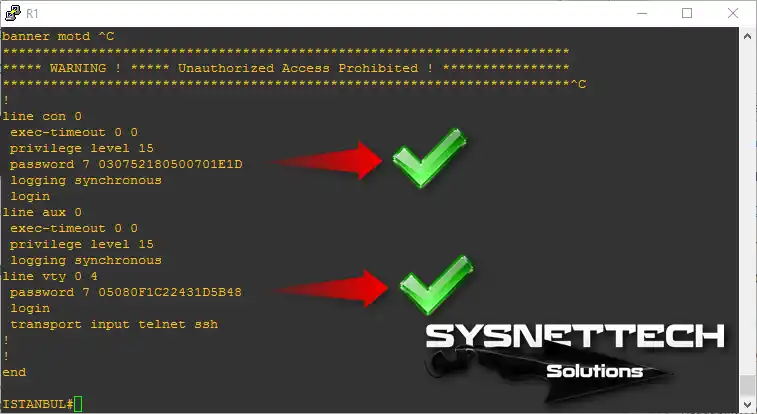
ISTANBUL#Step 10: Encrypting Passwords
If you want all your passwords to be encrypted, enter global mode. After that, you can use the “service password-encryption” command.
ISTANBUL#conf t
ISTANBUL(config)#service password-encryption
ISTANBUL(config)#end
ISTANBUL#
Before you hide passwords;

After you hide the passwords;
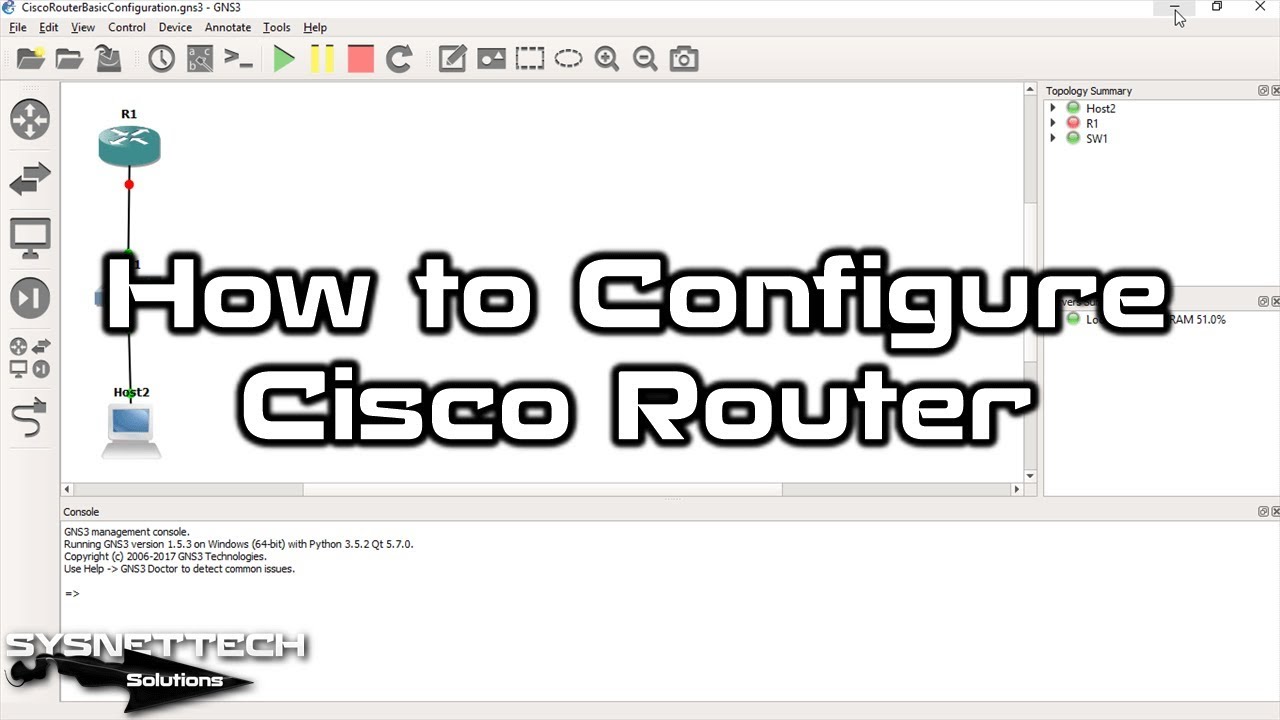
Configuring a Cisco Router with the GNS3 Program ⇒ Video
Feel free to watch the helpful video below. We take a close look at the basic configuration of the Cisco setup. We give an excellent tool for people wanting to better their networking skills.
Also, please subscribe to our YouTube channel; your help lets us make more useful videos!
Frequently Asked Questions (FAQ)
- What basic configurations can I perform for a Cisco Router?
- How do I save the configuration?
- How can I set up a console connection to the Router?
- What should I do if I encounter problems?
- How can I test the Router configuration?
Conclusion
As a result, configuring a Cisco Router with GNS3 for the first time involves essential steps, as you have seen. Even in a virtual environment, these settings let you make a safe and good network space.
Each job builds a strong base for your network work. First, I recommend setting the Router’s hostname. After that, add the IP addresses by specifying them.
Also, making strong passwords is a key step. Plus, you get extra safety by setting up access notes.
Using commands well makes the setup way more useful. It also makes Router care a lot simpler. Keeping the device working gets much easier.
I say you should spend time setting up the details right. This will not only guard your network from unwanted entry by knowing it more, but also make a path for smooth network use.
In short, even though the setup is easy, your basic skills will get better with practice. I am sure these skills will let you move to more complex setups.
All of these serve as necessary steps for you, as they will also enable you to learn advanced network techniques.

Be the first to share your comment