
In this article, I am sharing the VMware Unlocker software with you. With this tool, you can create macOS virtual machines on VMware Workstation & vSphere ESXi.
With this tool, you can get past the limits set by VMware. In other words, you can install macOS next to other systems with no trouble.
I will outline the installation process for you. After that, you can use macOS on a virtual machine in your projects with this knowledge!
Using VMware Unlocker to Run macOS
You can make virtual machines with tools like VMware or Oracle VM VirtualBox. This lets you put Apple’s operating systems onto your real computer.
Also, you can use these pretend systems without trouble. So, you can try many operating systems on one computer.
VMware Workstation gives you modern virtual computer tech. First, this program lets you use many virtual operating systems.
However, let’s say you created a virtual machine with Workstation 14, 15, 16, or 17. In this case, you usually won’t see the macOS option. This is because these tools don’t usually offer Mac OS X support. However, you can use an Apple virtual computer with special steps.
For example, you want to use a Mac system on VMware Workstation Pro or Player. At this point, you first need patch software.
This patch tool is known as VMware Unlocker. With it, you can install an Apple operating system on your virtual machine. In short, this method will allow you to run macOS alongside your existing Windows or Linux VMs.
This program is not only for VMware Workstation & Player. You can also use it in an integrated manner with ESXi and vSphere.
Key System Requirements for macOS Unlocker
VMware Workstation and Player tools block the macOS setup choice by default. In this case, you can use VMware Unlocker to add macOS help. Because of this, you can make a smooth Apple virtual computer.
Before you start, I suggest you check what VMware Unlocker needs. This is key for a smooth process. This way, you stop possible issues fast without losing time.
System Requirements:
I have listed the parts needed for macOS Unlocker in the table below. I have also described the tools that let you run the best macOS virtual computer.
| Requirement Category | Special Requirements and Details |
|---|---|
| ✅ VMware Product | VMware Workstation Pro/Player (versions 11–17) or VMware Fusion (for macOS hosts). |
| ✅ Host Operating System | A genuine installation of Windows 10 or Windows 11 (64-bit). |
| 🖥️ CPU | Intel or AMD 64-bit processor. You must turn on hardware virtualization (Intel VT-x or AMD-V) in the BIOS/UEFI. |
| 💾 RAM | Minimum 8 GB of RAM. The macOS virtual machine needs sufficient memory to ensure the smooth operation of the host PC. Therefore, I recommend 16 GB or more. |
| 💿 Storage | At least 50–60 GB of free disk space. macOS and applications require a large amount of storage. For this reason, I highly recommend an SSD or NVMe drive. |
| 🔐 Permissions | If you have administrator rights, you won’t have any problems. |
Important note for AMD CPU users:
macOS is for Intel computers. Because of this, you must do more to use it on an AMD CPU. For this reason, Unlocker is often not enough.
First, you need to edit your VMs .vmx file. Then, you should add cpuid lines to emulate an Intel CPU. If you have an AMD CPU, you need to add special .vmx codes. Like this:
- For AMD computers, you usually must add these lines to your VMs .vmx setup file:
cpuid.0.eax = "0000:0000:0000:0000:0000:0000:0000:1011"
cpuid.0.ebx = "0111:0101:0110:1110:0110:0101:0100:0111"
cpuid.0.ecx = "0110:1100:0110:0101:0111:0100:0110:1110"
cpuid.0.edx = "0100:1001:0110:0101:0110:1110:0110:1001"- Also, you might need these extra CPUID codes:
cpuid.1.eax = "0000:0000:0000:0001:0000:0110:0111:0001"
cpuid.1.ebx = "0000:0010:0000:0001:0000:1000:0000:0000"
cpuid.1.ecx = "0000:0000:0000:0000:0000:0000:0000:0001"
cpuid.1.edx = "0000:0111:1000:1011:1010:1011:1111:1011"- Some users also say they got it working with this easier method:
cpuid.1.edx = "0000:0010:0000:1000:0000:1000:0000:0000"
cpuid.1.ecx = "0000:0000:0000:0000:0000:0000:0000:0000"
Download VMware Unlocker 3.0.5, 4, 3, 2, and 2.1.1
The latest version of Mac OS Unlocker is 3.0.5. This 3.x version supports VMware Workstation versions 11-17 and Player versions 7-17. You can also use the corresponding version on Windows or Linux.
Also, it works smoothly with the VMware Workstation program. You can also use it on a vSphere ESXi server.
You can use the buttons below to download the latest VM Unlocker. Plus, you can then safely download the files I shared with you via Google Drive.
About Unlocker: Thanks, Paolo, the developer of this tool, for making it possible to run macOS on Windows, Linux, and ESXi hosts. You can find the developer’s GitHub page here.
Download Unlocker 3.x and 2.1.1 Older Versions
If you encounter issues installing Mac OS on your ESXi server with the new version, you can try an older version of the tool. For example, versions 3.03, 3.0.2, and 2.1.1 are good options.
This is because I have tested these versions on many platforms. So, I am sure that they work without any trouble.
| Version | Links |
|---|---|
| Unlocker 2.1.1 | Download |
| Unlocker 3.0.2 | Download |
| Unlocker 3.0.3 | Download |
| Unlocker 3.0.4 | Download |
| Unlocker 3.0.5 | Download |
How to Install VMware Unlocker
1. Install Unlocker on Windows
Download the relevant version to your Windows PC using the button above. Then, shut down your Workstation to install Unlocker on your Windows 11 & 10 OS. If you don’t shut it down, you may encounter errors during installation, so be sure to do this!
Also, make sure the Workstation program is not running in the background. You can easily check all processes on your OS using Task Manager.
After you close the program, unzip the .rar file you got into a folder. Then, find the win-install.cmd file inside to begin the setup on Windows. Right-click the file, select the “Run as Administrator” option, and start the process.
win-install.cmd ⇒ Configures Workstation Settings
win-uninstall.cmd ⇒ Restores / Uninstalls Workstation Settings
win-update-tools.cmd ⇒ Downloads the latest macOS Guest VM Tools
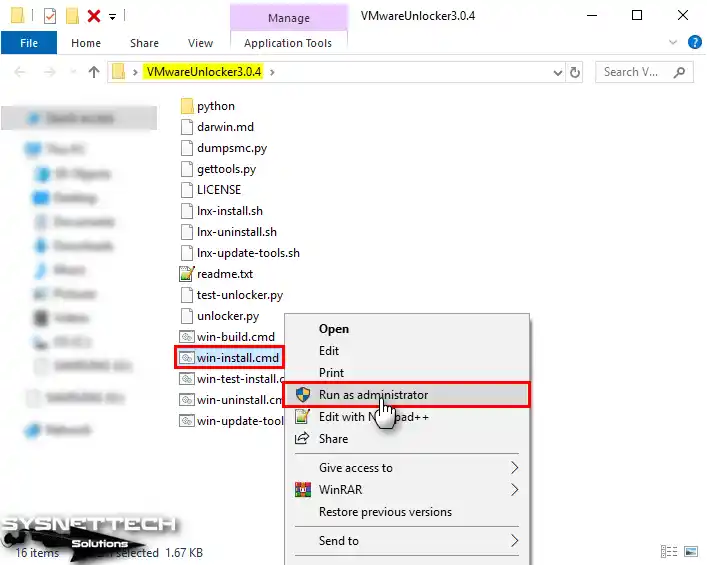
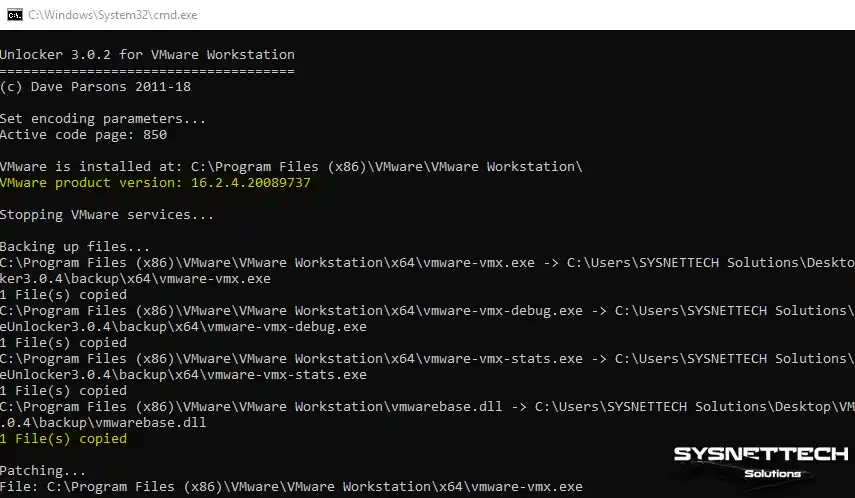
After you run the Win-install.cmd file, a command window will open. Then, the patch tool setup will begin by itself.
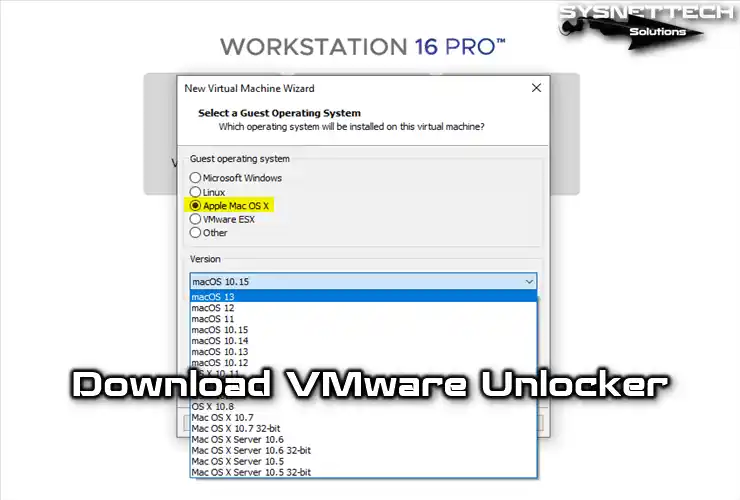
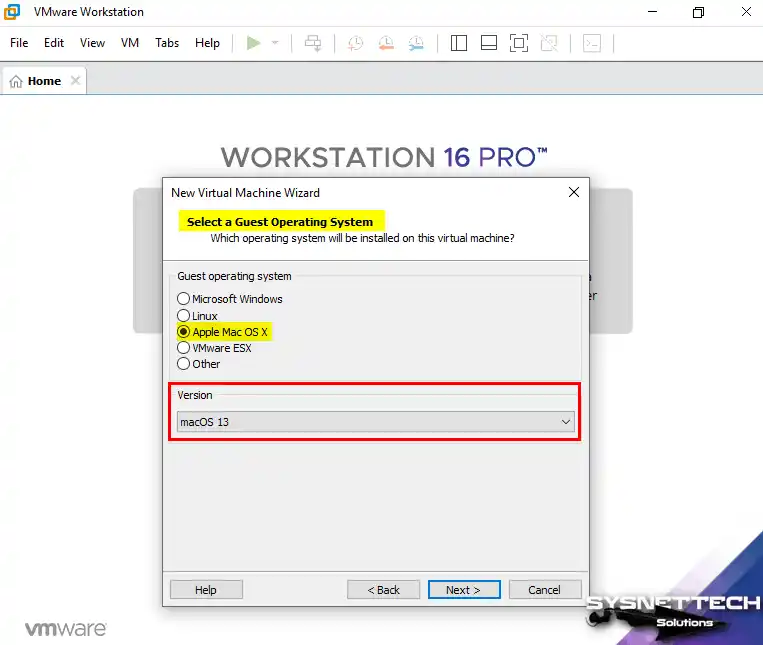
After the setup is OK, open the VMware Workstation program. Then, click Create New Virtual Machine to check the Apple OS X option. So, this lets you begin installing macOS right away.
Proceed to the “Select a Guest operating system” window. You will then see the Apple Mac OS X option, as shown in the image below. In short, you are able to install macOS with VMware!
NOTE: When creating a macOS High Sierra or Mojave virtual machine, allocate at least 4 GB of RAM. Also, don’t forget to add 2 processor cores. Also, you must turn on virtualization in the VM settings. I strongly suggest you change these settings to make it work better!
To make your macOS virtual computer work better, add the line “smc.version=0” to its .vmx file. This helps it work well and fixes problems with power and speed by acting like a real Mac. This easy step is critical for a smoother virtual computer experience!
2. Install Unlocker on Linux
Let’s say you are using a Linux system like Ubuntu, Linux Mint, or Debian. In this case, you may want to run macOS on these systems as well.
Thanks to VMware Unlocker, you can create a macOS VM on your Linux OS. To do this, simply run the lnx-install.sh file in the folder. As a result of this process, you will now be able to access the Mac OS X option that you couldn’t see before!
But you must also close VM Workstation on Linux. You also must stop the linked services. To do this, open the terminal and run these commands:
sudo /etc/init.d/vmware-tools start
sudo /etc/init.d/vmware-tools stop
sudo /etc/init.d/vmware-tools restart
Open Terminal on your Linux system and switch to root access. In Terminal, use the “chmod +x lnx-install.sh” command to adjust the file permissions. Then, use the “sudo ./lnx-install.sh” command to start the installation.
lnx-install.sh ⇒ Configures Workstation Settings
lnx-uninstall.sh ⇒ Restores / Uninstalls Workstation Settings
lnx-update-tools.sh ⇒ Downloads the latest Mac OS Guest VM Tools
3. Install Unlocker on ESXi
Using Unlocker on an ESXi host requires a few steps. First, make sure you have a matching ESXi version.
Next, download Unlocker for ESXi. Install the files on your server and extract them to a temporary directory such as “/tmp”.
Next, turn on SSH access for the host computer. Make a command-line link using an SSH tool. Once linked, go to the folder holding the Unlocker files.
Now, run the setup file (like ./unlocker.sh). This file will change the ESXi setup to work with macOS.
Finally, restart your host to use these changes and check the setup. When you make a new VM in the vSphere tool, you will see the macOS options.
Frequently Asked Questions About Unlocker (FAQ)
- What is VMware Unlocker?
- Which versions of Workstation work with Unlocker?
- What system requirements do I need to use Unlocker?
- Can I use it with AMD CPUs?
- Where can I download VMware Unlocker?
- Is it safe to use the macOS Patch?
Conclusion
In the end, VMware Unlocker is a vital tool. It allows you to run macOS on VMware. It works on Workstation, Player, or ESXi. First, follow the installation steps I described to you.
This way, you easily pass VMware’s limits. You can then keep working in a virtual space, using every part of macOS.
Really, this way helps developers, testers, and fans. They can now use Apple’s system. They can check their current work in a macOS space without extra cost.
That is why you may be beginning new projects. Or, you might only be learning macOS. So, VMware Unlocker gives you new chances. I can say it is a door to new ideas.
Lastly, always pick the correct version. Always check your program and computer details. This will give you the best virtual computer experience!

40 People Shared Their Experience
Thank you very useful!
You’re welcome! Also thank you for your comment!
unable to install on ubuntu host, at booting stage from iso system restart when the progress bar reaches half.
Hi tolqabaqci
Do you know if is possible to fix the multi display visualizzation for macosx vmware?
thank you in advance
i have installed the win-install.cmd and still i am not able to see the Apple menu on VMware to install MAC OS I have enabled the VT in Bios .
You need to close VMware Workstation before you click Win-install.cmd. Did you notice that?
When will we get an update that works with VM Ware 15.5.0
Create a boot ISO from Catalina app store download on macOS from a terminal window:
cd ~
mkdir TempInstall
cd TempInstall
Mount the InstallESD.dmg installer included in the Install macOS Catalina.app installer to the /Volumes/Catalina mount point:
hdiutil attach /Applications/Install\ macOS\ Catalina.app/Contents/SharedSupport/InstallESD.dmg -noverify -mountpoint /Volumes/CatTemp
Create a blank disk image of 7316 Mb located in the current directory:
hdiutil create -o ./CatalinaBase.cdr -size 7316m -layout SPUD -fs HFS+J
Mount the CatalinaBase.cdr.dmg image to the install_build mount point:
hdiutil attach ./CatalinaBase.cdr.dmg -noverify -mountpoint /Volumes/install_build
Restore the disk image to the install_build directory you have created before:
asr restore -source /Applications/Install\ macOS\ Catalina.app/Contents/SharedSupport/BaseSystem.dmg -target /Volumes/install_build -noprompt –noverify -erase
Remove the Packages directory with all containing files:
rm -rf /Volumes/macOS\ Base\ System/System/Installation/Packages
Create a new empty directory instead of the previously deleted one:
mkdir -p /Volumes/macOS\ Base\ System/System/Installation/Packages
Copy the installation packages:
cp -R /Volumes/CatTemp/Packages/* /Volumes/macOS\ Base\ System/System/Installation/Packages/
Unmount disks from the directories:
hdiutil detach /Volumes/macOS\ Base\ System/
hdiutil detach /Volumes/CatTemp/
Rename the CatalinaBase.cdr.dmg file to the BaseSystem.dmg file
mv ./CatalinaBase.cdr.dmg ./BaseSystem.dmg
Create a blank disk image of 8965 Mb located in the current directory:
hdiutil create -o ./Catalina.cdr -size 8965m -layout SPUD -fs HFS+J
Mount the cdr.dmg image to the install_build directory:
hdiutil attach ./Catalina.cdr.dmg -noverify -mountpoint /Volumes/install_build
Restore the disk image to the install_build directory:
asr restore -source /Applications/Install\ macOS\ Catalina.app/Contents/SharedSupport/BaseSystem.dmg -target /Volumes/install_build -noprompt –noverify -erase
Copy the BaseSystem.dmg image to the “OS X Base System” directory:
cp ./BaseSystem.dmg /Volumes/macOS\ Base\ System/
Unmount the “OS X Base System” directory:
hdiutil detach /Volumes/macOS\ Base\ System/
Convert the cdr.dmg image to the iso image. You can use a location with enough free space that is convenient for you.
hdiutil convert ./Catalina.cdr.dmg -format UDTO -o ./Catalina.iso
Rename the Catalina.iso.cdr file to the Catalina.iso file and move it to your desktop for more convenience.
mv ./Catalina.iso.cdr ~/Desktop/Catalina.iso
If everything is OK, remove the cdr.dmg file:
rm ./Catalina.cdr.dmg
UPDATED Procedure for Catalina 10.15.1: New image sizes are necessary, pay attention to the OLD/NEW comments below. It’s a shame that this site prevents copy and paste, so type the commands carefully!
sudo -s
cd ~
mkdir TempInstall
cd TempInstall
Mount the InstallESD.dmg installer included in the Install macOS Catalina.app installer to the /Volumes/Catalina mount point:
hdiutil attach /Applications/Install\ macOS\ Catalina.app/Contents/SharedSupport/InstallESD.dmg -noverify -mountpoint /Volumes/CatTemp
Create a blank disk image of 8940 Mb located in the current directory:
OLD 10.15.0
hdiutil create -o ./CatalinaBase.cdr -size 7316m -layout SPUD -fs HFS+J
NEW 10.15.1
hdiutil create -o ./CatalinaBase.cdr -size 8940m -layout SPUD -fs HFS+J
Mount the CatalinaBase.cdr.dmg image to the install_build mount point:
hdiutil attach ./CatalinaBase.cdr.dmg -noverify -mountpoint /Volumes/install_build
Restore the disk image to the install_build directory you have created before:
asr restore -source /Applications/Install\ macOS\ Catalina.app/Contents/SharedSupport/BaseSystem.dmg -target /Volumes/install_build -noprompt –noverify -erase
Remove the Packages directory with all containing files:
rm -rf /Volumes/macOS\ Base\ System/System/Installation/Packages
Create a new empty directory instead of the previously deleted one:
mkdir -p /Volumes/macOS\ Base\ System/System/Installation/Packages
Copy the installation packages:
cp -R /Volumes/CatTemp/Packages/* /Volumes/macOS\ Base\ System/System/Installation/Packages/
Unmount disks from the directories:
hdiutil detach /Volumes/macOS\ Base\ System/
hdiutil detach /Volumes/CatTemp/
Rename the CatalinaBase.cdr.dmg file to the BaseSystem.dmg file
mv ./CatalinaBase.cdr.dmg ./BaseSystem.dmg
Create a blank disk image of 9965 Mb located in the current directory:
OLD 10.15.0
hdiutil create -o ./Catalina.cdr -size 8965m -layout SPUD -fs HFS+J
NEW 10.15.1
hdiutil create -o ./Catalina.cdr -size 9965m -layout SPUD -fs HFS+J
Mount the cdr.dmg image to the install_build directory:
hdiutil attach ./Catalina.cdr.dmg -noverify -mountpoint /Volumes/install_build
Restore the disk image to the install_build directory:
asr restore -source /Applications/Install\ macOS\ Catalina.app/Contents/SharedSupport/BaseSystem.dmg -target /Volumes/install_build -noprompt –noverify -erase
Copy the BaseSystem.dmg image to the “macOS Base System” directory:
cp ./BaseSystem.dmg /Volumes/macOS\ Base\ System/
Unmount the “macOS Base System” directory:
hdiutil detach /Volumes/macOS\ Base\ System/
Convert the cdr.dmg image to the iso image. You must use a location with enough free space and is convenient for you.
hdiutil convert ./Catalina.cdr.dmg -format UDTO -o ./Catalina.iso
Rename the Catalina.iso.cdr file to the Catalina.iso file and move it to your desktop for convenience.
mv ./Catalina.iso.cdr ~/Desktop/Catalina.iso
If everything is OK, cleanup the working files:
rm ./Catalina.cdr.dmg
rm ./BaseSystem.dmg
Hi, Unlocker still not work with VMWARE 15.5.0, it failed when running gettolls.exe – (when trying download the darwin iso files) ..
issue running on Kubuntu 19.10 and Workstation 15.5.2. when running the install script, it doesnt make the changes on Workstation and fails to connect/download the tools and give python errors
Hi Tolqa,
firstly, let me thanks and appreciate your great work and sharing knowledge. I have two quick question here.
1. Is there any tested EXSI Unlocker which work on ESXI 6.0 Build 3380124? if yes please share the link?
2. To maximize screen resolution, what is a true working solution if any ?
Hello there. Thanks for your nice comment.
I have created a Patch that can work in ESXi 6.0 version for you. Download it to your server and install it here. If it works, please inform me.
>
You can browse this article to solve the screen resolution problem.
I ran the win-installer like you said, and it looks like it runs fine but then I open VMworkstation pro and I don’t see the Mac OS option.
Any Ideas, I even closed all vm running apps from Task manager and nothing. Same outcome.
Why can’t I paste text here???
The unlocker script fails on 15.5.2.15785246
In the end of script, throws this error: file could not be opened successfully. Failed to execute script gettools.
No se encuentra el archivo: darwin*.*
Finished
But the VMWare stills unpatched.
Anyone know how to uninstall the Unlocker tool off a ESXI server?
None of these work any longer. There is no interest in this issue, so none of the authors care to aid in resolving it. Just buy a mac mini.
First of all,
Last poster, it’s nice to see you come out in the open, but frankly, what you do in the privacy of your home is not our concern.
I’ve just installed the old esxi unlocker 2.1.1 on esxi 6.7u3 and have installed MacOS Sierra and MacOS Mojave succesfully as vm’s.
It works.
Shane, look at the esxi unlocker readme file or even in the extracted directory where you punt the installer, you will see an uninstaller there.
Looking and reading the readme.txt is FAR quicker then posting on a website and waiting for someone to look for you.
The installer scrips is called “esxi-install.sh” and suprise, the uninstall script is called “esxi-uninstall.sh”.
Thanks for your feedback, Marco Polo!
Yes, you are right, “esxi-uninstall.sh” command must be executed to uninstall the unlocker.
I am having a problem in the command line ( after run as admin) it is not retrieving Darwin tools
i am getting this message:
File ” gettools.py”, line 159, in
main ()
File “gettools.py”, line 112, in main
tar=tarfile.open(convertpath(dest+’/tools;com.vmware.fusion.tools.darwin.zip.tar’),’r’)
File ” tarfile.py”, line 1680, in open
tarfile.ReadError: file could not be open successfully
[11876] Failed to execute script gettools
File not found – darwin*.*
0 files copied
Any help with that?
Thanks
same error for both version of the unlocker( 2.1.1 and 3.0.2). I am using VMware workstation 15.5.6
Hello Tolga! That 6.0 version what you shared at april 20 is working with my esxi build 5050593? I can install Catalina?
Thank you for your work!
The macOS Unlocker tool has been updated. Please try the new version. If it doesn’t work, use this tool on ESXi and send me feedback.
Having the same issue as @Bruno
Same error, The Tools for VMware are not in the same location. I cannot get them. This thread is dead.
It worked thanks
You’re welcome!
erreur le systeme n’a pas trouver la cle ou la valeur de registre speciffié que ce que je dois faire?
Réparez votre logiciel VMware Workstation et réessayez.
Hi there,
each version opens after right-click – run as admin- for a blink of a second and closes immediatly without any change in vmware.
Do i have to update or change settings in the enviroment (python, etc?)
Is this working with windows 7?
VMware was closed
Thanks in advance for your help & answers!
How can I do this for VMware Fusion 12 on MacOS?
I want to install Mac OS 10.4.11 into Fusion to run on Macbook Retina 15″…
You can install macOS on a MacBook using the Fusion software. You do not need the unlocker program.
MERCI POUR VOTRE AIDE.
LA VERSION 3.0.3 A FONCTINNEE PARFAICTEMENT POUR MON VWARE 16.2.2
Will this work on VMWare WS Player 16? I quit trying two months ago. Are you sure this is worth to try, again?
It works fine, you can try it.
I followed the instructions but I keep receiving the error “CPU has been disabled by the guest operating system”. Linux VMWare 16
Hi,
It doesn’t work on VMware Workstation Pro. 16.2.5
Thank you for this guide! I have a problem: after correctly creating the Mac OS 14 VM, I have selected the ISO as the dvd as stated in the tutorial. However, the VM cannot start from there, it bring me to the boot menu of the “PC” .
What can I do?
Finally a working one on Wx64 VMWare WS Player 16 with High Sierra, v3.0.5.
Thx for the info. Kudos to Paolo.
Unfortunately doesn’t work on version 25H2 any more.
Missing entry point prevents startup.