
Do you want to install Oracle VM VirtualBox 7.0 on Ubuntu 23.10 or 24.04? VirtualBox lets you run different operating systems on your computer. Plus, you can also easily create, manage, and use virtual machines with it.
In this guide, I will tell you how to install VirtualBox virtual machine software on the Ubuntu system. Then, I will show you how to download and install the Extension Pack so that you can use virtual PCs more efficiently. Let’s get started!

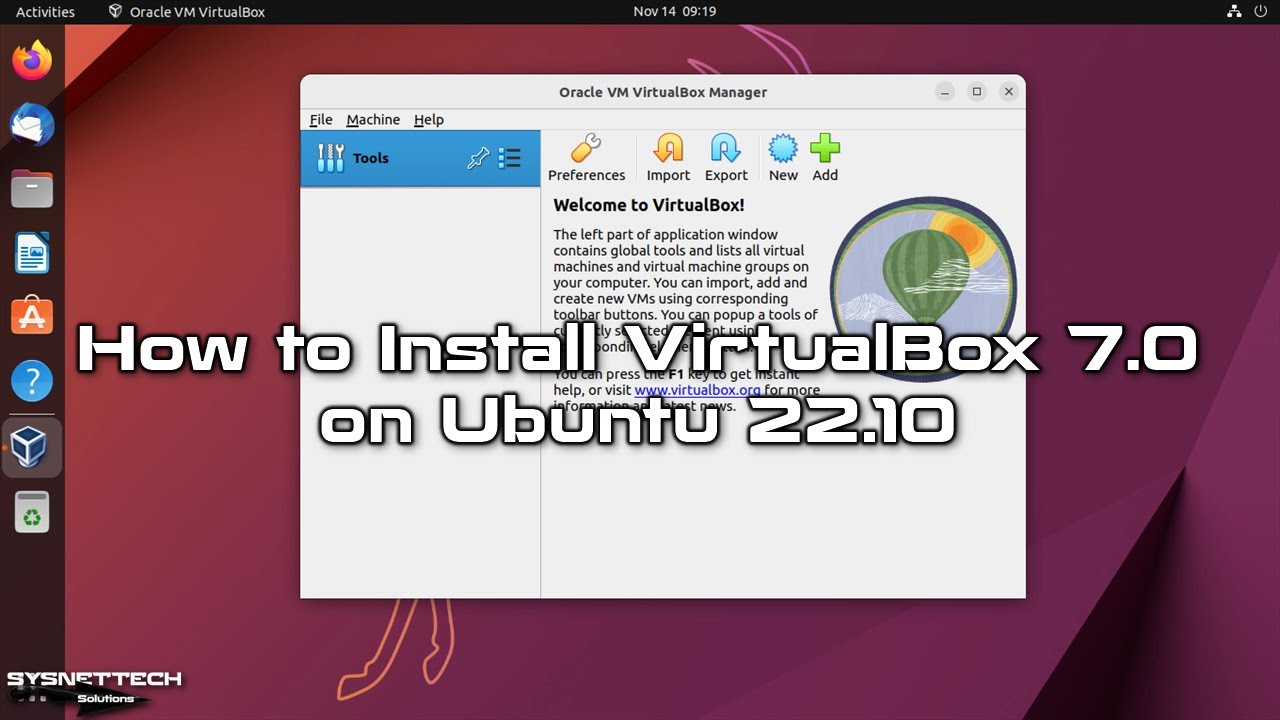
How to Set Up Oracle VM VirtualBox 7.0 on Ubuntu 23.10 & 24.04 Distribution
You can use Oracle VM VirtualBox to make VMs on your desktop or laptop. This software lets you install and run different operating systems like Windows, Linux, and macOS. But your PC’s processor must support virtualization to use it.
To check if your CPU supports VTx, visit your hardware maker’s website or use third-party software. In short, these tools will tell you if your processor can use virtualization.
Oracle VM is a free and popular VTx program that belongs to the Hypervisor Type 2 group. After you install VirtualBox on your Linux PC, you can create a new virtual machine. Thus, to install an operating system, add the ISO files to this VM.
A big plus of VirtualBox is that it’s free. That is, this means you can use it for virtualization without spending any money.
After running this software on the Linux system, you must get and install the Extension Pack required for the app. In this way, this software lets you use your host device’s hardware on guest machines, such as a USB, Webcam, or network card.
How to Download and Install VirtualBox
You can get Oracle’s VirtualBox software from different places, including its official website. First, go to VirtualBox.org. There, you can download the version that matches the Linux OS you have on your PC.
Step 1
To download Oracle VM for Linux systems, go to the official website and click on the Download VirtualBox 7.0 image.

Step 2
In the Downloads section, you will see a link to get different Linux versions.

Step 3
On the Download VirtualBox for Linux Hosts page, click on the Ubuntu 23.10 or 24.04 option and download the deb package to your PC.

Step 4
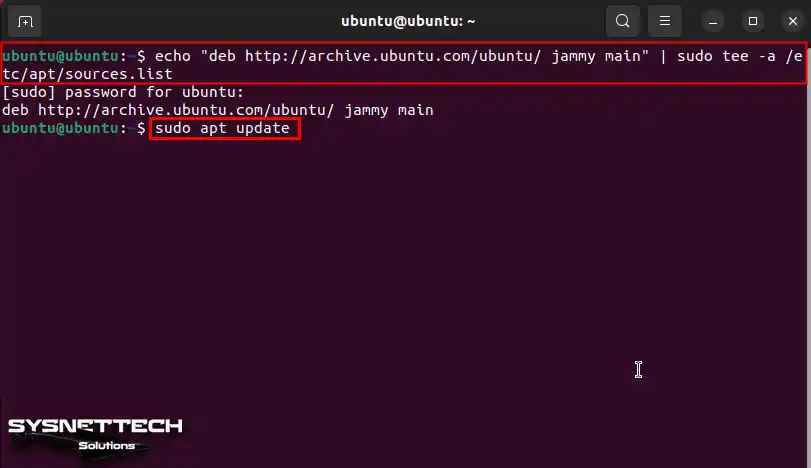
To install Oracle VirtualBox on Ubuntu, first, add the 24.04 and 23.10 repo addresses to your software list. Then, update the list by running the sudo apt update command in the terminal.
For 23.10:
echo "deb http://archive.ubuntu.com/ubuntu/ mantic main" | sudo tee -a /etc/apt/sources.list
sudo apt update
For 24.04:
sudo vi /etc/apt/sources.list.d/ubuntu.sourcesNext, add the following values to the ubuntu.sources file:
Types: deb deb-src
URIs: http://us.archive.ubuntu.com/ubuntu/
Suites: noble noble-updates noble-backports noble-proposed
Components: main restricted universe multiverse
Signed-By: /usr/share/keyrings/ubuntu-archive-keyring.gpg
Types: deb deb-src
URIs: http://security.ubuntu.com/ubuntu/
Suites: noble-security
Components: main restricted universe multiverse
Signed-By: /usr/share/keyrings/ubuntu-archive-keyring.gpg
Step 5
To make VirtualBox work well on Ubuntu, you need to install the correct Linux kernel packages. Without them, you won’t open or work properly.
sudo apt install linux-headers-$(uname -r) build-essential dkms -yNOTE: Suppose you encounter the error message “The vboxdrv kernel module is not loaded” even after installing the Linux kernel packages. In that case, you can resolve this issue by installing the required Linux kernel and its dependent packages mentioned in the warning notice. Follow the commands below to fix this problem, specifically on the 22.04 version.

Step 6
The VirtualBox program is an .exe file on Windows and a .deb file on Linux. On Linux, you usually install .deb files using the dpkg command.
Open the terminal to install the VirtualBox.deb package you got. In the terminal, type cd ~/Downloads to go to the Downloads folder.
Once you are in the Downloads folder, install the package by typing sudo dpkg -i FileName.deb. But replace “FileName.deb” with the name of your VirtualBox file.
cd ~/Downloads
sudo dpkg -i virtualbox-7.0_7.0.2-154219_Ubuntu_jammy_amd64.deb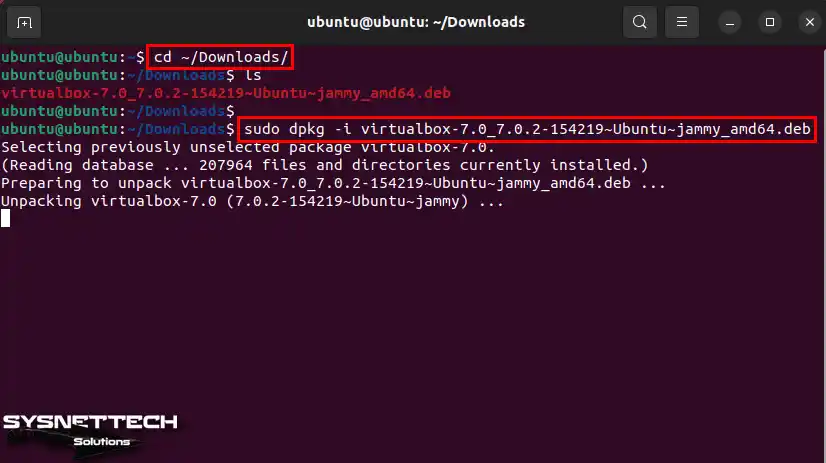
Step 7
When you install the Oracle deb package, run the command sudo apt install -f -y. This will force the installation of the necessary packages and automatically accept any extra disk space needed. Afterward, the terminal will show a message that some other packages need to be installed on your Ubuntu PC.
sudo apt install -f -yTo see if VirtualBox is running well after setup, use this command in the terminal: sudo systemctl status vboxdrv.service.
sudo systemctl status vboxdrv.service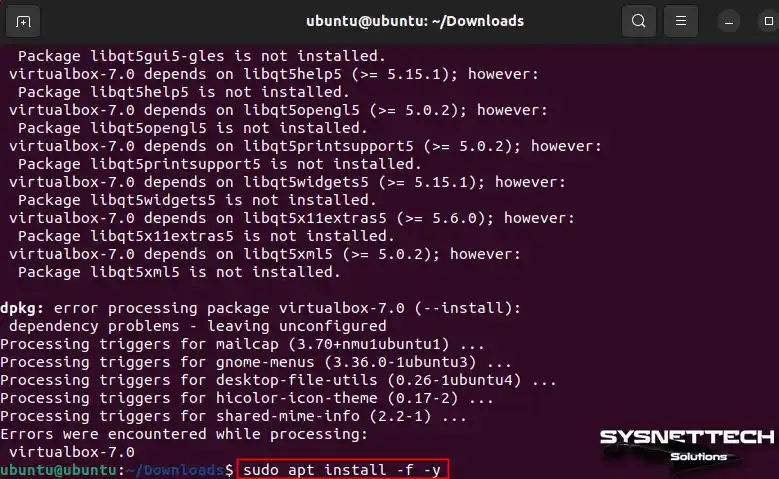
Step 8
After you install Oracle VirtualBox, you can quickly start it by typing “virtualbox” in the terminal or by finding and opening it from the start menu.
virtualbox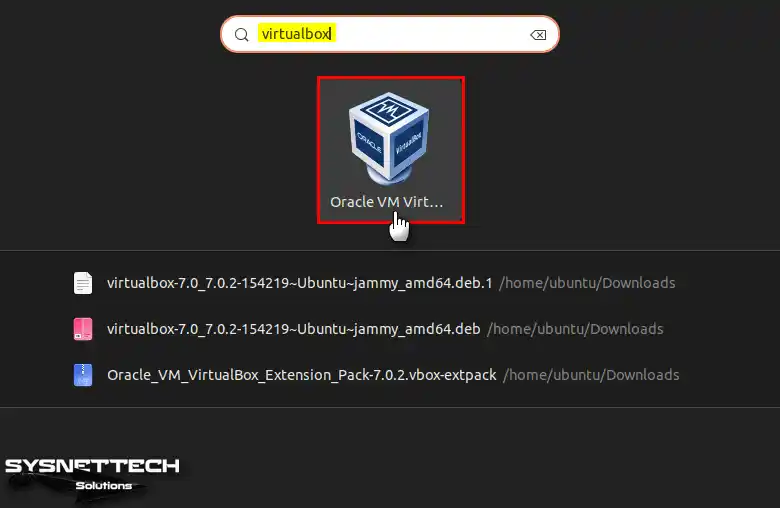
Step 9
You can open the Help / About window from the tool menu and check the new version of the VirtualBox software.

How to Install Extension Pack in Ubuntu PC
After you install VirtualBox on Ubuntu, you need to install the Extension Pack. In short, the Extension Pack helps the virtual machines run better.
After installing this package, you can quickly transfer files between the virtual machine and your PC. For example, this makes moving data simpler.
You can also make your experience better by using full-screen mode. On the other hand, this gives you a bigger workspace and makes everything look beautiful.
Step 1
Go to the website where you downloaded VirtualBox. After that, click on “All supported platforms” to download the Extension Pack.

Step 2
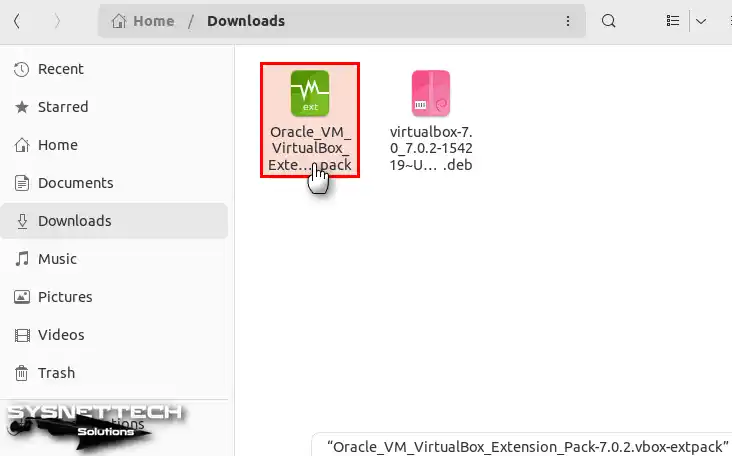
To start the installation, double-click the vbox-extpack file you got in your Downloads location.
Step 3
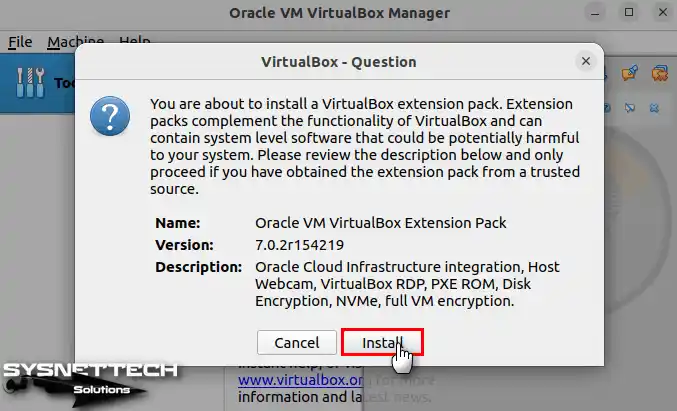
As soon as you double-click on the file, the VirtualBox – Question window will open as shown below. This window informs you that you must install the Extension Pack to use USB devices, webcam, RDP, PXE ROM, disk encryption, and NVMe features on guest VMs. To use the specified segments, click the “Install” button to initiate the installation.
Step 4
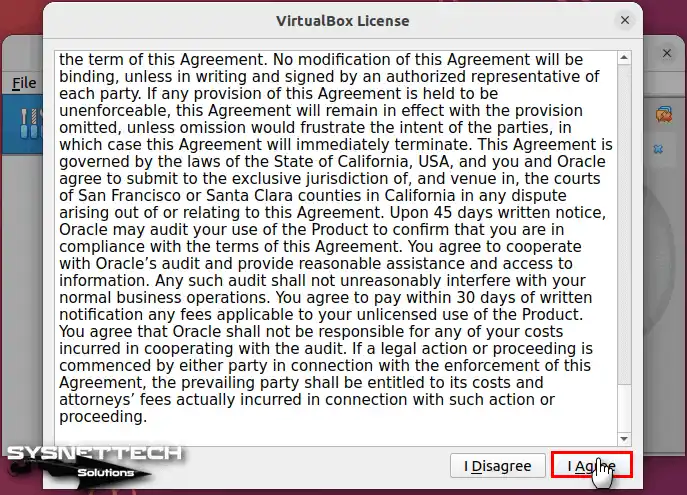
Please scroll down the page to accept the license agreement; the I Agree button will be active. While installing the package, type your user password in the window that you will see and click the Authenticate button.
Step 5
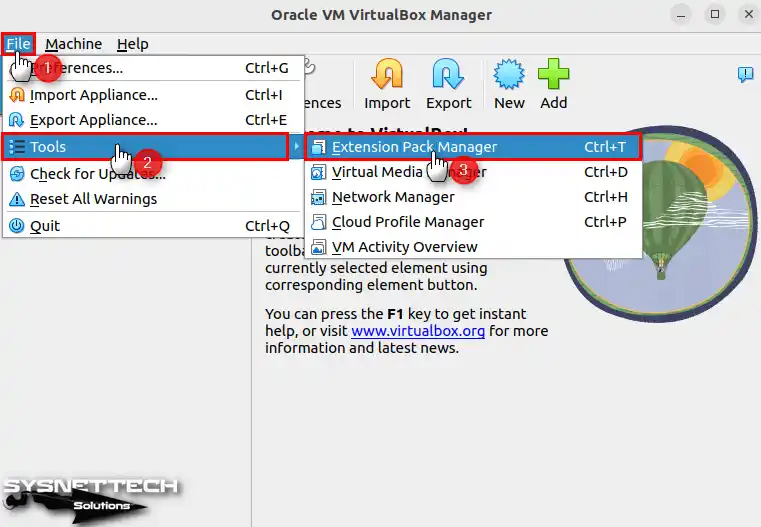
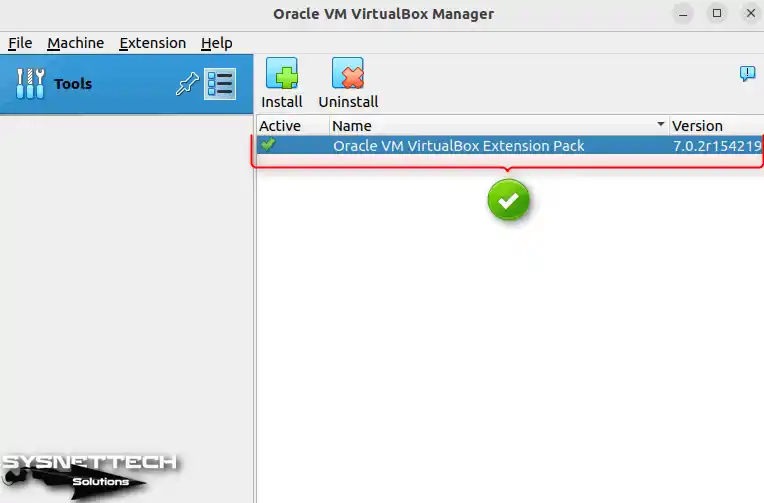
Open the Extension Pack Manager by going to File, then Tools, in the Oracle VM menu.
Step 6
After opening the application, ensure that the Extension Pack is installed. If so, your virtual machines now have drivers.
How to Create a New Virtual Machine on Ubuntu with VirtualBox
You have installed Oracle VM VirtualBox on your PC with no issues. Now, create a new virtual machine to see if there are any errors.
In this section, I will be setting up a Windows 10 virtual PC on the Ubuntu distribution. You can try a newer or older platform if you want.
NOTE: If you see the “Fix Can’t Enumerate USB Devices” error in Oracle VM, you need to join your user account to the vboxusers group. First, use the command sudo groups $USER to check your current groups. Then, run sudo adduser $USER vboxusers to add yourself to the vboxusers group. Finally, restart your Ubuntu PC and see if you fixed the USB error.
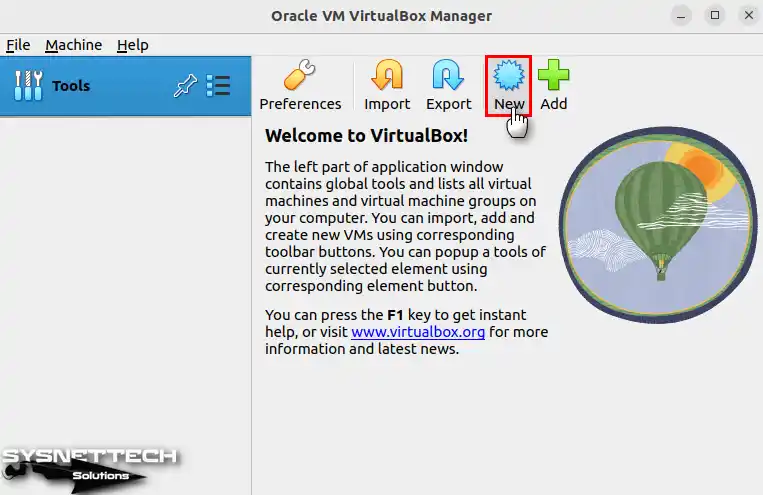
Step 1
Let’s start creating a new virtual machine in VirtualBox. To do this, you can first begin the process by clicking the “New” button on its interface.
Step 2
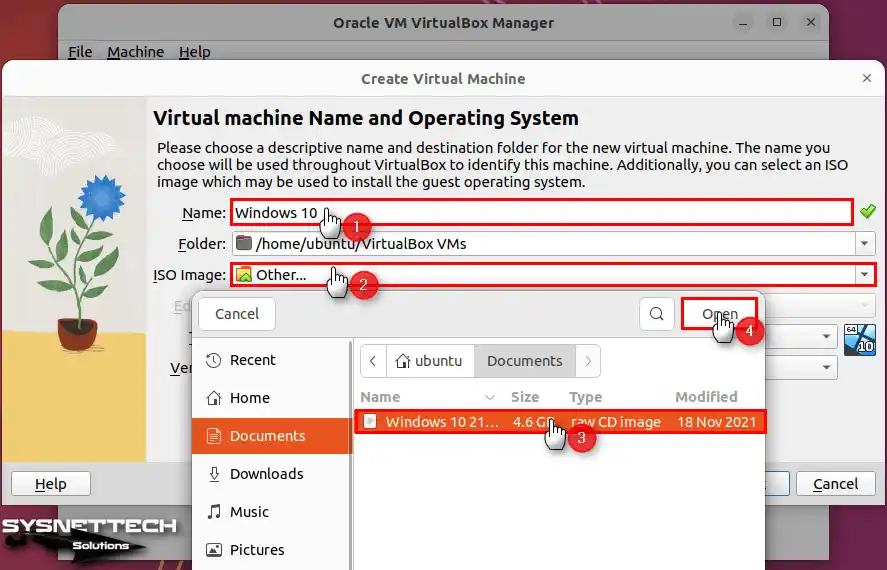
In the Virtual Machine Name and Operating System window, set your VM. First, enter the name of the VM, its installation location, type, and version. Then, make sure to provide the correct details for each parameter.
Also, you must enter the necessary information correctly to continue with the virtual machine installation. Finally, expand the window that opens from the ISO Image section. With that, click on the Other option. In the window that opens, pick the Windows 10 image file and open it.
Step 3
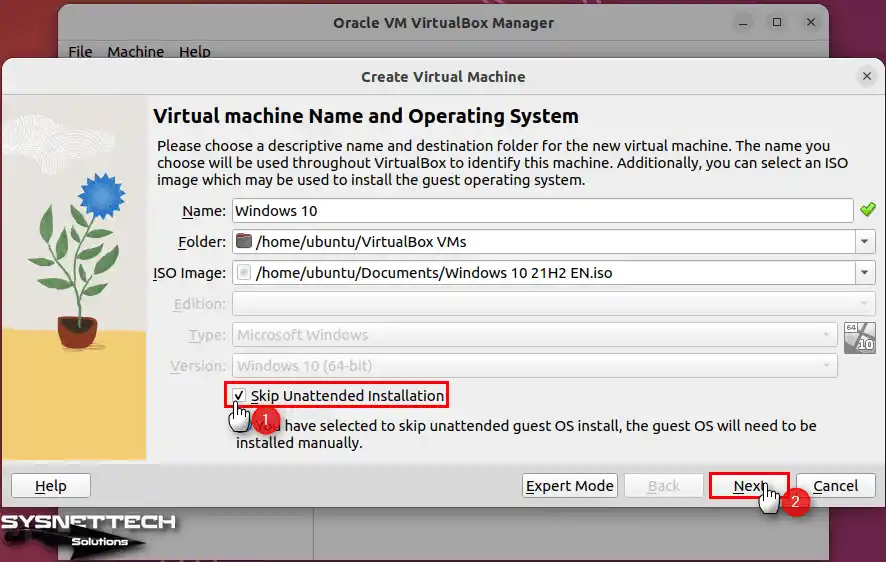
In the new version of Oracle software, you can use the Unattended Installation feature. It helps set up things quickly, like entering the product key. You can skip it for a standard installation, but it can be beneficial in some cases.
Step 4
In the Hardware window, you can choose how much RAM to give the VM in the Base Memory section. You can also set the number of virtual cores in the Processor section based on your host PC’s capacity. Set these correctly to make your virtual machine work better.

Step 5
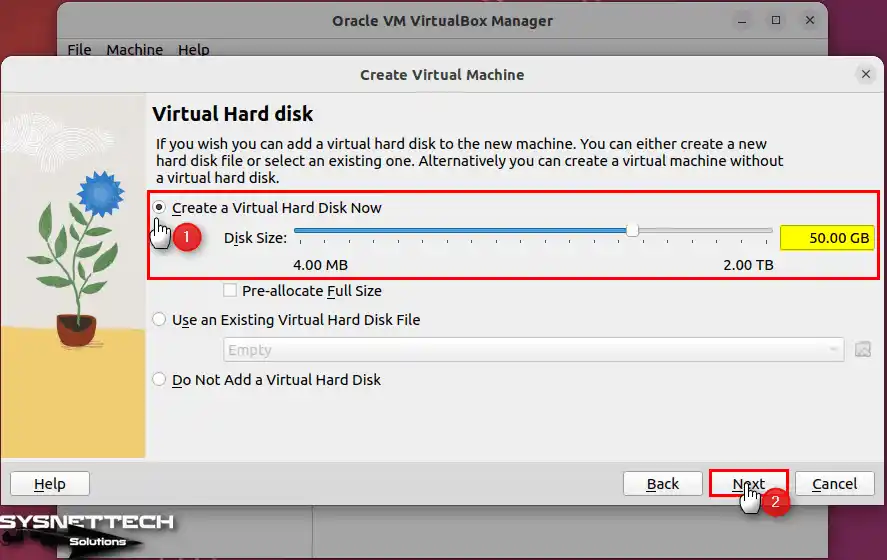
You can automatically set the virtual disk size according to the OS version. But you can also set this setting manually. Thus, you should configure the disk size according to your needs. Also, consider the size of your disk and the operations you will do on the virtual PC. This is because older platforms take up less space after installation.
Note: Before you continue, you need to choose the size of the vdisk for your guest machine on your host’s HDD/SSD. If you select “Pre-Allocate Full Size,” it might take longer to create the disk, but it could improve performance on older disks and save space on your host’s disk. If you don’t select this, it will use “Dynamically Allocated” disk space. So this means the virtual disk will only use as much space as needed from your physical disk.
Step 6
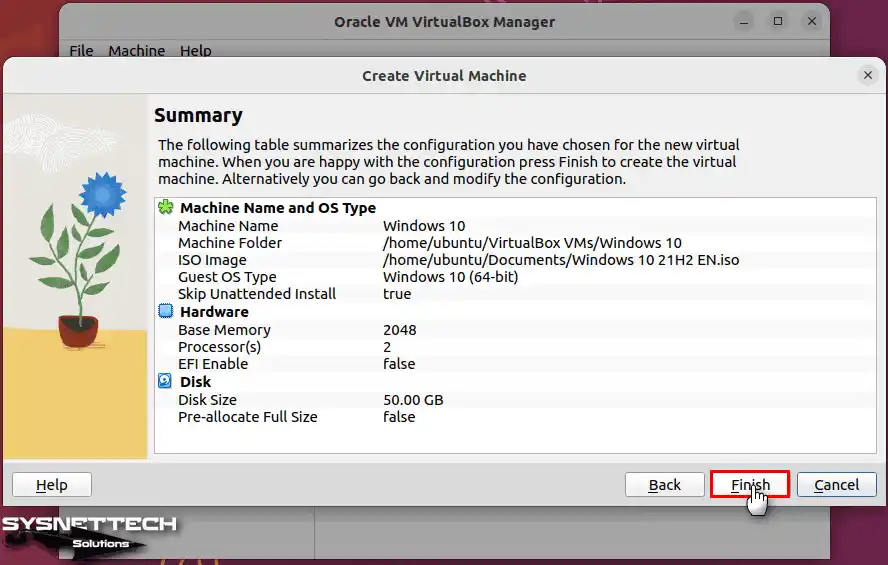
Check the hardware settings of the guest machine you created on your Ubuntu PC and close the wizard.
Step 7
You need to set up a few things for your virtual system, like the boot order and virtualization features. After creating the virtual disk, click the “Settings” button.

Step 8
In General / Advanced, set Shared Clipboard and Drag and Drop to Bidirectional. That is, this will allow you to transfer files and drag and drop between your host and VM.

Step 9
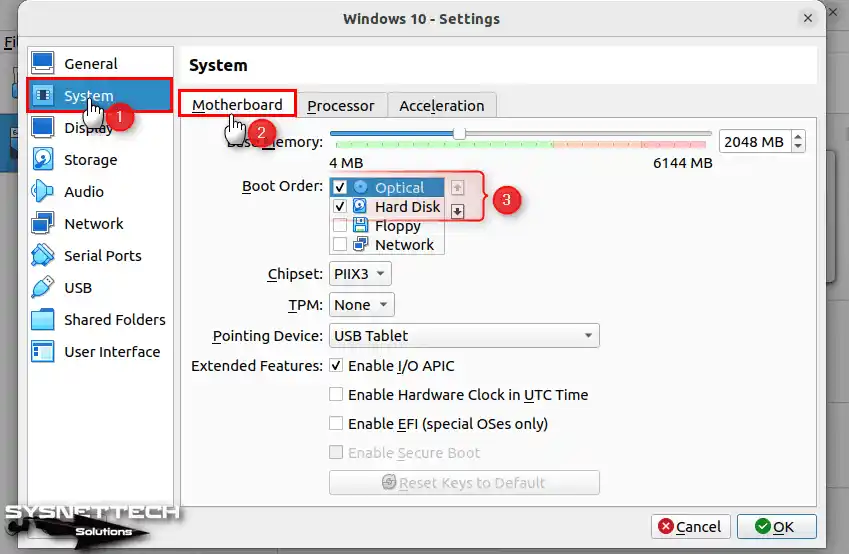
In System / Motherboard, remove Floppy from the Boot Order settings and set the Hard Disk as the primary device.
In the System/Processor position, you can adjust the number of processors according to your host computer’s hardware features and performance. For example, if you have an Intel i7 10th/11th/12th processor, you can set a minimum of 4 or 8 CPUs here.
Step 10
In Display / Screen, turn on “Enable 3D Acceleration” for better image quality. Then, you set the Video Memory size to 256 MB.

Step 11
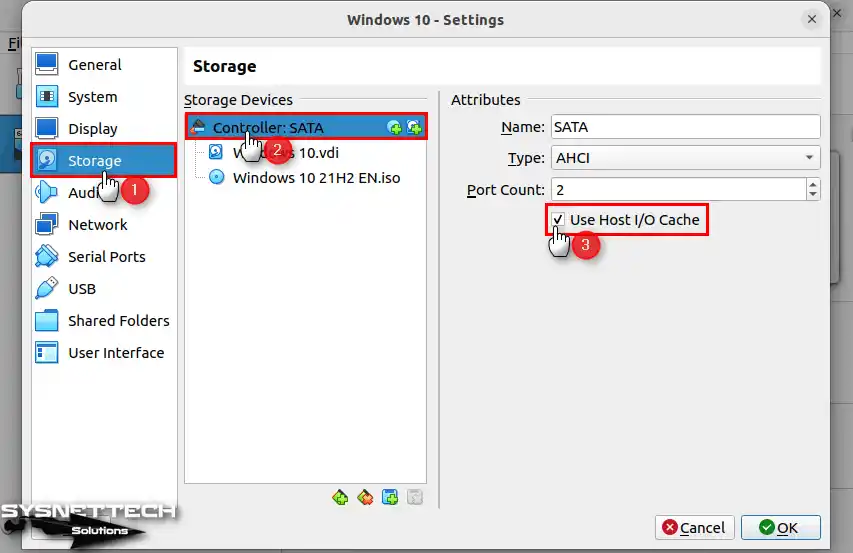
To make the disk work faster on the guest VM, go to the Storage section, select the SATA Controller, and turn on the “Host I/O Cache” option in the Attributes section.
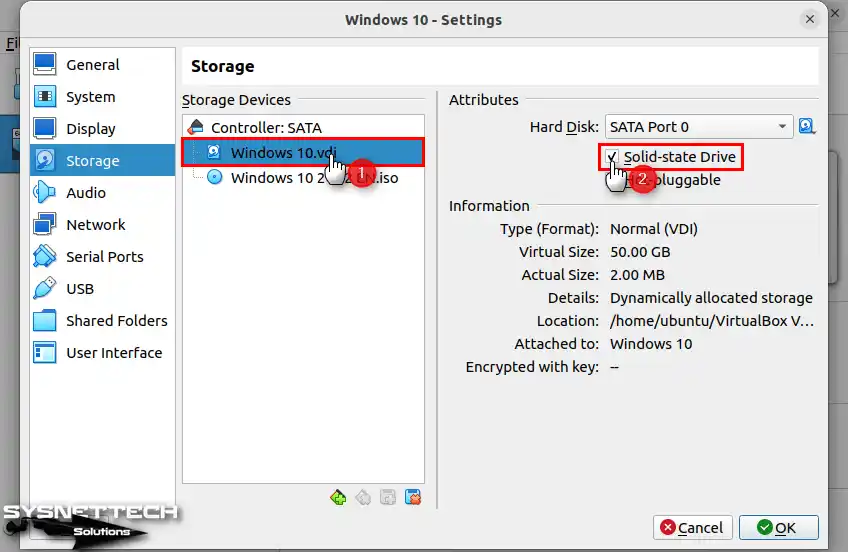
Step 12
Also, choose the Solid-State Drive option after selecting the Windows 10.vdi disk file.
NOTE: To change the ISO image added to your VM, go to Storage> Empty> Optical Drive. Then click “Choose a disk file” and select the new image you want.
Step 13
To connect a USB 3.0 External HDD to the virtual machine, turn on the USB Controller and check the USB 3.0 (xHCI) Controller option.

Step 14
Click the Start icon in Oracle to run the Windows 10 virtual machine and start the system installation.

Step 15
After running the Windows 10 guest machine and booting it with the ISO file, you can install your system using the Install Windows wizard.

How to Delete a Virtual Machine from the Ubuntu PC
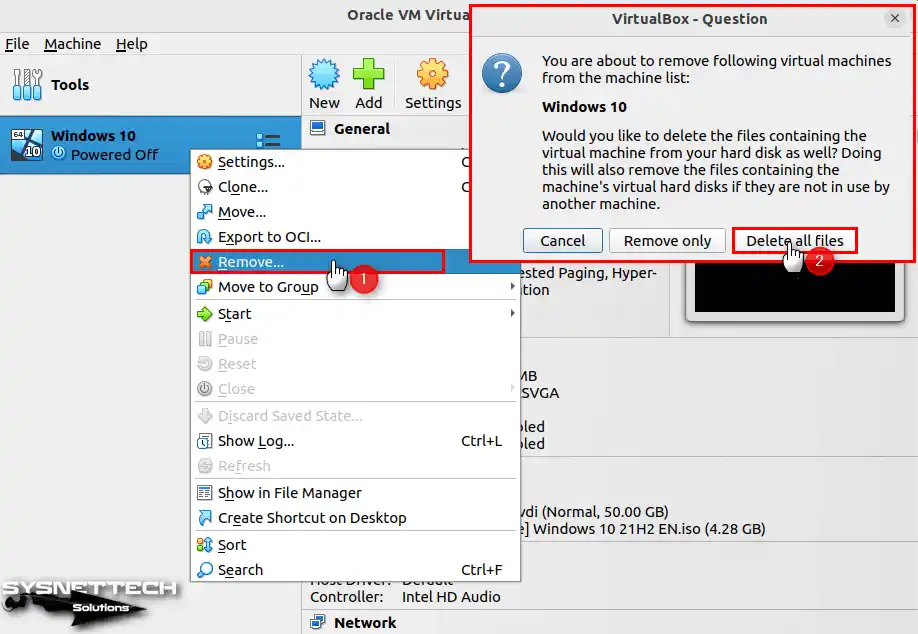
Suppose you must remove or delete your Windows guest machine from your Ubuntu system. In that case, you can accomplish this effortlessly by following these actions: First, open your VirtualBox app. Next, find your VM in the left section and proceed to right-click on it. Finally, select the “Uninstall” option from the resulting menu.
In the Question window that opens, click the Delete All Files button to clear all files related to your virtual machine from your disk.
How to Uninstall VirtualBox from Ubuntu
When you install VirtualBox, several actions occur. First, you create a shortcut in the Show Applications menu. Second, you make a folder called VMs in the Home directory, which serves as the storage location for the virtual machines. Additionally, there is a separate folder in the /usr/lib/ directory to house the essential files. Finally, you set up a new user group called vboxusers in the user groups.
Suppose you want to remove VirtualBox from your system altogether. In that case, you need to delete all the appropriate locations or files associated with it. The simplest way to do this task is to use the terminal. Thus, you can remove VirtualBox without leaving any traces on your system. In short, you can effectively delete all the necessary locations or files.
Step 1
You can take some steps to free up space on your system. First, you need to remove unnecessary packages and files associated with Oracle software. To do this, you need to use a specific command in the terminal. This command will clear unnecessary space on your system. In addition, if you check for such files regularly, you can increase the performance of your system.
sudo apt remove --purge *virtualbox*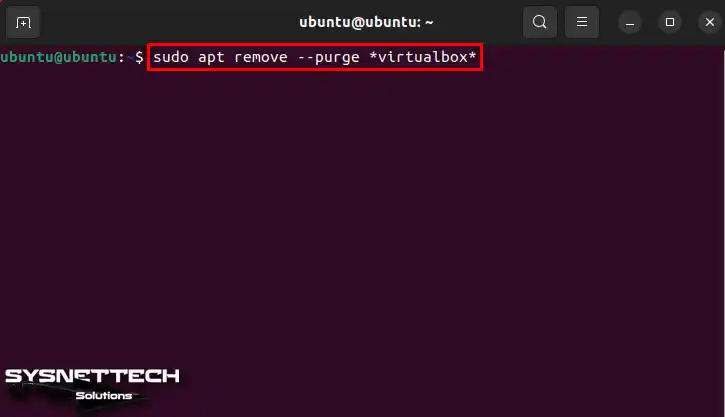
Step 2
To confirm removing the packages, go to the Package section, press’ Y,’ and then press ‘Enter.’

Step 3
You need to remove the Oracle virtual machines and the /usr/lib/virtualbox folder. First, open the terminal and run the commands below. These commands will delete your virtual machines and their files.
After doing this, you will thoroughly remove Oracle software and clean up all traces from your Ubuntu.
sudo rm -rf ~/"VirtualBox VMs"
sudo rm -rf ~/.config/VirtualBox/
sudo rm -rf /usr/lib/"virtualbox"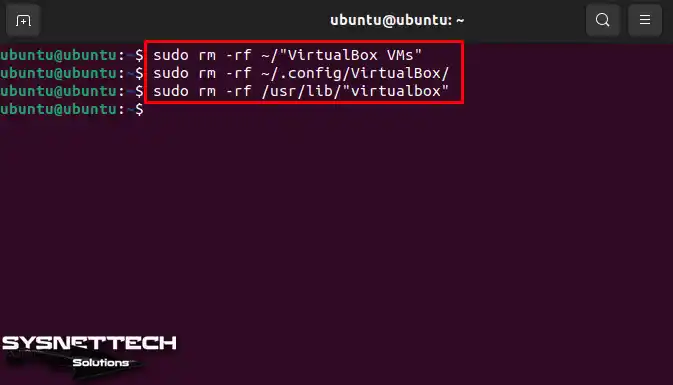
Step 4
In the last step, you need to remove the VirtualBox user group. First, check if the vboxusers group is still there by using the compgen command. If it’s there, delete the group with the groupdel command.
compgen -g | grep -i "vbox"
sudo groupdel vboxusers
Video
Installing Old Versions
You can install and use VirtualBox on older versions of Ubuntu. But it’s best to keep your Linux PC updated for better performance and security. If you choose to use an older version, you can still install the VTx software.
| Ubuntu | Oracle VM | YouTube Video | Slide |
|---|---|---|---|
| 17.10 | 5.x | Watch | View |
| 18.04 | 5.x | Watch | View |
| 18.10 | 5.x | Watch | – |
| 20.10 | 6.x | Watch | View |
| 21.10 | 6.x | Watch | View |
| 22.04 | 6.x | Watch | View |
| 22.10 | 7.0.x | Watch | – |
Conclusion
As a result, you can, of course, install VirtualBox on your Ubuntu PC in a healthy way. This way, you can run platforms from Microsoft or other manufacturers virtually. In short, if you follow the steps I have provided, you will be able to use the benefits of Oracle virtualization.
You can also run different operating systems on your main computer without any issues. Whether you’re a developer, IT professional, or just interested in tech, Oracle VM is an excellent tool for you! It lets you try out different software environments at no extra cost. In short, VirtualBox is a handy tool for Ubuntu users!

Be the first to share your comment