In today’s linked world, good network care is key. Both companies and homes need smooth web access. One big way to do this is NAT, or Network Address Translation.
Here, we look at Port NAT, also called NAT Overload. This lets many devices on one local network share a single public IP. So, it makes the most of a few resources. It also keeps links safe and fast.
In this article, I will show you how to set up NAT Overload. We will use a picture network tool and virtual machines on VMware. This step-by-step guide will boost your network skills.
In the end, it will help you make sure all your devices can get online well. Come with us to learn about PAT and why it matters now.

What is the Use of PAT (NAT Overload) on Routers in a Network?
A popular NAT type is Overload, also named PAT. This lets many local devices use one public IP. So, all devices can go online without trouble.
PAT is not like other NAT setups. For example, Static NAT gives one public IP to one device for good. Dynamic NAT uses a group of public IPs. So, devices get a short-term address from this group.
Most times, an ISP gives this group of IPs. So, the count can be low due to the user’s plan. This limit makes smart resource use key for groups.
But PAT only uses one public IP. It links different inside ports to that one outside address. So, many devices can talk online at the same time.
In short, many homes and firms use just one global IP from their ISP. Putting PAT on a router is then very common. This saves IPs and adds safety for the inside network.
How to Set Up PAT on a Cisco Router in GNS3
To better understand the operating logic of NAT Overload PAT, run the network simulator and follow the steps below.
Steps:
Step 1
Create a network topology as in the image below and add a Router, Cloud, Switch, and two Hosts to the workspace.

Step 2
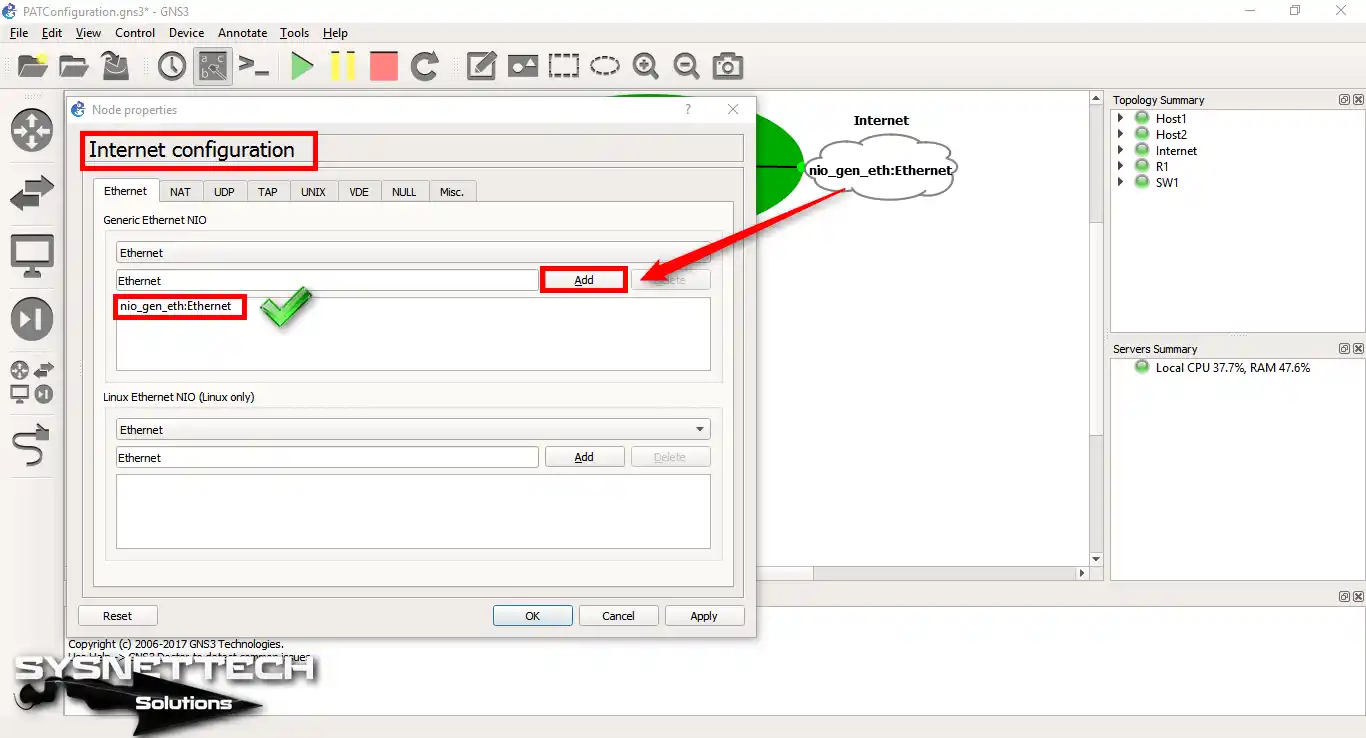
Open the Cloud settings and select and add your computer’s physical adapter on the Ethernet tab.
Step 3
Adding two virtual computers to a Switch in GNS3 may cause network connection problems.
To resolve this issue, you can make changes to the port numbers to which virtual computers are installed in the Switch settings.

Step 4
Open Virtual Network Editor, add a new VMnet3, and configure the IP address block according to the network topology.
Configure the adapter settings of the virtual machines as VMnet3 because these computers are in block 192.168.8.0/24 in the network topology.

Step 5
Double-click R1 to open the CLI command prompt. Now, run these commands to set up PAT.
R1# conf t
R1(config)# interface fastethernet 0/0
R1(config)# ip address 192.168.8.1 255.255.255.0
R1(config-if)# ip nat inside
R1(config-if)# no shutdown
R1(config-if)# exit
R1(config)# interface fastethernet 0/1
R1(config-if)# ip address dhcp
R1(config-if)# ip nat outside
R1(config-if)# no shutdown
R1(config-if)# exit
R1(config)# access-list 1 permit 192.168.8.0 0.0.0.255
R1(config)# ip nat inside source list 1 interface fastethernet 0/1 overload
R1(config)#exit
R1# copy running-config startup-config

Step 6
First, you enabled PAT. Next, start the Windows 8.1 virtual machine in VMware. Then, you can check your network link by pinging the Google DNS servers.
Pinging the Google DNS servers will be successful, as shown in the image below.

Step 7
Pinging from the Windows 10 virtual machine to the Google DNS servers will succeed as follows!

Step 8
After pinging, type “show ip nat translations” on the Router. Then, look at the IPs and port numbers that your LAN computers use to get online.

Step 9
In the same way, execute the show ip nat statistics command and examine the NAT records.

Step 10
First, run the “clear ip nat translations *” command in the CLI. This will clear the PAT records on your device. Right after, look at the NAT translations again.

CLI Show Commands in PAT Configuration
- show running-config
- R1#show ip nat translations
- R2#show ip nat translations
R1#show running-config
Building configuration...
Current configuration : 1095 bytes
!
version 12.4
service timestamps debug datetime msec
service timestamps log datetime msec
no service password-encryption
!
hostname R1
!
boot-start-marker
boot-end-marker
!
no aaa new-model
memory-size iomem 5
no ip icmp rate-limit unreachable
ip cef
!
no ip domain lookup
ip auth-proxy max-nodata-conns 3
ip admission max-nodata-conns 3
!
ip tcp synwait-time 5
!
interface FastEthernet0/0
ip address 192.168.8.1 255.255.255.0
ip nat inside
ip virtual-reassembly
duplex auto
speed auto
!
interface FastEthernet0/1
ip address dhcp
ip nat outside
ip virtual-reassembly
duplex auto
speed auto
!
ip forward-protocol nd
!
no ip http server
no ip http secure-server
ip nat inside source list 1 interface FastEthernet0/1 overload
!
access-list 1 permit 192.168.8.0 0.0.0.255
no cdp log mismatch duplex
!
control-plane
!
gatekeeper
shutdown
!
line con 0
exec-timeout 0 0
privilege level 15
logging synchronous
line aux 0
exec-timeout 0 0
privilege level 15
logging synchronous
line vty 0 4
login
!
end
R1#
R1#show ip nat translations
Pro Inside global Inside local Outside local Outside global
icmp 192.168.1.102:1 192.168.8.5:1 8.8.8.8:1 8.8.8.8:1
tcp 192.168.1.102:49193 192.168.8.5:49193 2.17.20.139:80 2.17.20.139:80
tcp 192.168.1.102:49194 192.168.8.5:49194 2.17.20.139:80 2.17.20.139:80
tcp 192.168.1.102:49195 192.168.8.5:49195 2.22.109.171:80 2.22.109.171:80
icmp 192.168.1.102:0 192.168.8.10:1 8.8.8.8:1 8.8.8.8:0
tcp 192.168.1.102:49706 192.168.8.10:49706 23.62.98.64:80 23.62.98.64:80
tcp 192.168.1.102:49730 192.168.8.10:49730 23.62.98.64:80 23.62.98.64:80
tcp 192.168.1.102:49731 192.168.8.10:49731 23.62.98.8:80 23.62.98.8:80
tcp 192.168.1.102:49736 192.168.8.10:49736 23.62.98.8:80 23.62.98.8:80
tcp 192.168.1.102:49809 192.168.8.10:49809 173.223.11.177:80 173.223.11.177:80
tcp 192.168.1.102:49854 192.168.8.10:49854 13.107.4.50:80 13.107.4.50:80
tcp 192.168.1.102:49858 192.168.8.10:49858 23.62.98.8:80 23.62.98.8:80
tcp 192.168.1.102:49895 192.168.8.10:49895 13.107.4.50:80 13.107.4.50:80
tcp 192.168.1.102:49897 192.168.8.10:49897 13.107.4.50:80 13.107.4.50:80
tcp 192.168.1.102:49908 192.168.8.10:49908 40.77.229.91:443 40.77.229.91:443
tcp 192.168.1.102:49909 192.168.8.10:49909 40.77.229.17:443 40.77.229.17:443
tcp 192.168.1.102:49914 192.168.8.10:49914 40.77.229.10:443 40.77.229.10:443
tcp 192.168.1.102:49916 192.168.8.10:49916 40.77.226.250:443 40.77.226.250:443
tcp 192.168.1.102:49917 192.168.8.10:49917 92.123.166.179:443 92.123.166.179:443
udp 192.168.1.102:59225 192.168.8.10:59225 192.168.1.1:53 192.168.1.1:53
R1#show ip nat translations
Pro Inside global Inside local Outside local Outside global
tcp 192.168.1.102:49212 192.168.8.5:49212 151.101.194.49:80 151.101.194.49:80
R1#
R1#show ip nat
R1#show ip nat s
R1#show ip nat statistics
Total active translations: 1 (0 static, 1 dynamic; 1 extended)
Outside interfaces:
FastEthernet0/1
Inside interfaces:
FastEthernet0/0
Hits: 180715 Misses: 431
CEF Translated packets: 179908, CEF Punted packets: 2474
Expired translations: 635
Dynamic mappings:
-- Inside Source
[Id: 1] access-list 1 interface FastEthernet0/1 refcount 1
Appl doors: 0
Normal doors: 0
Queued Packets: 0
R1#
How to Configure NAT Overload ⇒ Video
Want to know how to set up NAT Overload as a video? Watch our helpful training resource below. It’s simple to follow and packed with great advice. Also, think about joining our YouTube channel. This helps us and keeps you in the loop on our newest videos!
Conclusion
To end, learning NAT Overload (PAT) is key to your network. It uses resources well and gives smooth web access to many devices.
By following our step-by-step guide, you can put PAT on a Cisco router with GNS3. This saves public IPs and makes your inside network safer. This know-how is needed for both homes and firms in today’s linked world.
As you look into network tools, recall that a good NAT setup helps speed. Also, it makes a stronger network base. Thanks for using this lesson. We hope it makes your network skills better!
To make your network best, learn NAT Overload (PAT) first. Then, look at other NAT types. If you need a fixed public IP for one device, see our guide on how to set up static NAT in GNS3.
Also, if you want to be flexible, think about dynamic NAT. Our article on how to set up dynamic NAT in GNS3 will help you give out public IPs from a group with ease. Knowing these choices makes your network care skills better. In the end, it makes sure all your devices can get online without trouble.

TolgaBagci
Hi, I'm Tolga, a computer expert with 20 years of experience. I help fix computer issues with things like hardware, systems, networks, virtualization, servers, and operating systems. Check out my website for helpful info, and feel free to ask me anything. Keep yourself in the loop about the newest technologies!