
Are you thinking of running Windows 8/8.1 on your Mac? So, look no further for the installation method! In this article, I will show you how to set up this system in a new virtual machine, that is, a VM, using VMware Fusion 12 Pro on the macOS host system.
So, whether you are a tech enthusiast or want to try virtualization, by following our professional guide, you will be able to run Windows 8/8.1 on your Mac without any problems!
How to Set Up Windows 8/8.1 on a Virtual Machine on Mac / macOS using Fusion 12 Pro
Suppose you want to install and run Microsoft’s Windows 8/8.1 version on your Mac computer. In that case, you can use Fusion Pro, one of the virtualization software platforms.
VMware Fusion is a helpful app for macOS that lets you create virtual machines. It makes it easy to install and use different operating systems without restarting your computer.
You can install a Windows system on Apple computers using Boot Camp software. Still, you will have to restart your computer each time you switch systems.
Therefore, you can avoid these problems by using the Fusion software developed by VMware for Mac computers.
When you create a virtual machine in Fusion, it’s essential to choose the right platform for your operating system and set up the virtual hardware correctly. In short, this helps your virtual computer run smoothly and efficiently on your central system.
How to Create a New Virtual Machine (Fake PC) for Windows 8/8.1
After installing Fusion Pro on your Mac and running the program from Applications, you are now ready to create a virtual machine.
Making a virtual machine in Fusion is easy. Just drag and drop the operating system’s ISO image onto the Fusion homepage. For better performance, you can customize the settings instead of using the defaults.
Step 1
After running Fusion Pro, you can create a VM or add an existing VM to the program by dragging and dropping an ISO image directly onto its homepage.
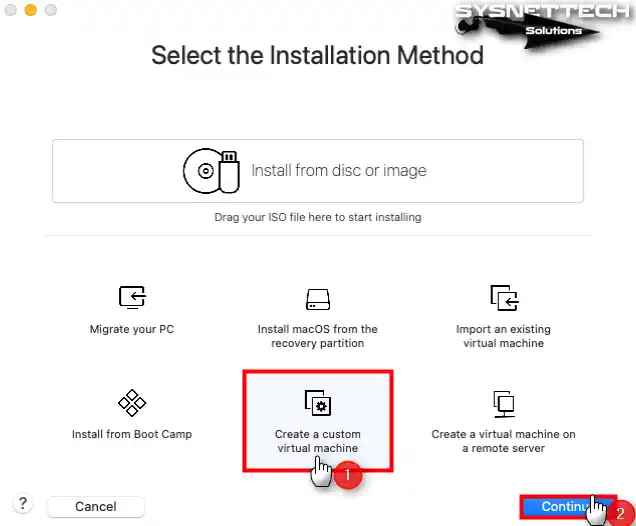
You can manually adjust the VM’s configurations. To do this, select the option to create a custom virtual machine and click Continue.
Step 2
When you see the Guest operating system selection window, choose Microsoft Windows / Windows 8.x x64 and then click Continue.

Step 3
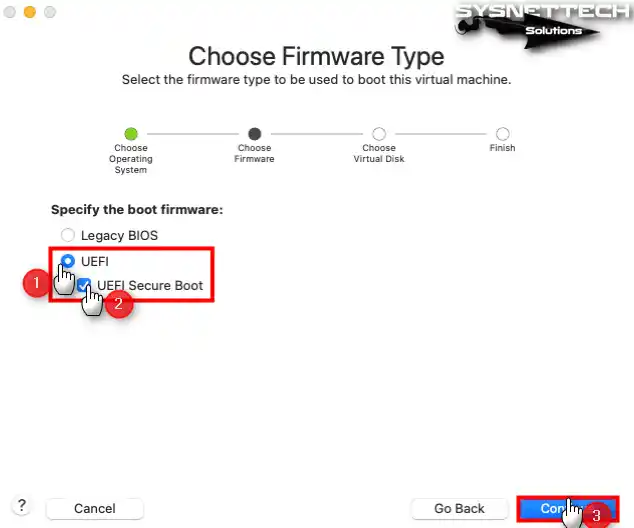
If the OS you’re installing on the virtual machine supports UEFI firmware, select it. You can change the firmware type from this window, too.
In fact, choosing Legacy BIOS is the best option when you plan to install legacy systems. However, you may want to increase the security of the virtual machine. In such cases, select UEFI / Secure Boot to enable both security and fast boot.
Step 4
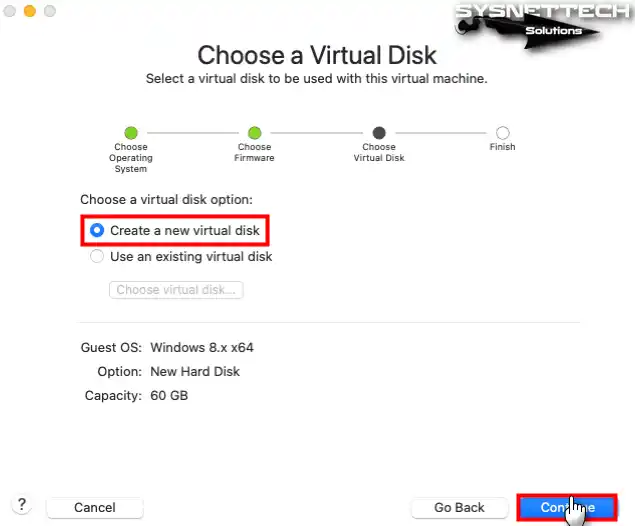
Let’s say you are aiming to install Windows 8 from scratch. In this case, proceed by selecting Create a new virtual disk in the vdisk selection window.
But let’s assume you have a ready-made Win8 virtual disk that you installed before. You can add the existing disk to the VM in this area and include it directly in the program.
Step 5
You can see the summary information of the virtual machine you have prepared here. If you want to configure the virtual hardware settings better, click Customize Settings. If you do not want it, click the Save button to accept the default installation location and proceed.

Step 6
Click the Processors & Memory device in the virtual machine’s settings, increase the number of virtual processors, and configure the amount of RAM depending on the hardware features of your Mac.
If you intend to use any virtualization software within the virtual machine, enable the hypervisor. Also, it allows IOMMU to improve memory management between the host and VM.

Step 7
You can choose the Ethernet adapter to assign an IP address to the guest machine from the DHCP server from which your Mac gets the IP address. With this option, your guest machine will appear as an additional computer on the local network.

Step 8
If you run the Windows 8/8.1 operating system on the NVMe virtual disk, you will significantly increase the virtual machine’s performance. So, change the Bus Type from SCSI to NVMe and click Apply.
By default, the disk size defined for Windows 8x in Fusion is 60 GB. If you want to increase or decrease the capacity of the virtual disk, you can change it in Disk Size.

Step 9
To add the Windows 8x ISO file to the virtual machine, click Choose a disc or disc image from the CD/DVD (SATA) device settings drop-down list.

Step 10
Select the Windows 8.1 Pro x64 ISO file you downloaded to your computer from the table at the bottom of the article, and then click Open.

Step 11
If you are not going to use your printer on the guest machine, click Remove Printer Port and click Remove to confirm the removal.

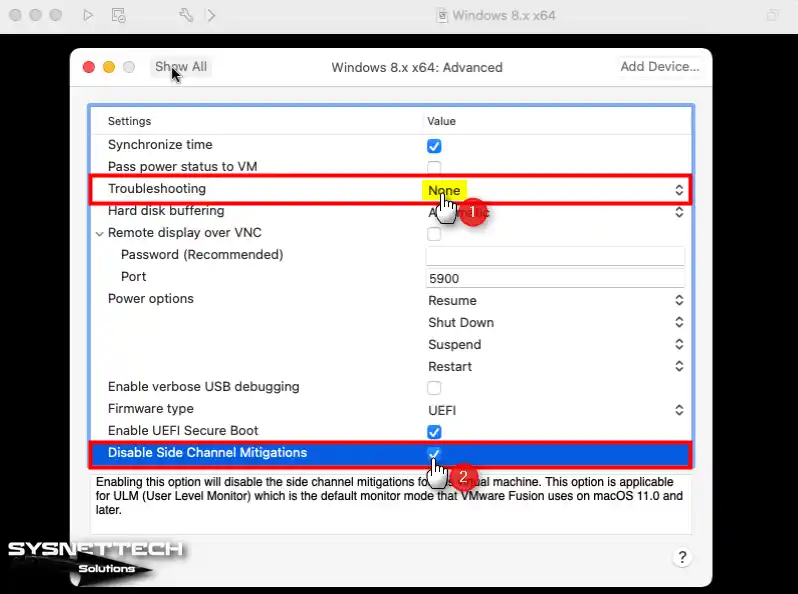
Step 12
Change the Troubleshooting property to None in the advanced settings of the virtual computer and turn off the Side Channel Mitigations feature.
Step 13
Run your virtual computer to start the Windows installation.

How to Install and Run Windows 8/8.1 on a Mac PC with macOS System
After creating a new virtual computer for Windows 8.1 and adjusting its settings, you need to boot the system with the ISO image you added and start the installation.
The installation steps of an operating system that you will install on the guest machine on your Mac computer are the same as if you were installing it on a real computer.
Step 1
After running your virtual system, press any key on your keyboard to start the Windows setup wizard.

Step 2
In the Windows 8 setup wizard, set the system language, keyboard layout, and system time you will use on your system, and click the Next button.

Step 3
Suppose you have installed the Windows 8x operating system before. In that case, you can click Repair Your Computer in this window to repair your system. Click Install Now to start the Windows installation and continue.

Step 4
If you have purchased Windows 8 before, type your product key and click Next.

Step 5
Accept the Windows 8x license agreement and click Next.

Step 6
Suppose you have an older version of Windows. In that case, you can upgrade your system without deleting your existing files, settings, and applications. Since you will be installing a system from scratch, click the Install Windows Only option in this window.

Step 7
Click New to adjust the unallocated disk space, then click Apply to confirm the automatically set disk size. Also, click OK in the window to inform yourself that Windows will create additional spaces for system files.

Step 8
After creating a new partition for the entire capacity of the virtual disk, select the Primary partition and click Next.

Step 9
Wait while the Windows wizard is copying the system files required for installation, and do not turn off your guest machine.

Step 10
The wizard will reboot your virtual system within the specified time after copying the Windows 8 system files. Restart your guest machine without waiting for the time and continue.

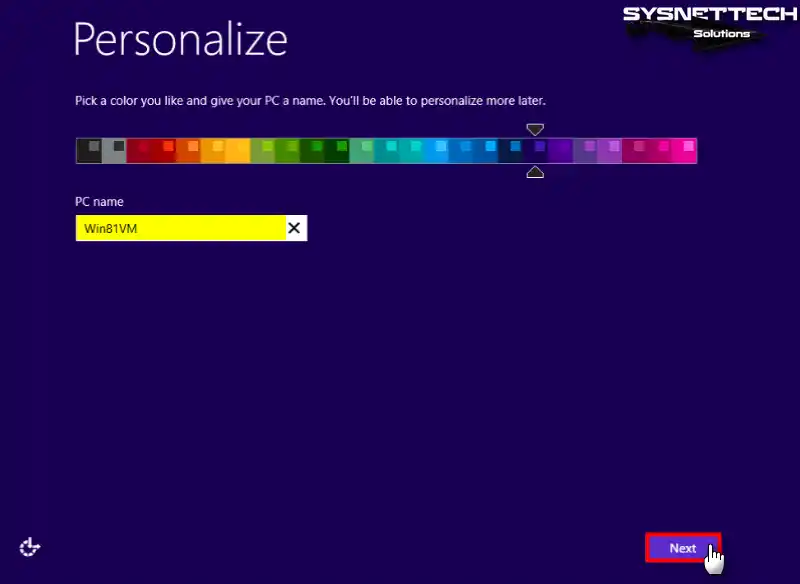
Step 11
Type a different computer name from other computers in your local network, set the theme color, and click Next.
Step 12
You can permit by clicking Use Express Settings to connect to other devices on the local network automatically, install Windows updates, protect your data with Windows Defender, or help its development by sending user data to Microsoft.
If you want to change some system settings to suit your purpose, you can click Customize and turn some settings on or off.

Step 13
To sign in to Windows 8x, you can sign in with a Microsoft account and back up all your data in the cloud. Since there is no continue without Microsoft account option on this screen, click Create a new account and continue.

Step 14
On the Create a Microsoft account screen, click Sign in without a Microsoft account to enable logging in with the offline account.

Step 15
To create a local user account in your virtual system, type a username and click Finish.

Step 16
After installing Windows 8.x, press Windows + R to open the Run window. Then, type “winver” and press OK to check the system version.

How to Install VMware Tools on Fusion Windows 8 VM
After installing Windows 8/8.1 with VMware Fusion on macOS, you need to install VMware Tools to enable the VM to run more efficiently, allow full-screen resolution, and transfer files between the host and the VM.
Step 1
While the virtual machine is running, go to Virtual Machine > Install VMware Tools from the VM Fusion menu. Then, click Install to mount the CD image to the system from the window that appears.

Step 2
After adding the VMware Tools CD image to the virtual machine, start the wizard by clicking on Run setup64.exe.

Step 3
Click Next in the VMware Tools setup wizard.

Step 4
If you plan to use your guest machine with other VMware products later, select Complete for compatibility and click Next.

Step 5
Click Install to start the setup of the Guest machine tools, or click Back if you want to make changes.

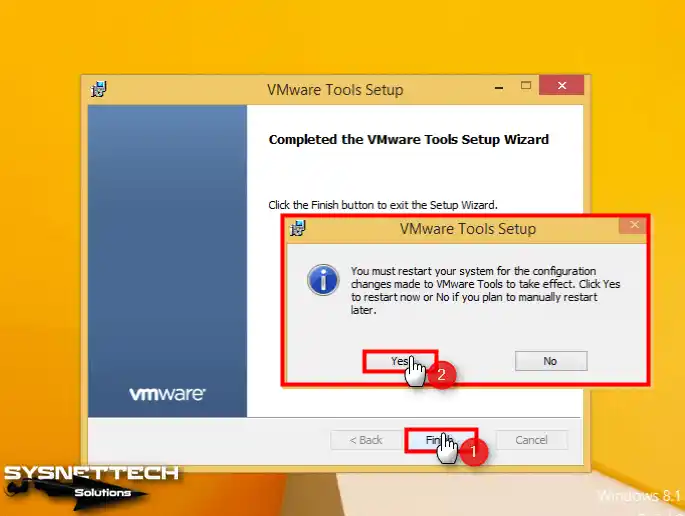
Step 6
After installing VMware Tools on your Windows 8 virtual computer, restart your system.
Step 7
Take your guest operating system in full-screen mode and check the resolution.

Step 8
Also, check that you can transfer files between your Mac and the guest machine by drag and drop.

How to Check Internet Connection in Windows 8 Guest PC
You may need to check that the guest machine you are running on your Mac can access your local network and the Internet. This way, you can continue with your work in the VM.
Step 1
To open the Command Prompt on your Windows 8 PC, simultaneously press the Windows key and the R key to bring up the Run dialog. Then, type “cmd” in the Run tool and click OK. After opening the CMD prompt, execute the ping 8.8.8.8 command and test your Internet connection by pinging the Google servers.

Step 2
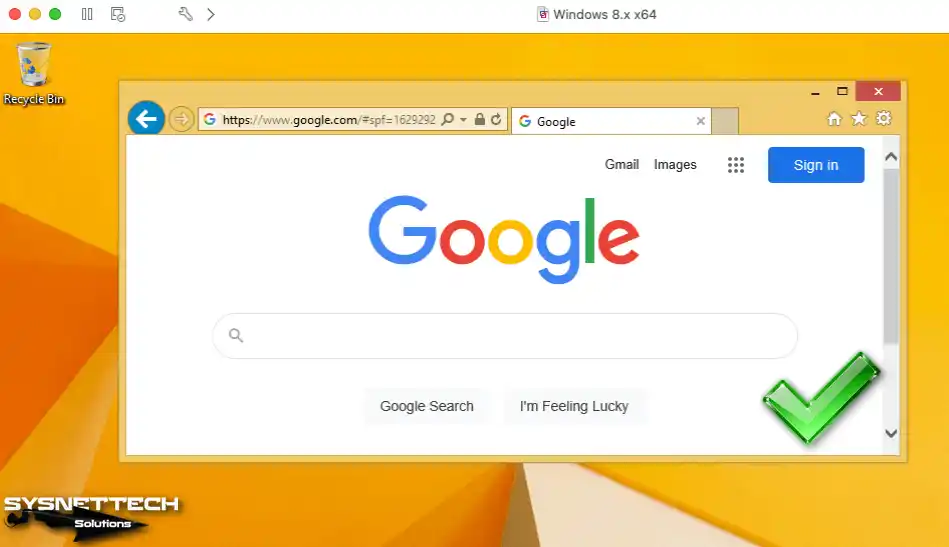
If you can ping Google or any website, you have an Internet connection. Additionally, open the Internet Explorer browser and try to visit the Google homepage.
How to Configure a Shared Folder
To move files from your Mac to the guest machine, drag and drop them. But this can take time. For faster transfers, turn on Shared Folders in Fusion and choose a place to exchange data.
Open the settings of the Windows 8.1 guest machine and click Sharing.

To set up Shared Folders, first enable the feature and then click the “+” button. Then, choose a specific location to designate as a shared folder on your Mac. After configuring the public folder, you will notice that there is a shortcut for VMware Shared Folders on the guest machine.
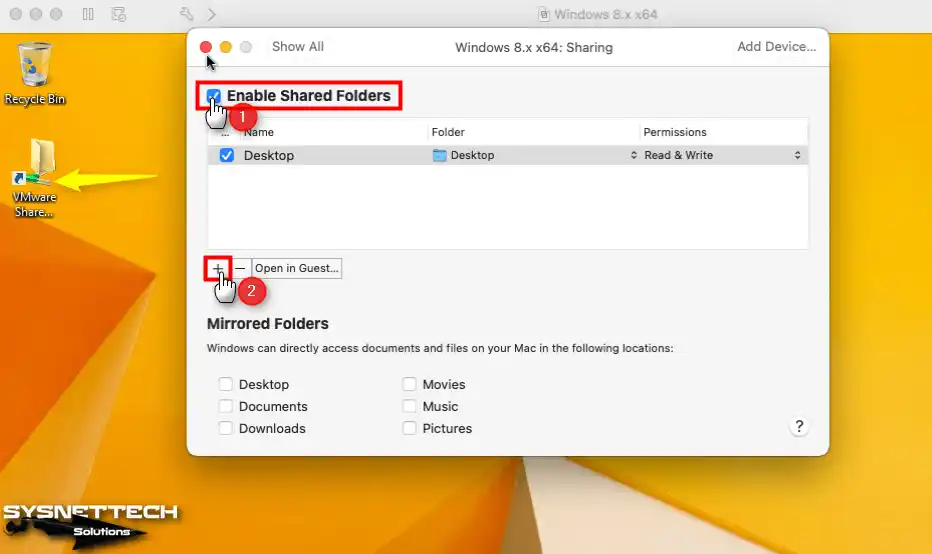
You can click the Shared Folders shortcut to access Shared Folders on your guest machine. Once there, create a text document. And then, immediately verify that you have copied this document to the location on your Mac.

How to Use USB Flash Memory
Another way to transfer files with a VM on your Mac is to use a USB flash drive. USB sticks that you use on your Windows computer cannot usually be used on macOS because this OS does not support devices in the NTFS file format. So you need to format NTFS to ExFAT format.
Step 1
When you plug your USB flash drive tool into your Mac, Fusion will ask you where you want to connect the device. In this window, you can choose to connect either to your Mac or to your Windows guest machine.
To make the flash drive writable, you need to format the file, so connect your device to your Mac.

Step 2
Open Disk Utility and click the right button / Erase option on your flash memory from the External section.

Step 3
Select ExFAT from the Format section and click the Erase button again.

Step 4
Check that it is writable by creating a new folder in the USB memory named KINGSTON.

Step 5
Click Virtual Machine / USB & Bluetooth / Connect (Name of Your USB) in the tool menu to connect your USB stick to the Windows 8 guest machine.

Step 6
You can now use your USB stick on both macOS and Windows 8 virtual PC.

How to Connect from a Mac to a Windows Guest Machine using Microsoft Remote Desktop
You can remotely connect to your guest machines via LAN or WAN using the Microsoft Remote Desktop application on your Mac computer.
Step 1
Once you’ve downloaded the Microsoft Remote Desktop app from the App Store, find the setup file and double-click it to start installing. Follow the steps in the wizard and click “Continue” to complete the installation.

Step 2
To accept the license agreement of the remote desktop application, click Continue after accepting the agreement.

Step 3
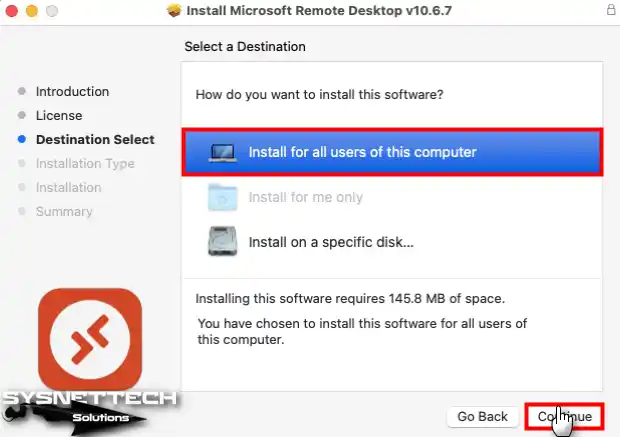
Select Install for all users of this computer and continue.
Step 4
After clicking the Install button in the window that states that the installation will use 145.8 MB of disk space, type your user account password and click Install Software.

Step 5
After installing the Microsoft Remote Desktop application on your macOS system, close the wizard.

Step 6
Open Applications on your Mac and run Microsoft Remote Desktop.

Step 7
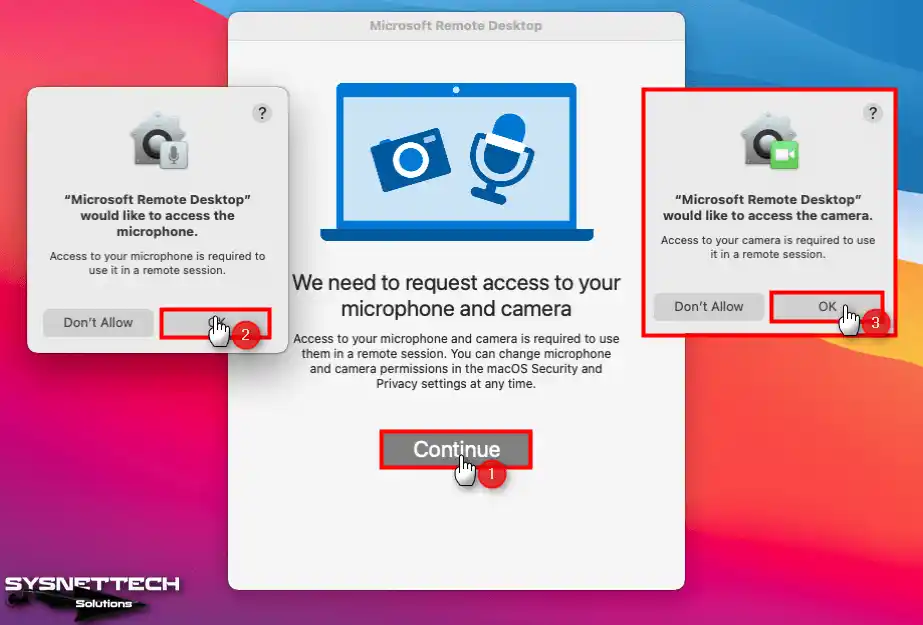
If you want to use your host’s camera and microphone device on your guest machine after installing the remote desktop application, give access permission.
Step 8
Right-click on My Computer on your Windows 8x virtual machine and click Manage. When Computer Management opens, click Local Users and Groups / Users, right-click / Set Password on the username you created for your virtual system, and then click the Proceed button in the window that opens.

Step 9
Please generate a new password for your user account and then click “OK” to confirm.

Step 10
To allow remote connections on the guest machine, open the computer properties and then click Remote Settings in the left pane.
On the Remote tab of the System Properties window, check the Allow remote connections to this computer option and click OK.

Step 11
Find out the IP address that your Windows guest machine automatically gets from the DHCP server in your local network.

Step 12
Click the Add PC button in the remote desktop application.

Step 13
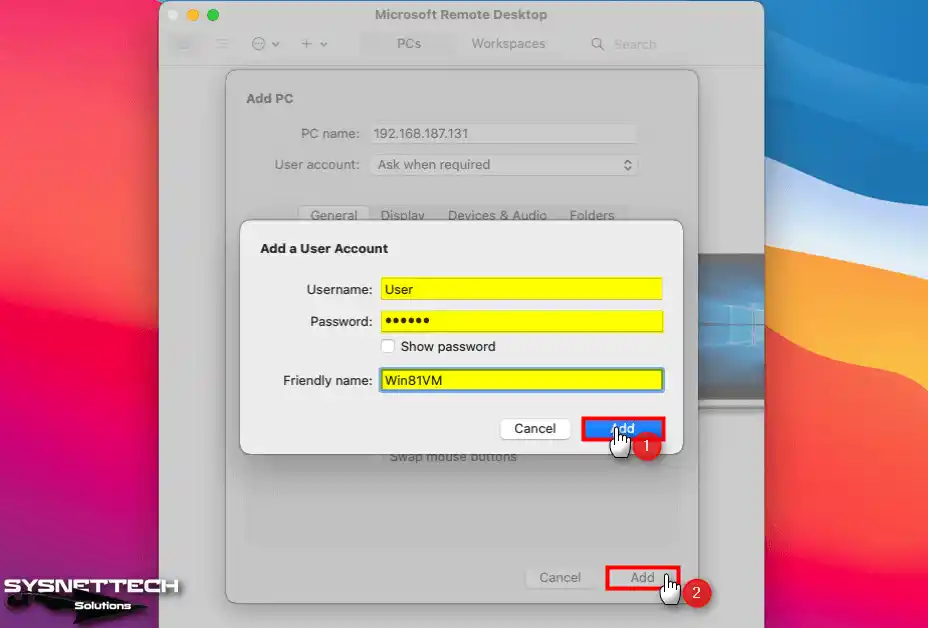
After typing the IP address of the virtual machine in the PC Name field, click Add User Account from the User Account drop-down list.

Step 14
Type the user account name and password in your virtual system, as well as the VM name, and click the Add button.
Step 15
After clicking the right button / Connect on the guest machine you added, click Continue in the window that shows the certificate warning.

Step 16
You have successfully made a remote connection to the Windows 8 guest machine. However, I recommend verifying the IP address of the guest machine to ensure correct connection and network configuration.

Video
Windows 8x ISO Download
| Edition | Download Link |
|---|---|
| Windows 8.1 Professional x64 EN | Download |
Conclusion
As a result, you can provision a virtual machine on your Mac using VMware Fusion 12 Pro. And so you can easily install one of Microsoft’s Windows 8 & 8.1 versions on top of it, too. In this case, you will not affect the performance of your Mac. Moreover, you discover a convenient and effective way to experience a different operating system.
I recommend you follow all the steps and configurations that I have outlined in our detailed guide. By making a perfect installation, you can run the Windows 8 platform on macOS without any problems. You can also open up new possibilities in software compatibility and testing.

Be the first to share your comment