
Do you want to use VirtualBox to run Windows 10 on a virtual machine? Virtualization helps you test different operating systems and can make your work better and faster.
In this professional guide, I will explain how to install Windows 10 using Oracle VM VirtualBox 7.0. In addition, I will explain how to install the necessary add-on packages. Plus, I will show you how to use your storage devices, such as USB, and add them to the VM.
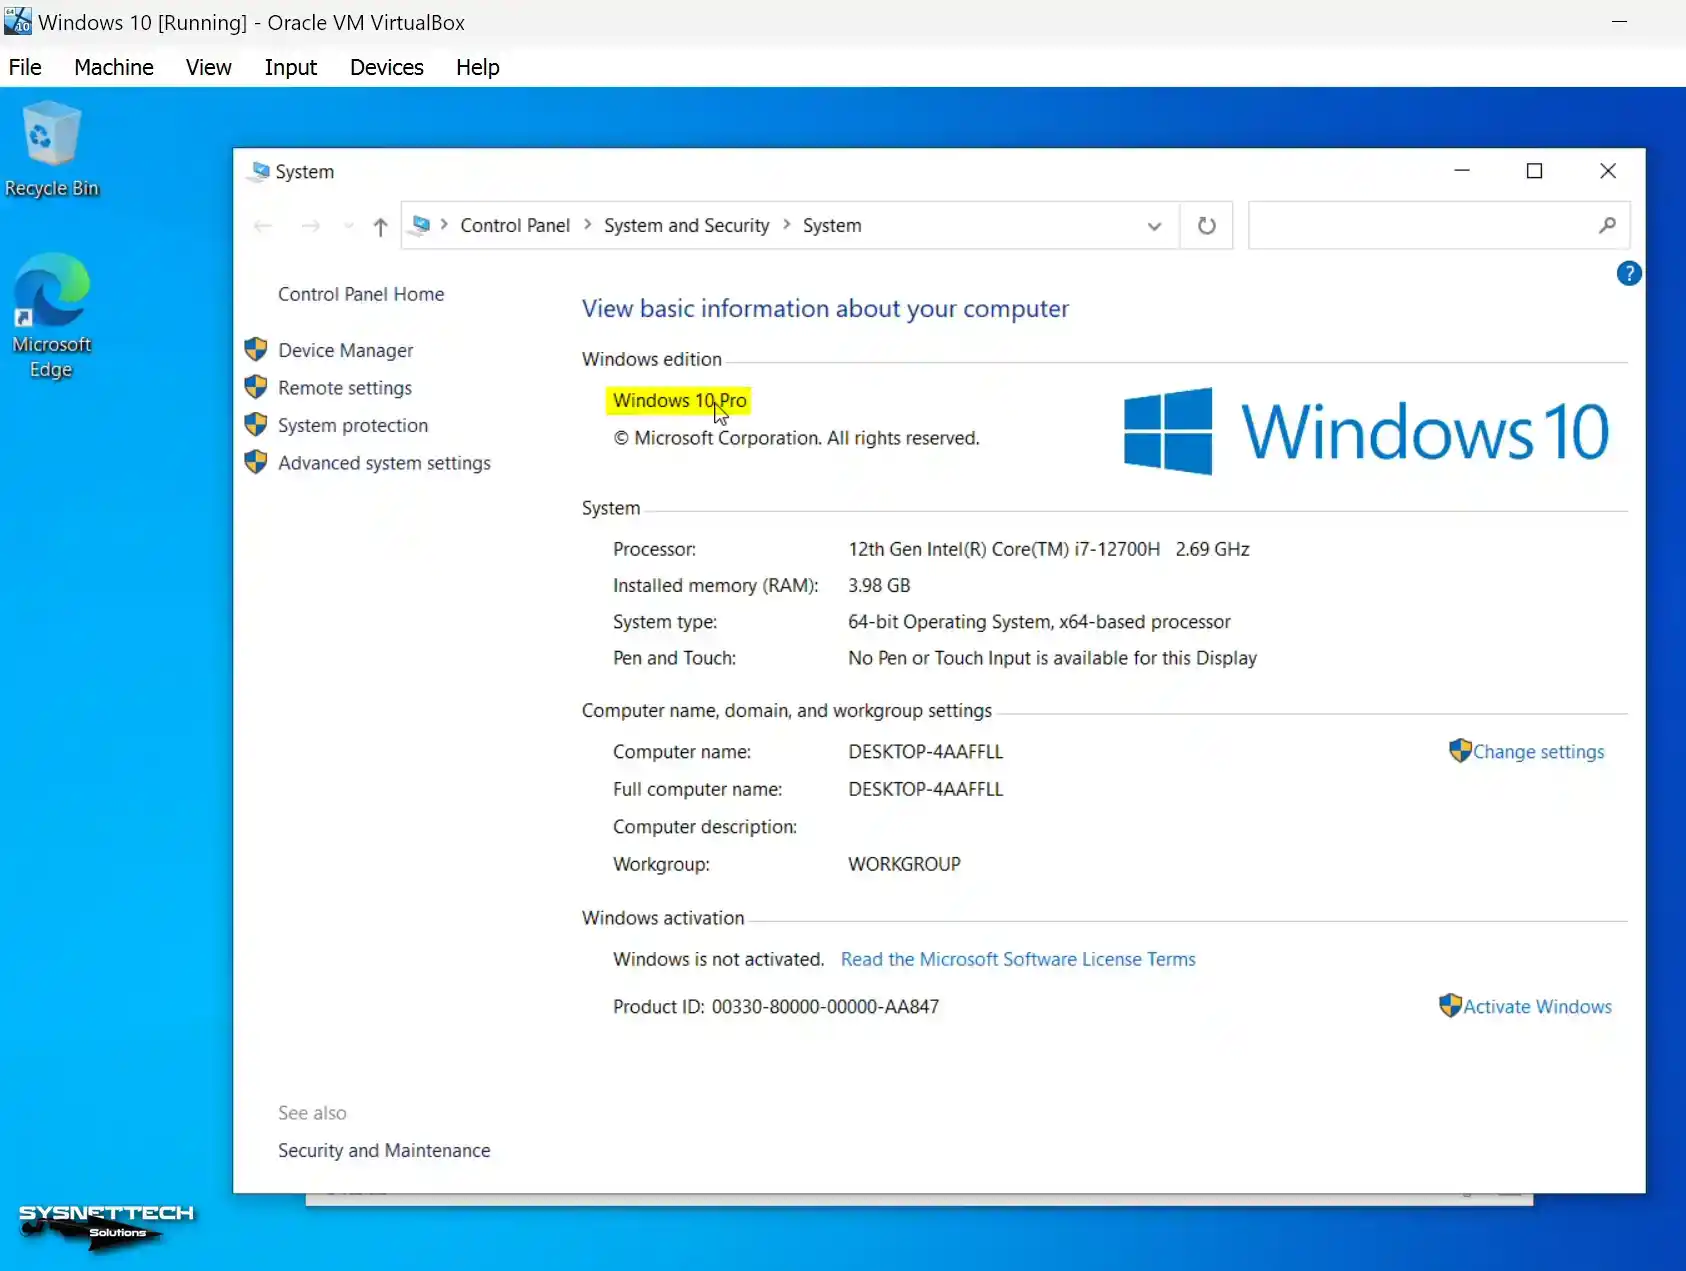
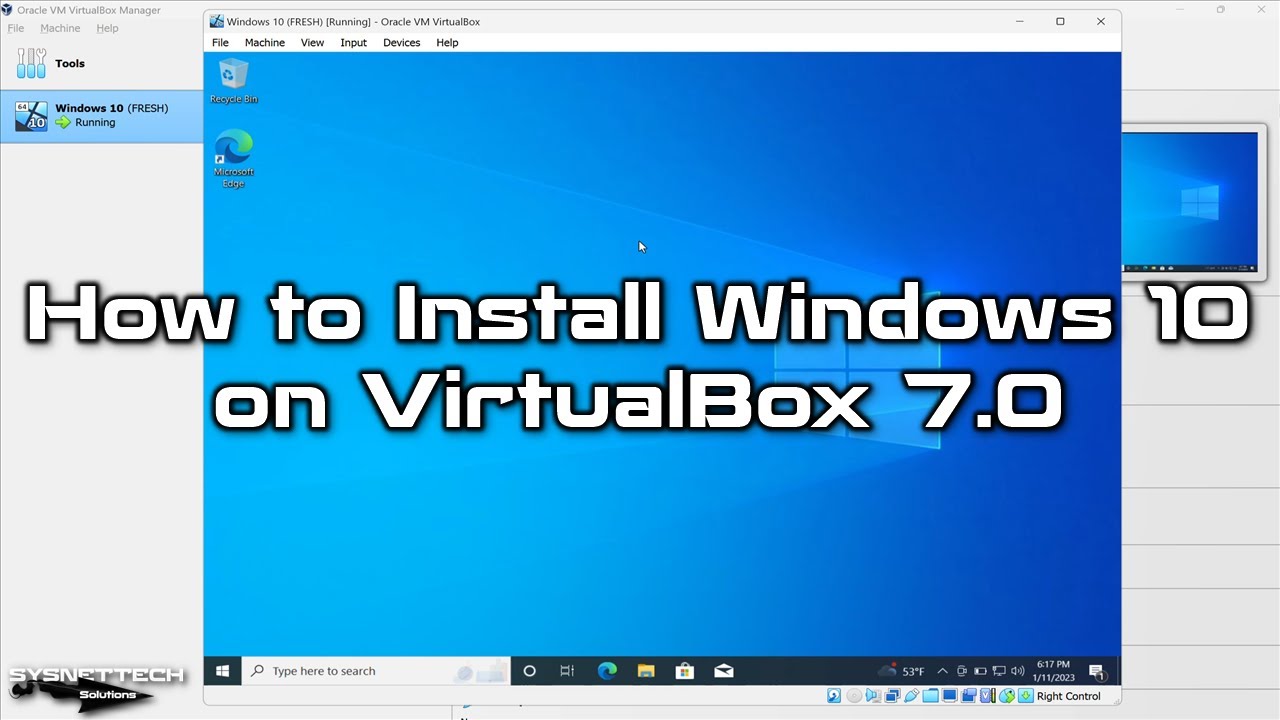
How to Run Windows 10 OS on a Virtual Machine using VirtualBox 7 Version
Oracle VM VirtualBox is a software that runs on virtualization-supported hardware. That is, you can install & use it on Windows, Linux, and macOS operating systems. It is also completely free to use. With this software, you can make a virtual computer instead of a dual-boot. In addition, you can install the platform you want to use on this virtual PC.
If you have a computer with VTx support, you can easily install VirtualBox. Your current system can be Windows or Linux. For instance, if you are using the Ubuntu OS, you can run Windows 10 with VirtualBox. Moreover, you will not experience much performance loss.
After installing an operating system on VirtualBox, it is also possible to get better performance. To do this, you should install the Guest Additions software. This software provides many advantages to your virtual machine. For example, you can work at full-screen resolution. You can also transfer files by dragging and dropping.
How to Create a New VM (Virtual Machine) for Windows 10 OS Correctly
After installing VirtualBox, you may want to try Windows 10. Also, it is vital to create the virtual computer correctly. If you install the platform with the default settings, you may experience performance loss. Therefore, you need to enable some settings. As a result, the performance of the VM will increase.
Step 1
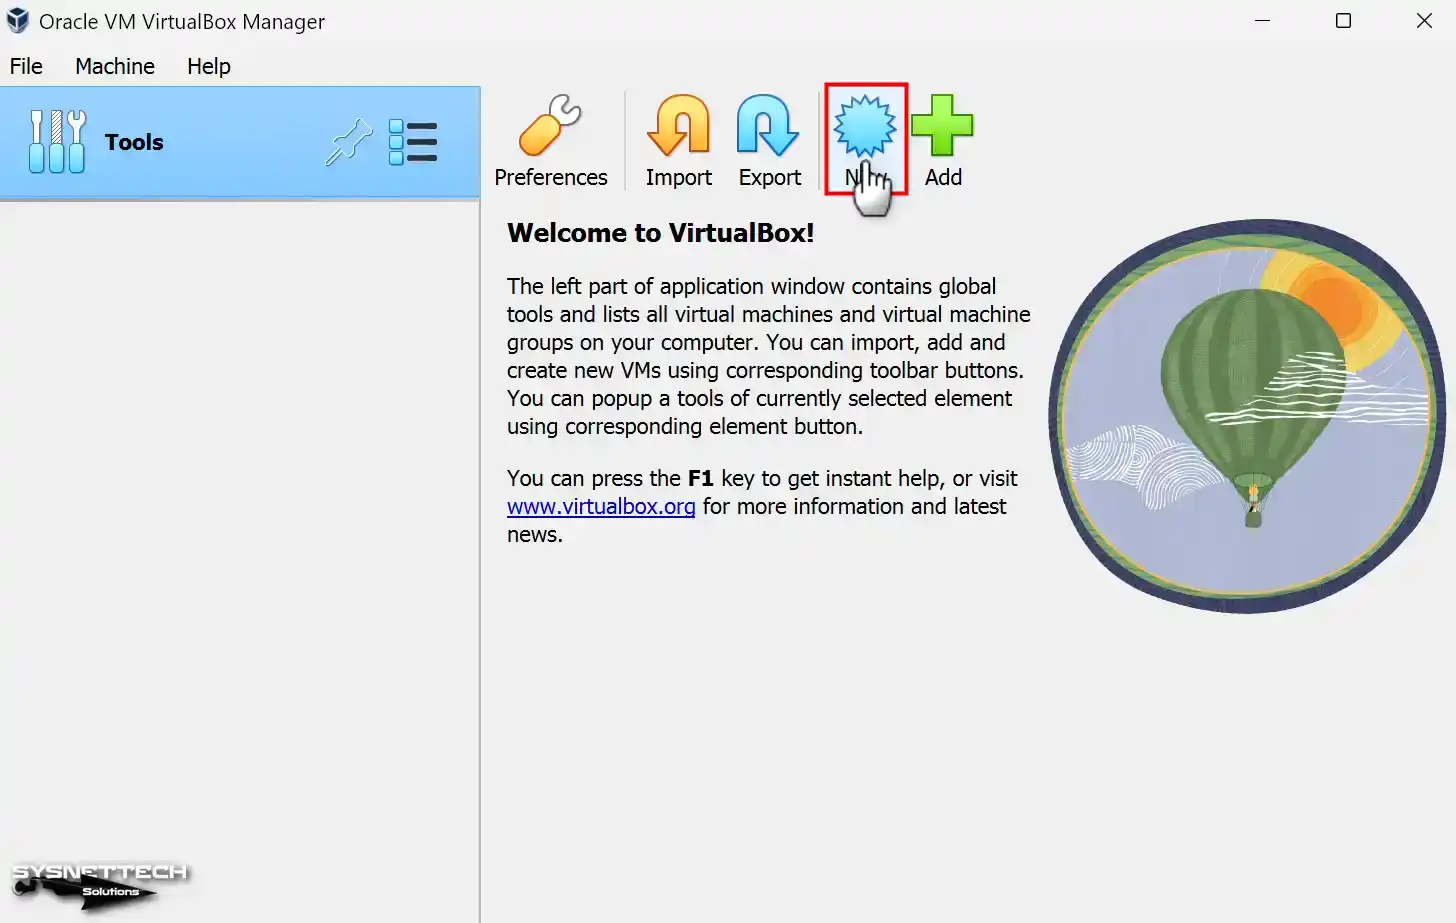
After opening Oracle VM VirtualBox, you can start the VM wizard. To do this, you can go to the Machine menu from the user interface. You can also click on the New option under the menu. However, you can also click on the New button in the section with the large icons.
Step 2
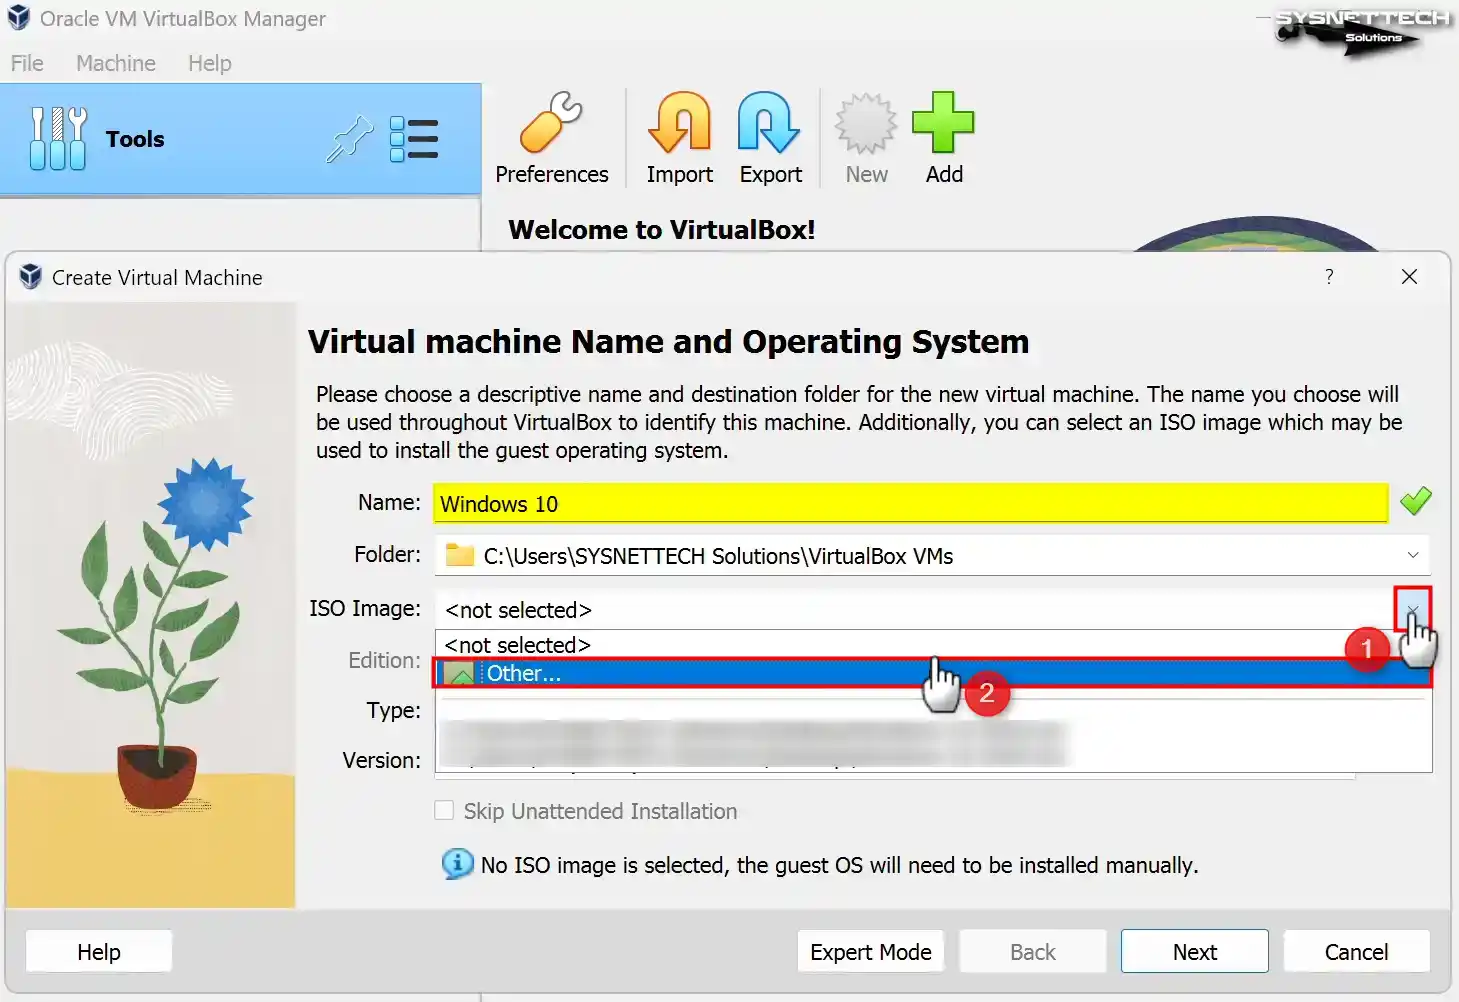
In the virtual machine wizard, you should write the system name in the Name section. Also, the Type and Version sections will be set automatically. These settings are determined according to the platform you write for.
Write “Windows 10” in the Name section. Also, select your external SSD, HDD, or host disk in the Folder section. New-generation computers usually have NVMe drives. This significantly increases VM performance.
However, you should avoid filling the disk capacity with virtual machines. As a result, I recommend installing it on a portable disk. Also, SSD and NVMe drives can lose performance over time. Therefore, it is helpful to store only the VMs you use most often on these disks.
Step 3
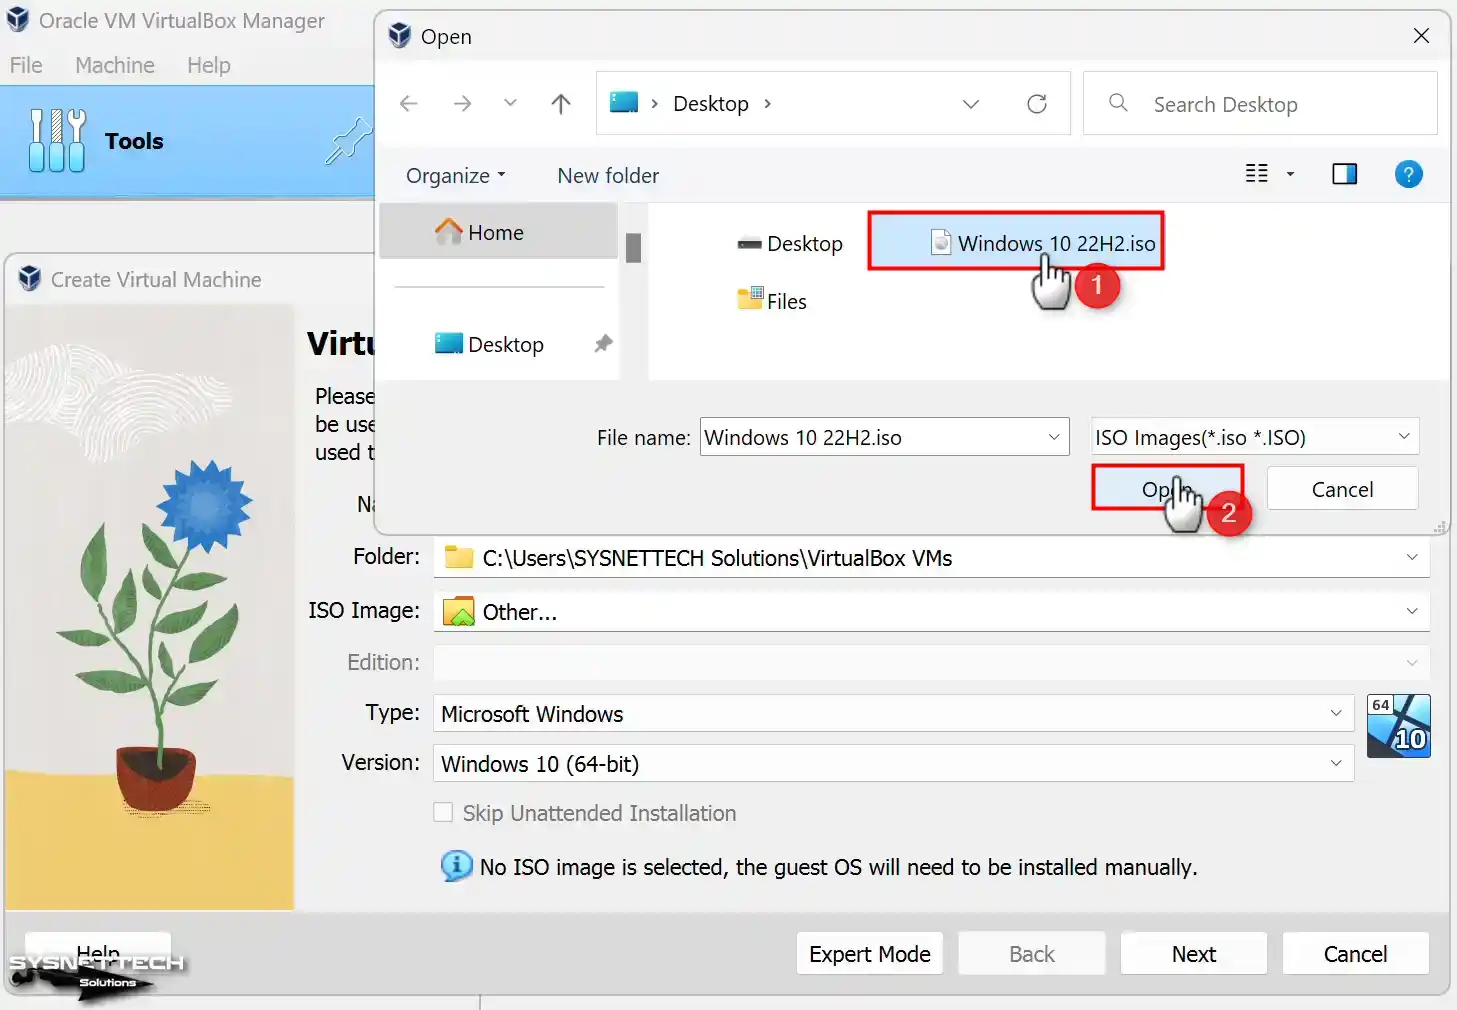
To add the Windows 10 22H2 ISO file to the virtual machine, go to the ISO Image section. First, click on Other from the drop-down menu. Then, select the image file you downloaded to your computer in the window that opens. Finally, open the file.
Step 4
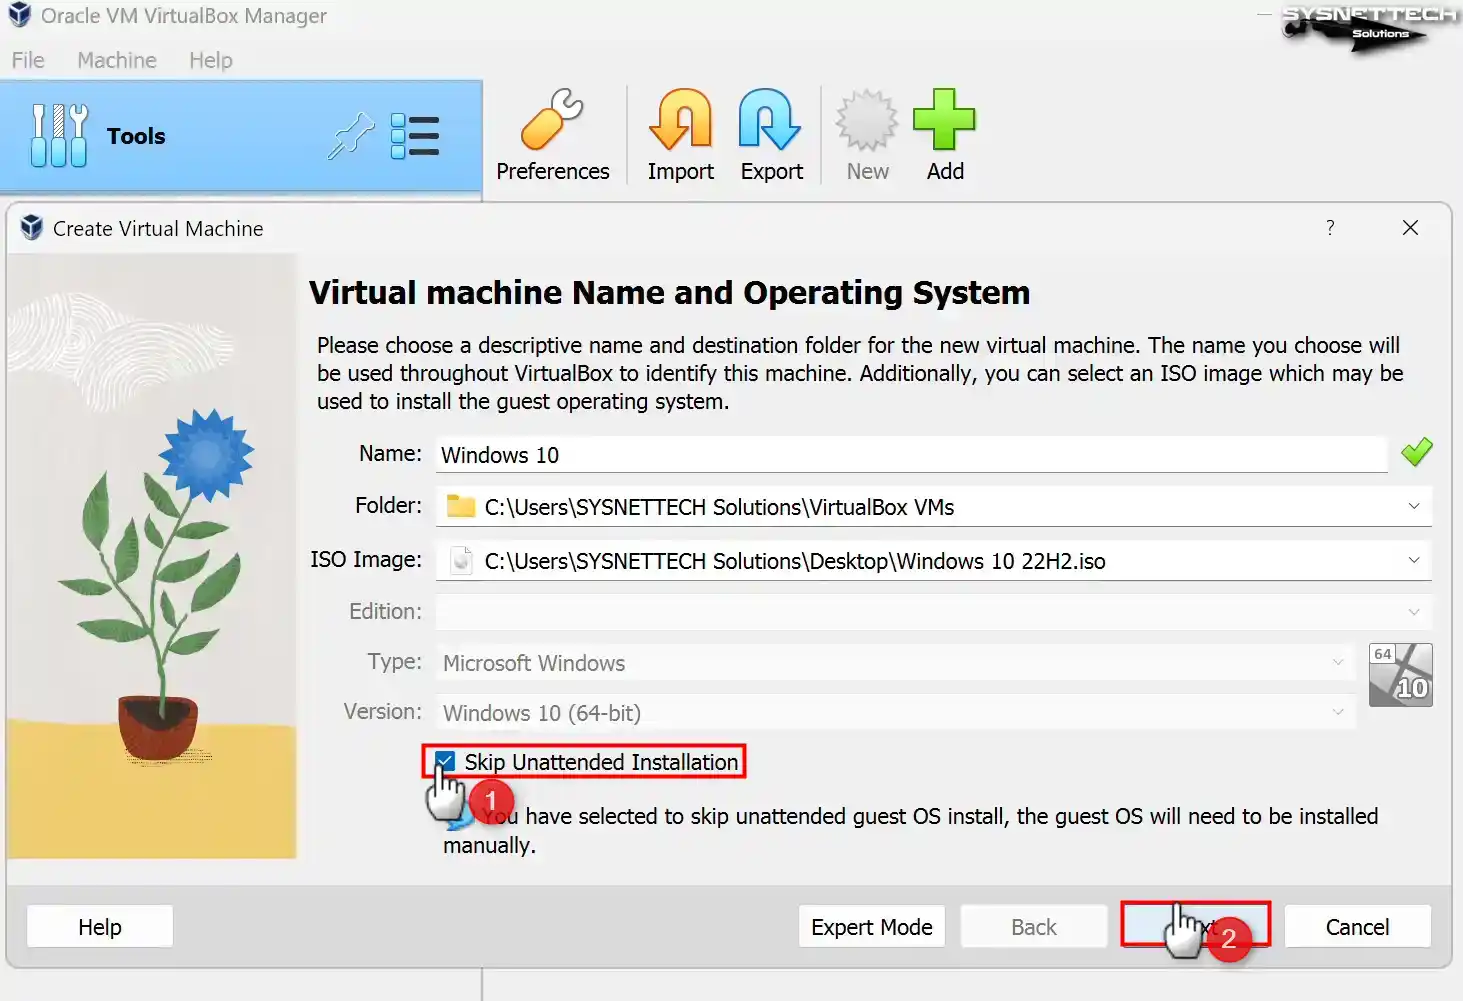
VirtualBox 7 offers new features with its unattended installation settings. If you want to use the old method, select the Skip Unattended Installation option. Then, click the Next button.
Step 5
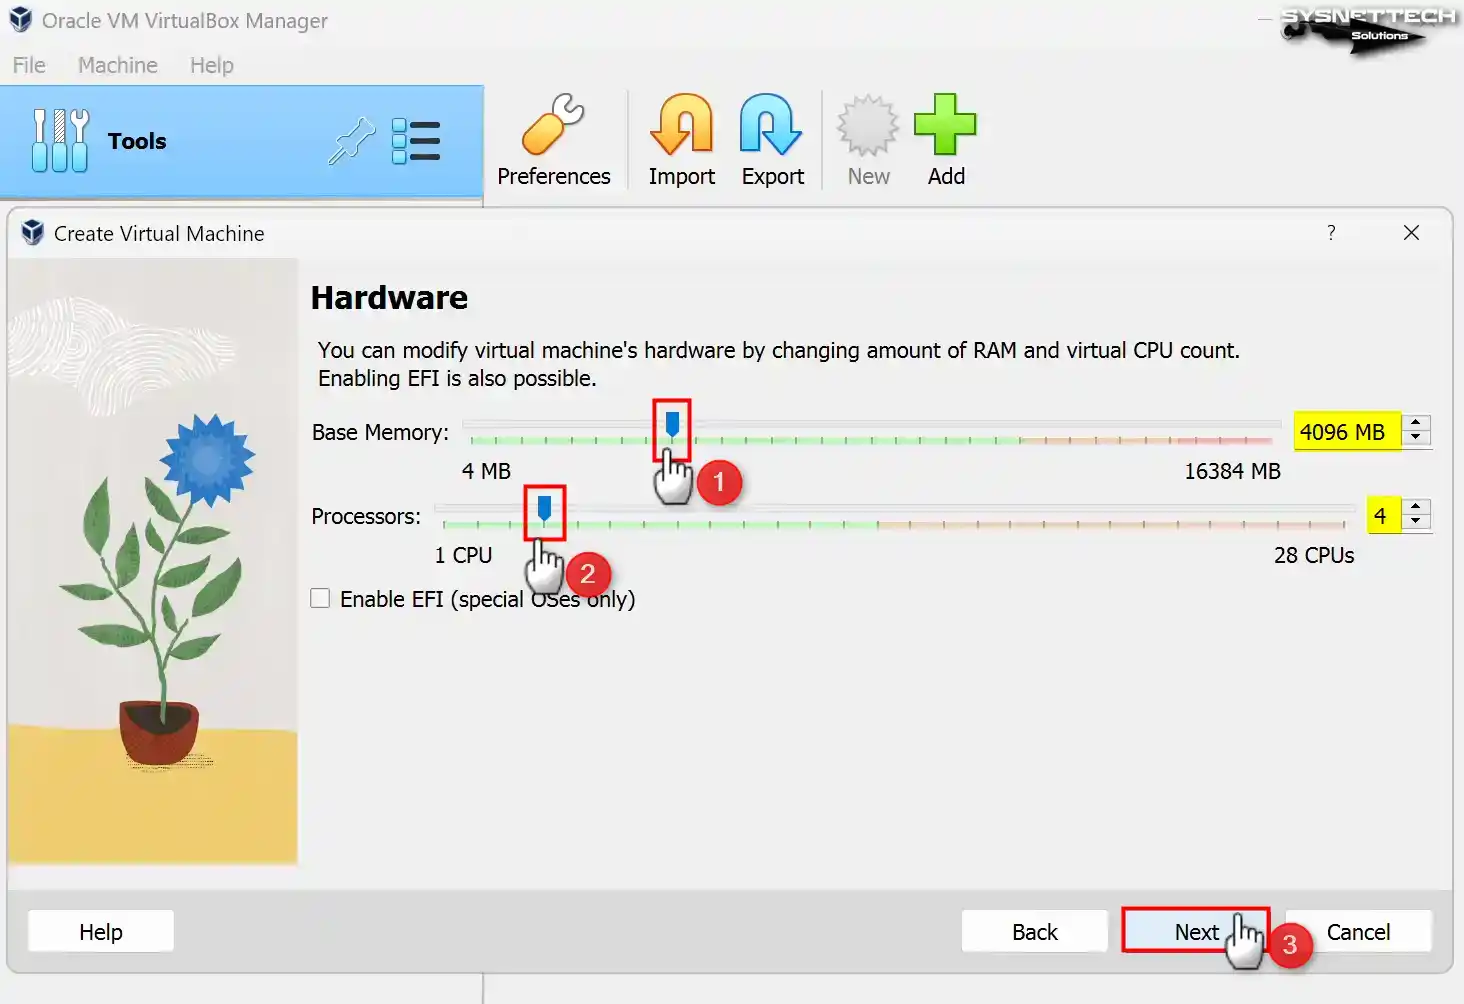
Set the virtual memory size for the Windows 10 virtual machine according to the RAM capacity. If your host device has 16 GB of RAM, you should configure 8 GB or 4 GB of memory size in the Memory Size window.
However, you can improve performance by increasing the number of virtual processor cores in the Hardware settings. As a result, you will get a more stable guest machine performance.
Step 6
In the Virtual Hard Disk configuration window, you can select your existing virtual disk file. If you have previously created a virtual disk, you can use the existing file.
However, if you want to install Windows 10 from scratch, click Create a Virtual Hard Disk Now. Specify the disk size and click the Create button.
NOTE: The disk configuration interface is different in VirtualBox 6.x versions. If you are using an older edition, select VDI (VirtualBox Disk Image) at this stage and click Next. However, in the Storage on Physical Hard Disk window, select Dynamically Allocated and click Next again. Then, if you want to allocate a fixed-size storage space for the VM, select the Fixed Size option. The fixed-size option can increase the performance of the virtual machine. However, if you install more than one VM, your storage space may decrease.

Step 7
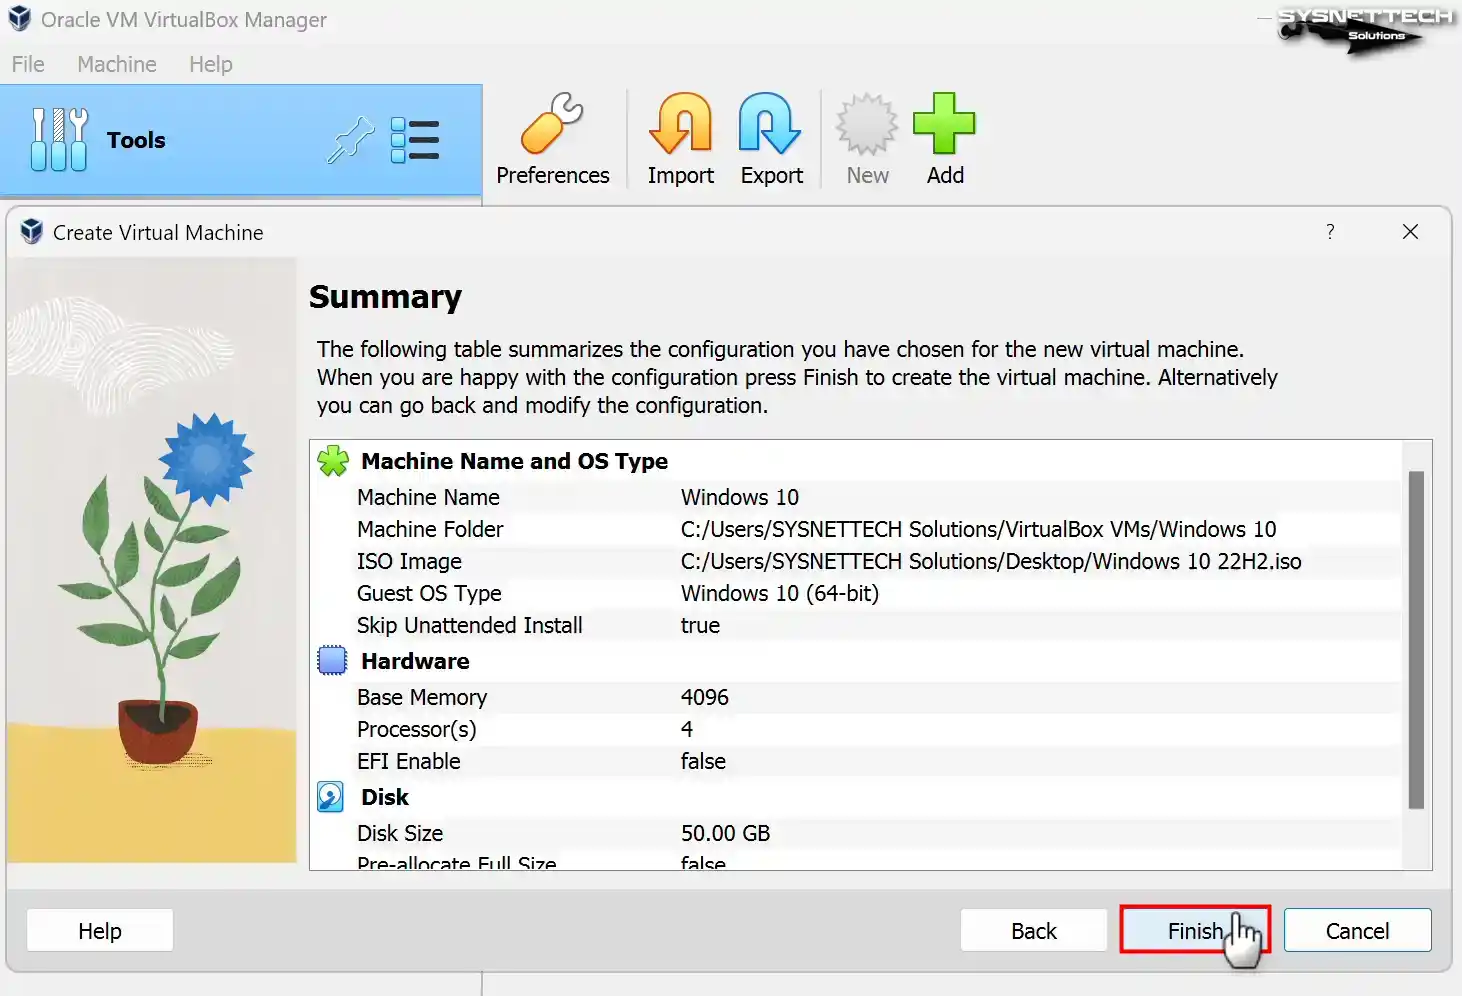
In the Summary window, check the virtual hardware settings for Win10. Also, review the settings and close the window.
Step 8
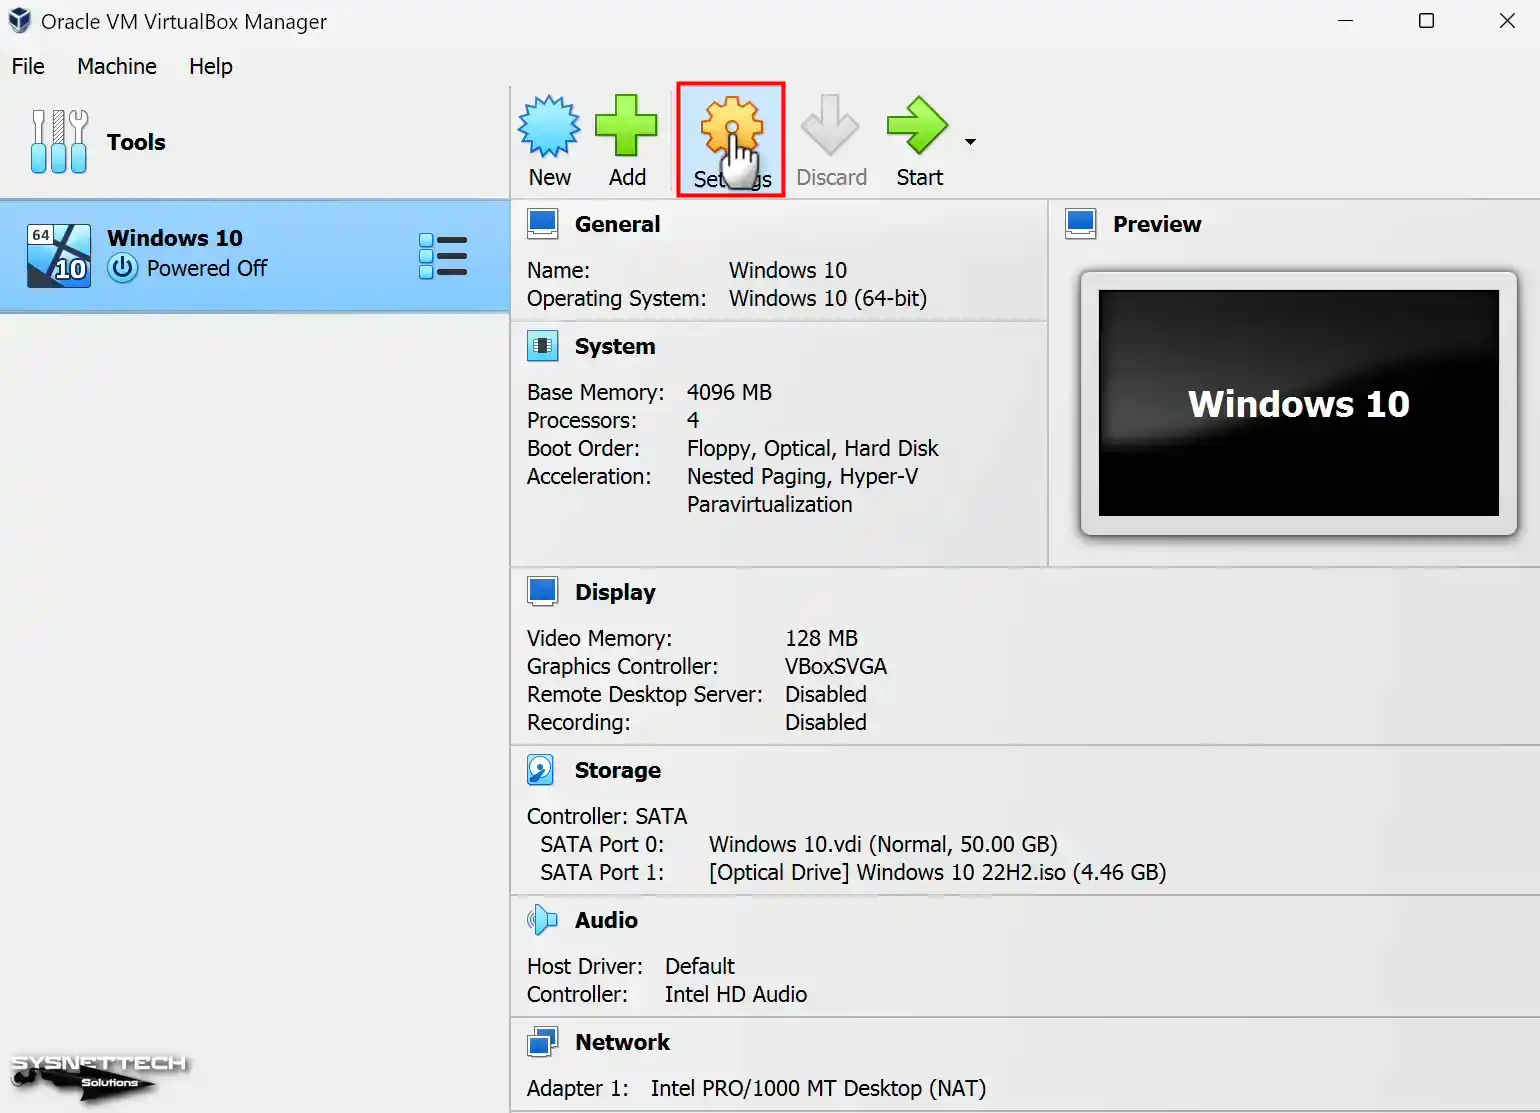
Click Settings to configure the guest machine’s settings most professionally.
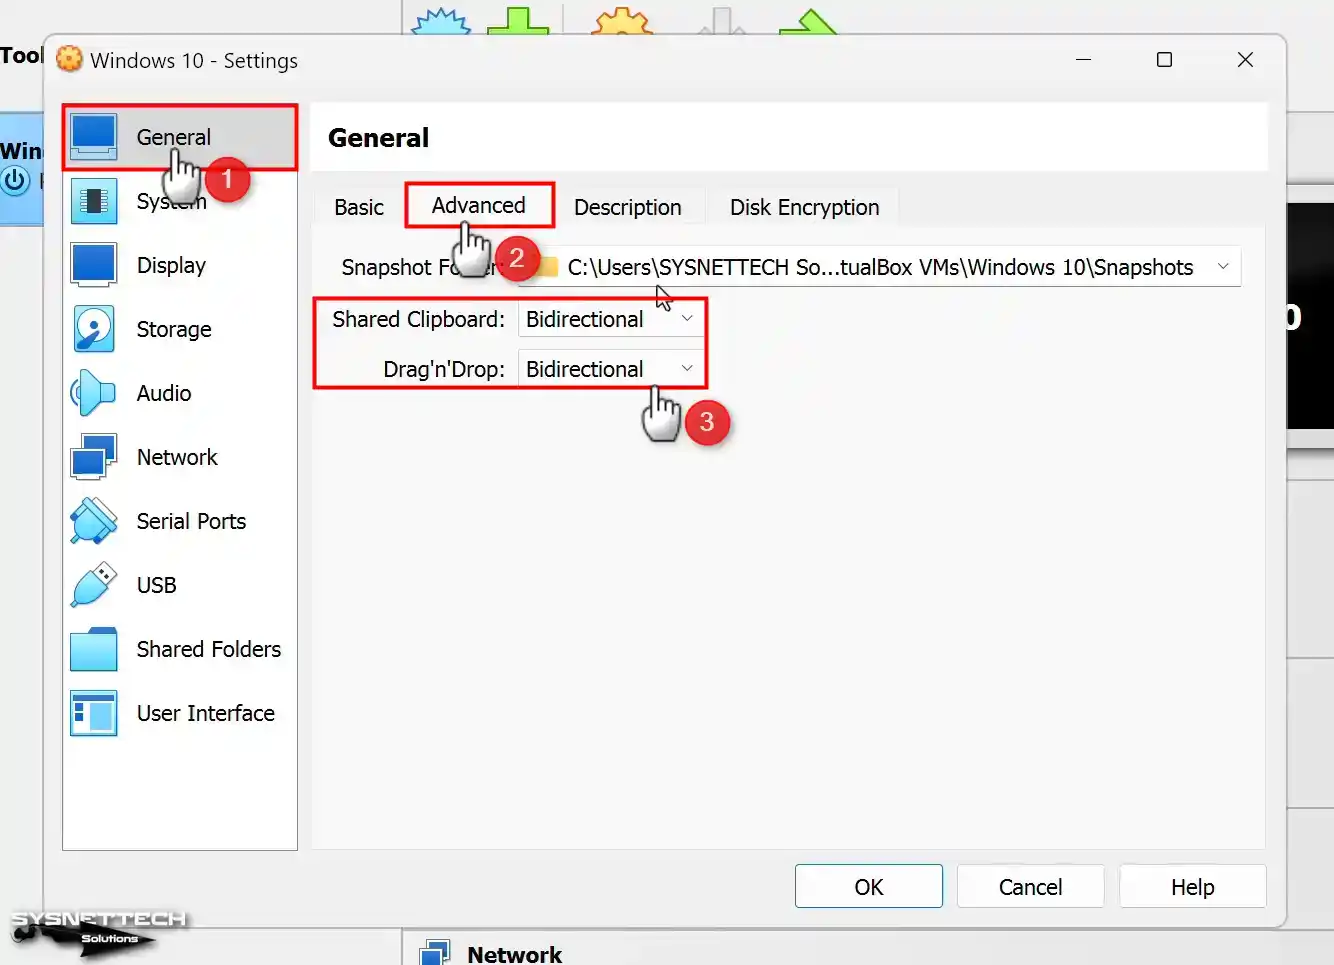
Step 9
In the General settings, go to the Advanced tab. Also, it enables two options to transfer files between the virtual PC and the host device. These are Shared Clipboard and Drag’n’Drop.
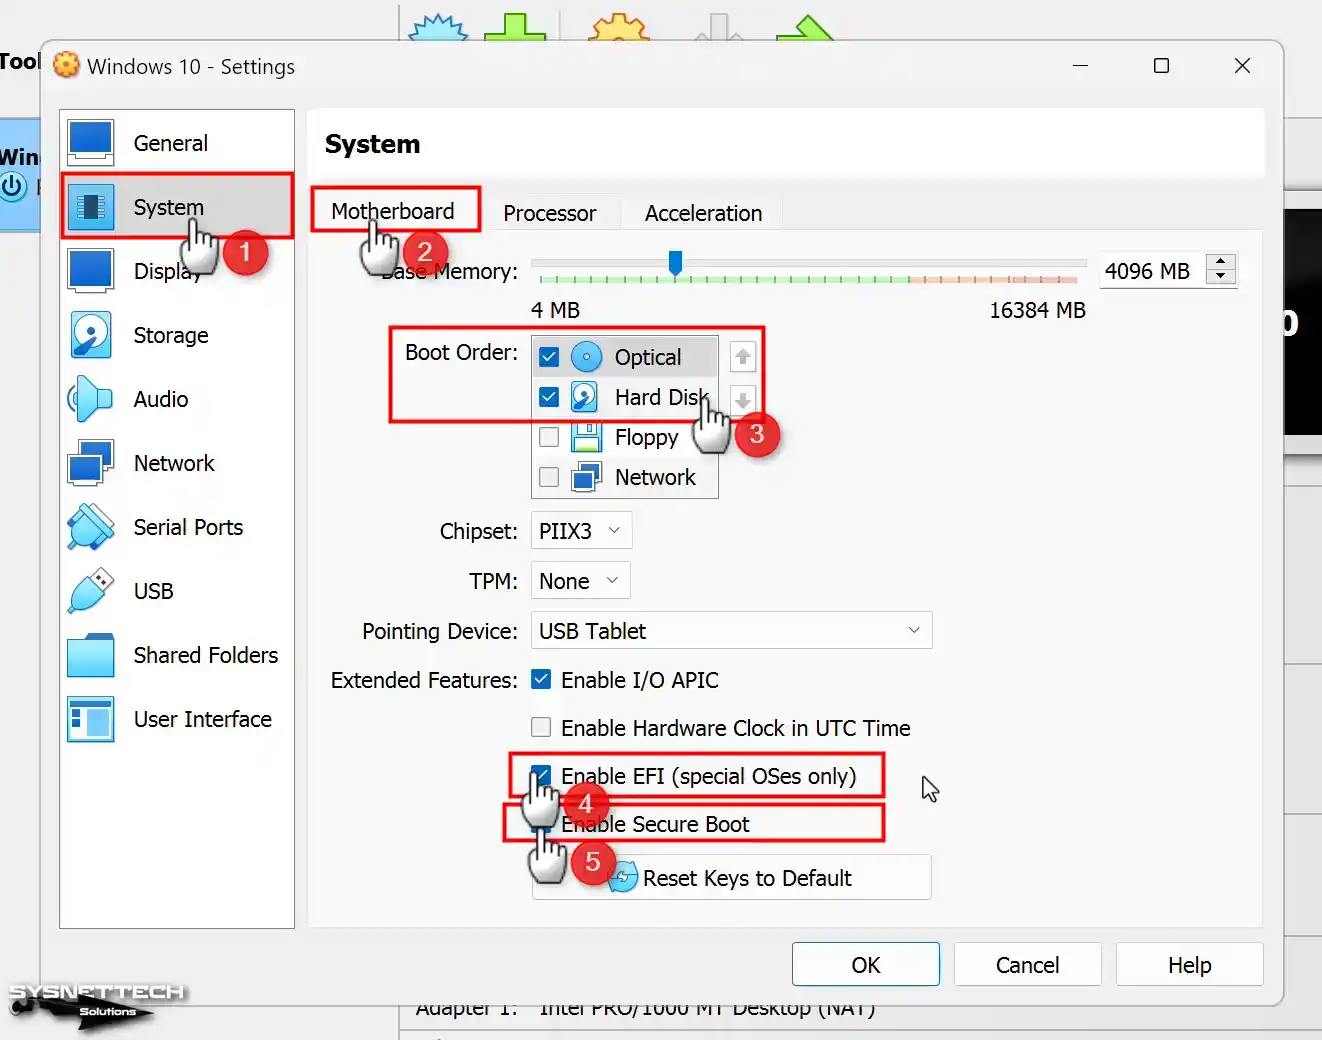
Step 10
In System settings, go to the Motherboard tab—Uncheck Floppy in the Boot Order list. Also, select Optical and move it to first place with the up arrow key.
However, you can reconfigure your RAM size in the System window. Also, enable the Secure Boot option. If you are going to install with UEFI, allow the EFI to be an option as well.
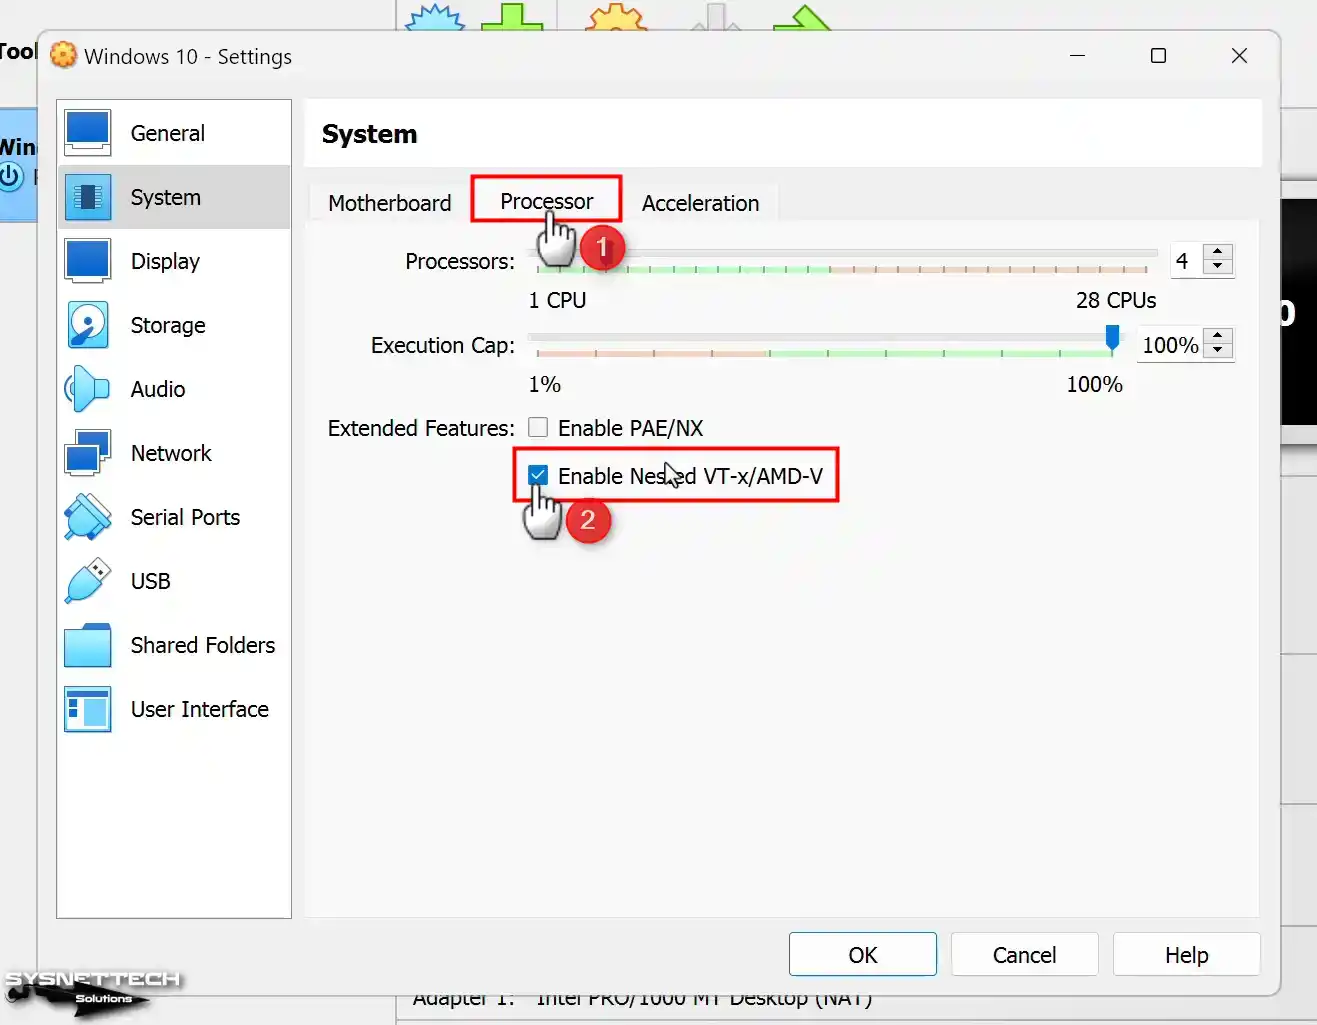
Step 11
Configure the number of virtual processors for your VM according to the host CPU capacity. If you have an 8-core processor, you can specify 4 virtual cores for your Win10 VM.
Also, if you want to use VMware or Hyper-V on the platform, you will install and enable Nested VT-x/AMD-V.
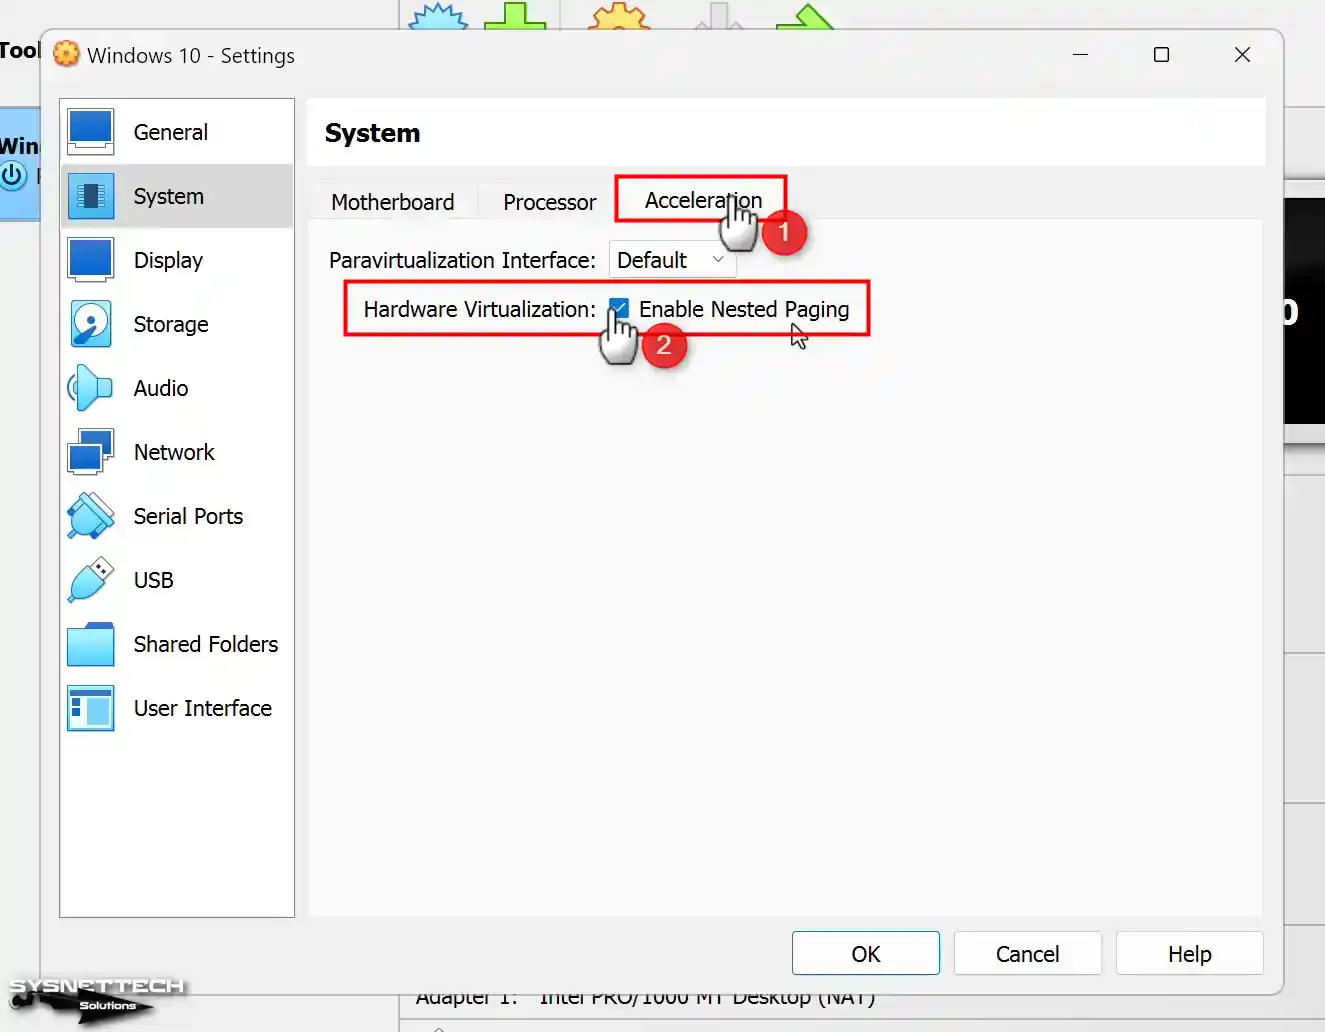
Step 12
In the Acceleration tab, the Paravirtualization Interface is set to Default by Default. VirtualBox picks the right setting for your operating system. In the Hardware Virtualization section, make sure to turn on Nested Paging. This helps your virtual platform use memory better, which makes it run faster.
Step 13
In the Display settings, go to the Screen tab. Enable 3D Acceleration so that your virtual machine can better render graphics. Also, set the Video Memory size to the maximum value.

Step 14
Since you will install Windows 10 on the NVMe virtual disk, delete the VDI disk file in the SATA Controller section.
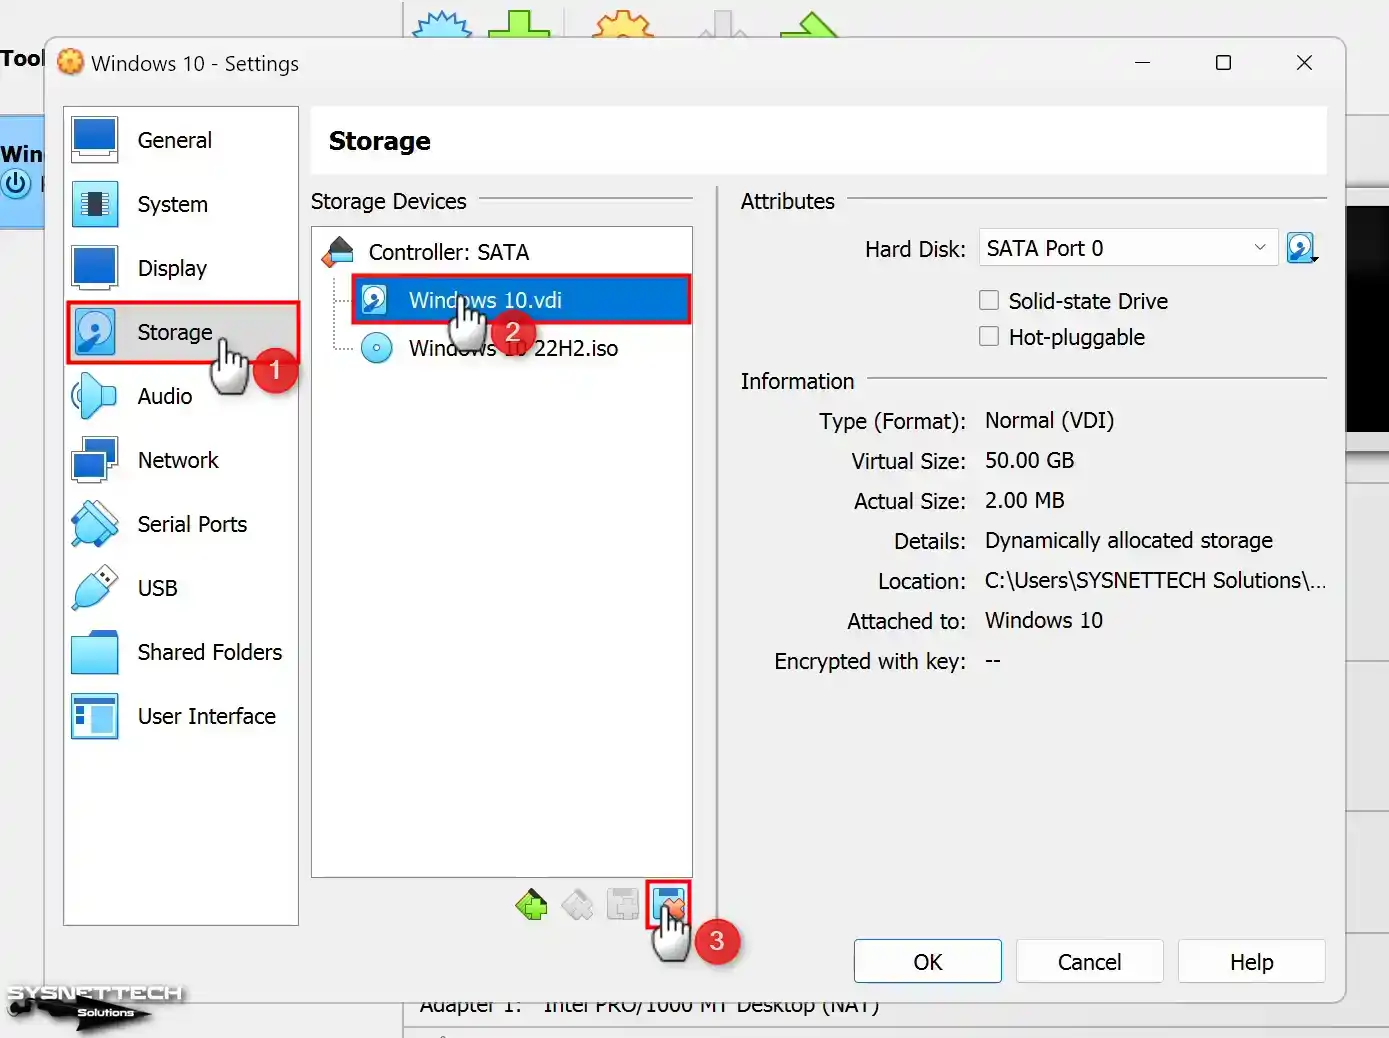
Step 15
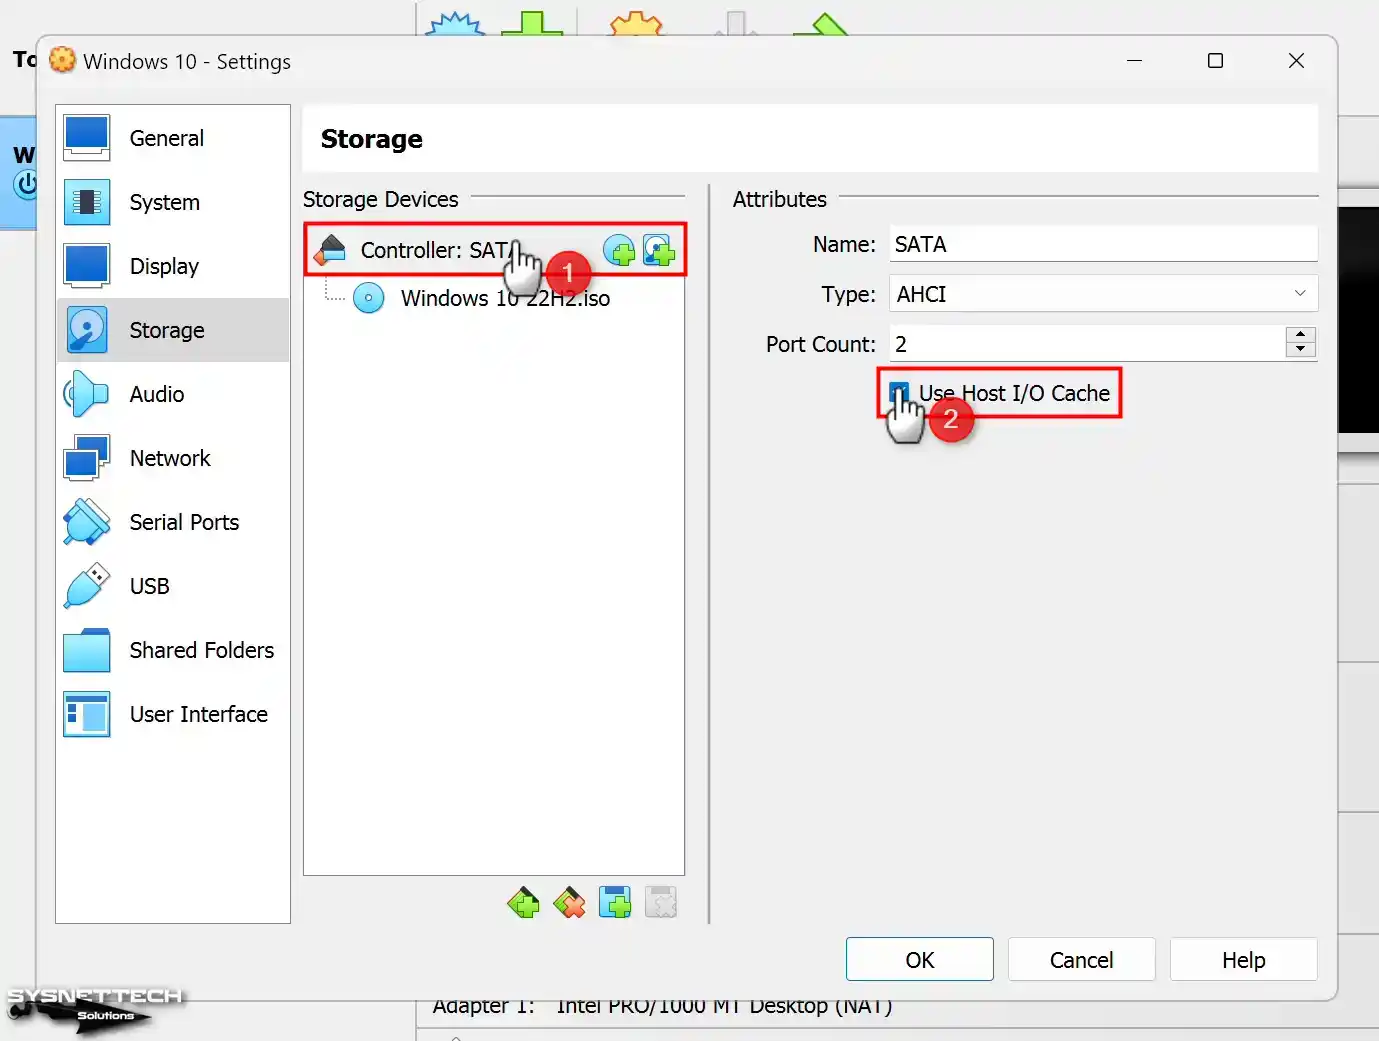
A typical performance problem after installing this OS with VirtualBox is the incorrect disk controller settings. First, go to Storage settings. Then, select Controller: SATA controller and enable the Host I/O Cache option.
Also, one of the essential components of virtual machine performance in VirtualBox is the Host I/O Cache. Oracle clearly states this feature in this document.
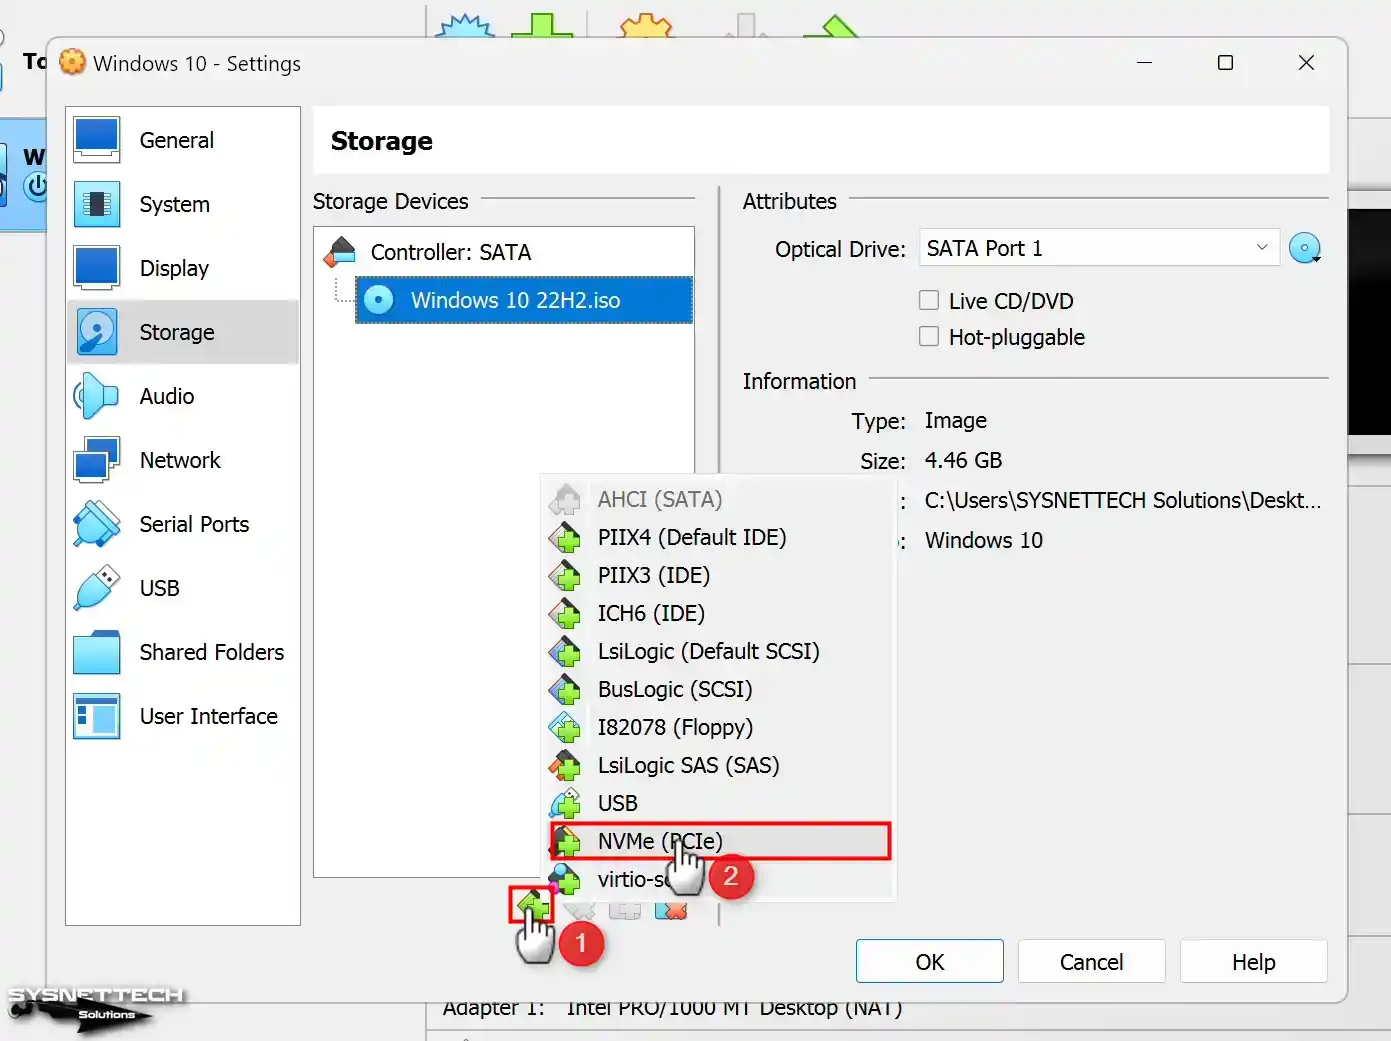
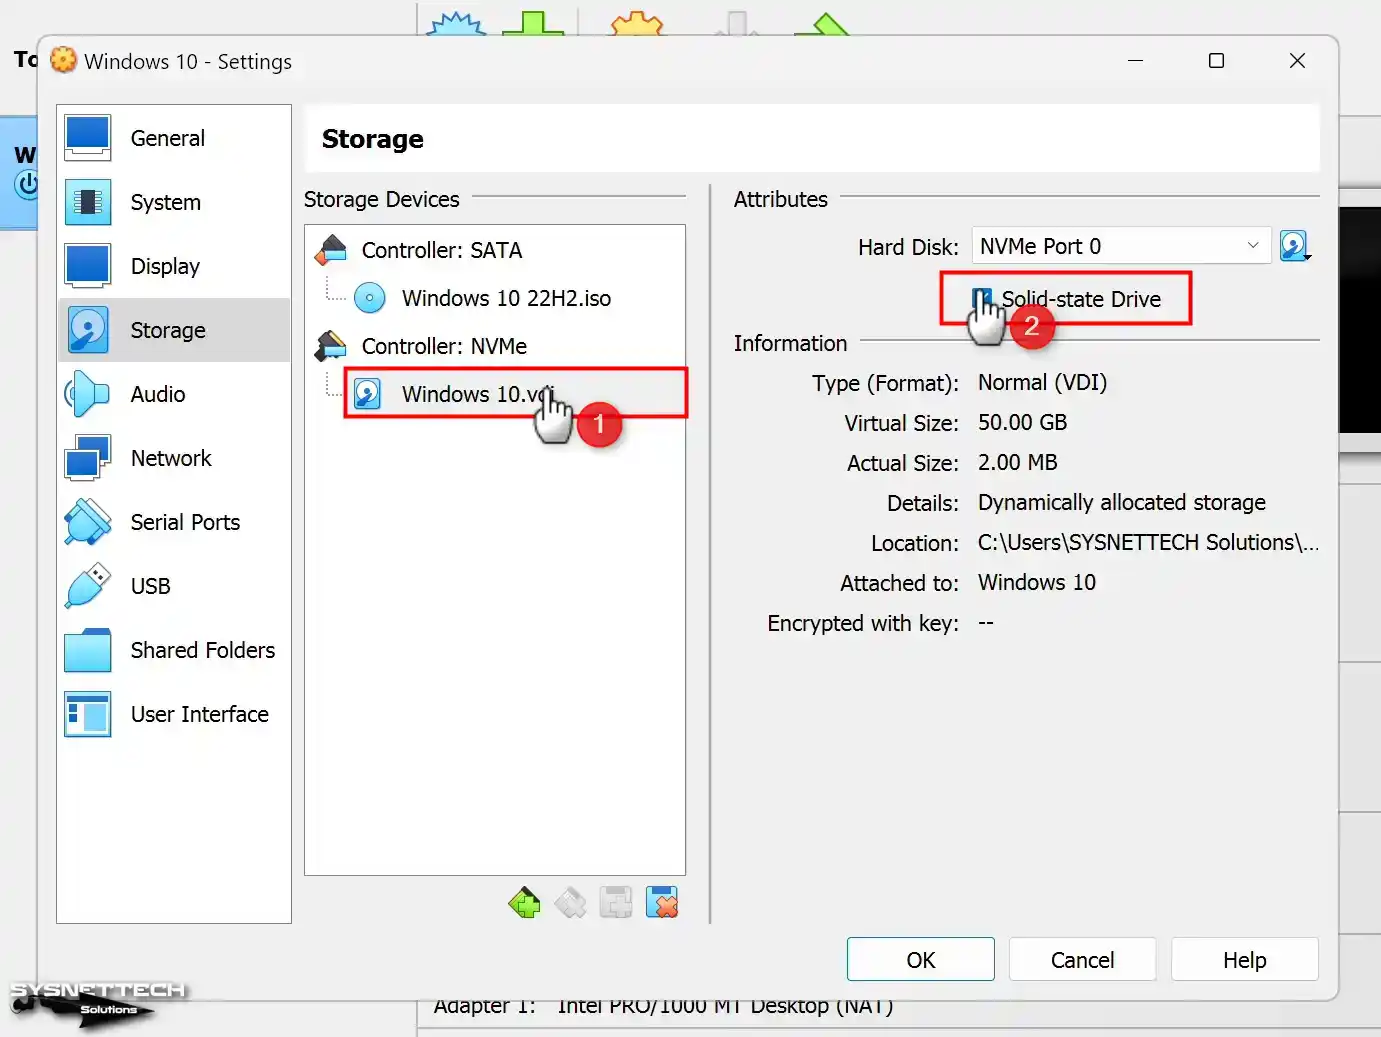
Step 16
To add an NVMe disk in VirtualBox, click on the add icon in the image below. Then, select NVMe (PCIe) from the listed controllers.
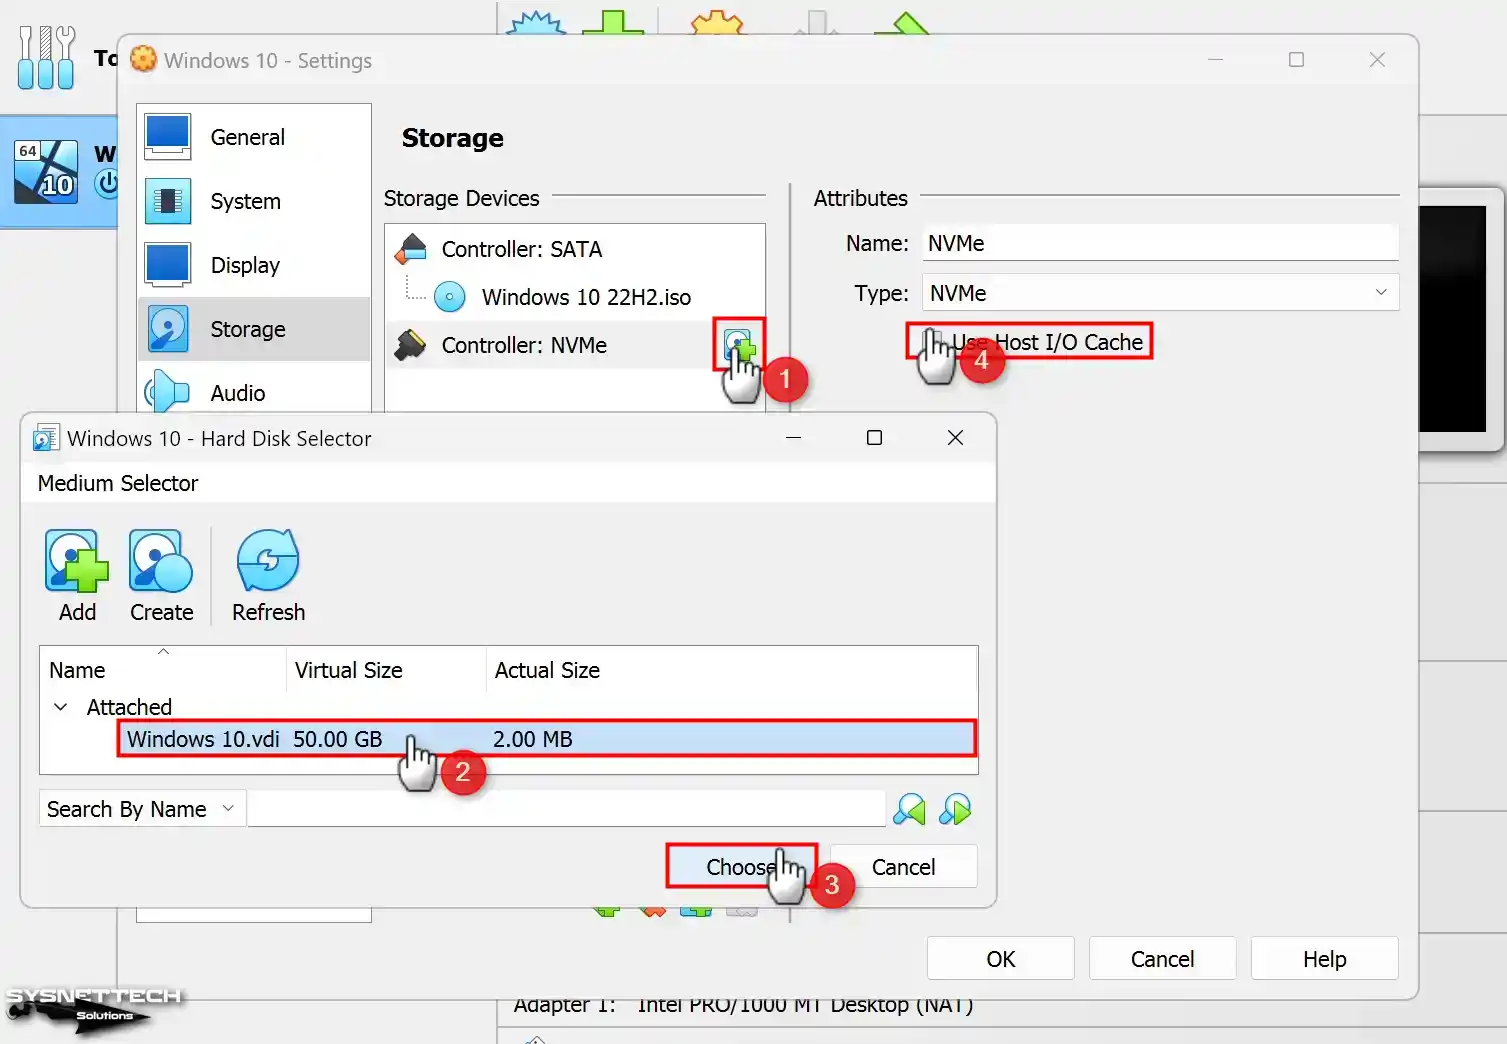
Step 17
After adding the NVMe Controller, add the Win10.vdi disk. Also, enable the Host I/O Cache option for the disk file.
Step 18
Tick Solid-State Drive to improve the write and read speeds of Windows 10.vdi disk file.
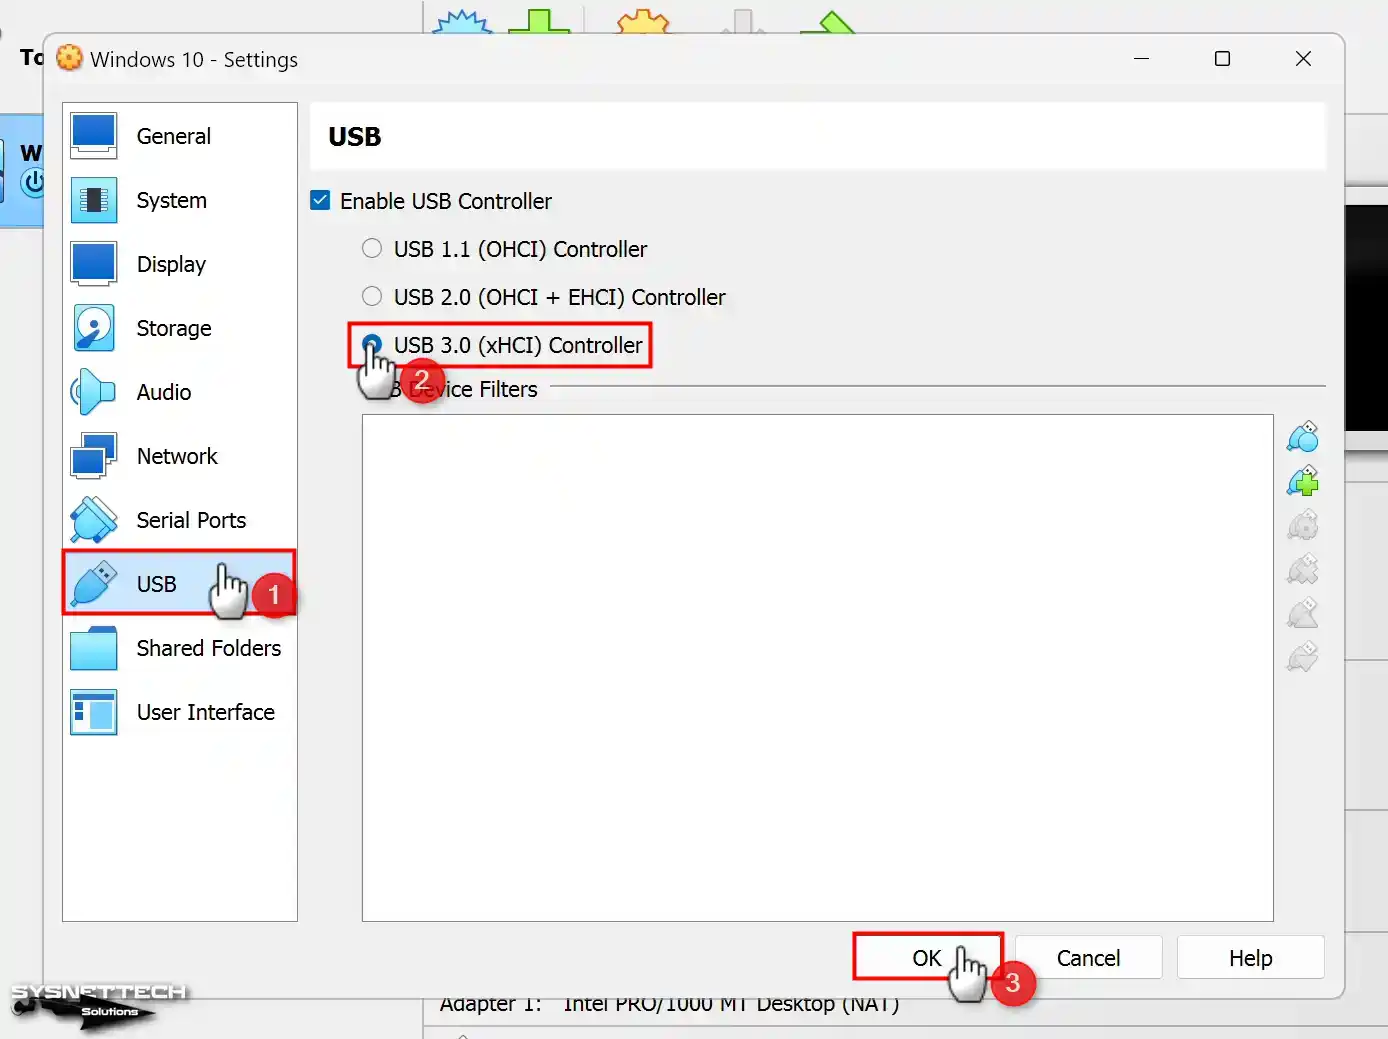
Step 19
Enable the use of USB devices on your VM. Then, close the settings by selecting 3.0 as the controller.
Step 20
After completing all the settings, start the guest machine. If you try to install the system, the NVMe virtual disk may not appear. This is because the NVMe disk is not recognized.
However, close Oracle VirtualBox. Then, open CMD or PowerShell as an administrator. You can fix the NVMe disk error by running the code below.
.\VBoxManage setextradata 'Windows 10' "VBoxInternal/Devices/nvme/0/Config/MsiXSupported" 0
.\VBoxManage setextradata 'Windows 10' "VBoxInternal/Devices/nvme/0/Config/CtrlMemBufSize" 0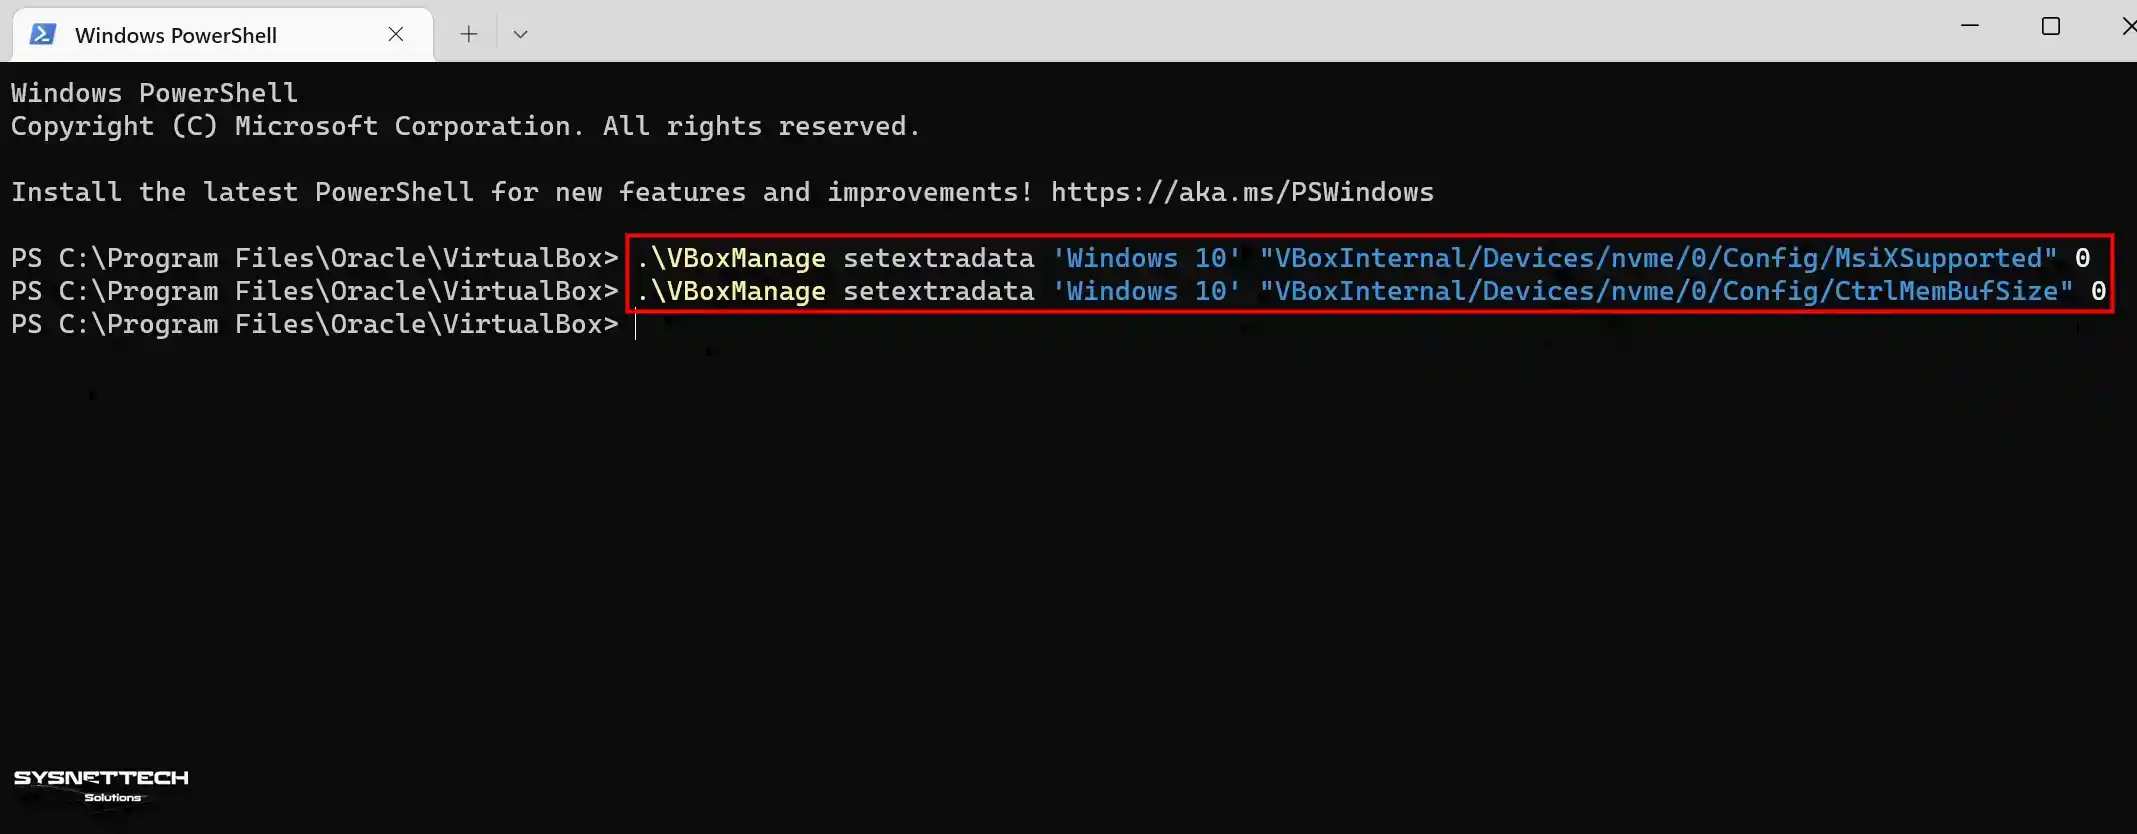
Step 21
After fixing the VirtualBox NVMe disk error, run your emulated computer for installation.

How to Install Windows 10 with VirtualBox
Up to this step, you have created a new and correct emulated PC for Microsoft Windows 10. You can install the virtual guest system after running your VM and booting from the startup disk.
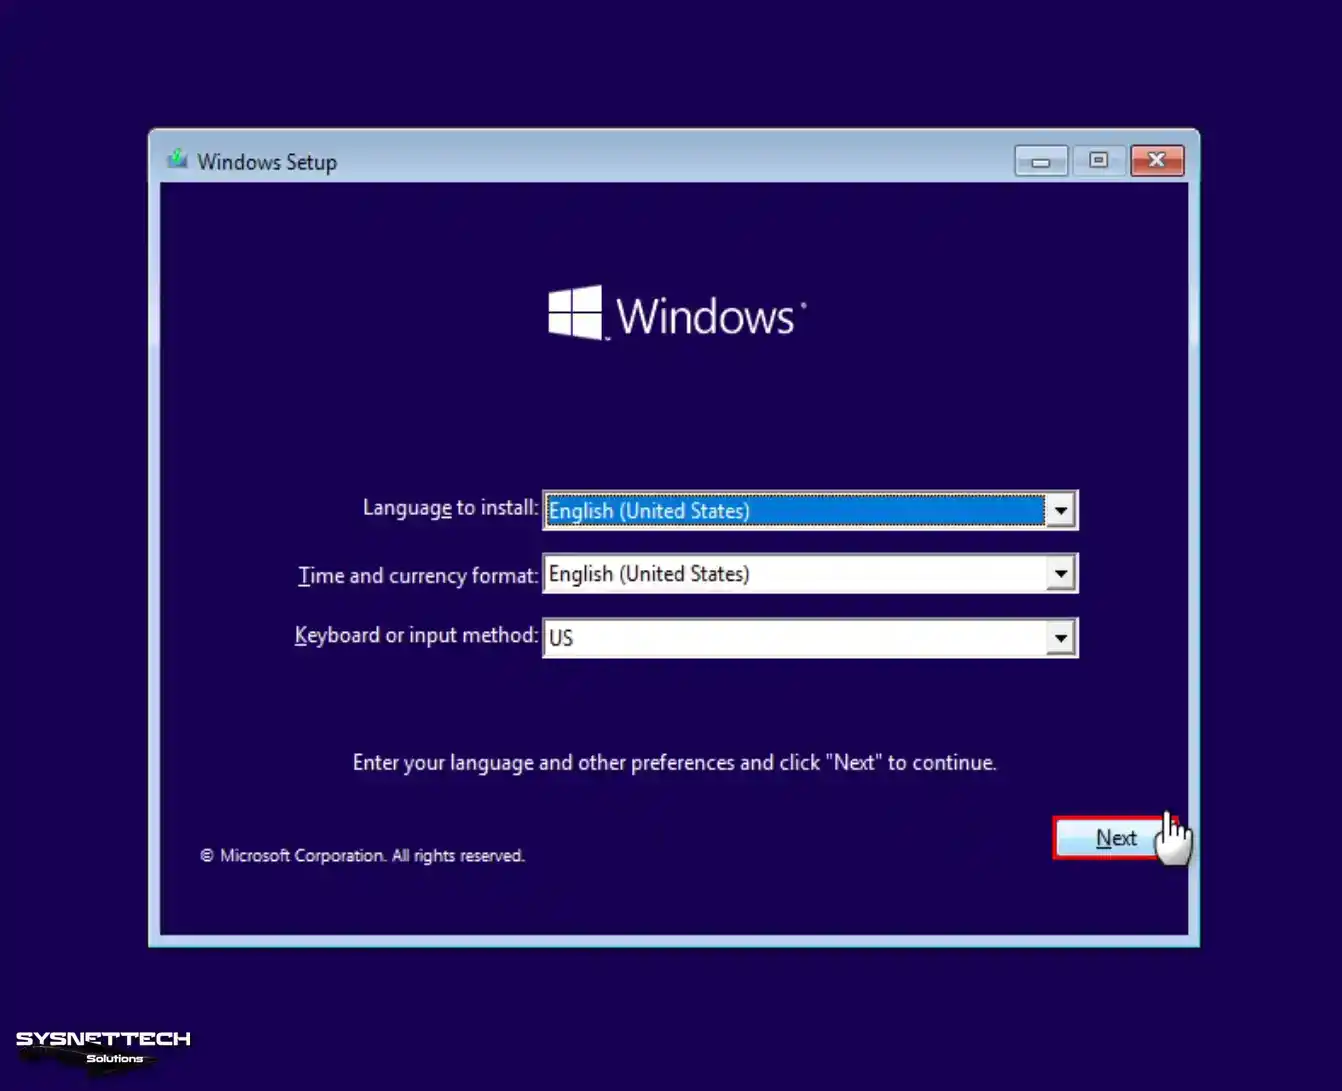
Step 1
On the Win10 installation screen, first select your system language. Then, configure the time and date format. Then, specify your keyboard layout and click the Next button.
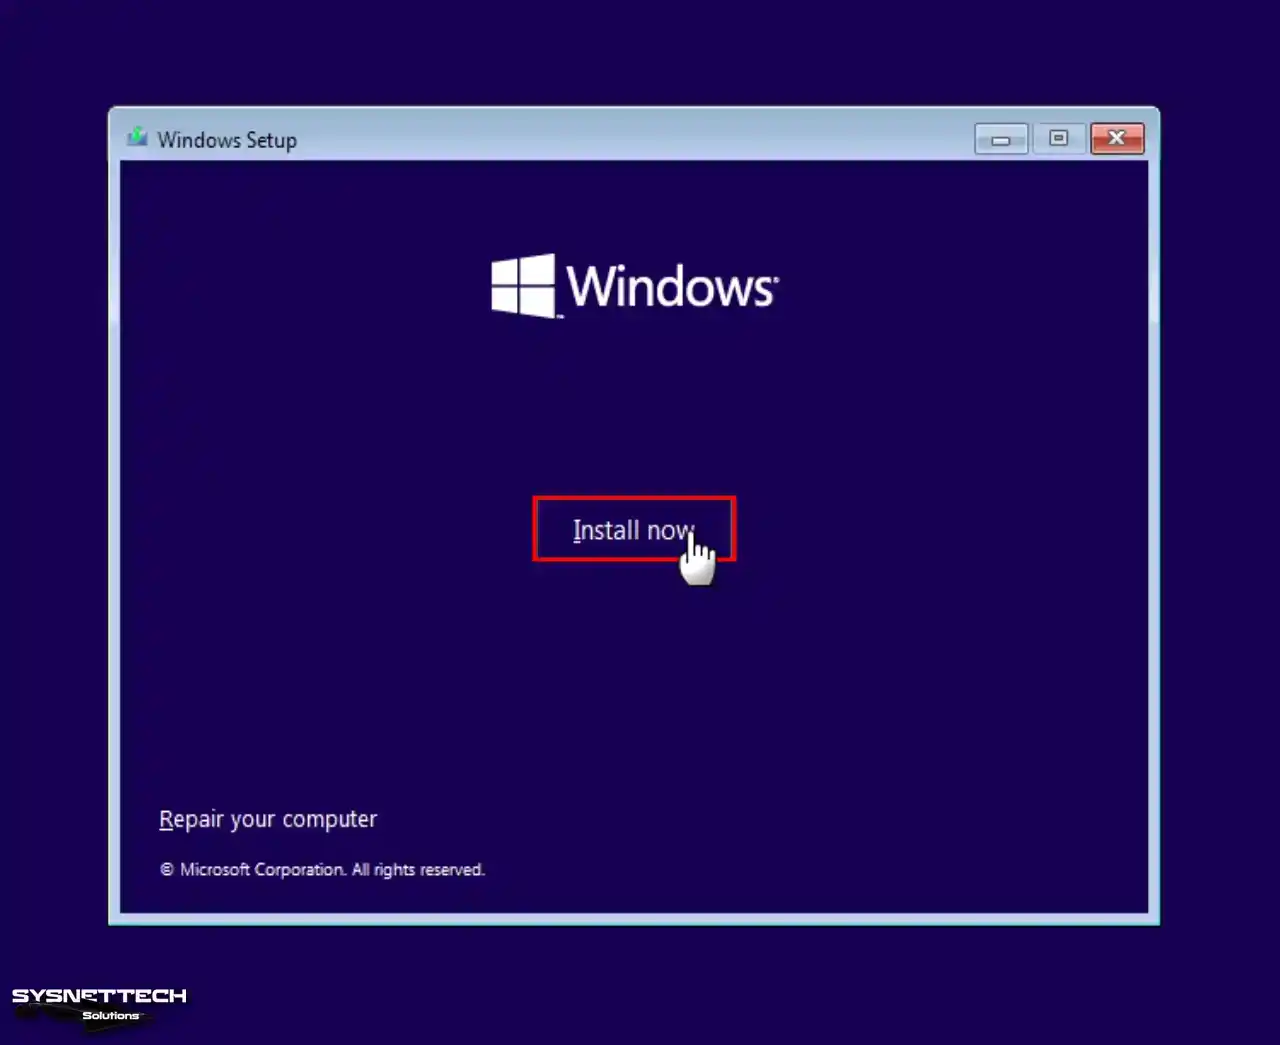
Step 2
After configuring your required system settings, click the Install Now button.
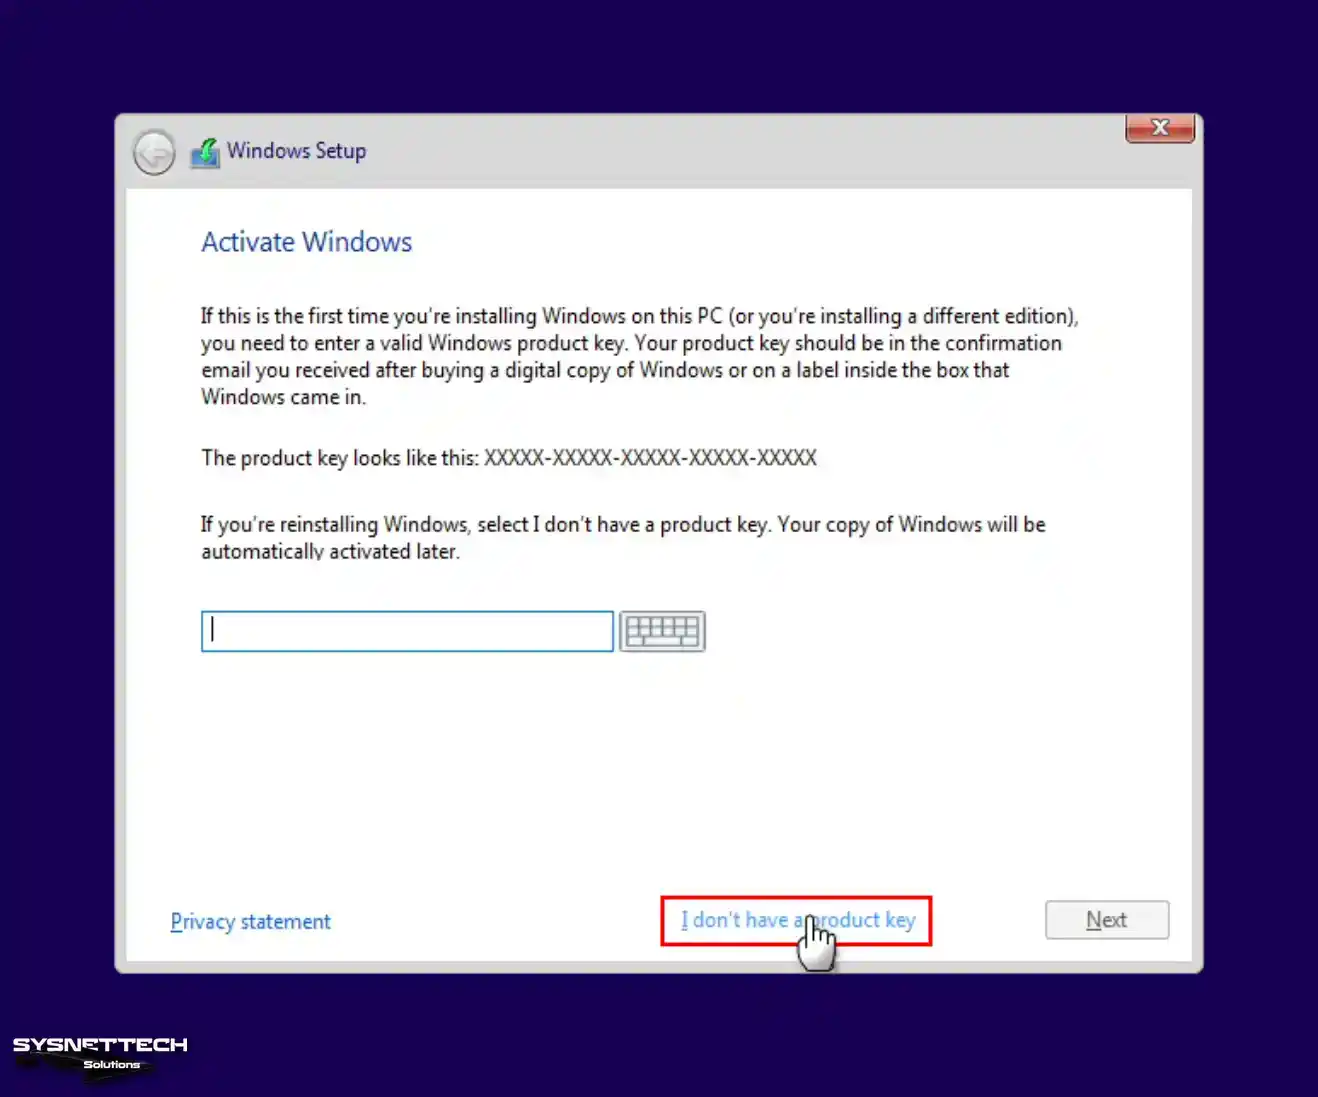
Step 3
If you have a Microsoft Windows 10 license key, enter it in this window. If you do not have a license key, continue by clicking “I don’t have a product key.”
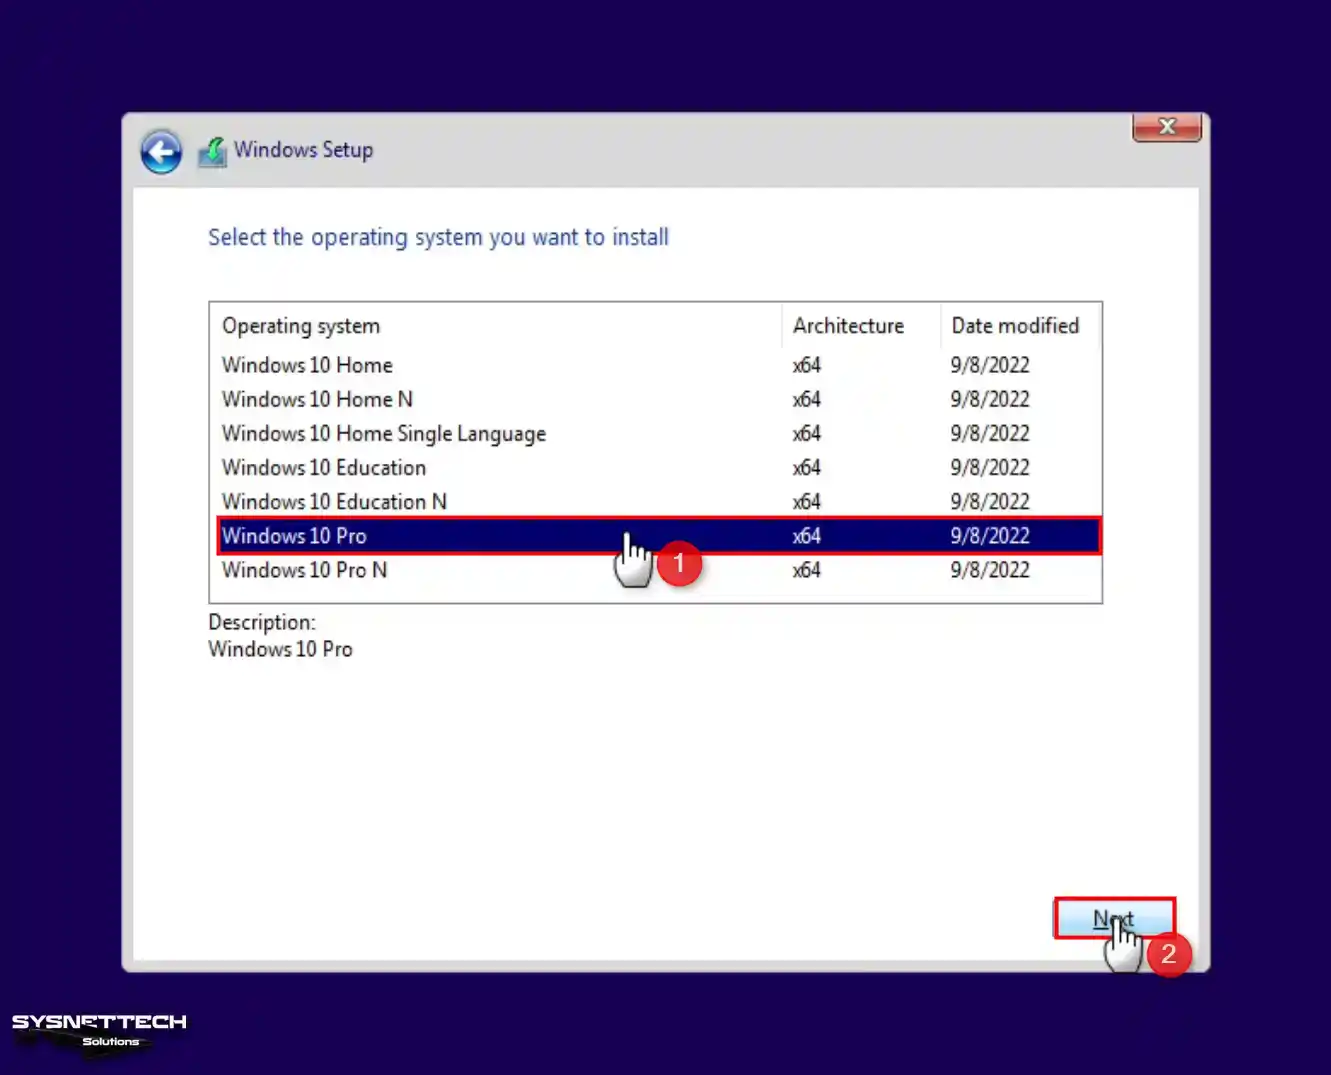
Step 4
First, select the version of Windows you want to install. Then, you can continue with this process by clicking on the “Next” button.
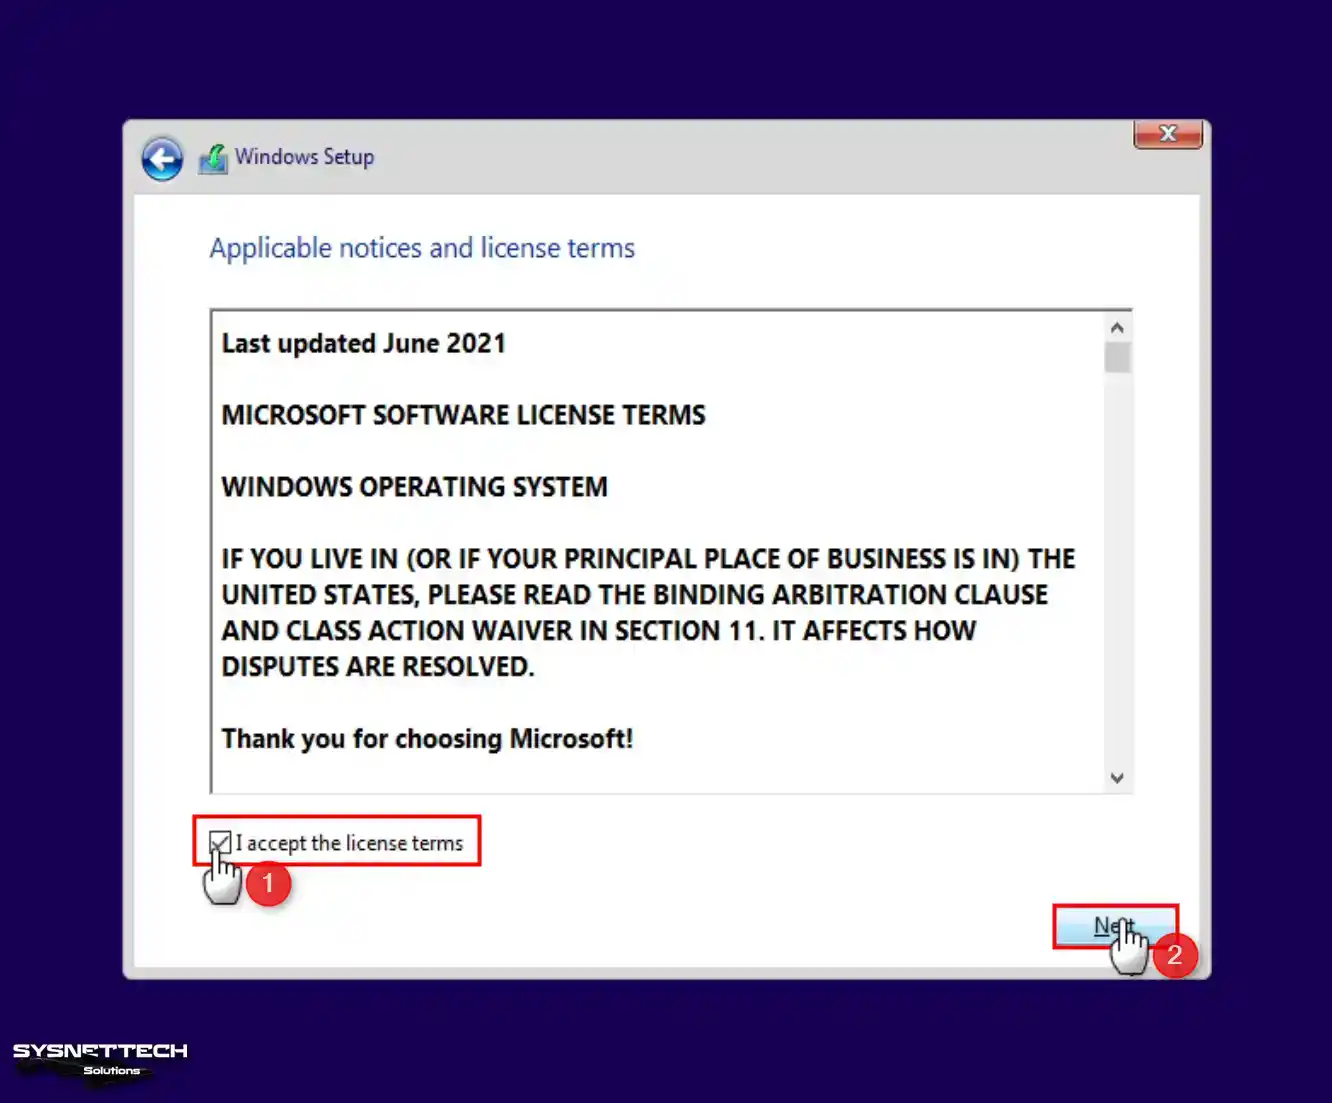
Step 5
Read and accept the Microsoft license agreement and click Next again.
Step 6
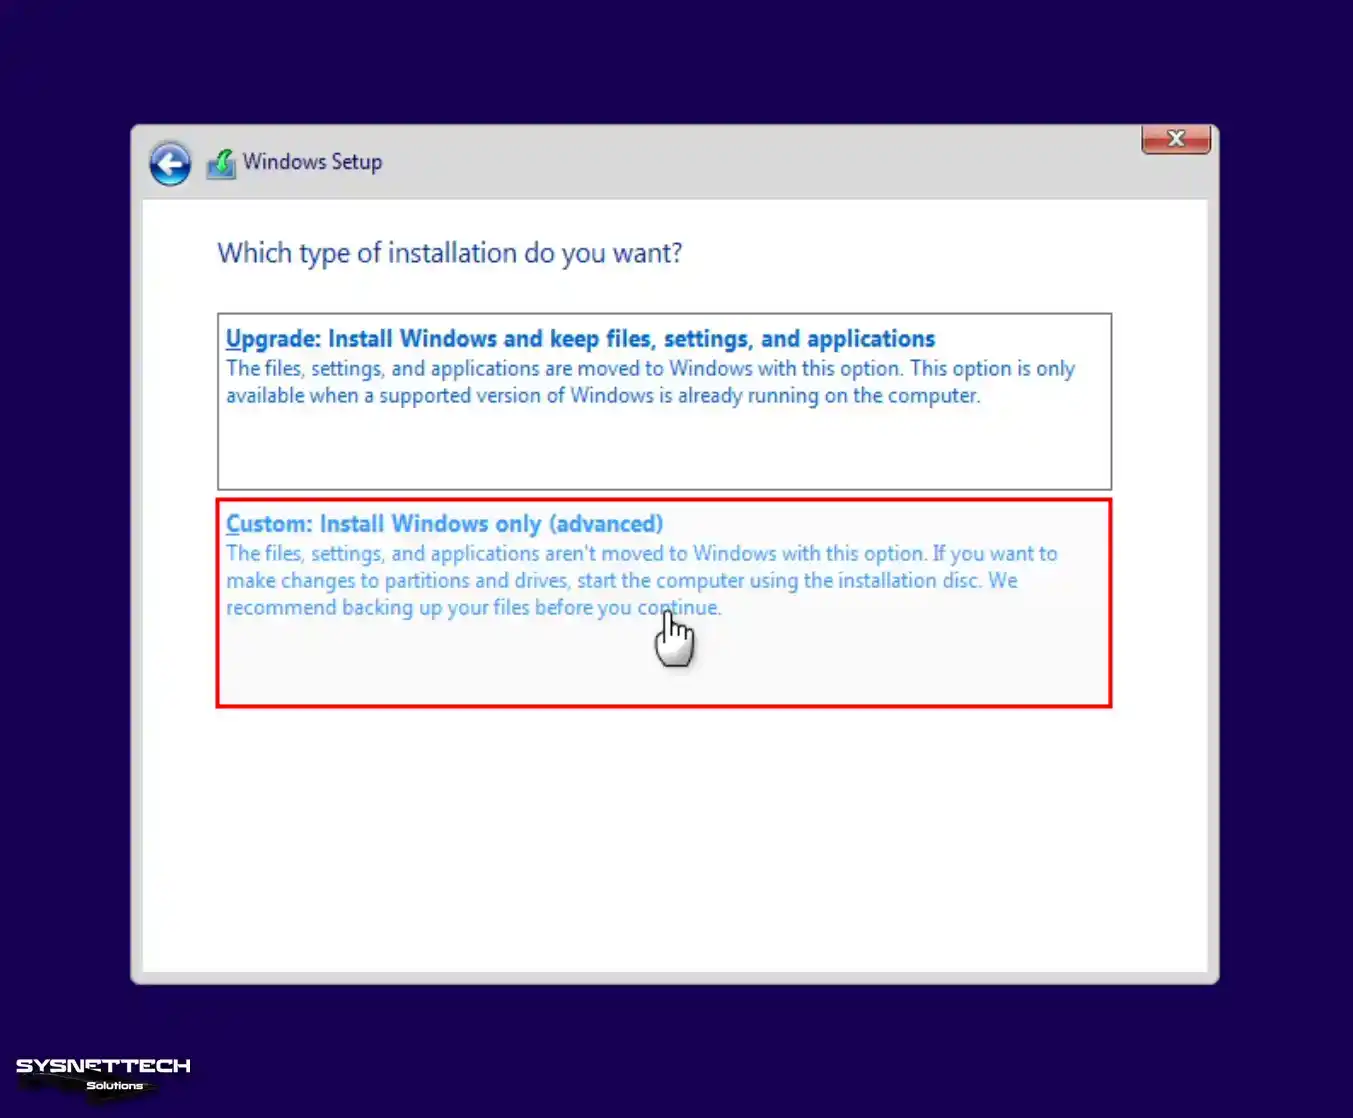
Click Install Windows Only to install it as a new operating system.
Step 7
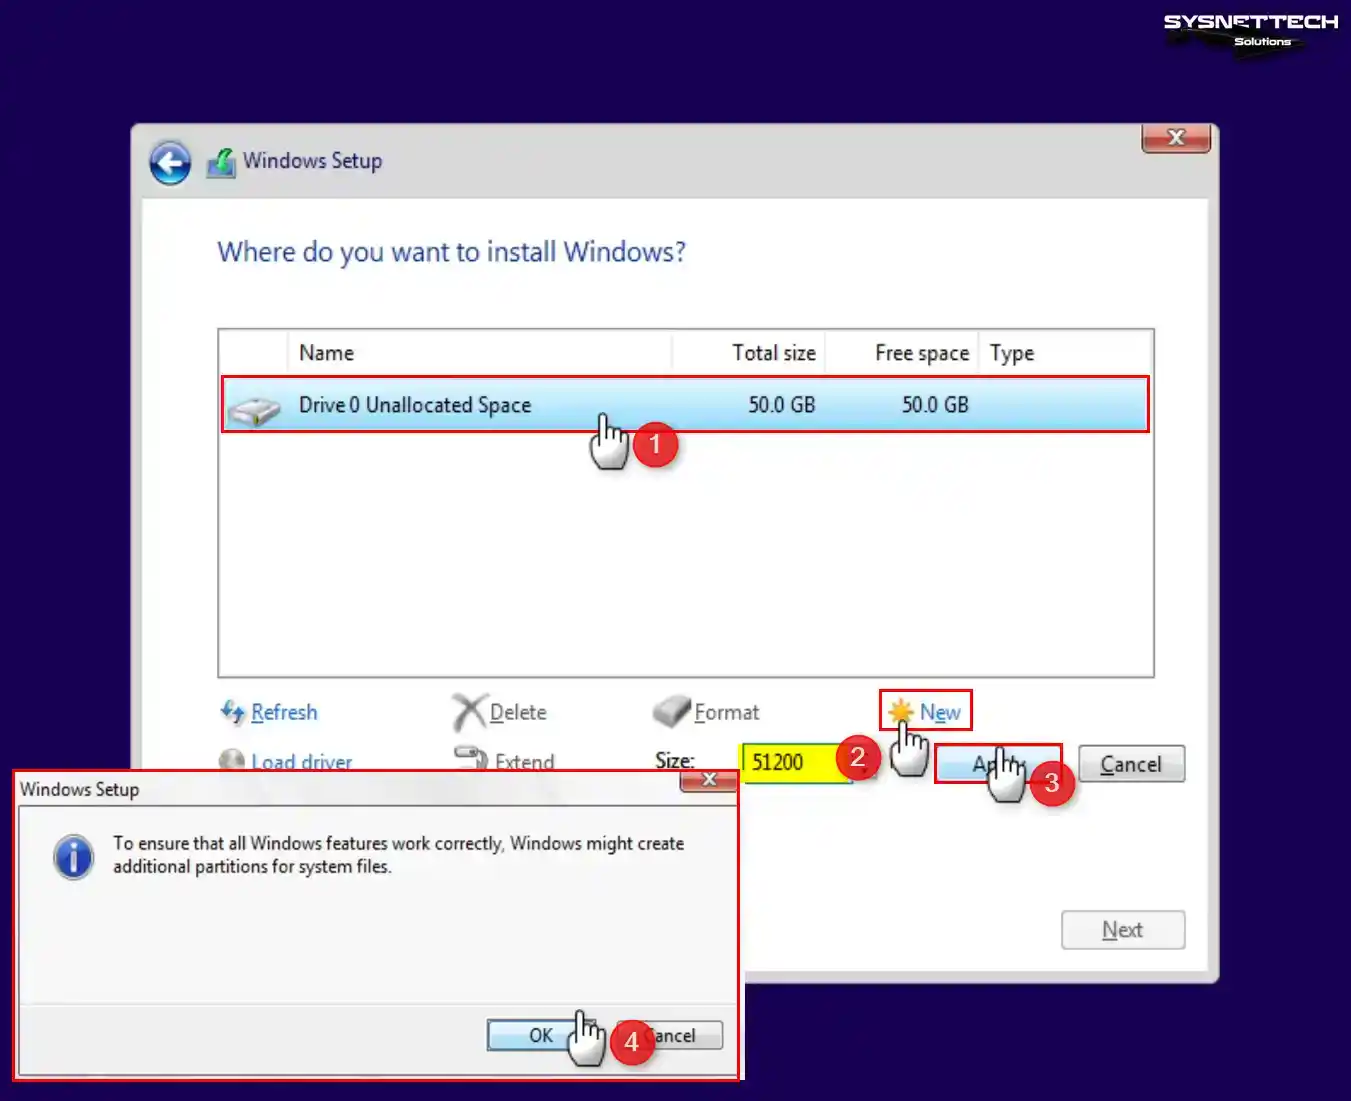
In the disk configuration window, select the unallocated space. Then, click “New”. Click “Apply” to confirm the automatically set disk space.
Windows may create additional space for the system to work correctly. You will see this notification. On this screen, click “OK” and continue.
Step 8
Select Partition to install the system on the partitioned disk space and continue with Next.

Step 9
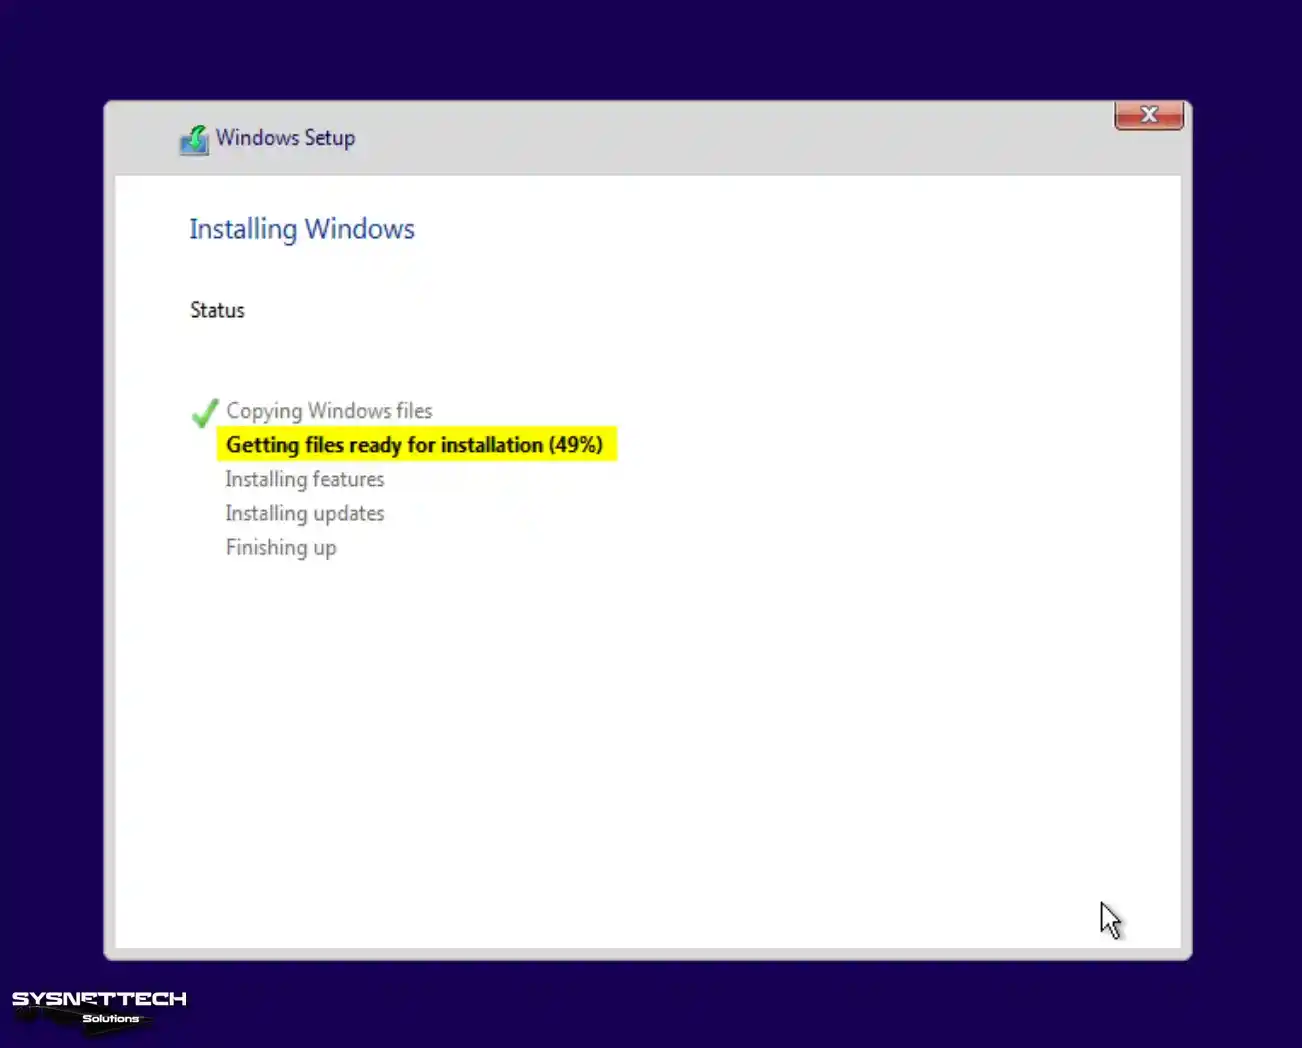
Wait while the setup gets ready to install Windows 10.
Step 10
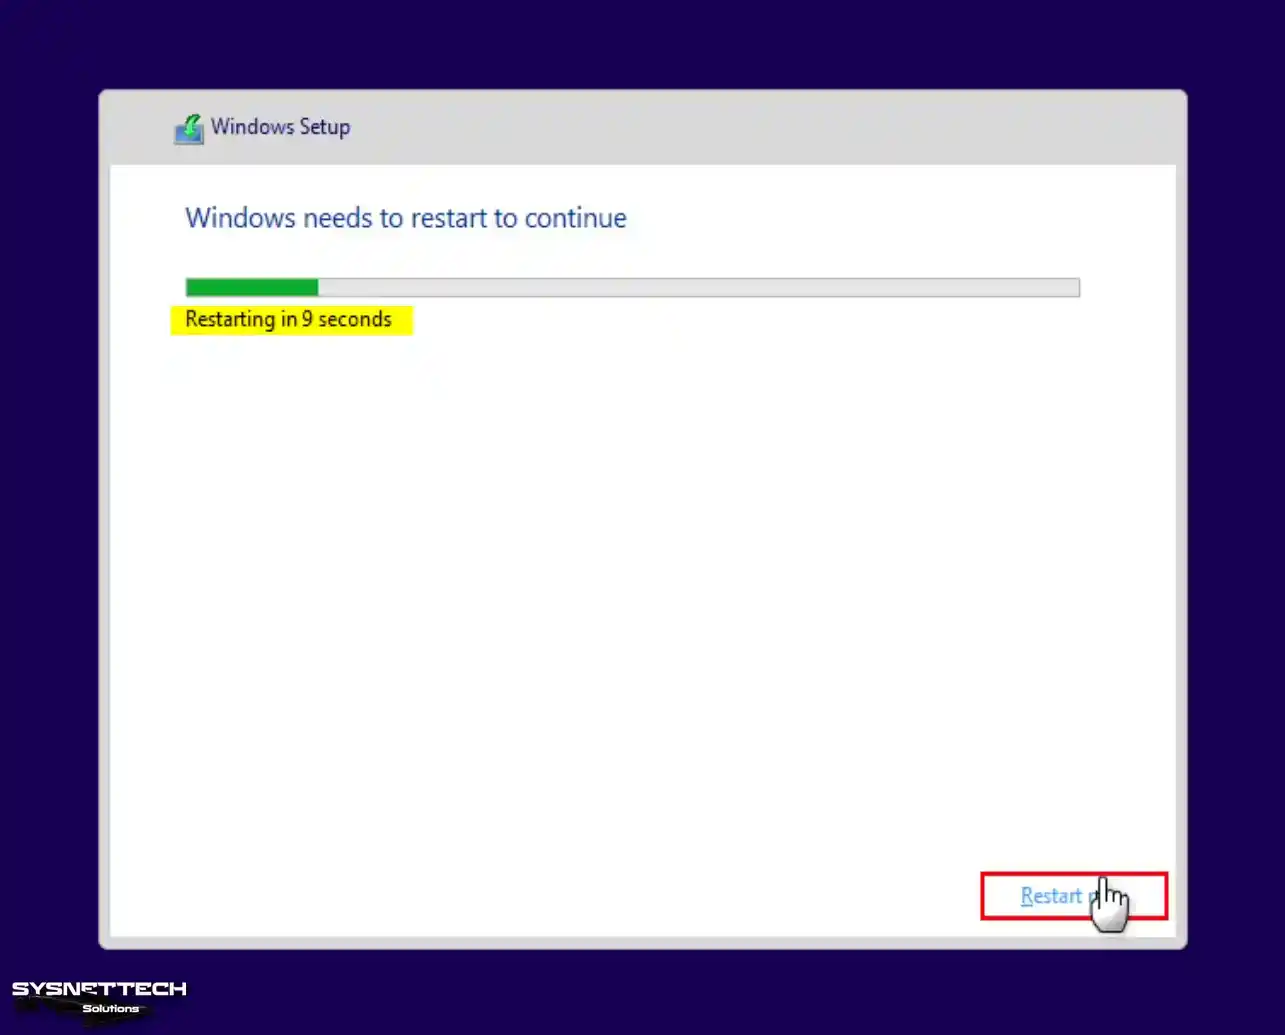
The installation wizard will restart your system after the specified time. However, if you do not want to wait this time, click the “Restart Now” button. This way, you can restart immediately.
Step 11
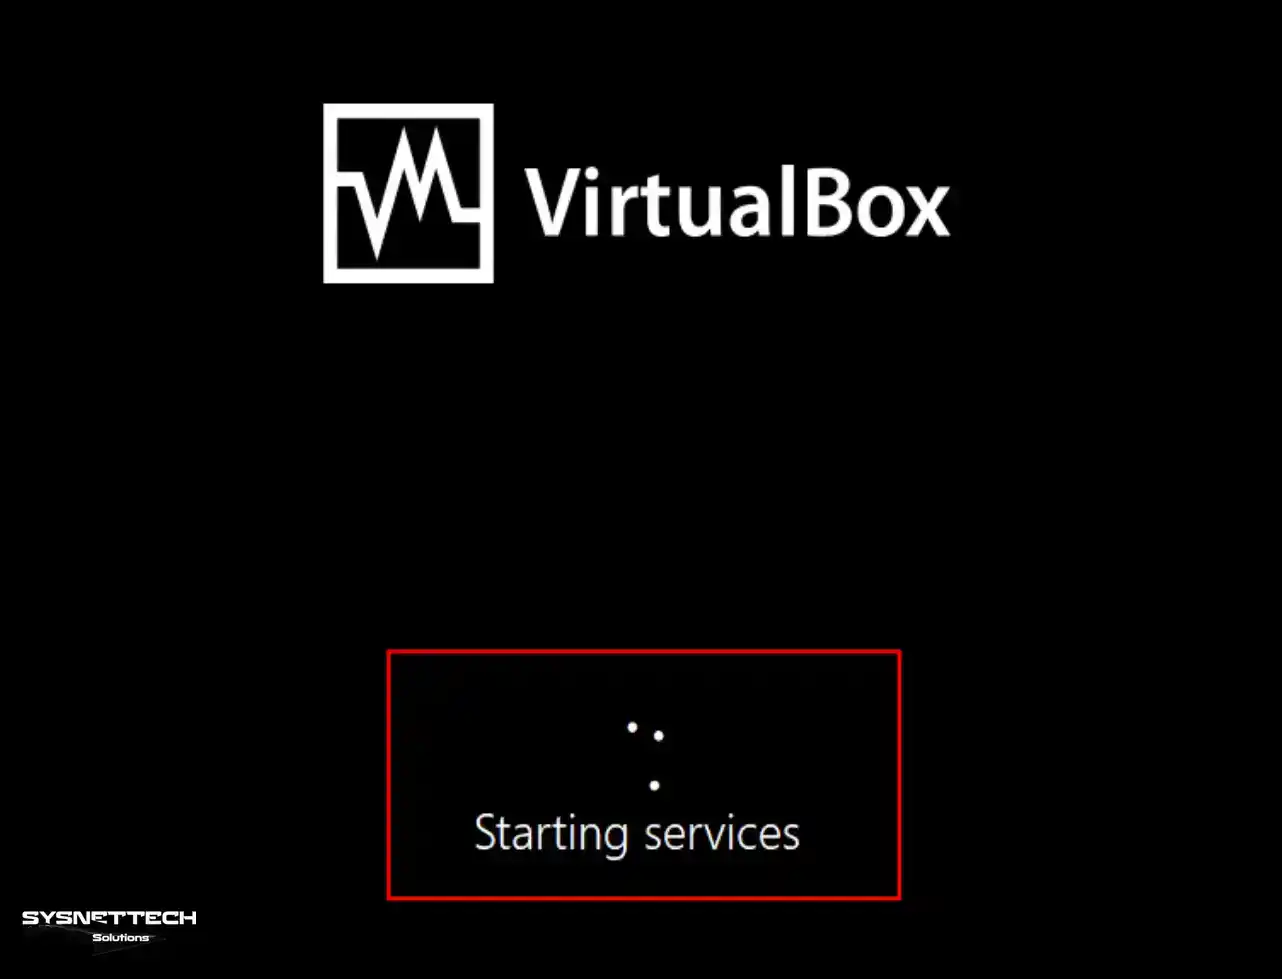
After the system has copied the files, wait while the services start.
Step 12
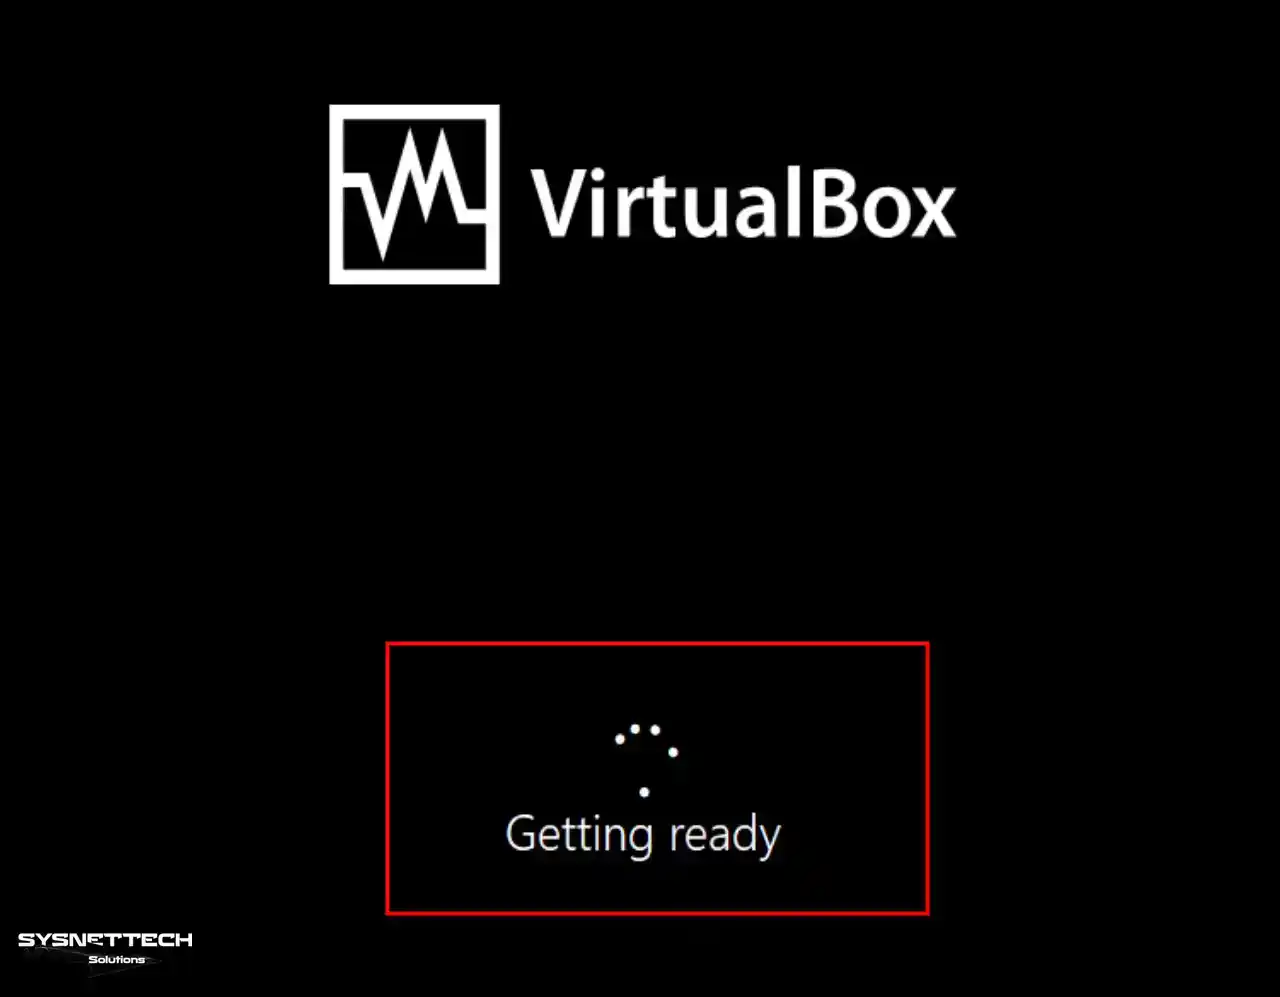
Wait while the devices are being prepared.
Step 13
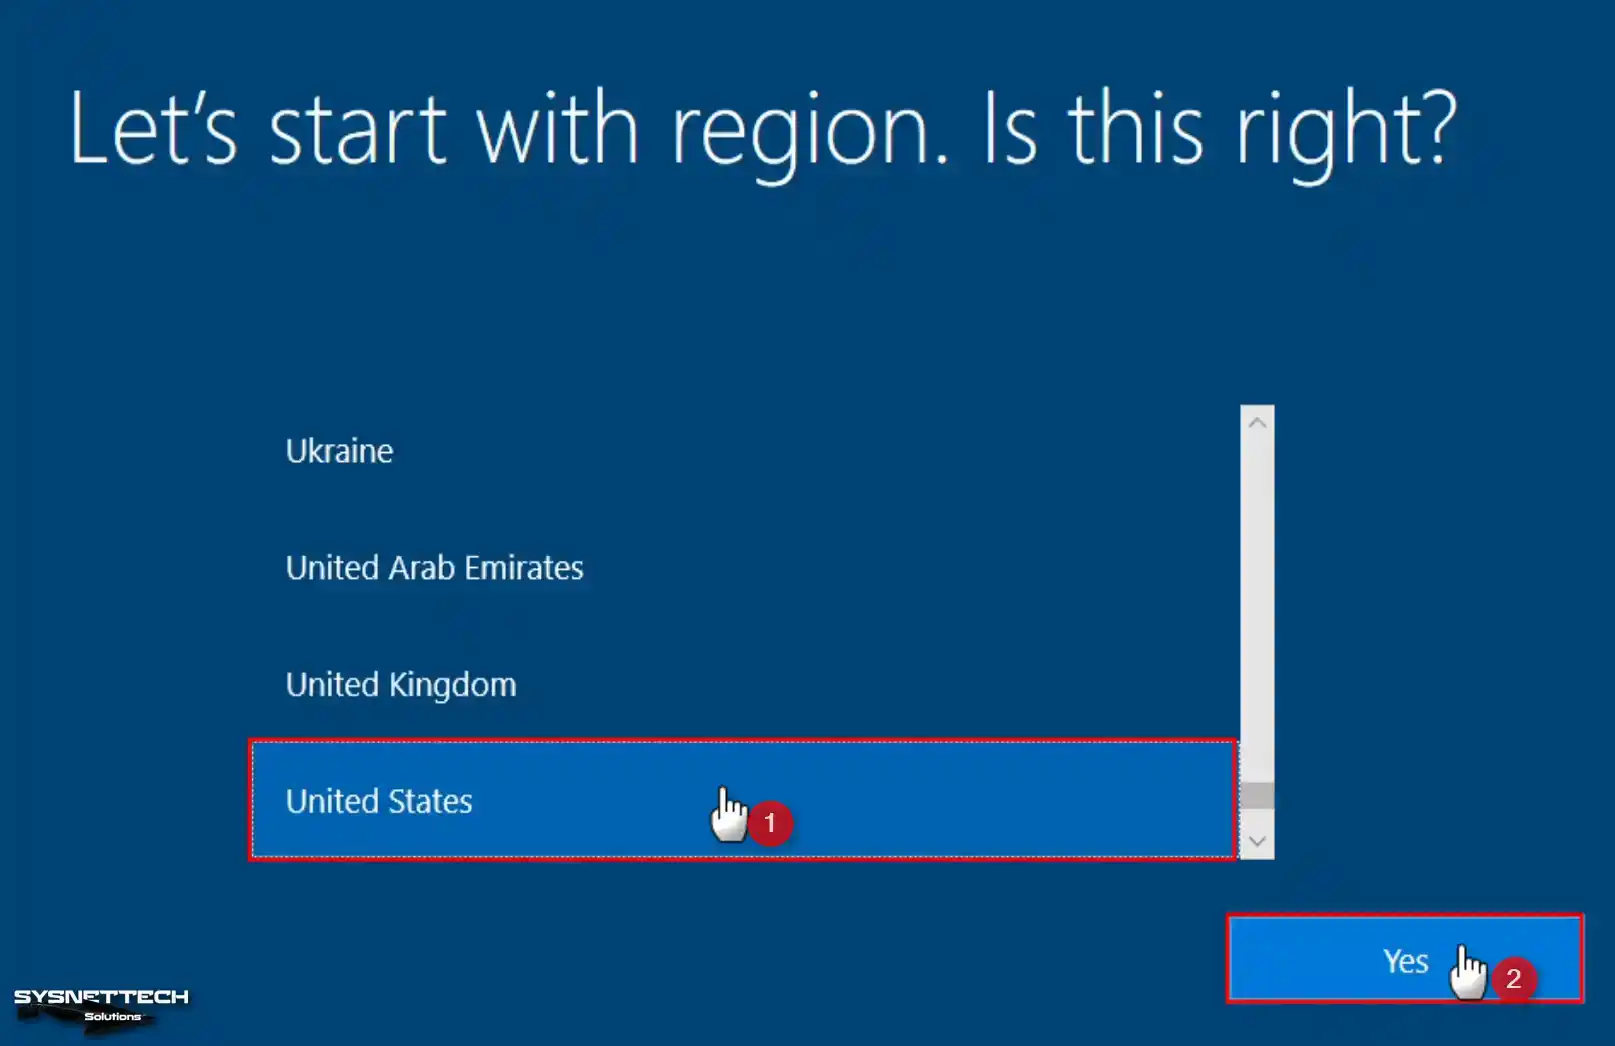
Configure the region settings in Windows 10 according to the location where you live. Then, you confirm the settings by selecting “Yes”.
Step 14
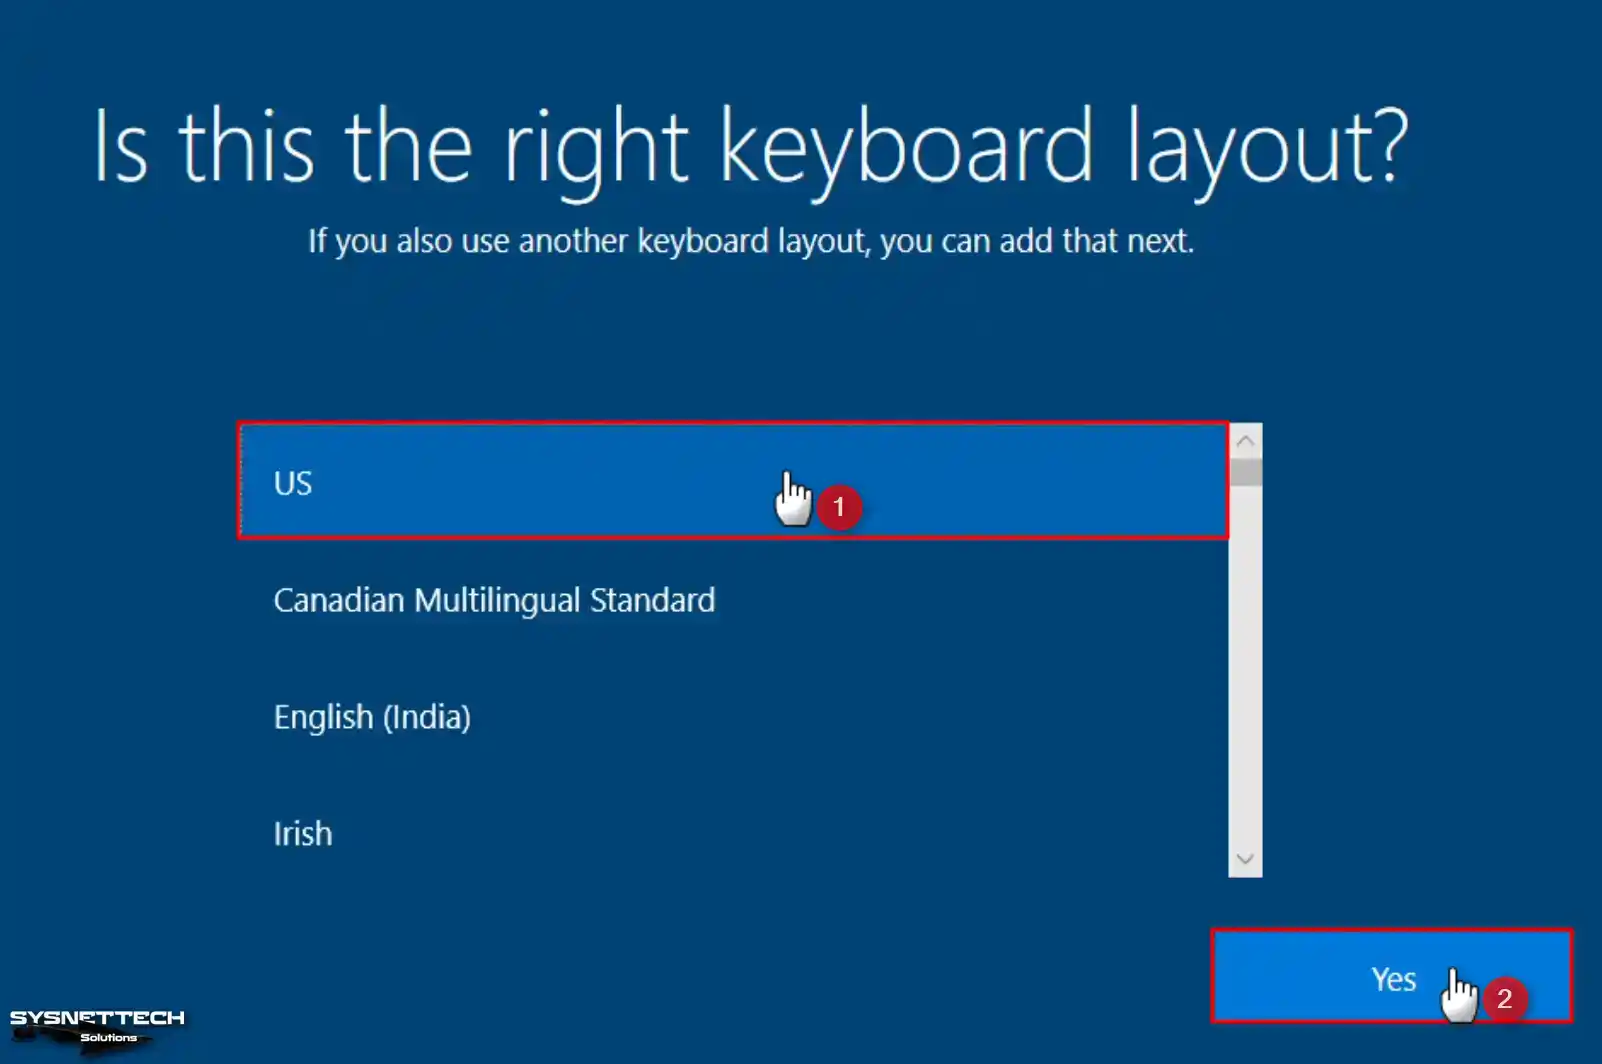
If you want to change your keyboard layout in the setup screen, follow this step. First, go to the “Keyboard Layout” screen. Then, you can change the necessary settings here. In this way, you can update the keyboard design.
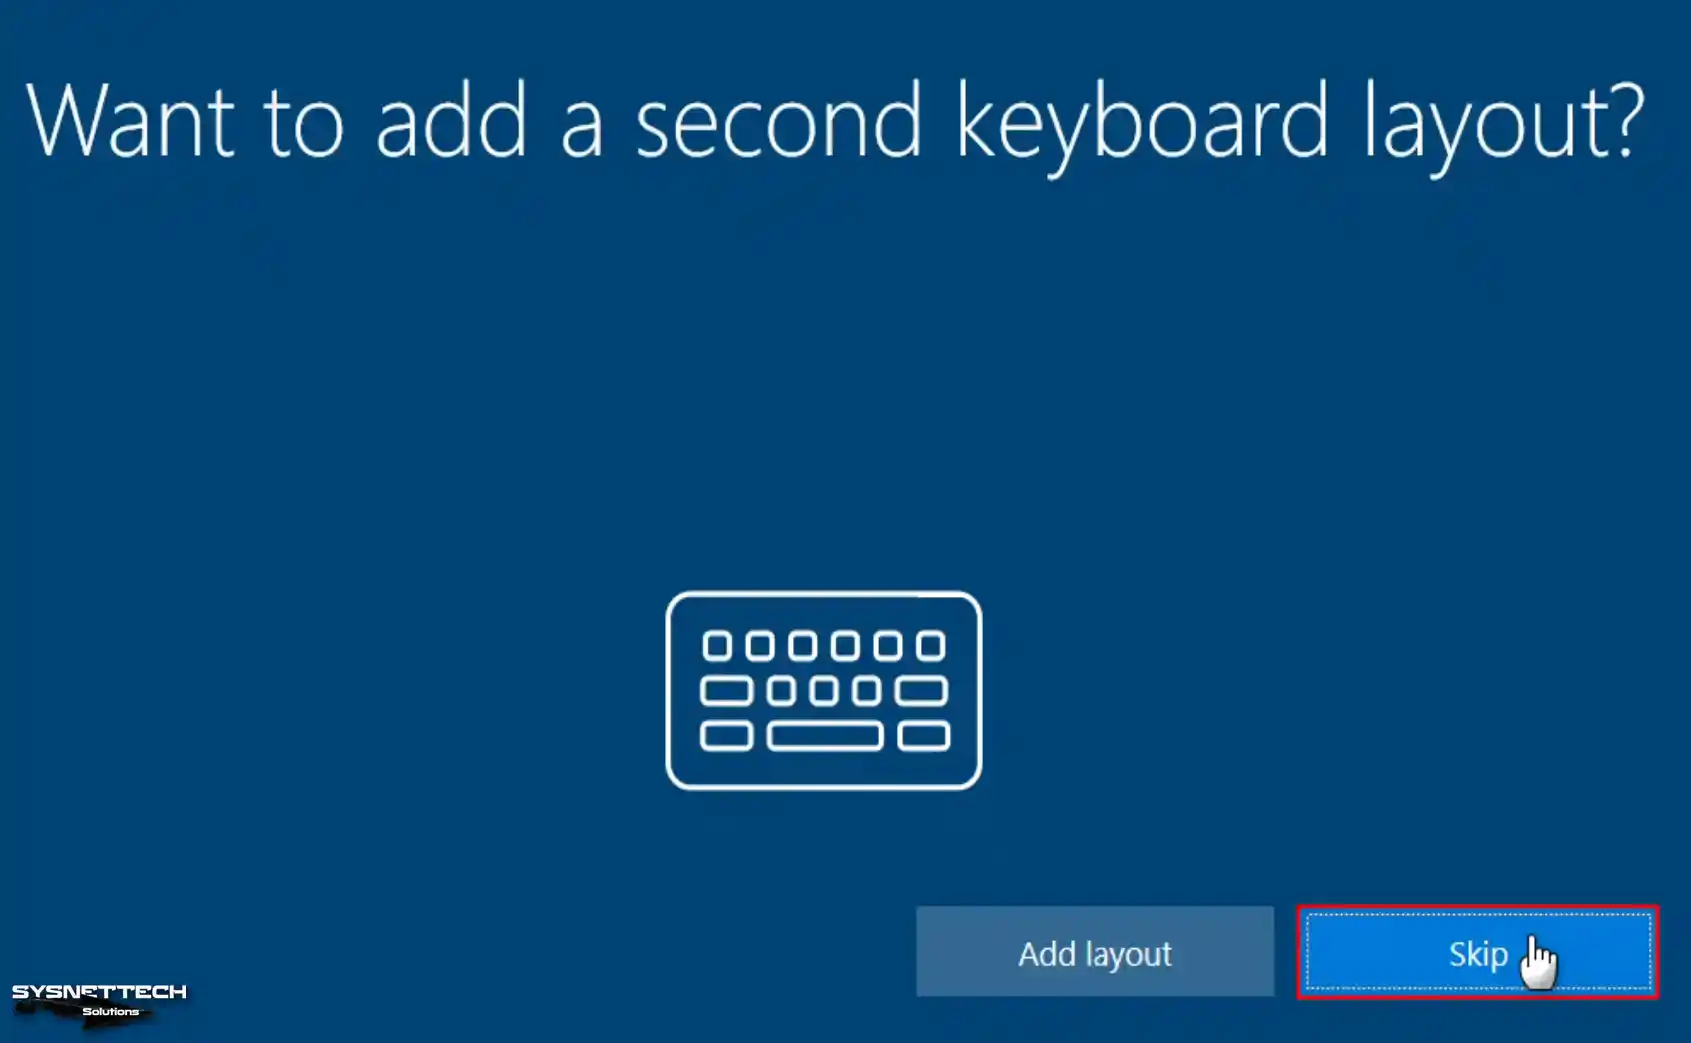
Step 15
If you want to add a second keyboard layout, click the Add Layout button. However, if you do not wish to add a design, you can click the Skip button. As a result, you can continue with this step.
Step 16
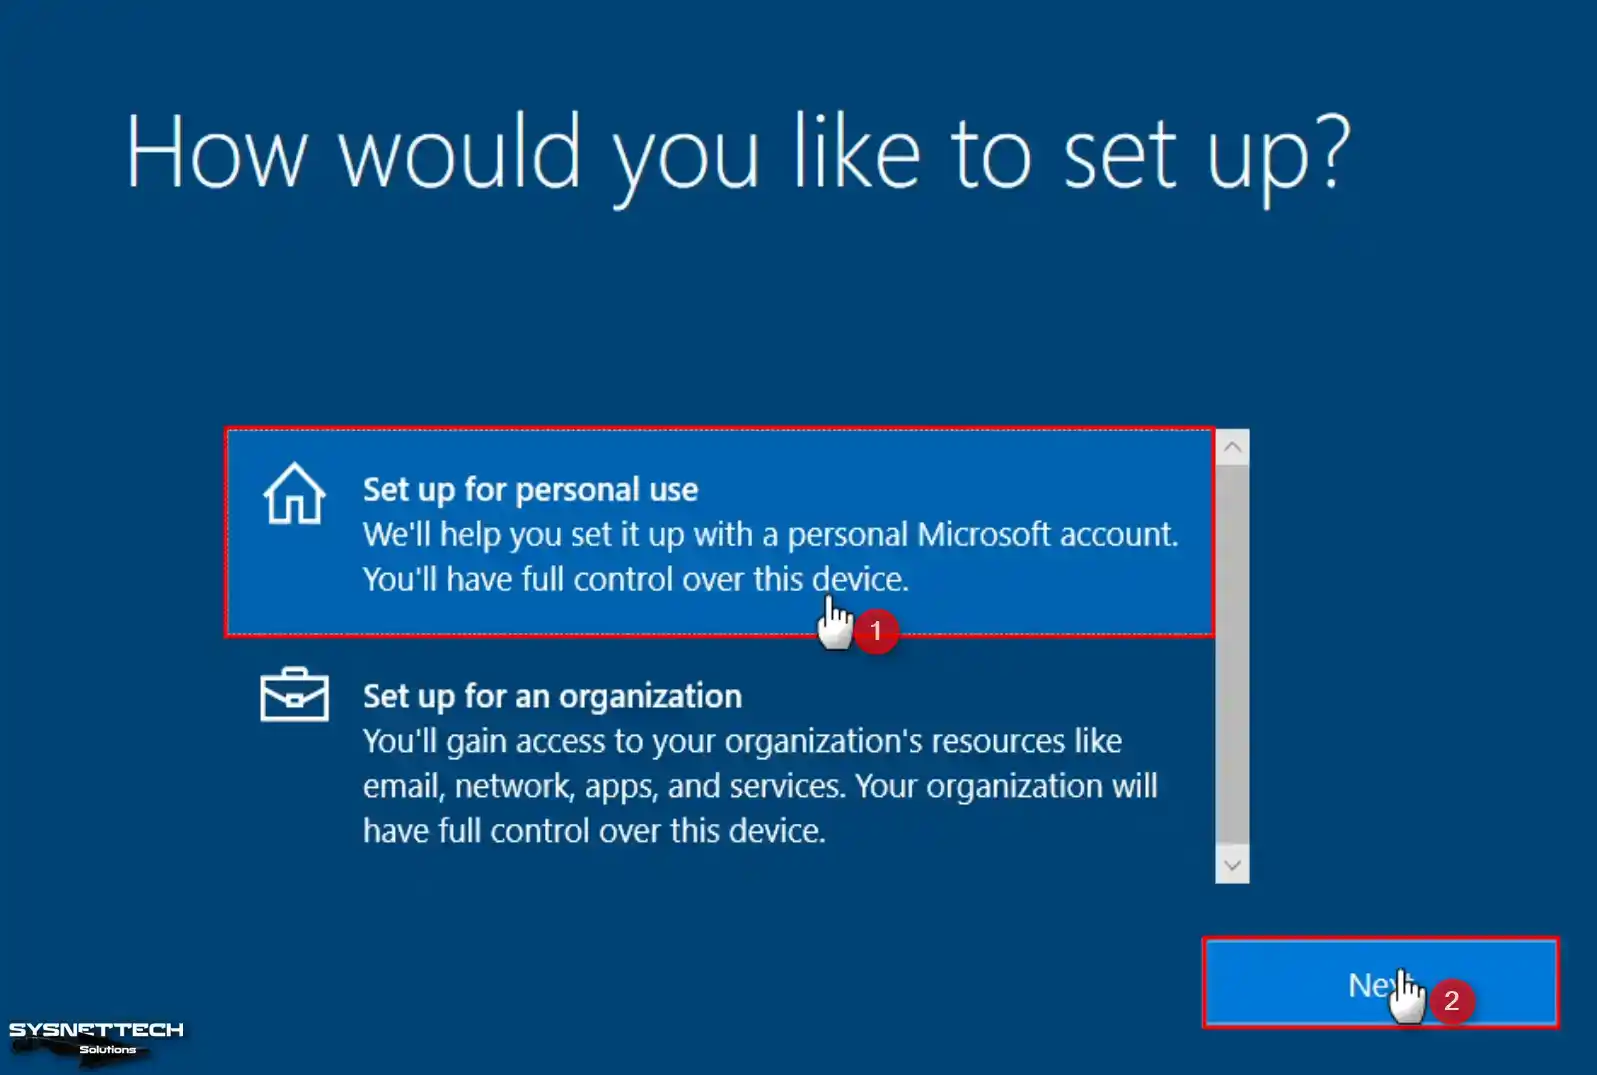
In this window, you can choose how you will use your emulated system. If your VM will be used in an organization, select the option “Set up for an organization.” This will make it a member of the Active Directory environment.
However, you can also use your VM with a local account without a Microsoft account. However, you should select the option “Set up for personal use.”
Step 17
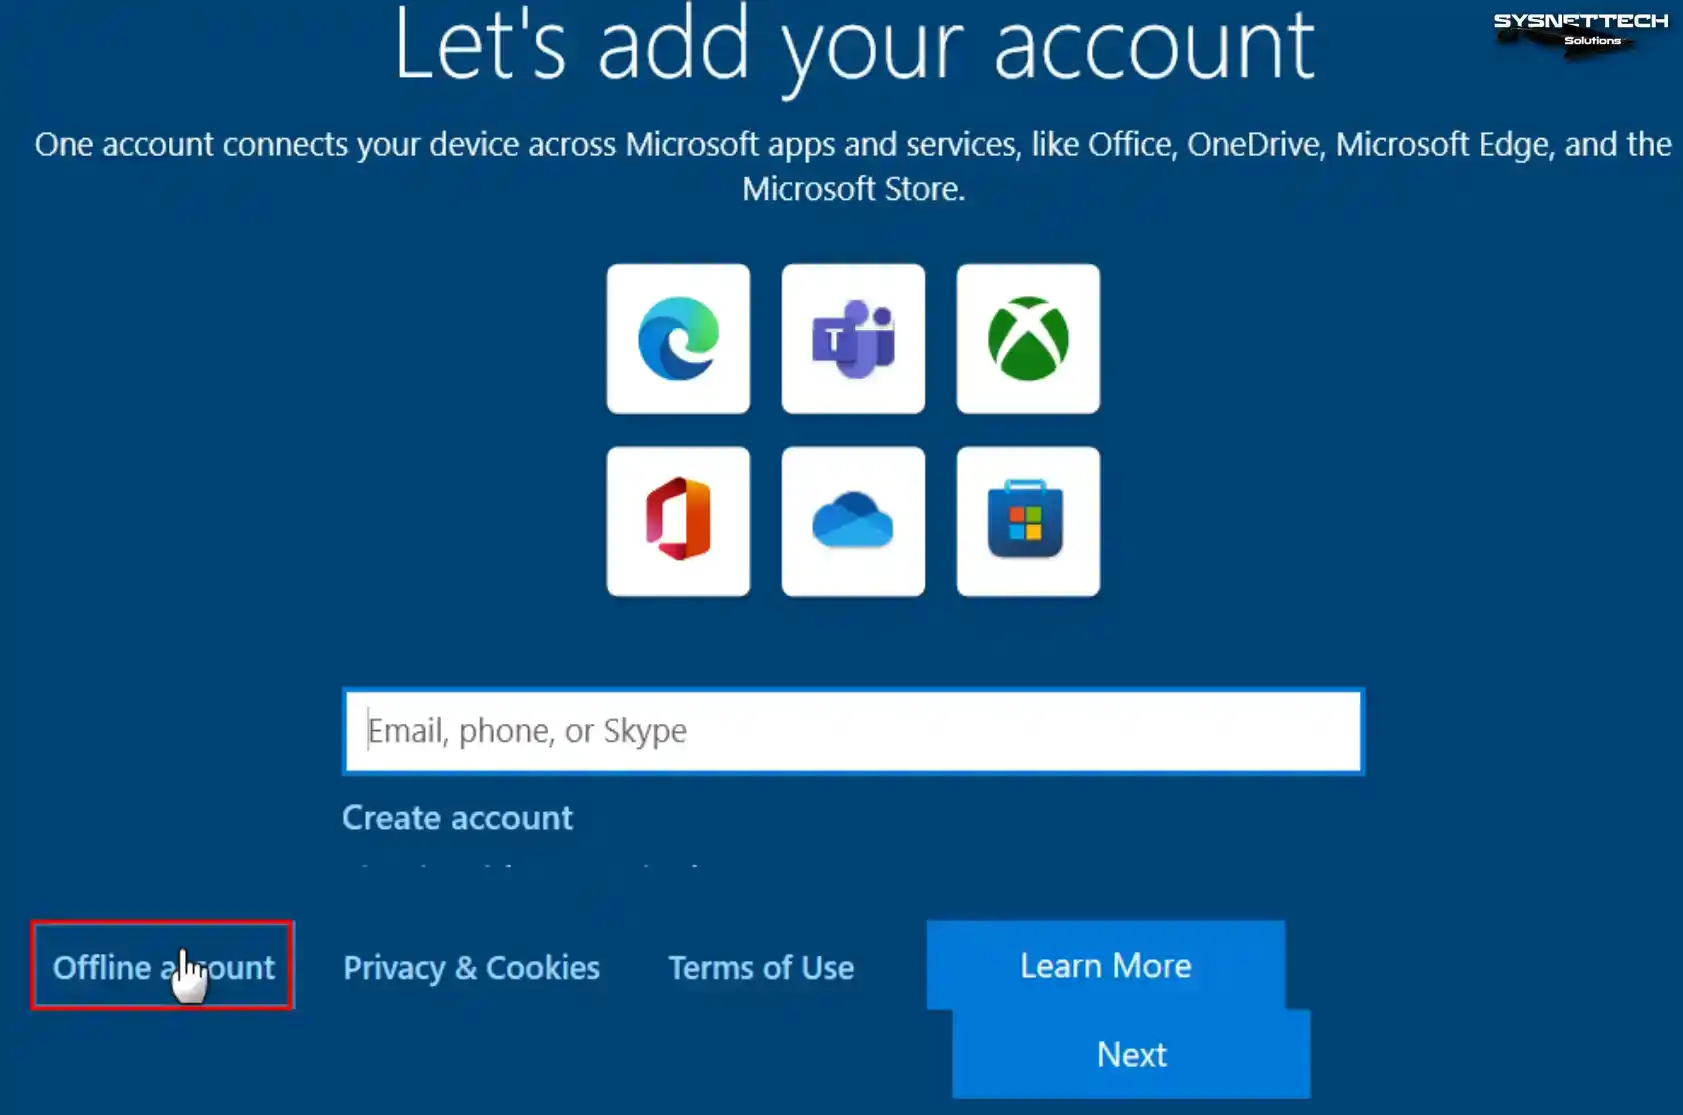
If you are going to use a guest system synchronized with a Microsoft account, you can log in with your account. If you do not own a Microsoft account, you can create a new account with the Create Account option.
However, you may want to add an account without a Microsoft account or later. Now, proceed with the Offline Account option on this screen.
Step 18
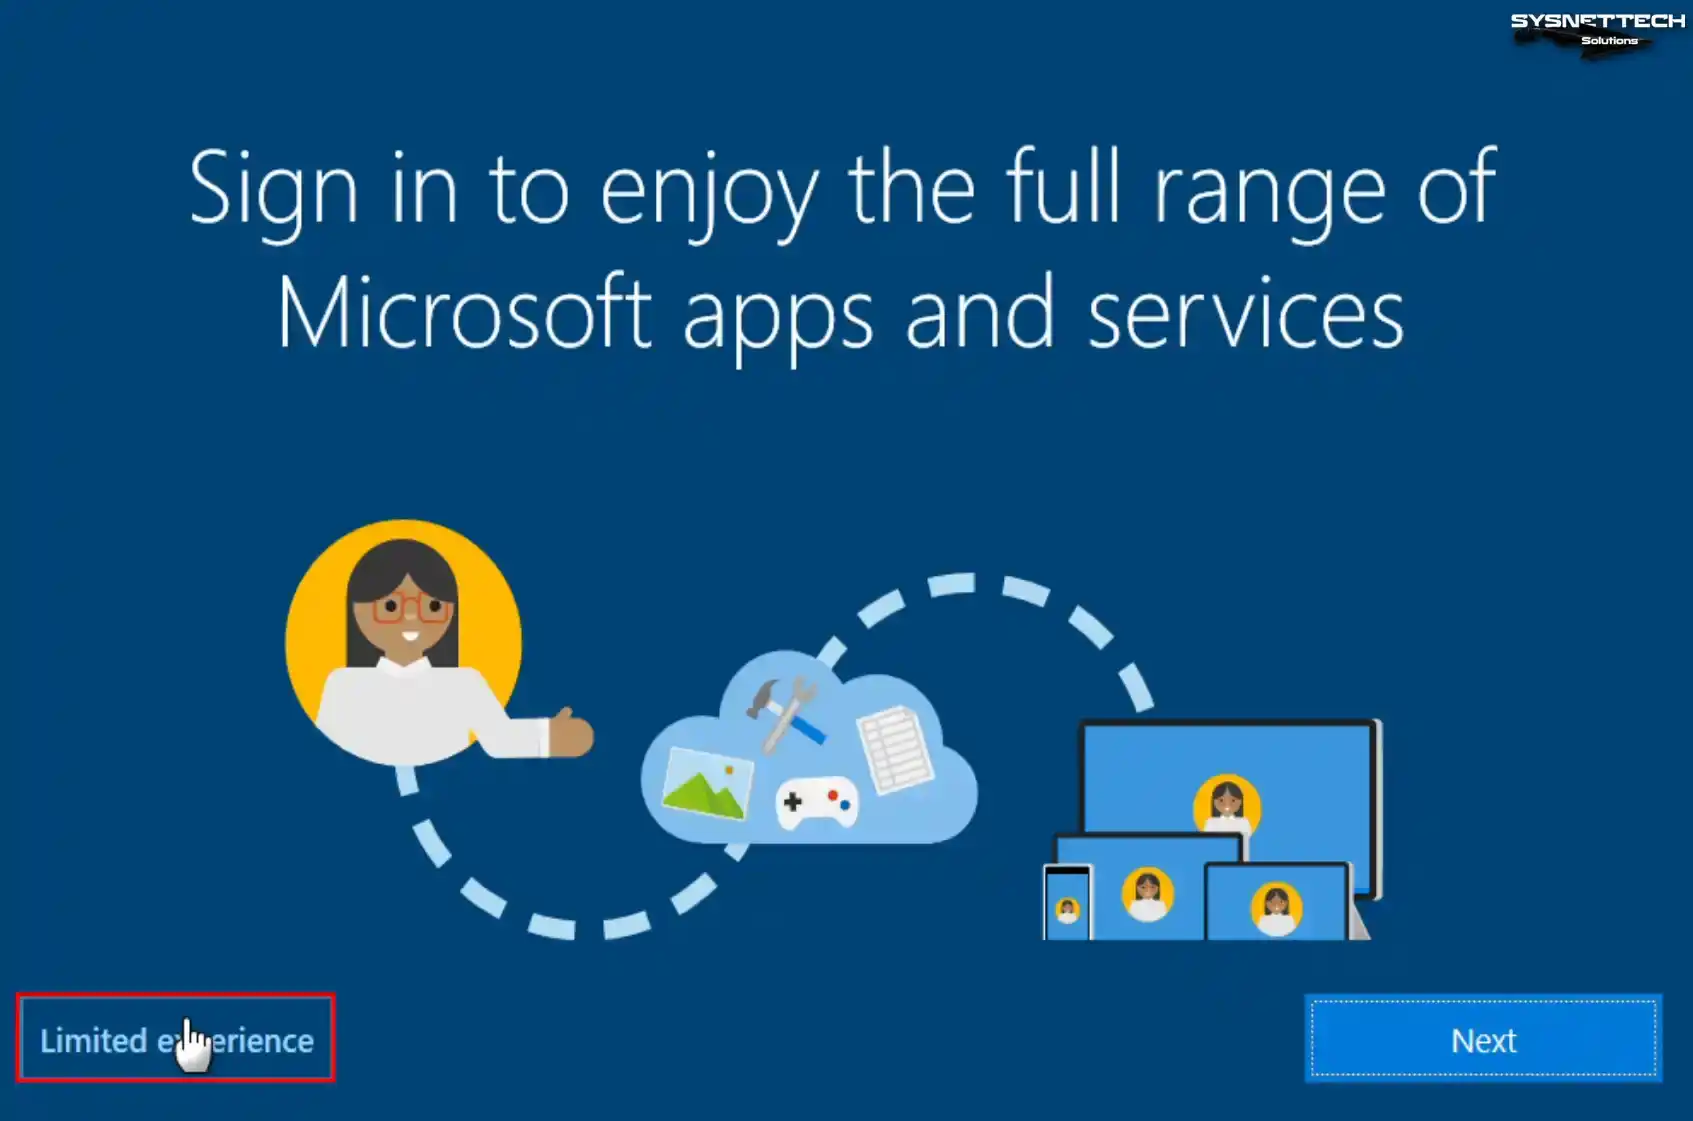
Windows suggests using cloud services. With a Microsoft subscription, you can easily access your apps on any device.
If you don’t want to use these services, choose the Limited Experience option.
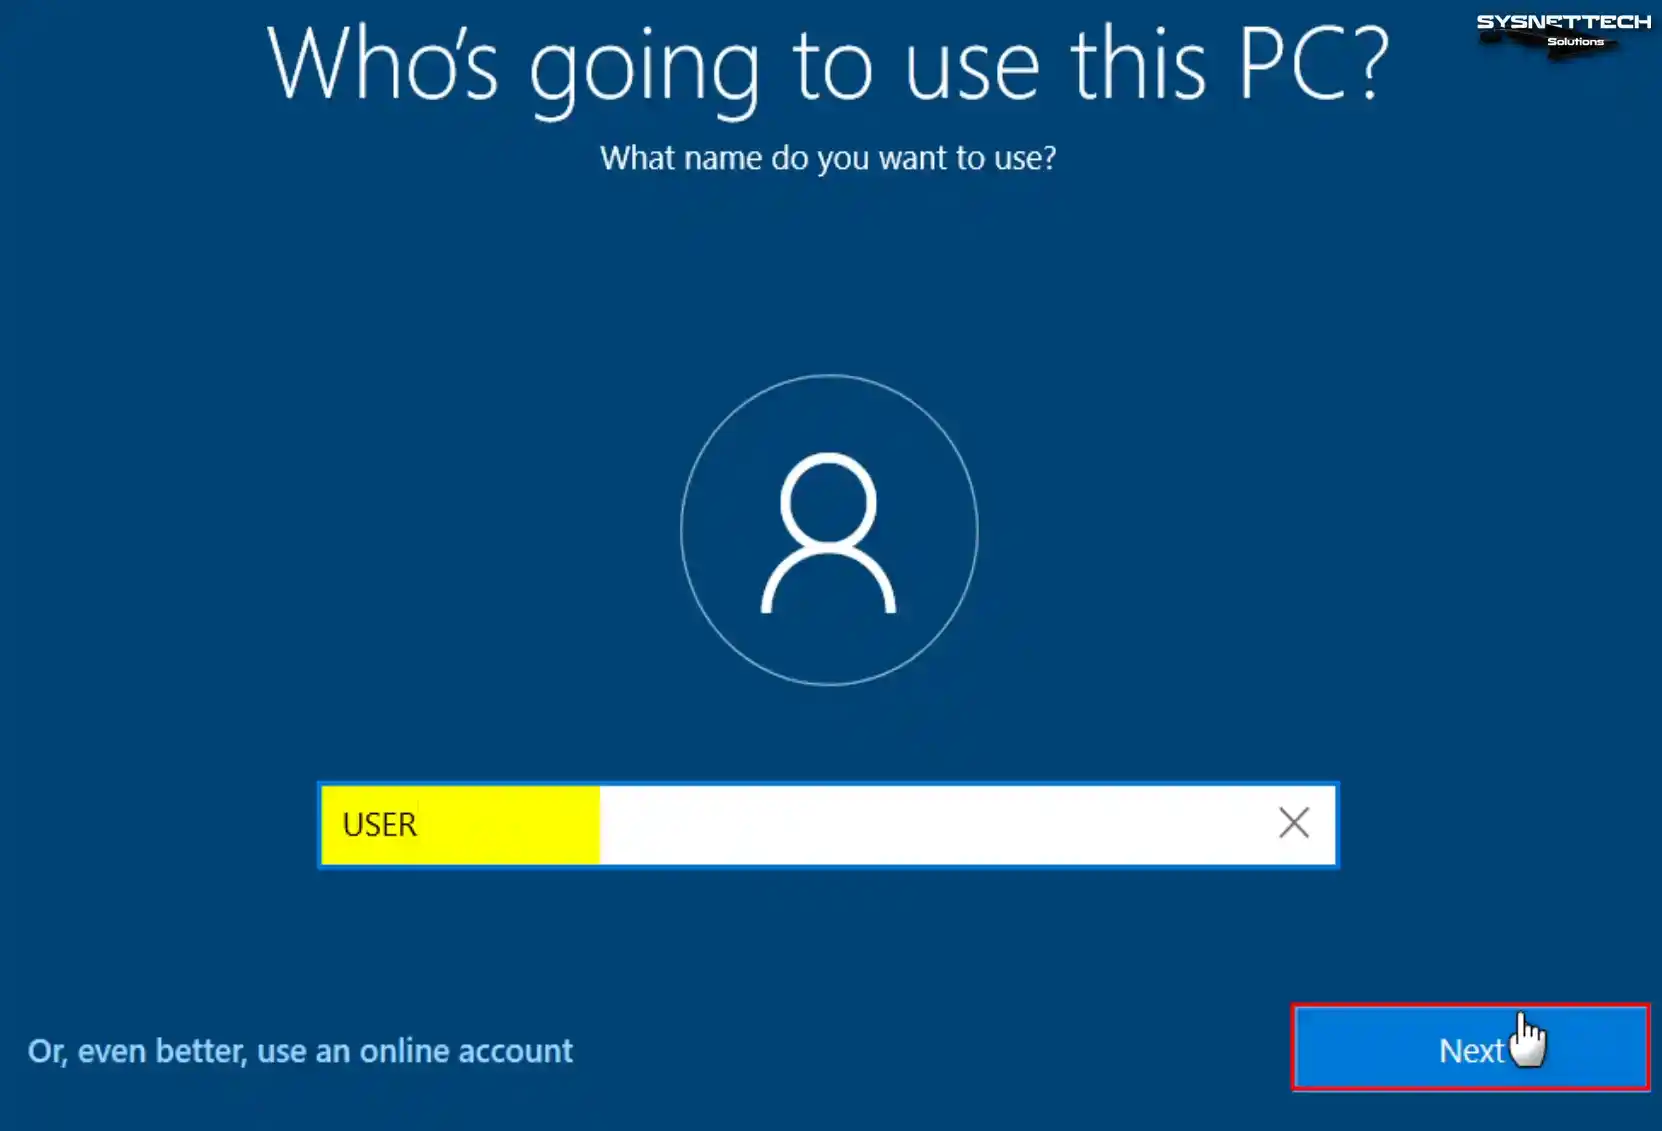
Step 19
Type a new user account name for your Windows 10 OS and click Next.
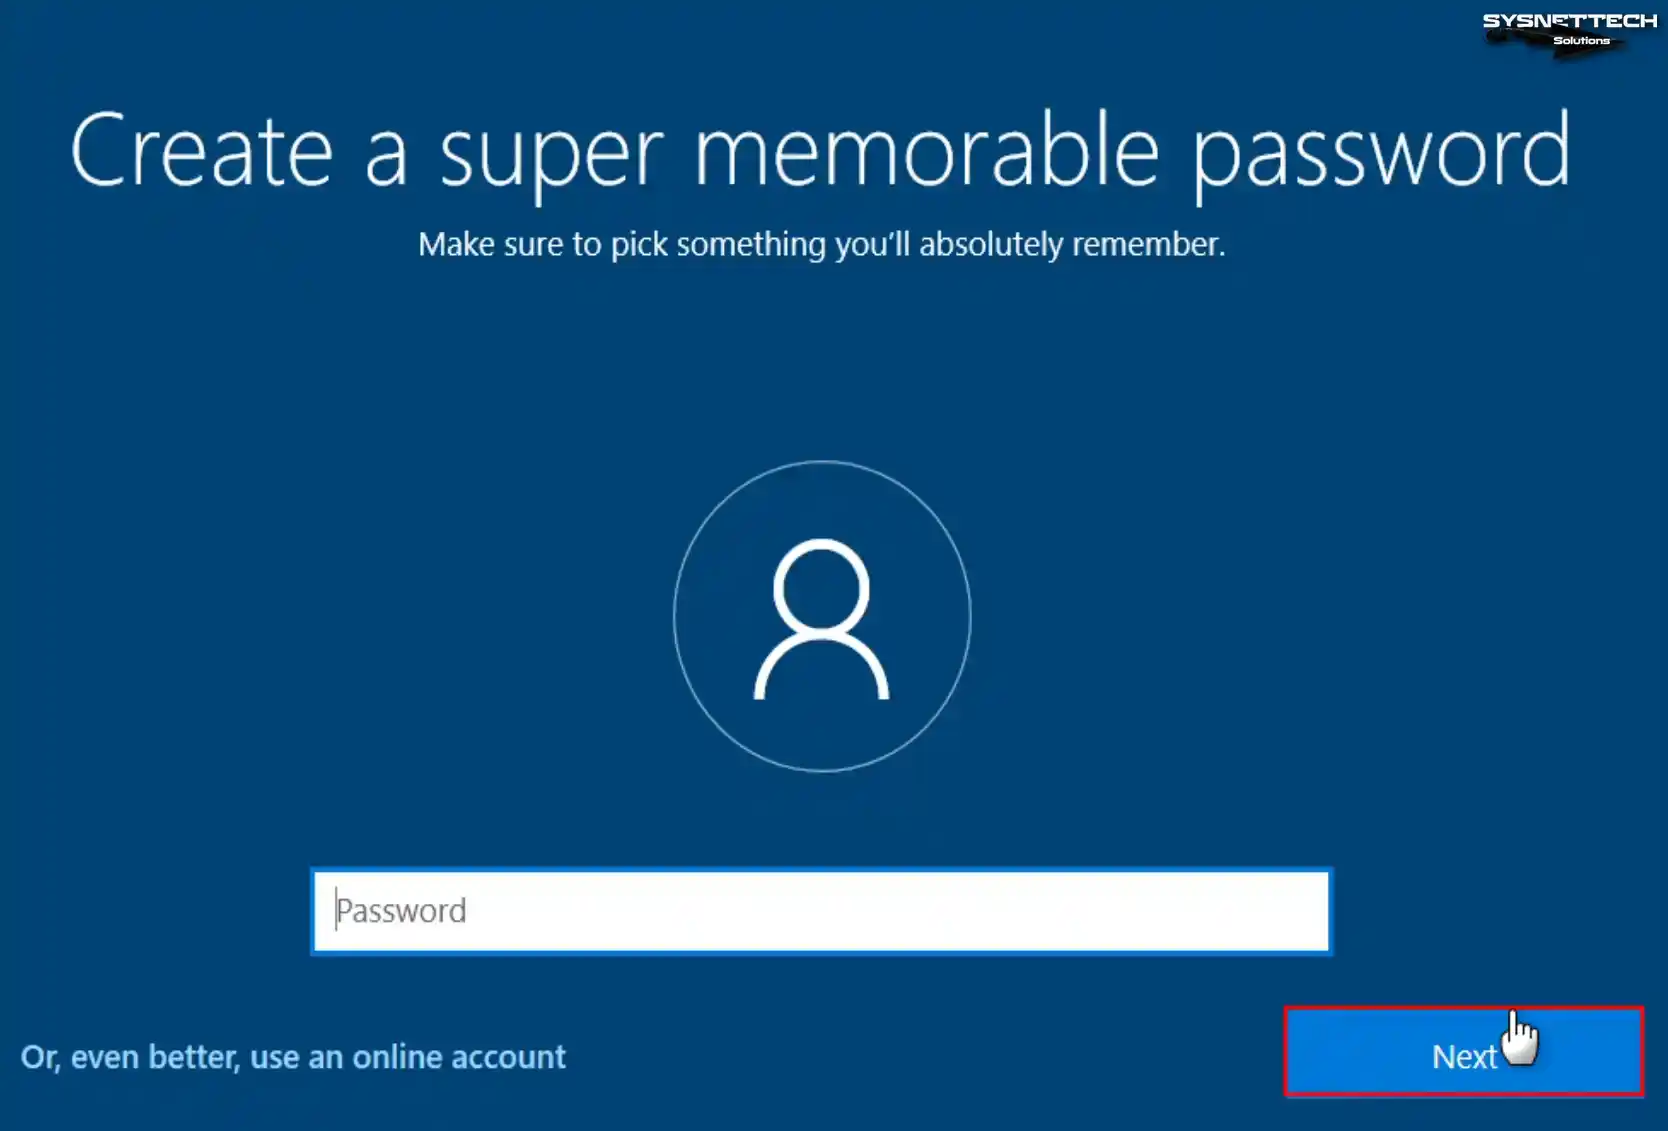
Step 20
Create a strong password to protect your Win10 VM. But make sure it’s also easy for you to remember.
Step 21
You can change your Windows 10 privacy settings to match what you like. Therefore, turn options on or off and adjust them to fit your needs.

Step 22
You can set up your guest PC based on your experience. Choose the category that fits you. If you prefer, you can also click the Skip button.

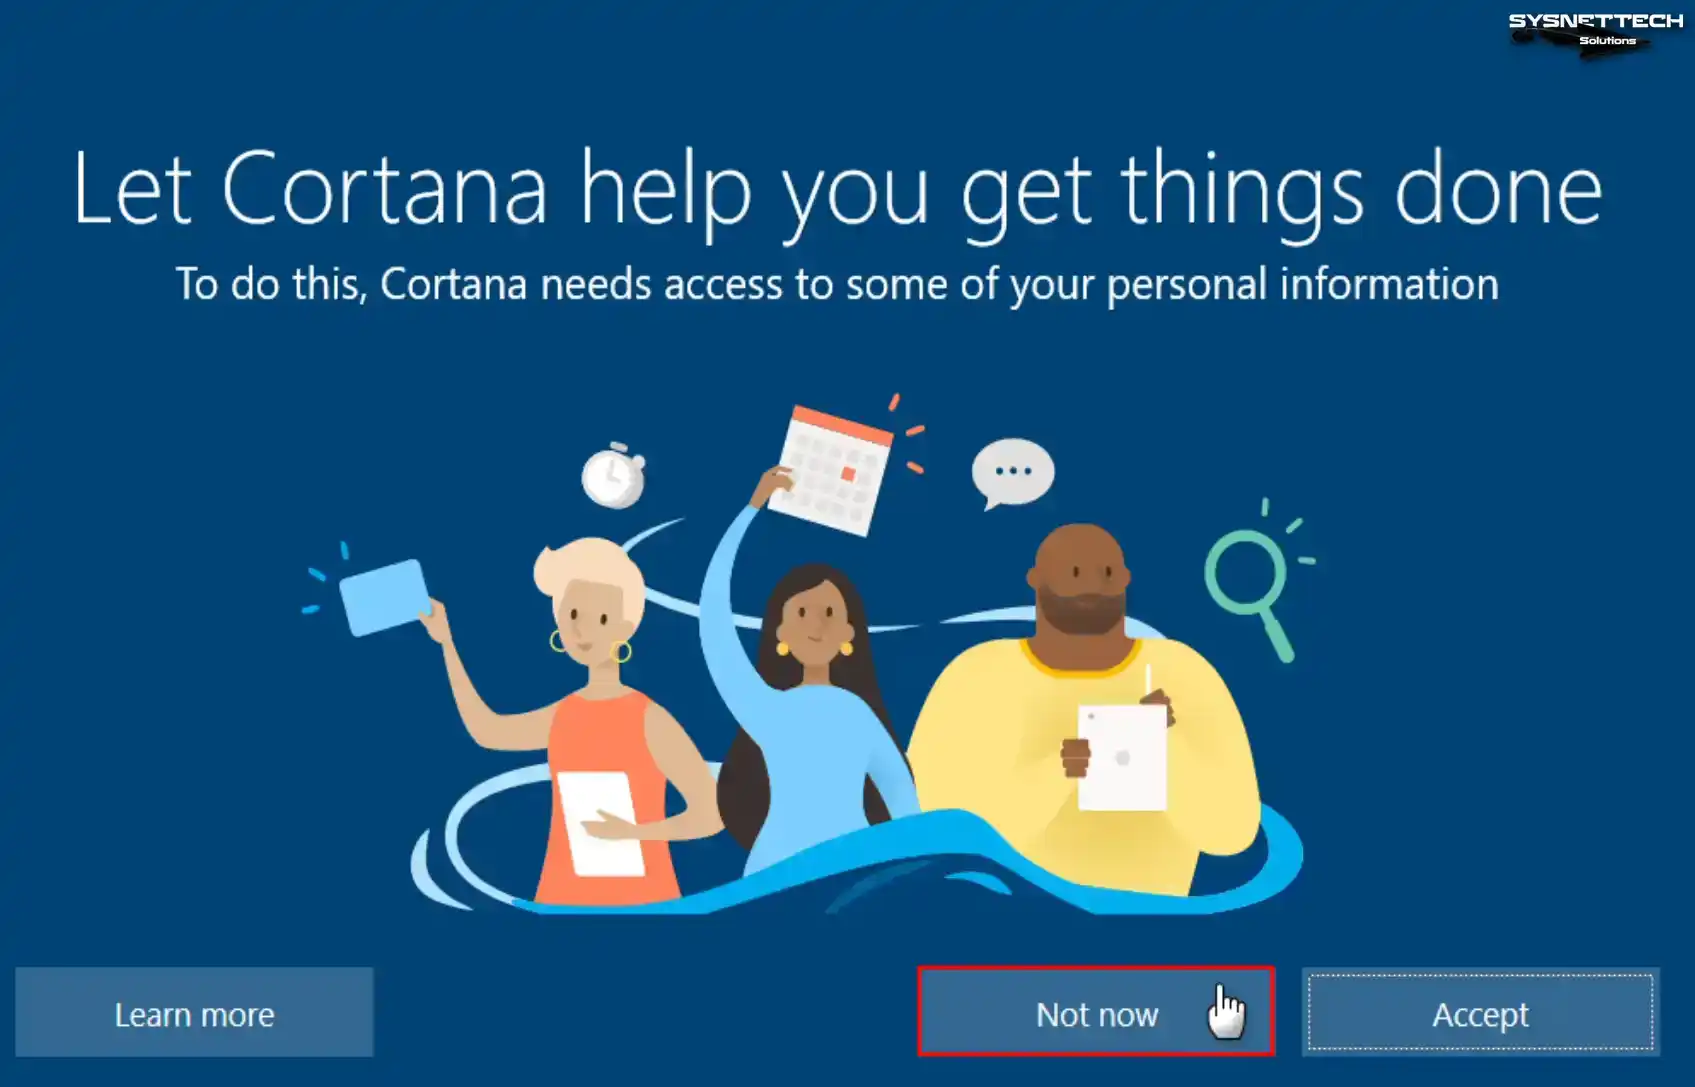
Step 23
If you want to use Cortana, click the Accept button. However, if you do not want to use Cortana, click the Not Now button.
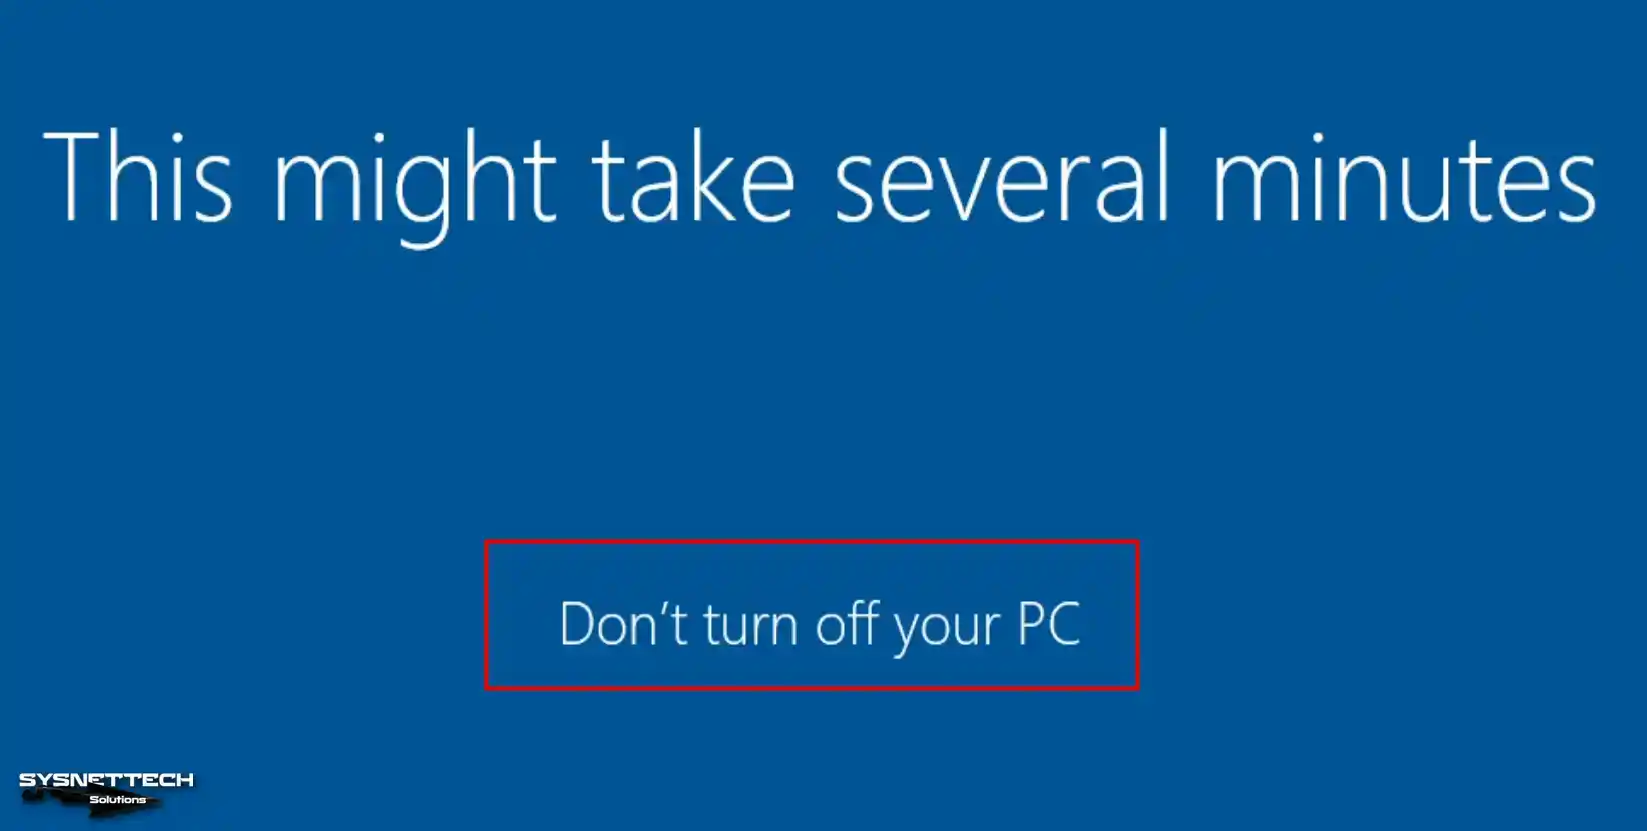
Step 24
Wait while your desktop and required system settings are configured, and do not turn off your VM.
Step 25
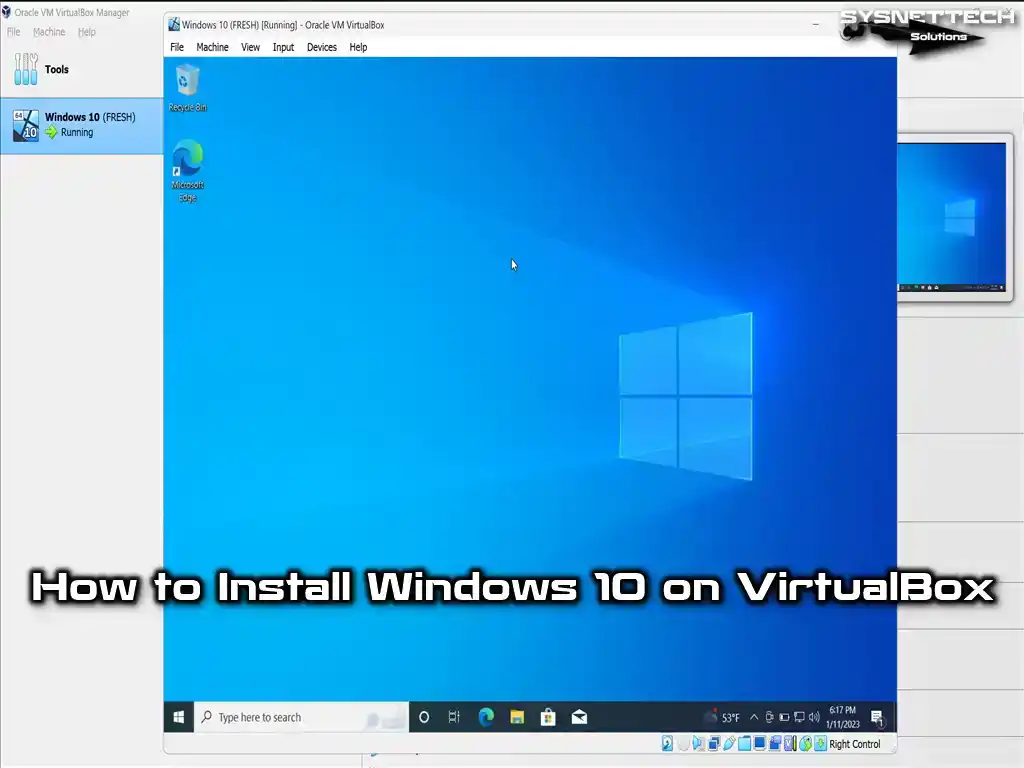
Windows 10 desktop view and system features are as follows.
How to Install Guest Additions on Windows 10
After installing this guest system on your guest PC, you need to take a few steps. First, install the missing drivers. Then, install the display adapter. Also, install the Guest Additions software to use the full capabilities of the VM.
Step 1
First, right-click on the Start menu of the Windows 10 guest PC. Then, from the options that open, click on Device Manager. Here, you can see that an uninstalled driver is present, and the virtual GPU is missing.
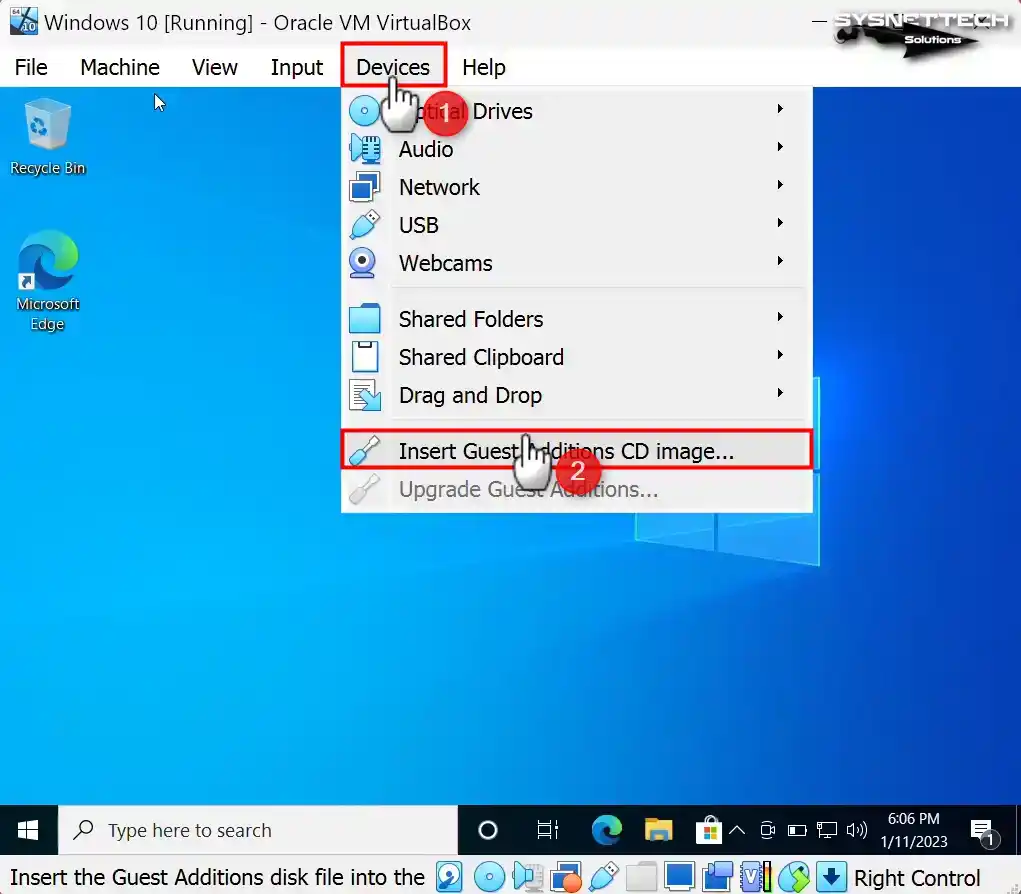
However, to install Guest Additions on Windows 10, go to the Oracle menu. Click on Devices. Finally, select the Insert Guest Additions CD Image option.
Step 2
If the VirtualBox Additions installation wizard does not open automatically, first open My Computer. Then, view the contents of the setup file. Then, double-click the VBoxWindowsAdditions-amd64 file. Finally, you can start the installation.

Step 3
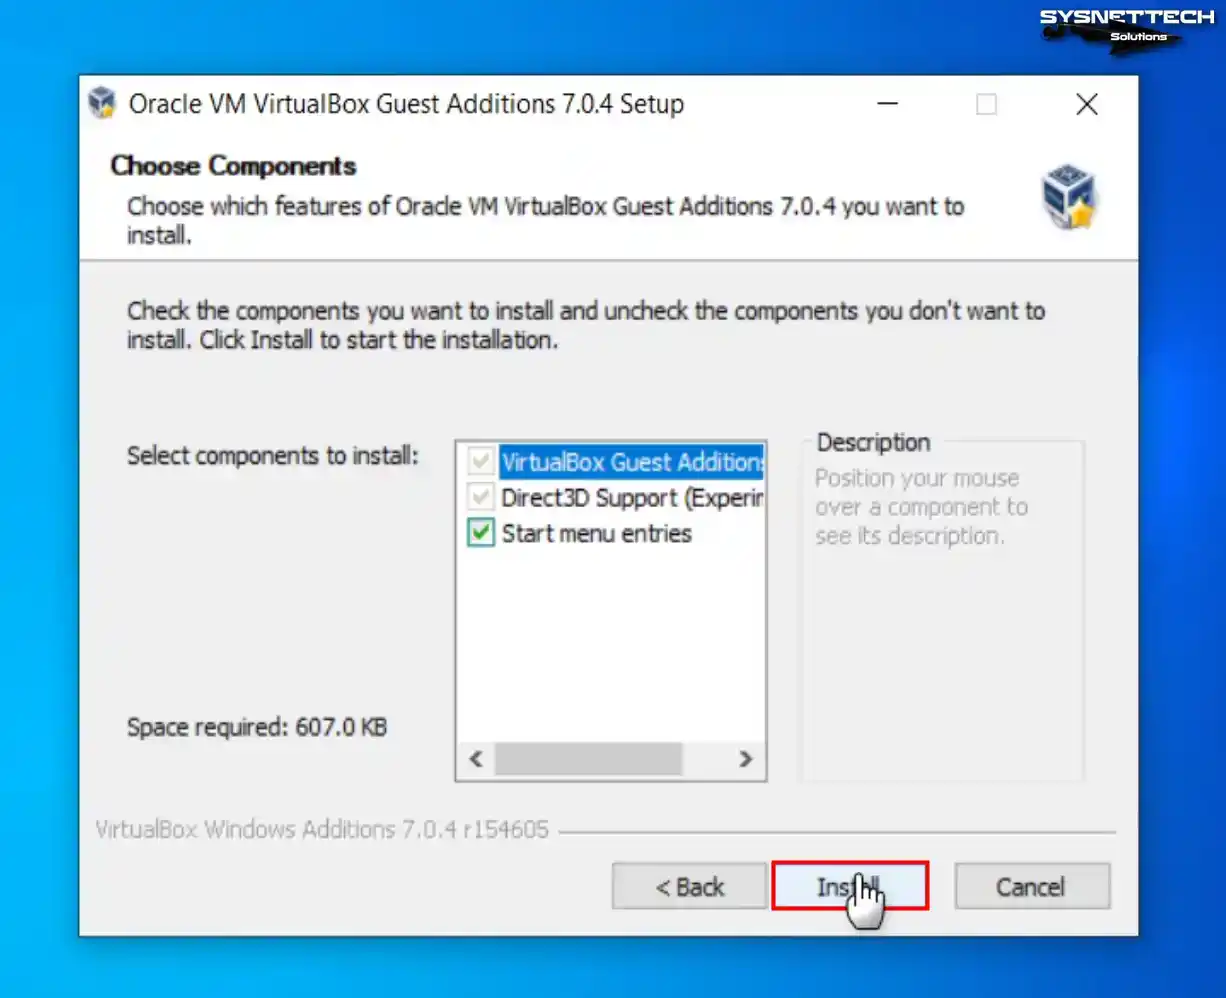
When the guest add-ons wizard opens, click Next to continue.

Step 4
You should keep the installation location at the default setting. If you change it and run into errors, you might not be able to use your VM in full-screen mode.

Step 5
After restarting your VM, recheck the Device Manager. You can see that all the drivers are installed. Also, check if the VirtualBox Graphics Adapter (WDDM) device is working correctly.
Let’s say you want to use your guest system in full screen. In this case, click on View / Full Screen from the tool menu.
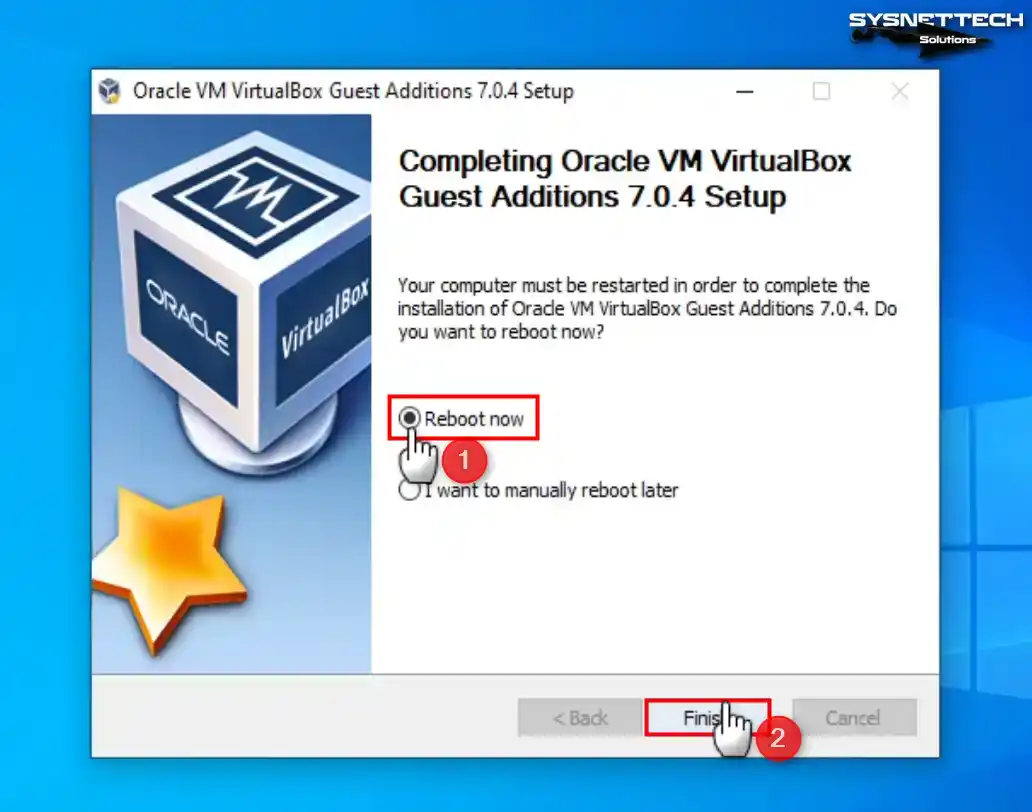
Step 6
After installing the guest plugins on the Windows 10 guest computer, restart your guest system.
Step 7
After restarting your VM, recheck Device Manager, and you will see that all drivers are installed. Also, you can check that the VirtualBox Graphics Adapter (WDDM) device is working fine.
When you want to use your guest system in full-screen resolution, you can click View / Full Screen from the tool menu.

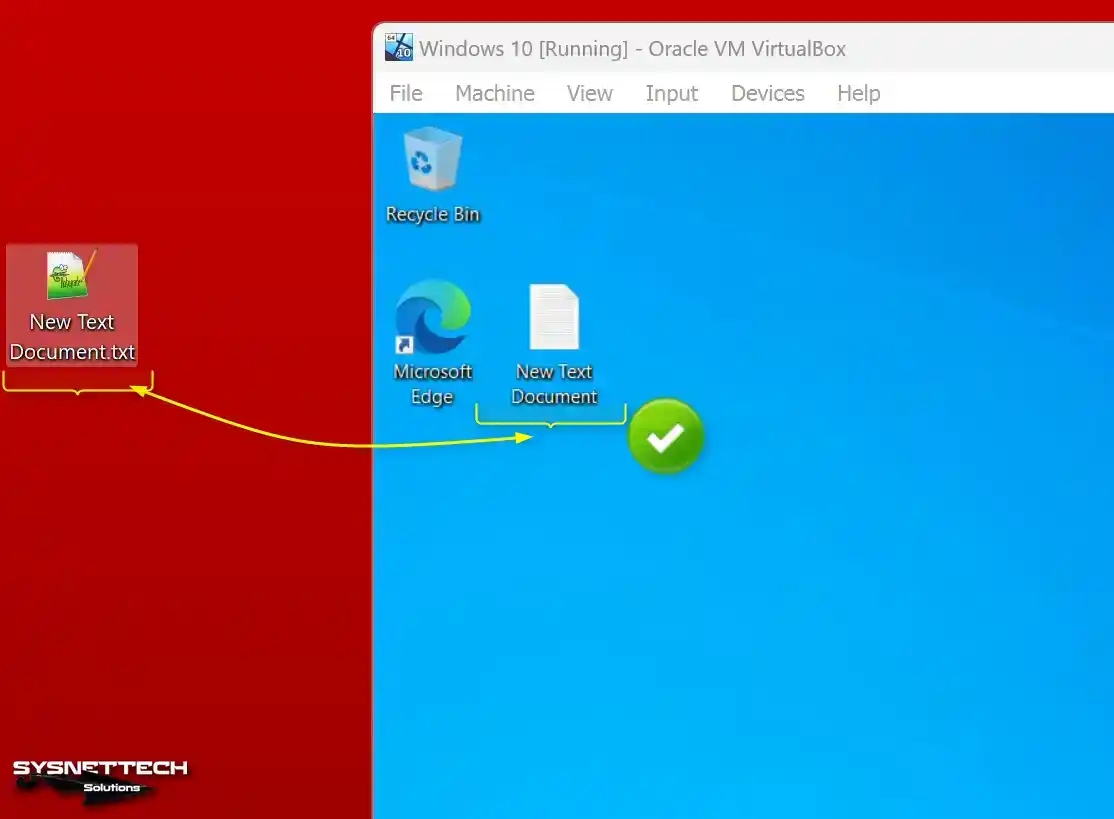
Step 8
When you drag and drop a file into your Windows VM, check that the file is copied. Also, observe if this operation is successful.
How to Check Internet Connection in Windows 10 VM
Another crucial aspect to verify is the virtual machine’s (VM) Internet connection. By default, VirtualBox configures installed VMs in the NAT network type. You can configure this network type in Network settings during VM creation.
Step 1
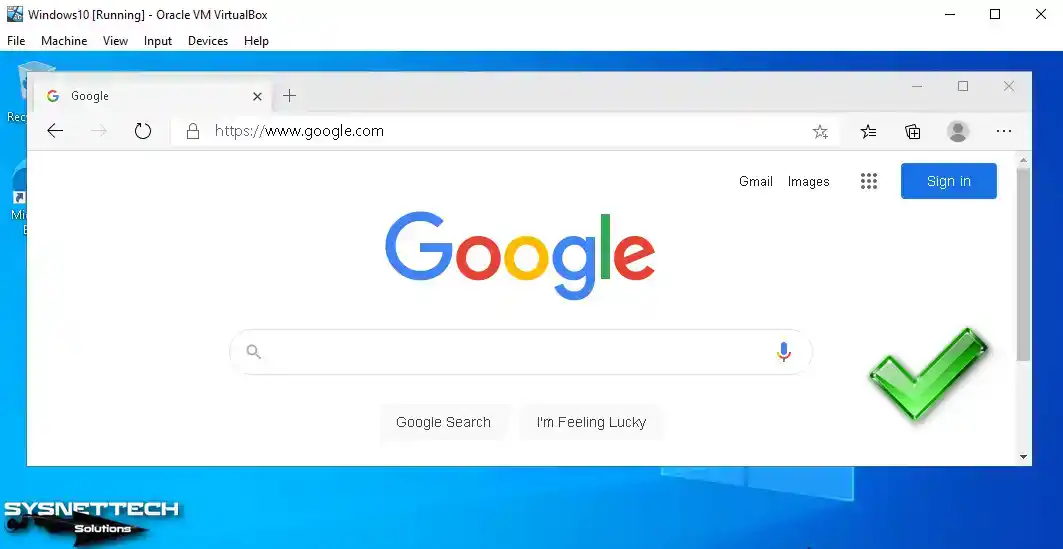
Open the Command Prompt on your Windows 10 guest machine. Then, ping Google servers using the ping 8.8.8.8 command. This way, you can check the network connectivity.

Step 2
If you can successfully ping the Google servers, you can then visit the Google homepage via a web browser.
How to Configure a Shared Folder
Shared Folder helps you move files between the VM and your host PC. That is, it makes transferring data easier.
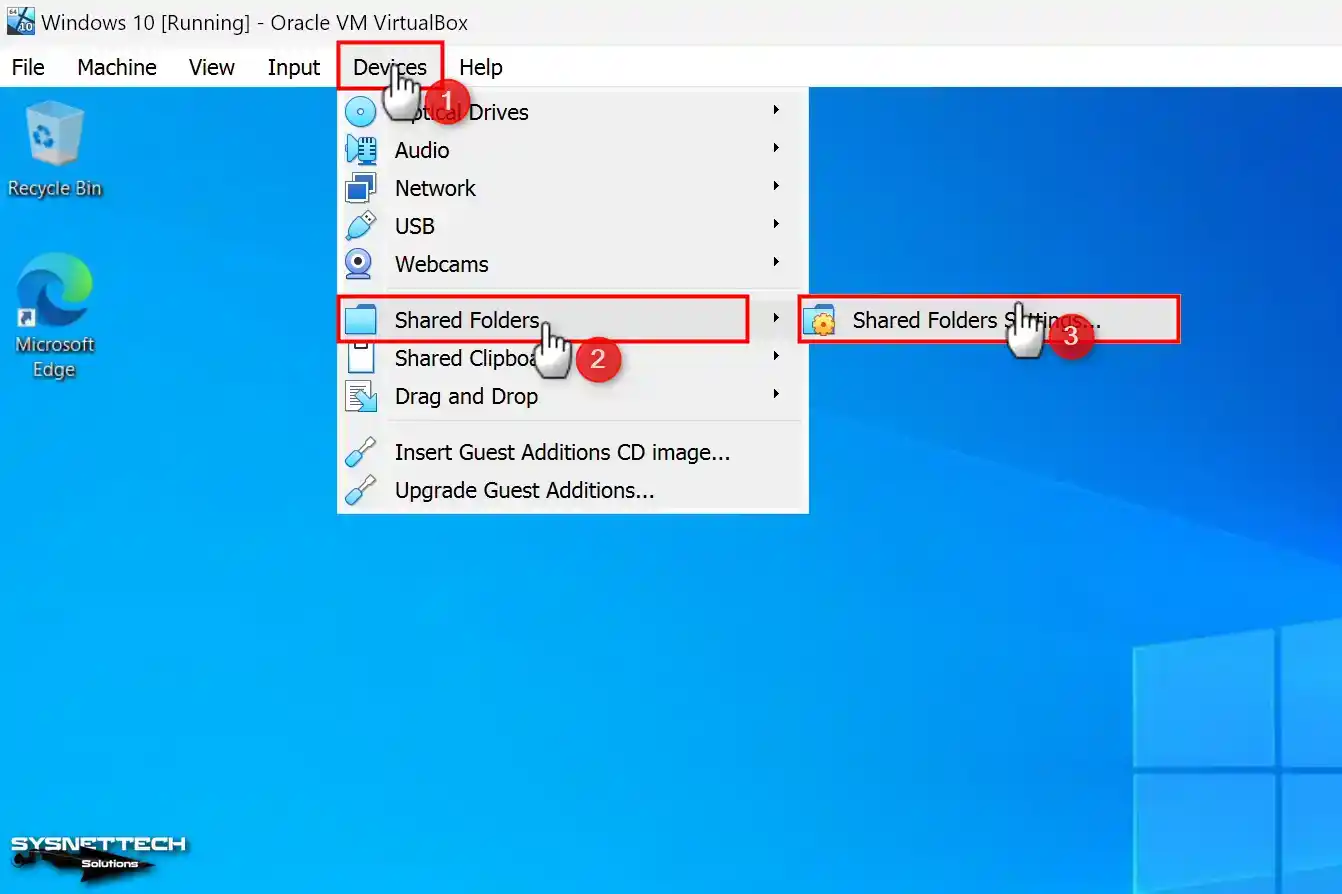
To enable Shared Folder in VirtualBox, go to the program menu and click Devices > Shared Folders > Shared Folders Settings.
In the guest machine settings window, Shared Folders will automatically open. Then, click the Add button. Then, create a folder on your host. In the Folder Path section, add this location.
Also, enable the Auto-Mount and Make Permanent options. This will allow you to configure the shared folder as a network drive.

Click the OK button and save the Shared Folder settings.

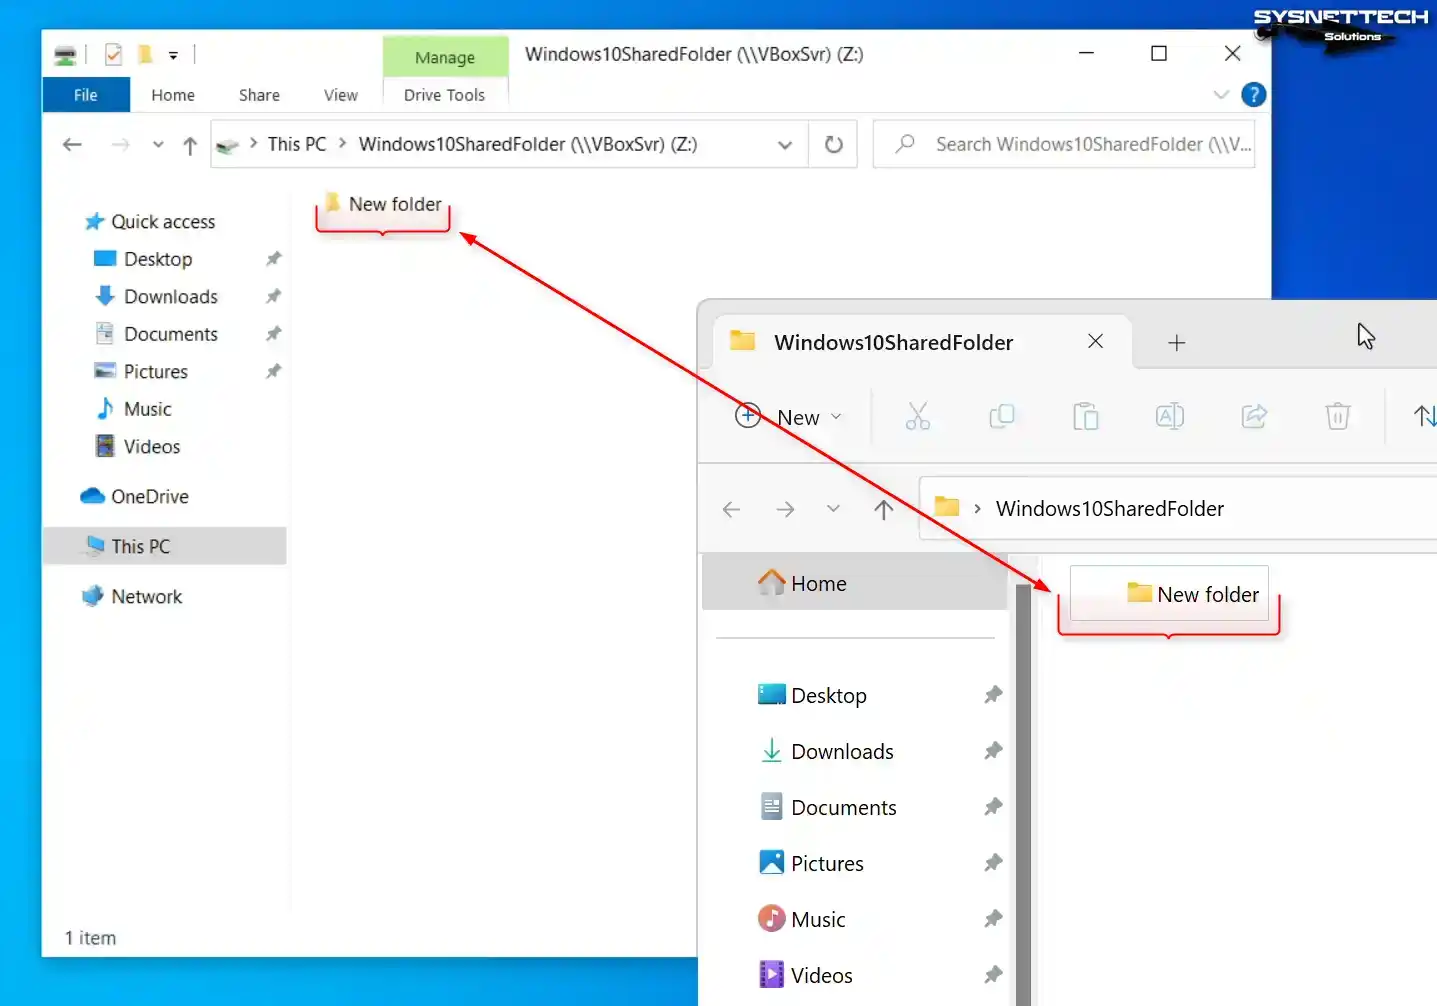
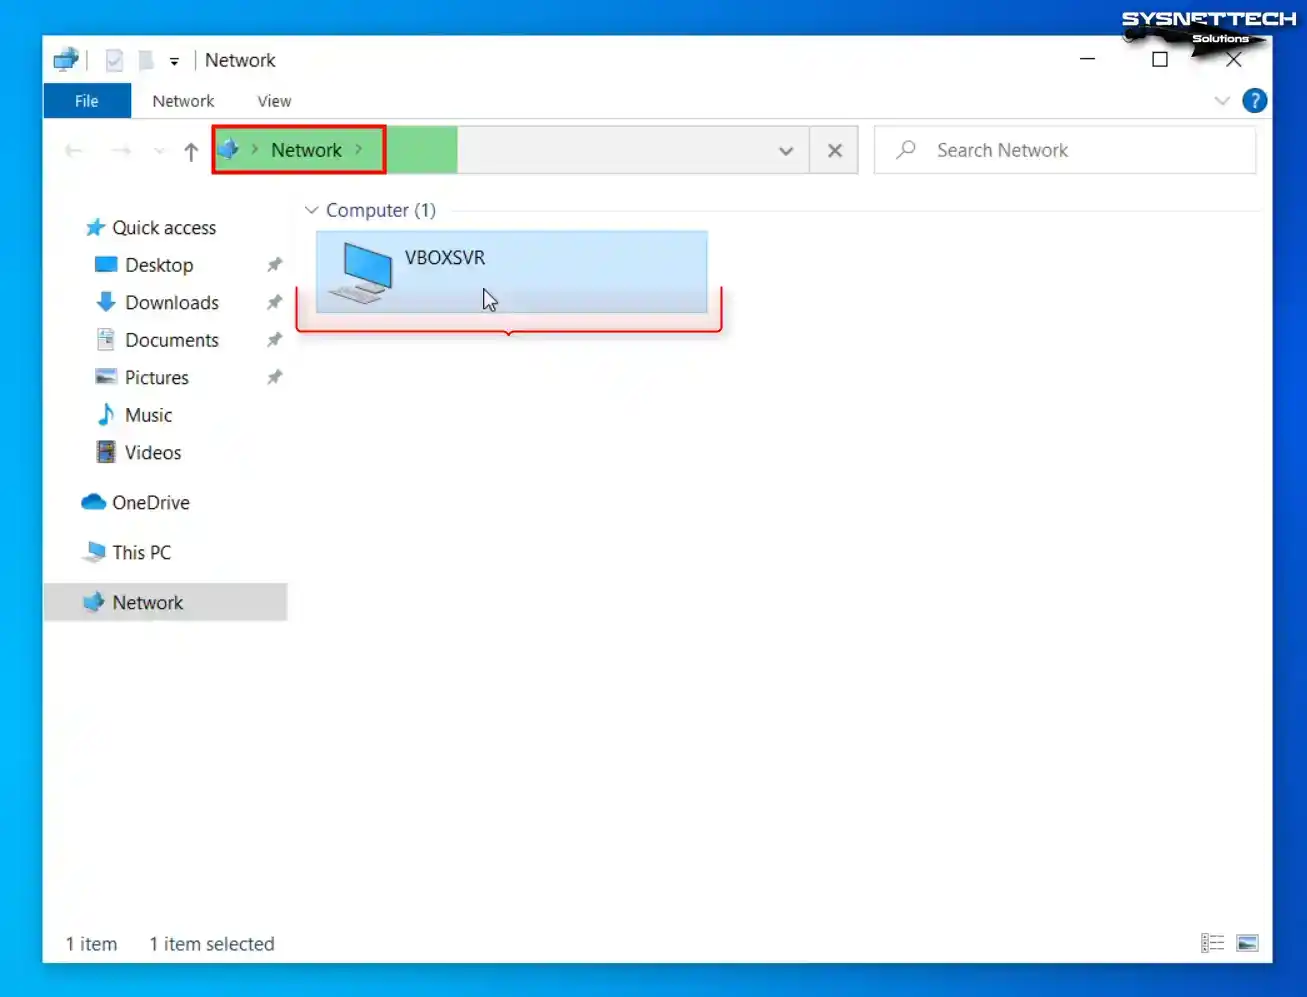
When you check the public folder on my computer, you can see it added as a network drive.
When you view the network, you can see that the network and sharing settings are initially turned off. After enabling the network and sharing settings in this window, the VBOXSVR device will be visible.
How to Use a USB Flash Drive in VM
It is easy to introduce a USB Flash Memory that you have inserted into your physical computer to the guest machine on VirtualBox. You can quickly connect your USB stick between the host and the VM.
Step 1
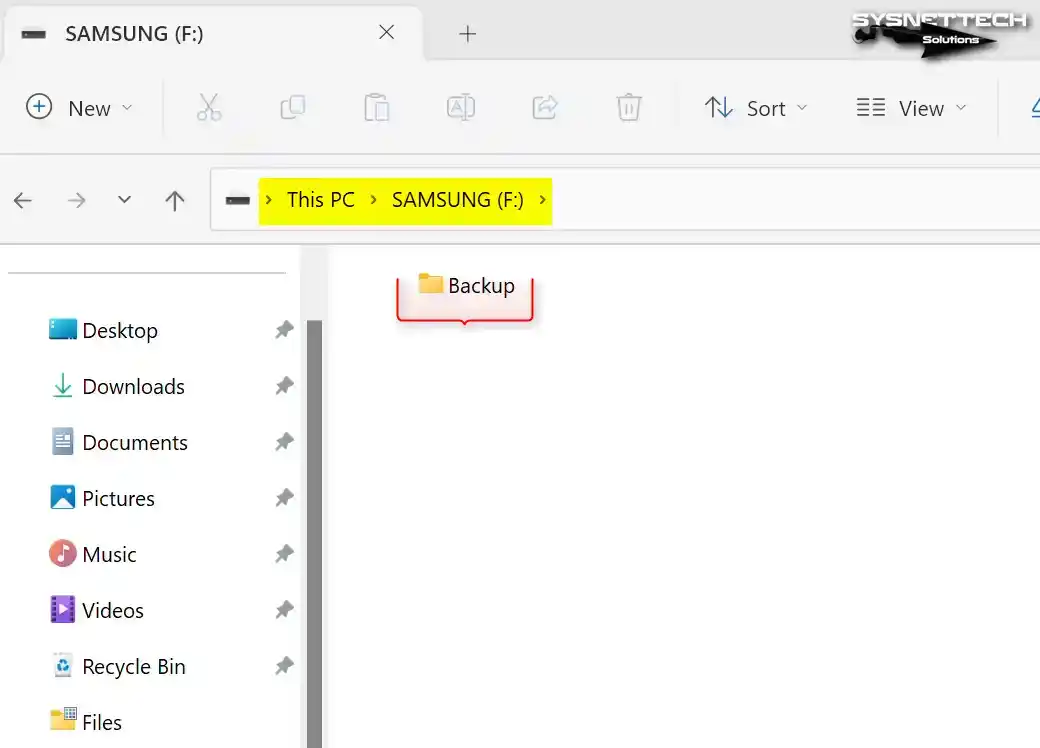
Insert your flash memory into one of the USB slots on your host computer and create a folder named “Backup” as an illustration.
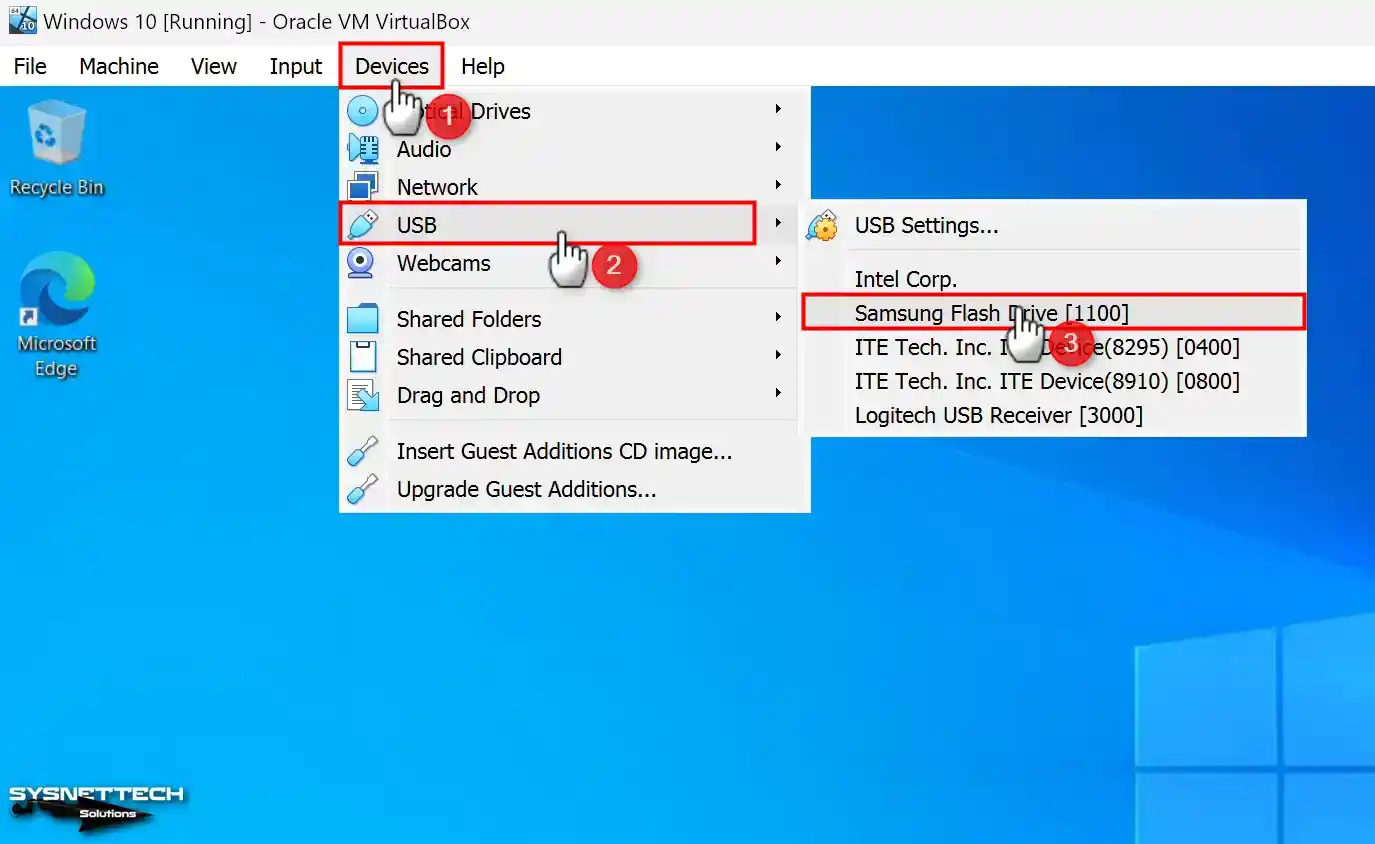
Step 2
Plug your flash drive into your host computer. Then, go to the VirtualBox tools menu. From there, click Devices, USB, and then the Name of your USB. Follow these steps to connect your flash drive.
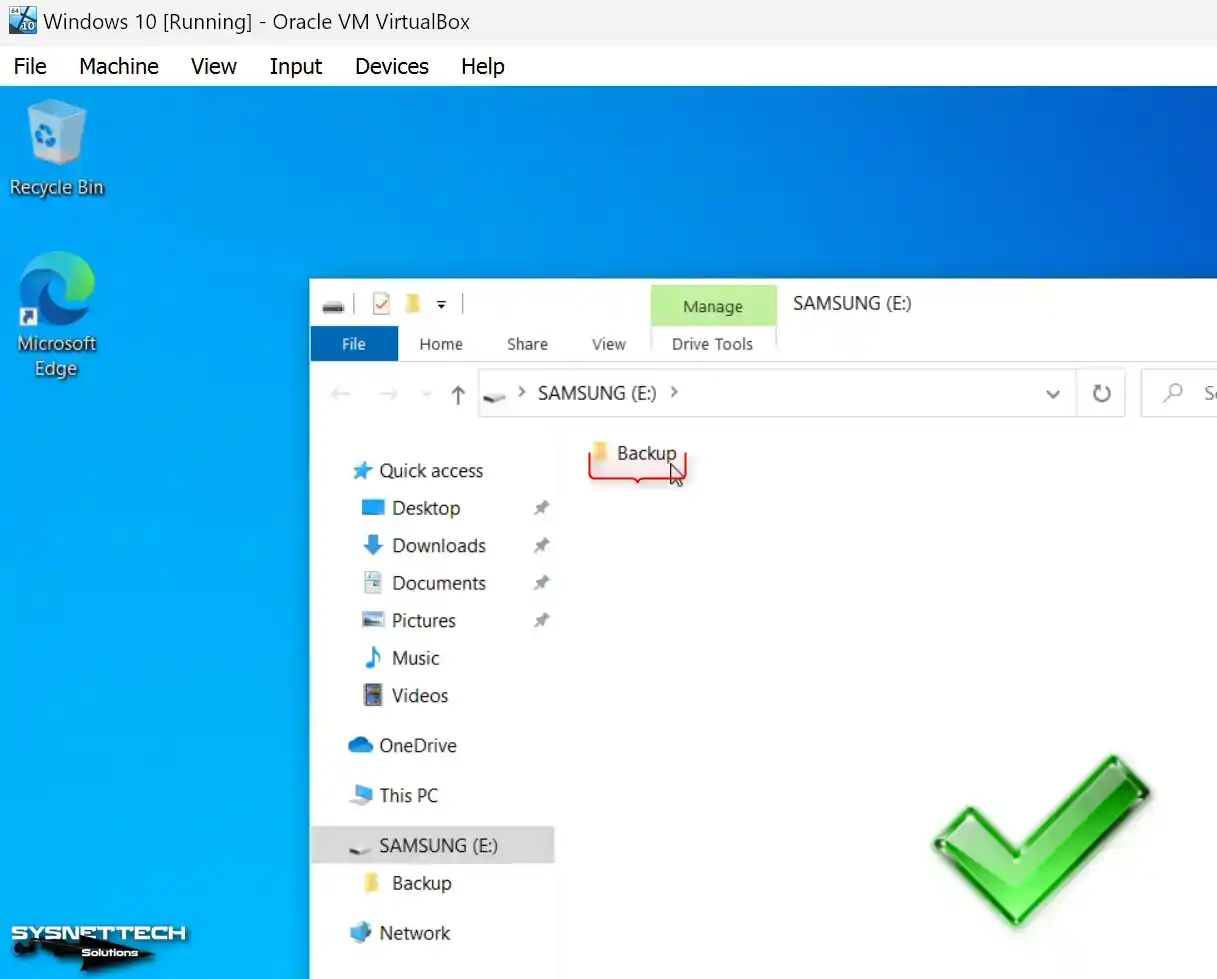
Step 3
Select your USB device in VirtualBox. Then, open My Computer on your guest system. You can see your portable storage device there. In this way, you can verify that your device is successfully connected.
Video
Installing Old Versions
Frequently Asked Questions (FAQ)
- Why would I want to install Windows 10 with VirtualBox?
- Where can I get the Windows 10 ISO file?
- What are the system requirements for running it?
- What are the recommended settings for running it?
Conclusion
As a result, you can install Windows 10 even if you use Oracle VM VirtualBox 7.0 or later. By running such a system in a virtual machine, you can test different operating systems without any problems.
If you follow the comprehensive steps I have prepared for you, you will be able to use this OS virtually. Thus, you will get full performance from your VM and maximize your efficiency.
In short, whether you are looking for development purposes, software testing, or want to explore new platforms, VirtualBox is for you! Thanks to the flexibility and power of Oracle virtualization, you will get a versatile computing experience.
You may want to run an older system alongside your current installation. In that case, check out our guide on how to run Windows 8 in VirtualBox. In this guide, I outline the necessary settings to ensure a smooth operation of this system. So, you may want to test out the old software on your host PC.

5 People Shared Their Experience
Great tutorials, very detailed!
I wonder if you plan to do any tutorials for the remaining Microsoft Operating Systems? You already did it for Windows 10, 8/8.1, 7, Vista, XP x86/x64, 2000, Me, 98FE/SE and 95, but what about NT4, NT3.51, NT3.5, NT3.1 and MS-DOS 6.22 / Windows 3.11? Might as well complete the pack 😉
I second Johnye’s comment. Instructions were spot-on.
I’d spent days troubleshooting my broken virtual machine when I came across your lifesaving tutorial. By the time I’d finished going through the steps I had a smooth running Windows 10 in virtual box on a Linux host. So many error-prone settings. What a relief. One thing: parts of the Windows settings will freeze and run into each other until “transparency” is turned off in the Windows 10 Personalization section. This is as much hassle at getting the destop window to fit in its frame. Fixing transparency and the window position should be the first chores after installing the OS. Thanks for your excellent tutorial.
I am very happy to assist you. Also, thank you for giving feedback to users.
Hello, I trying to install win 10 on NVMe disk, I’ve followed your directions . My host is linux I run the fix for NVMe disk with no issues. ther problem appear when start VM , a shell screen appear with something related to uefi and I’dont know what to do. I’ve tried removing tick on EFI option, this way I can start install process but when I came across menu to selext disk to install I create a new partition but the system create only one and tell me that I can’t install in that partition. I will aprecciate very much any help to solve this. thanks for your support