
In this guide, we’ll show you how to install and set up VMware vSphere Hypervisor ESXi 8.0b on a new virtual machine.
To do this, we’ll use two popular virtualization programs, VMware Workstation 17 Pro and Oracle VM VirtualBox 7.0.
How to Install VMware vSphere ESXi on a Physical Server
VMware ESXi creates a hypervisor virtualization layer using the vSphere framework. Thus, it allows you to run many of the guest operating systems on the same physical machine.
The VMware company developed ESXi as an operating system using the Linux kernel called VMKernel. You don’t have to install it on a Windows PC or any other system. Instead, it goes directly onto a strong IBM or HP server. This helps cut costs because it makes the most out of the server’s power.
ESXi is a particular operating system that stands on its own and works as a hypervisor. It sits between the actual hardware and the virtual machines you want to use. But, instead of needing a real server, you can put ESXi on your PC using virtualization software like VMware or VirtualBox.
If you use this software, your computer might need to work faster. Thus, if your physical PC has better hardware, it will perform better.
The latest version of the ESXi server virtualization platform released by VMware on October 11, 2022, is 8.0 (8.0b).
Version 8.0 mainly has these new features:
- vSphere Distributed Services Engine
- Improvements to vSphere with Tanzu
- Better ways to handle the lifecycle of your system
- Enhancements for AI and machine learning
- Support for new guest operating systems and hardware versions
- An improved Distributed Resource Scheduler (DRS)
- Upgrades to security features
To review the 8.0b release notes and innovations, you can visit this website.
System Requirements
- Your computer needs to have at least two CPU cores.
- It works with 64-bit x86 processors released after September 2006, which includes many multi-core processors. You can see the complete list of supported processors at this address.
- Make sure your CPU’s NX/XD bit is enabled in the BIOS.
- You’ll need a minimum of 4GB of physical RAM. It’s recommended to have at least 8GB of RAM for running VMs in regular production environments.
To support 64-bit VMs, your x64 CPUs should have hardware virtualization enabled (Intel VT-x or AMD RVI).
You should have one or more Gigabit or faster Ethernet controllers. Check the VM Compatibility Guide at this address for a list of supported network adapter models.
You need a SCSI disk with unpartitioned space or a local, non-network RAID LUN for VMs.
If you’re using Serial ATA (SATA), the disk should be connected to supported SAS controllers or supported SATA controllers. SATA disks are considered remote, not local. By default, these disks are not used as partitions because they are seen as remote.
How to Install vSphere ESXi on a Server
It would be best if you found out whether your current server supports the ESXi platform. So, check the developer compatibility web page. Then, you can prepare the installation media and proceed with the installation steps.
Step 1
After you download the ESXi ISO file from this link to your computer, and when you download it using the Rufus program, burn the ISO file to your flash memory. Then, insert your flash memory into your physical machine. Then, press Enter on the ESXi-8.0b-21203435-standard Installer option on the boot screen.
Wait while the ESXi installer loads.

Step 2
While the installation is happening, the system is copying essential files to finish the process. Hang tight and wait for the copying to complete to ensure a successful installation.

Step 3
To keep going with the installation, press the Enter key when the Welcome to the Installation window asks you to do so.

Step 4
Hit F11 to agree to the end-user license agreement.

Step 5
Right now, it’s looking at the devices on your system. Just wait until it finishes scanning everything.

Step 6
Please choose the disk that you want to install and then press the Enter key.

Step 7
Select the keyboard style you like, then press Enter to confirm your choice.

Step 8
To keep your system safe, make a strong root password. Check that it has capital letters and special characters, then press Enter after you’re sure.
NOTE: Check that the keyboard layout on your host PC, where you set the root password, matches the design for ESXi. Otherwise, you will get a root password error when connecting to a virtual server with a web browser.

Step 9
Once you’ve set things up the way you want, agree to have your disk replaced. Then, press F11 to begin the installation.
NOTE: You may see a message saying your computer’s processor might not work with future ESXi versions. Press Enter to ignore the warning and keep going to fix it.

Step 10
Wizard is installing ESXi 8.0.0 on your computer or server. Just hang tight!

Step 11
Once the setup is OK, press Enter using the option that says Remove the installation media before rebooting.

Step 12
The server will briefly turn off and then turn back on. Please don’t do anything during this time, as it might cause a short break in service.

Step 13
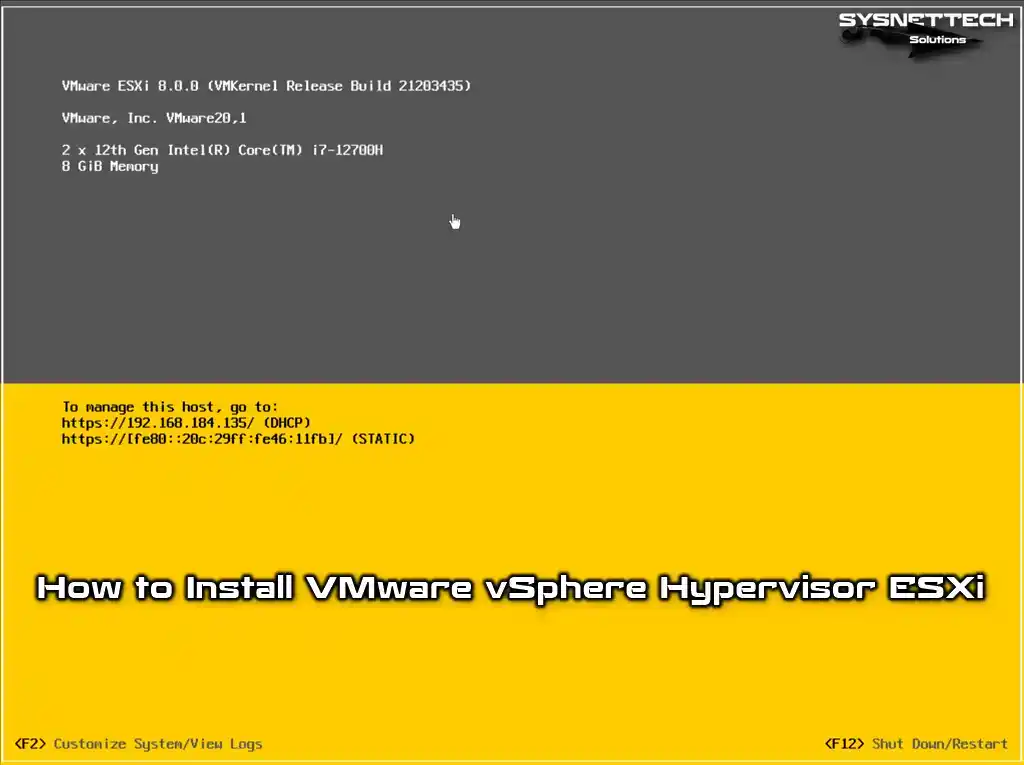
Once the installation is sound and everything works, open Chrome, Opera, or Internet Explorer. Then, go to the server using the IP address shown on the ESXi server screen.

Step 14
Enter the address 192.168.184.135 in the URL address line of the web browser. After that, expand the “Help me understand” option on the “Your Connection Is Not Private” screen and click “Proceed to 192.168.184.135 (unsafe)”.

Step 15
In the “User name” box, type ‘root,’ and after you’ve entered your password, click on login.
Sometimes, after the first installation, you might have trouble logging in with the root account you created. Even if you type the correct password, you could see an error saying, “Cannot complete login due to an incorrect username or password.”
You can solve the login problem by changing the root password of your ESXi server again. Now, press F2 on the server. Then, after typing your root password, press Enter in the Configure Password option.
After typing your old password in the Password window, create your new password and press Enter again. Again, try logging in with your new password on the login screen.

Step 16
Once you’re in the vSphere server, you have the chance to help improve the VMware Host Client. If you’re interested, choose the option you want and click OK to proceed.

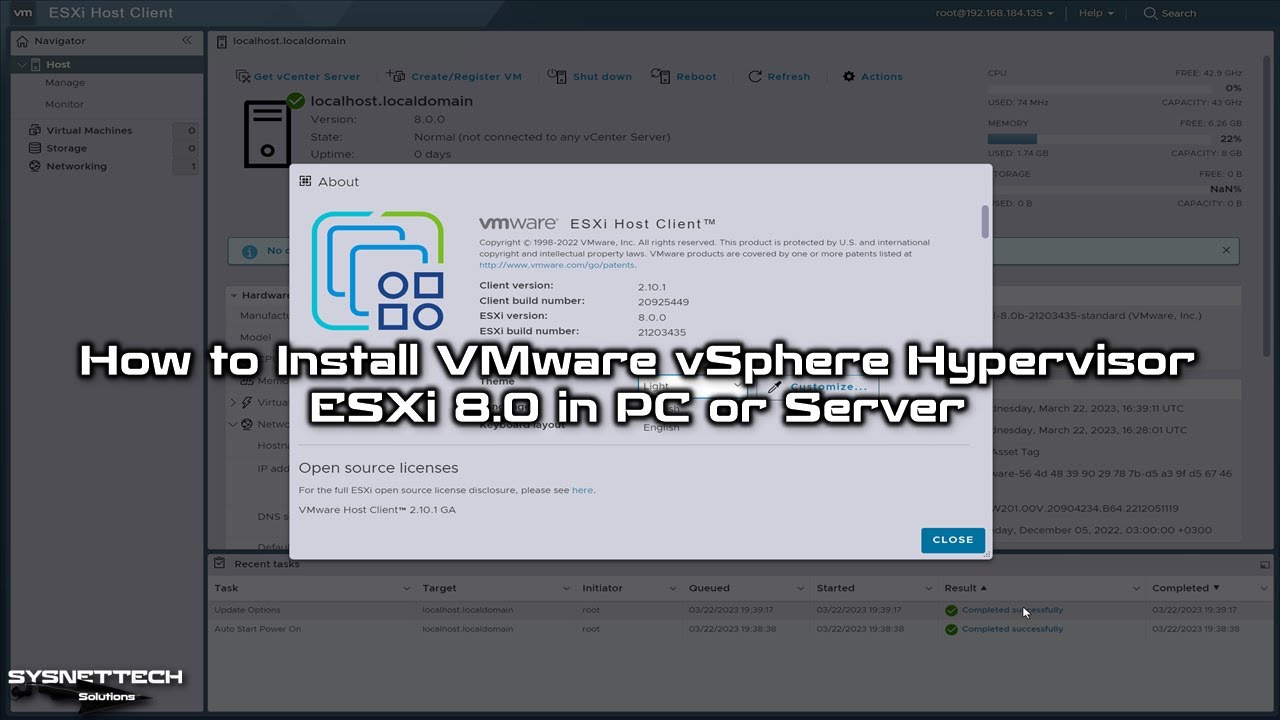
Step 17
To find out which ESXi version is on your server, go to the Help/About section.

How to Create a New Datastore
Imagine you added another disk to your actual server or virtual machine. You can set up this extra disk as a new storage space and put many virtual machines on it. It’s also a handy spot to keep your ISO files.
Step 1
Since we added a new 200 GB NVMe disk, we need to introduce this disk as a Datastore in ESXi. To do this, click Storage on the left panel of the Host Client and click New Datastore on the screen that opens.
In the New Datastore window, select “Create new VMFS datastore” and click Next.

Step 2
In the “Name” box, type the datastore name you like, and after choosing your disk, click Next.

Step 3
Choose “Use full disk” to use the entire capacity of the chosen disk, then keep going.

Step 4
Check what you’ve done on the Ready to Complete screen. After that, confirm the deletion of the disk by clicking Finish.

Step 5
Once you’ve made the NVMe datastore, please take a look at it on the Storage screen.

Video
How to Install ESXi in VMware Workstation Pro
You can also use a virtual machine for your ESXi virtualization training or testing. In short, you can do this on VMware Workstation Pro or Player. But your computer’s hardware features should be high-end.
Step 1
Launch your VMware Workstation 17 Pro virtualization program. Click on “Create a New VM” to make a new virtual server. In the window that appears, choose the Custom (advanced) option, and then click Next.

Step 2
Check that you’ve picked the newest one in the VMware hardware compatibility, and then click Next.

Step 3
To include the vSphere ISO file in the VM later, choose “I will install the operating system later,” and then click Next.

Step 4
Choose VMware ESXi in the Guest operating system window. Then, select ESXi 7, and later, from the Version section, click Next.

Step 5
Change the name of the virtual server to whatever you want. Then, set where you want it to be on your computer, and then click Next.

Step 6
Increase the number of virtual processors based on your PC’s capabilities, then click Next.

Step 7
If your computer has 16 or 32 GB of RAM, set a RAM size below these values for the virtual machine and continue.

Step 8
Select the NAT network setting for the network screen, and then click Next.

Step 9
Choose the para-virtualized SCSI option, and then proceed with the steps to create the VM.

Step 10
Select NVMe for the disk type and click Next.

Step 11
To create a new disk for the server, select Create a new vdisk and click Next.

Step 12
Specify the capacity of the virtual disk as 40 GB. And tick the option Store virtual disk as a single file, and click Next.

Step 13
Keep the name and location of the disk file as they are by default, and then move ahead.

Step 14
Take a look at the basic hardware info for the virtual server you made. Once you’ve looked it over, click on Customize Hardware.

Step 15
Turn on processor virtualization and other features in the virtual machine settings.

Step 16
You need to add the ISO file you downloaded to your virtual server. To do this, first click on the CD/DVD option and then click on the Browse button. Next, select the VMware-VMvisor-Installer-8.0b-21203435.x86_64.iso file and click Open.

Step 17
On the ESXi server, we recommend enabling USB 3.1 support for guest machines. To do this, set the Compatibility value in the USB Controller settings.

Step 18
Once you’ve adjusted all the settings, hit Finish in the summary window.

Step 19
If you want to add a second virtual disk to the virtual server, click Edit Virtual Machine Settings. Click the Add button in the area you are opening. Then, select the Hard Disk option in the Hardware window and continue with Next.

Step 20
After picking NVMe as the type of vdisk, keep going and check the option that says Create a new virtual disk.

Step 21
Choose to store the NVMe virtual disk as the only file type and increase the size according to your needs. Finally, edit the name of its file and click Finish to close the window.

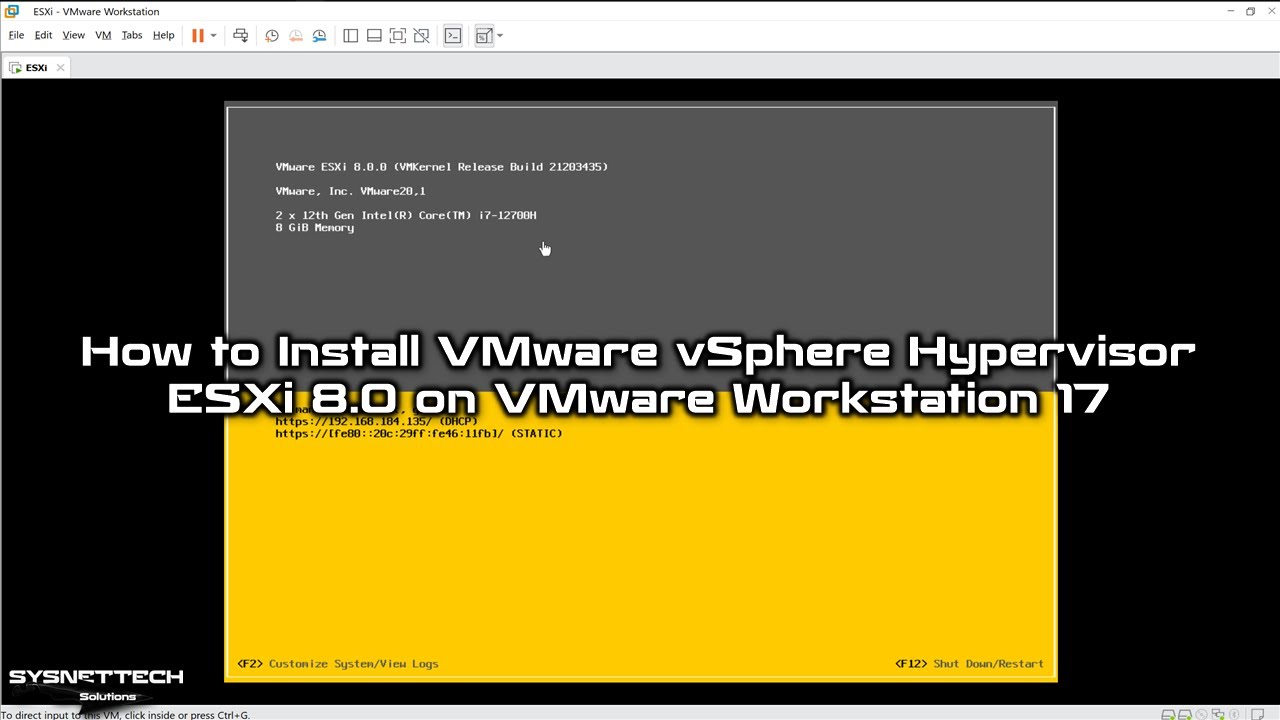
Step 22
When you run the ESXi virtual server in VMware, you can now start the system setup.

Video
How to Install ESXi in VirtualBox
You can install ESXi on VMware Workstation and VirtualBox. However, for VirtualBox, you have to turn on Nested virtualization after creating the virtual server. If you’re using an old version, the VT-x feature might not be on by default. So you’ll have to allow it yourself.
You may not see hardware virtualization enabled. In this case, run CMD or PowerShell as an administrator and allow it by executing the following commands.
- cd “C:\Program Files\Oracle\VirtualBox\”
- .\VBoxManage.exe modifyvm “VMwareESXi67” –nested-hw-virt on
NOTE 1: VMware has ended support for legacy Intel Pro/1000 family network cards after ESXi 7.0. You will get a “No Network Adapters” error when you try to install 7.0U2a and earlier in the latest versions of VirtualBox.
NOTE 2: The e1000 (Intel 82545EM Gigabit Ethernet NIC) network card is no longer supported for ESXi. Even if we try adding the old network adapter drivers into the Custom ISO file using ESXi-Customizer-PS to solve this problem, the installation won’t go through. We’ll update our article with a new solution once we find one.
Step 1
Once you’ve installed VirtualBox, open it up and then click the “New” button to create a new virtual machine for your server system.

Step 2
Give the virtual PC a name and choose “Other” from ISO Image to add the ISO file.

Step 3
Starting from vSphere ESXi 6.7 Update 1 (6.7U1), you can easily install it on VirtualBox 7.0 (7.0.6). Just click this link to get the image file, save it on your computer, choose the ISO file in the window, and open it.

Step 4
After adding the ESXi 6.7U1 image file, edit the Type and Version sections. So, do them as Linux / Other Linux (64-bit) and continue.

Step 5
To make sure your virtual server runs well, set the memory size to 4096 MB (4 GB). Also, select the number of virtual processor cores to 4. Additionally, turn on EFI support for server security.

Step 6
To create a new server disk, select Create a virtual hard disk now and change the disk size to 40 GB.

Step 7
Click Finish to close the summary window with all the hardware settings for the ESXi virtual PC.

Step 8
Go to the settings of the vSphere Hypervisor virtual server.

Step 9
Disable Floppy from Boot order in System settings and put the optical drive first. Change the Chipset hardware type to ICH9 and make sure the Pointing device is a PS/2 Mouse.
- Chipset: ICH9
- Pointing Device: PS/2 Mouse

Step 10
Turn on “Enable Nested VT-x/AMD-V” in the Extended Features section of the CPU’s settings.

Step 11
Last but not least, turn on Nested Paging, which is the Hardware Virtualization feature in the Acceleration tab. This helps with better memory management.

Step 12
Turn on Host I/O Cache for IDE Controller in the Storage device settings.

Step 13
Similarly, turn on the Host I/O Cache for the SATA Controller.

Step 14
Finally, check the Solid-State Drive (SSD) under the Attributes section. This improves the performance of the ESXi.vdi disk file.

Step 15
For a Bridged Adapter, you can pick either the Wireless or Ethernet network adapter. But, for the vSphere virtual machine, set up the network card as a Bridged Adapter. After that, choose the network adapter on your host machine that’s connected to the Internet in the Name section.
Also, double-check that the Adapter Type setting is Intel PRO/1000 MT Desktop (82540EM).

Step 16
To use USB 3.x devices on guest machines, enable USB 3.0 (xHCI Controller) on the virtual server.
 Controller")
Step 17
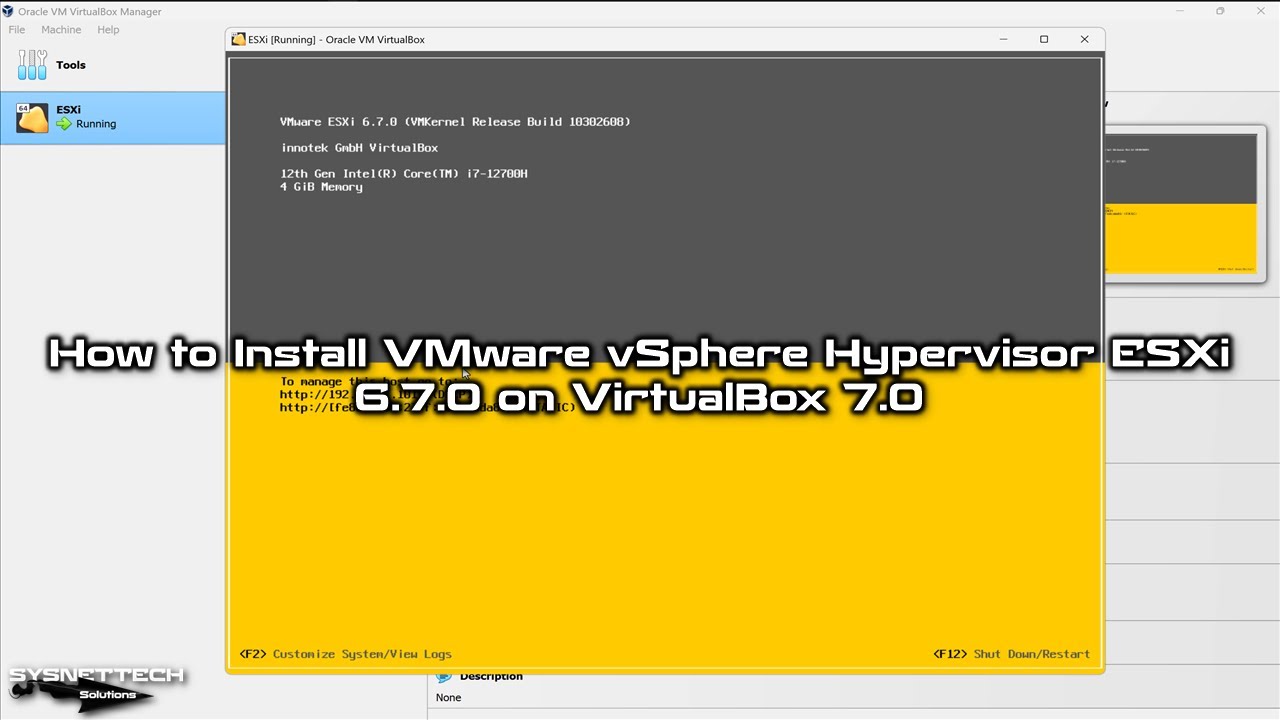
Start the VMware vSphere ESXi vPC in the Oracle VirtualBox app.

Step 18
To begin installing, pick “Installer” from the boot menu when your virtual server starts up. After that, you’ll see the server’s IP address, as shown in the image below.

Video
Frequently Asked Questions (FAQ) About ESXi Setup
- What are the system requirements to install ESXi?
- How can I download ESXi?
- Can I install ESXi on a virtual machine?
- What is the process of installing ESXi on a USB drive?
Installing Old Versions
Conclusion
In conclusion, installing VMware vSphere Hypervisor ESXi 8.0b increases your virtualization capabilities. You can also easily install it by following the steps in this guide. Make sure your server meets the necessary system requirements. However, you can use the latest features of ESXi 8.0b.
Additionally, it offers advanced security features and artificial intelligence support. As a result, it meets modern virtualization needs. Using VMware vSphere ESXi allows you to manage virtual machines efficiently. Additionally, it optimizes your IT infrastructure.

3 People Shared Their Experience
I get an error between steps 14 and 15 on installing the ESXi. “file:///ks.cfg:line 3: bootproto –device= specified, but “undefined” was not found on the system.”
This is a brand new server, HPE ProLiant DL380 Gen10. Hardware all says compatible, setup with HPE storage manager as RAID 5. Can you think of any problems there? Can’t find this specific error anywhere.
Hi, Bryan Rank.
I’ve researched this error for you and found out that there are custom ESXi images for HP servers. You need to check the VMware ESXi compatibility settings in the BIOS settings for your HP server.
To download the Custom VMware ESXi image for your HP server, see: https://www.hpe.com/us/en/servers/hpe-esxi.html
And also check the BIOS settings for the HP ProLiant DL380 server as described in the following site.
https://www.running-system.com/bios-settings-hp-dl380-gen10/
Also check: https://portal.nutanix.com/#/page/docs/details?targetId=HPE-Hardware-Firmware-Compatibility:hpe-hpe-gen10-sw-fw-compat-r.html
When I run this, I end up with the inability to use datastores as it says i have 0 bytes