
Are you thinking of trying macOS Sonoma 14 but don’t have a Mac? No problem! You can install macOS on your PC with Windows 10 & 11 using the Oracle VM VirtualBox 7.0 program.
In this article, I will guide you through the steps of creating a virtual macOS environment on your Windows PC. First, I will show you how to prepare a new virtual machine on your physical PC. Next, I’ll help you test macOS Sonoma without needing a Mac computer.
How to Run macOS Sonoma 14 on a Virtual Machine using VirtualBox 7 on Windows 11 or 10
Before you buy a MacBook Pro or iMac, if you use a Windows PC, you can try out the Mac system by installing it on a virtual machine.
You can use special programs to make the macOS system work on a regular desktop or laptop, even if it’s not an Apple Mac. So, you can set up Sonoma using programs like VMware Workstation or VirtualBox on Windows 10 or 11.
We can only make a virtual computer for macOS Sonoma with the Unlocker tool on VMware. But if you’re using Oracle VM VirtualBox, you don’t have to use extra tools like Unlocker. After making a fake Mac on VBox, you must type in a few commands before starting the installation.
Before starting the installation, download the Sonoma file and save it on your host computer. As a result, you can also use this file on VMware Workstation, Fusion, or ESXi servers.
How to Create a New VM for macOS Sonoma
Before you make a pretend computer, install VirtualBox on your Windows 10 or 11 computer. Also, get the Extension Pack and add it.
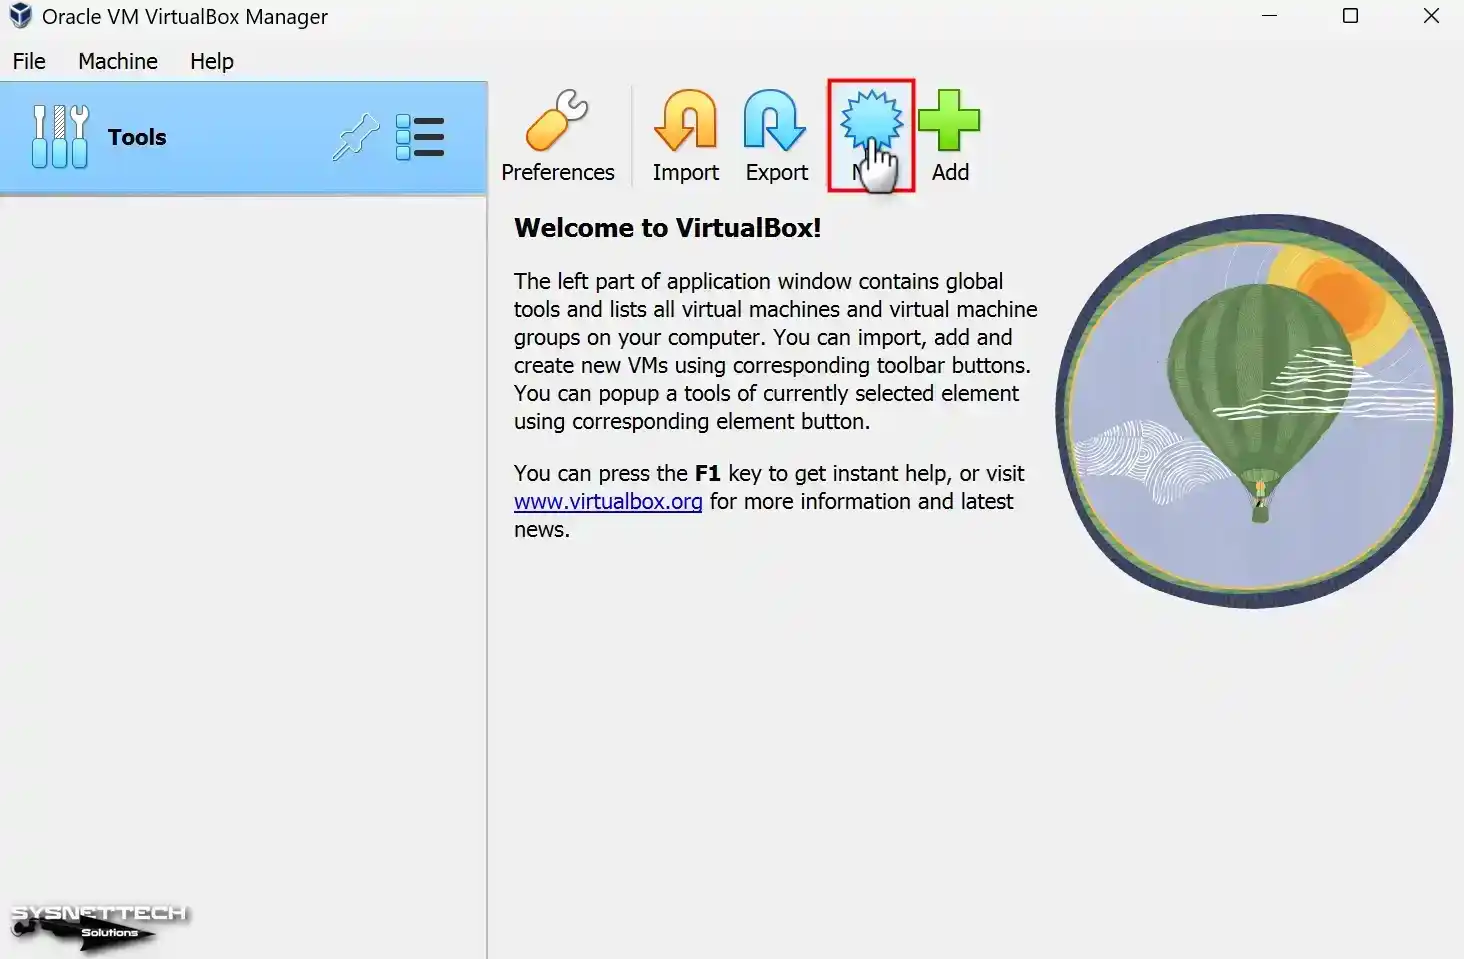
Step 1
When you start Oracle VirtualBox, click on the New button in the menu. This will help you create a new virtual machine for macOS Sonoma.
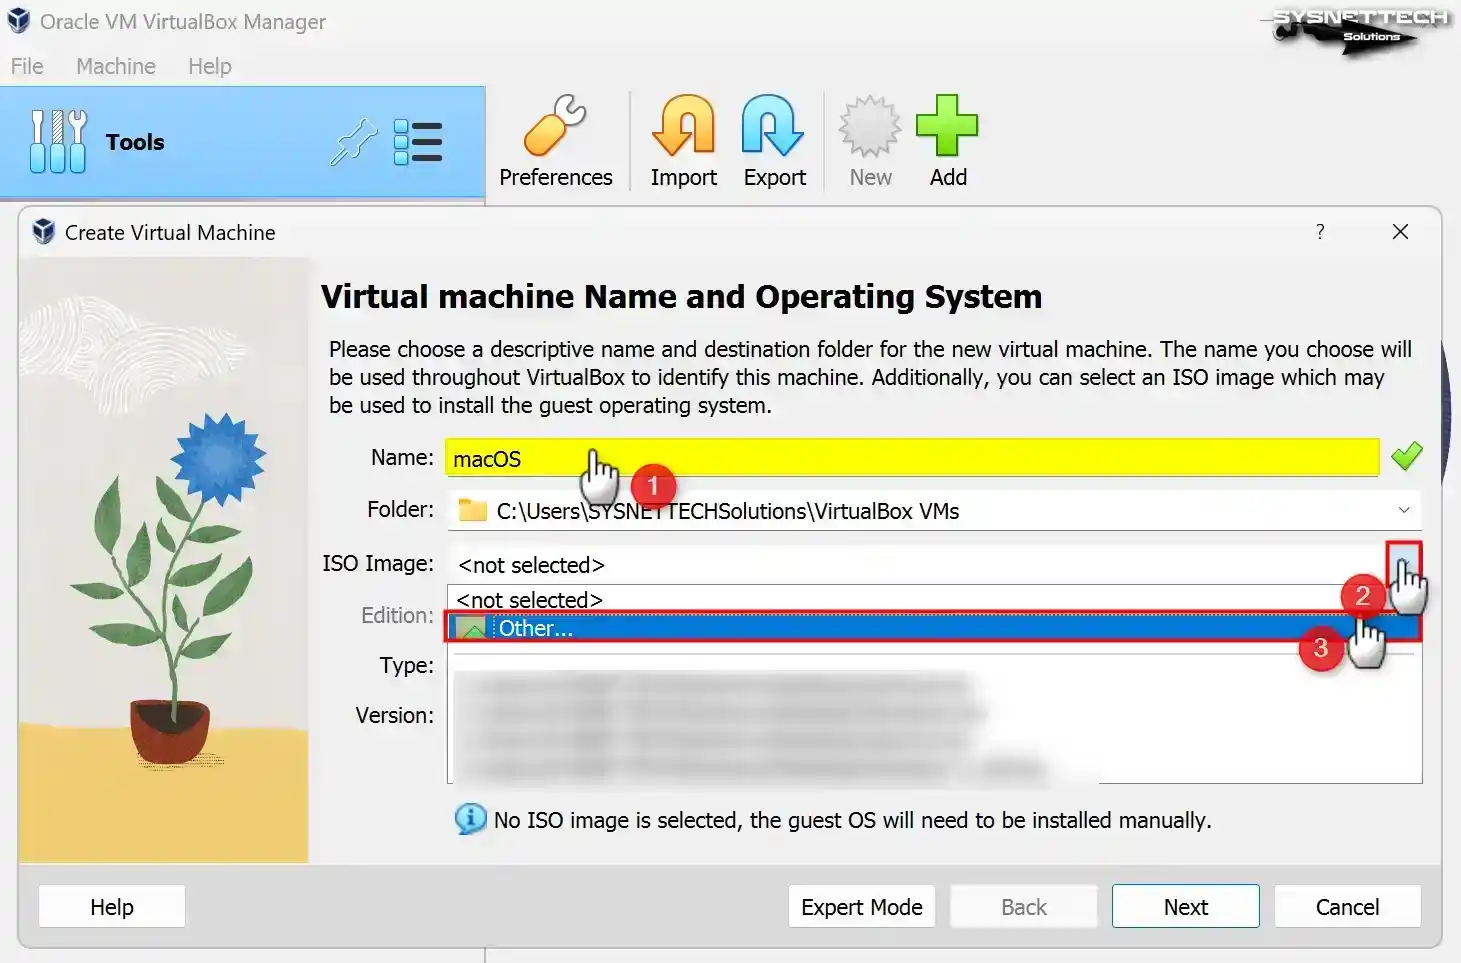
Step 2
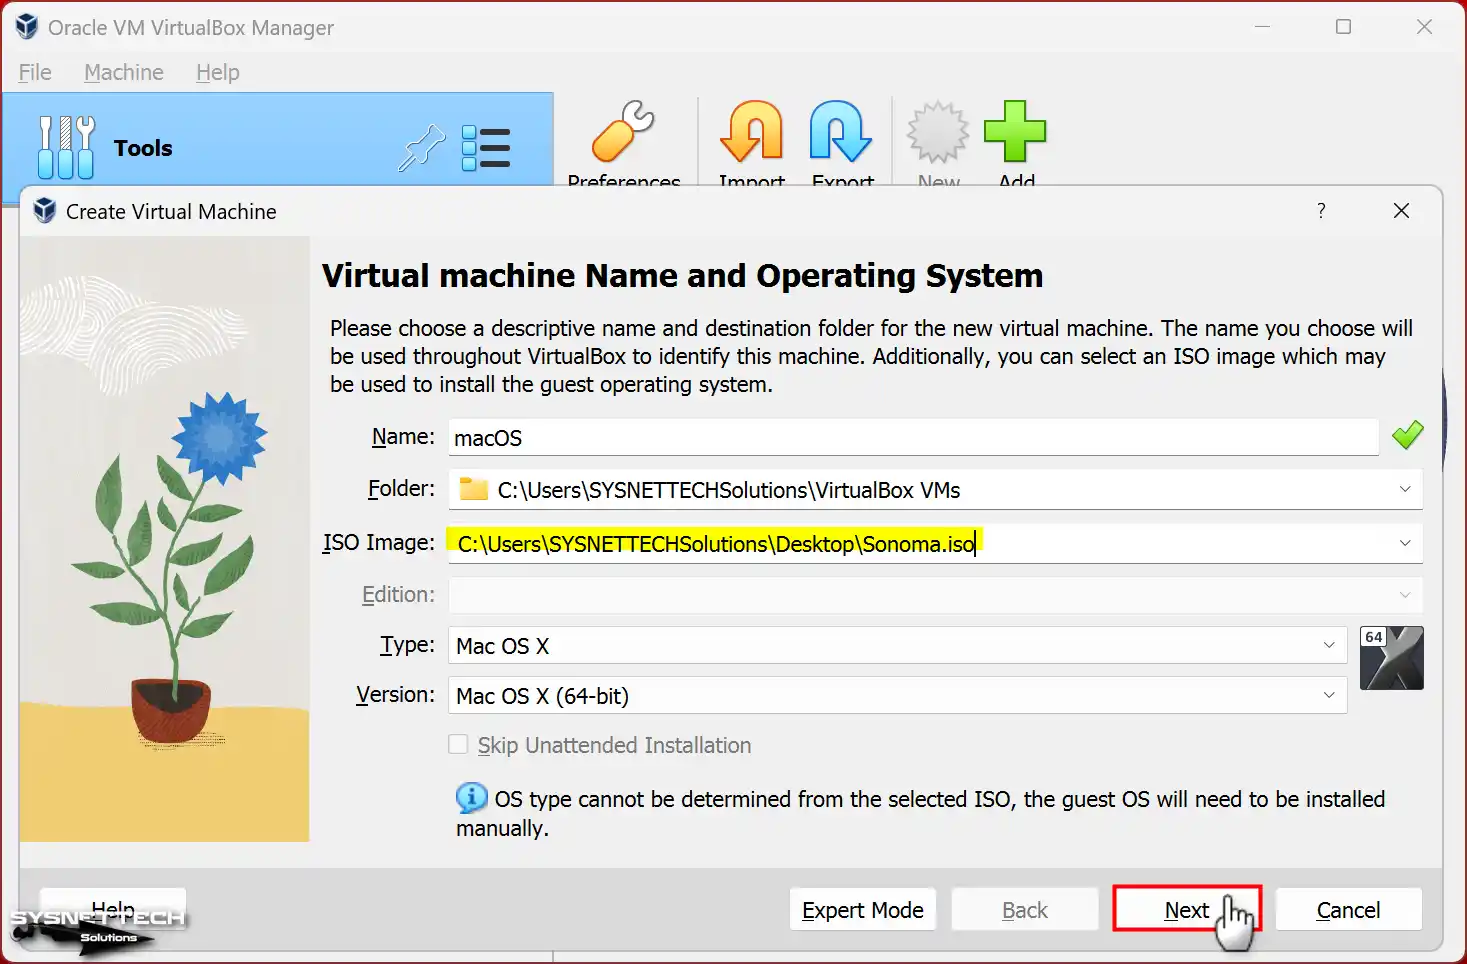
When you’re in the window to create a VM, type macOS in the Name, then, choose Mac OS X from the Type field. Afterward, select the macOS you want to install and click the Next button.
Select “Other” from the menu when you click on ISO Image. After that, you add the Sonoma file to the pretend computer.
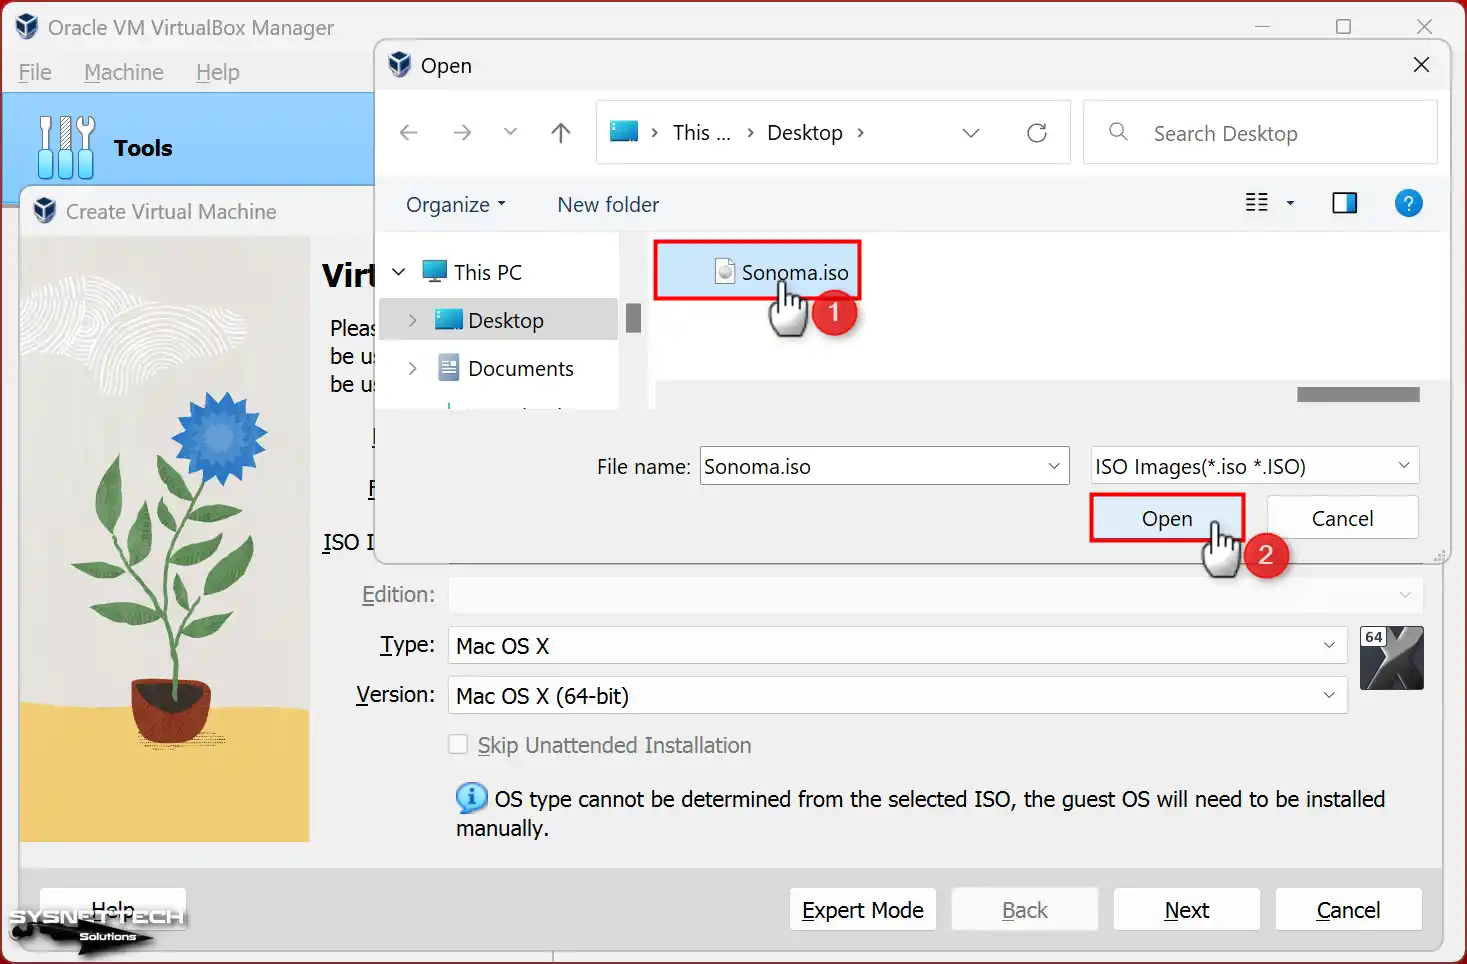
Step 3
When the window opens, go to where you saved the ISO file. Afterward, find the related file and open it up.
Step 4
After completing the initial steps, proceed to the next part by clicking Next.
Step 5
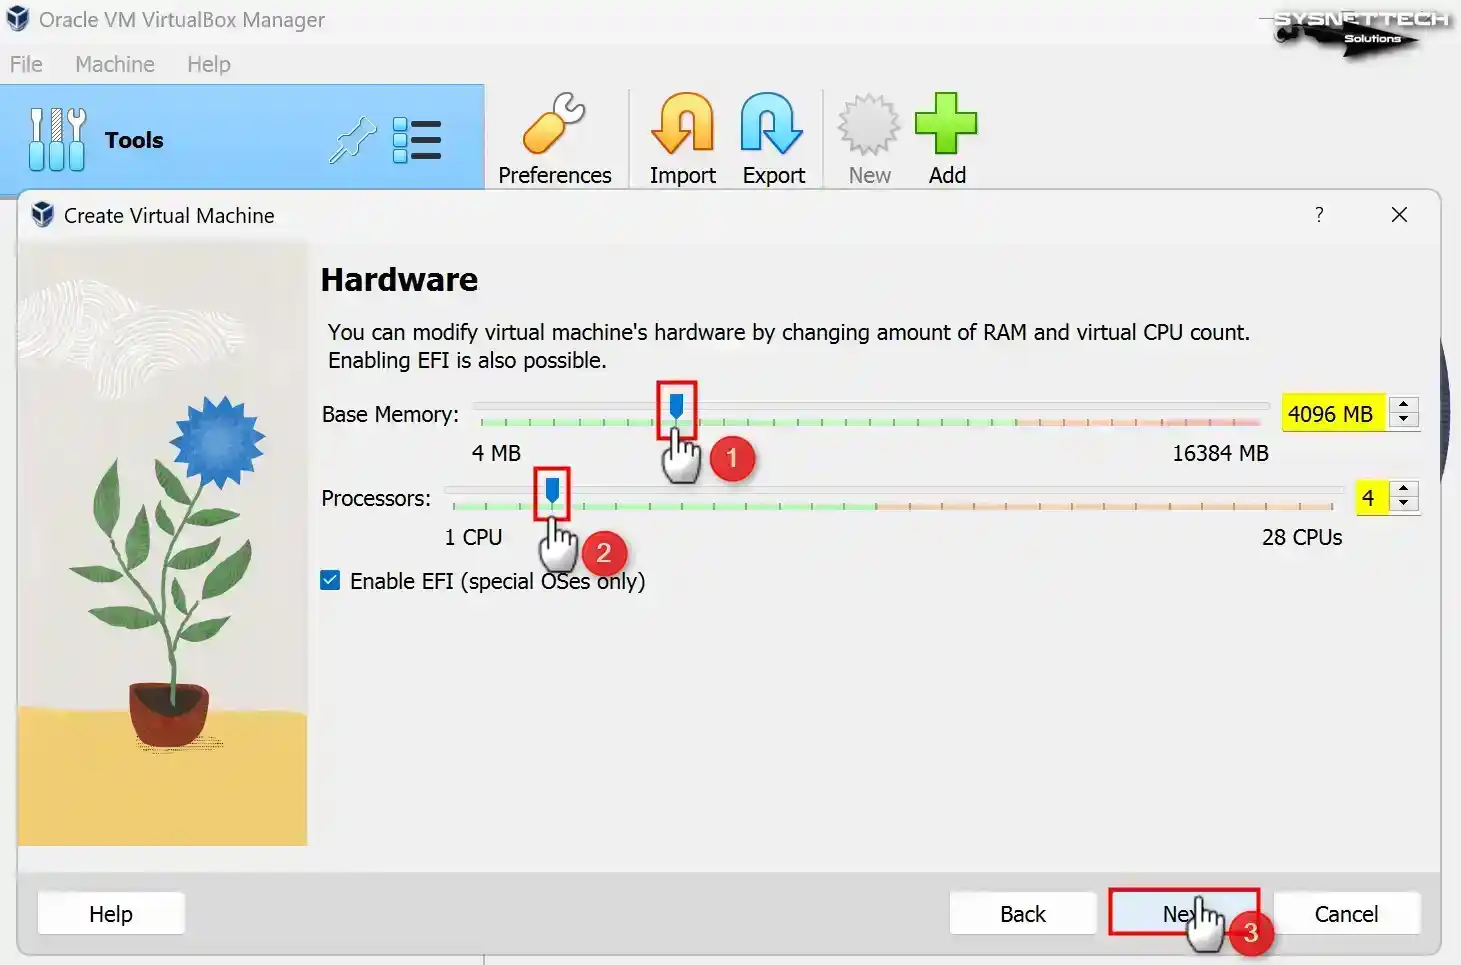
You should divide the RAM and virtual processor based on how well your computer works. So, adjust the virtual machine settings to match your PC’s specifications. If the host RAM is 16 GB, assign 4 GB or 8 GB. Consequently, change the Memory Size in the window accordingly. Under normal conditions, macOS VM runs smoothly with 4096 MB of memory. So, set the memory size to 4096 for optimal performance.
Another thing to do is choose either 2 or 4 virtual CPUs so the virtual macOS computer runs better. If your host PC has problems or gets stuck while installing, set the virtual processor cores to 1 and see if it helps.
Step 6
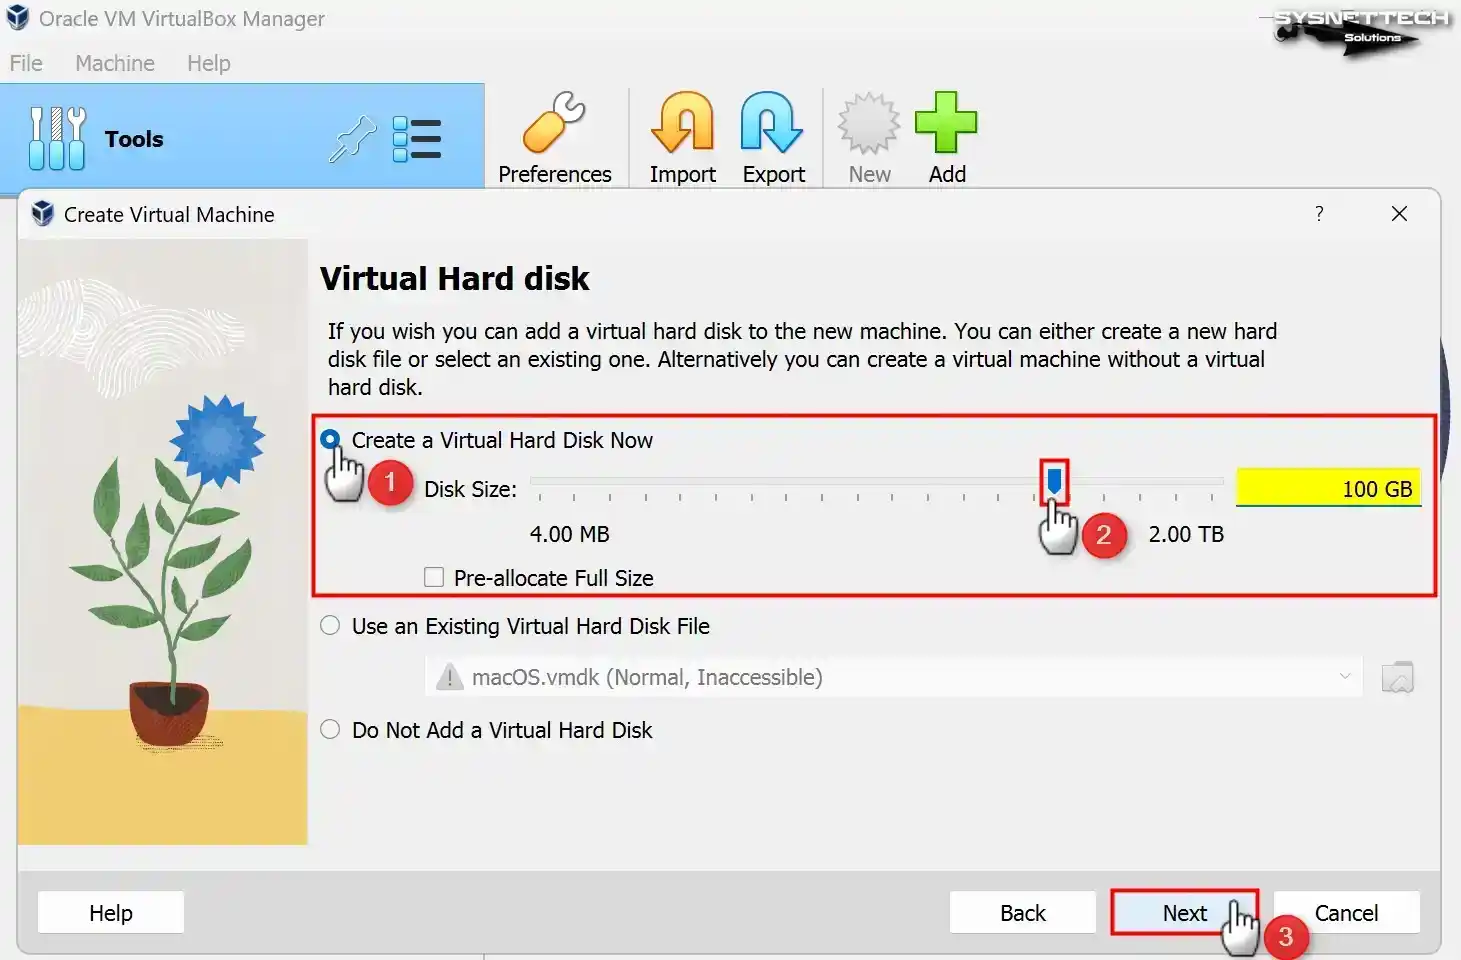
If the virtual machine disk is ready in the Virtual Hard Disk window, you can add it and start your virtual macOS. But if you’re starting fresh, choose the “Create a virtual hard disk now” option and click Create to continue.
If you have any VirtualBox 6.x versions, select the “VDI” (VirtualBox Disk Image) type for the virtual hard disk when setting it up. Then, click the Next button to move forward.
Furthermore, if you make the hard disk a fixed size when setting up the virtual PC in VirtualBox, it will use up space on your computer’s disk equal to the extent you set.
Making the pretend disk a fixed size on older computers can make things work faster. But if your computer’s disk is an SSD or NVMe, it’s better to set up the virtual disk as dynamic, meaning it uses space as needed.
Back up the location of the guest computer’s setup and where the virtual disk is on an external drive. Also, only fill up your computer’s disk with reason. Based on your activities on the simulated macOS system, determine the size of the imaginary disk. A disk size of 100 GB should be enough for installing and trying things out.
Step 7
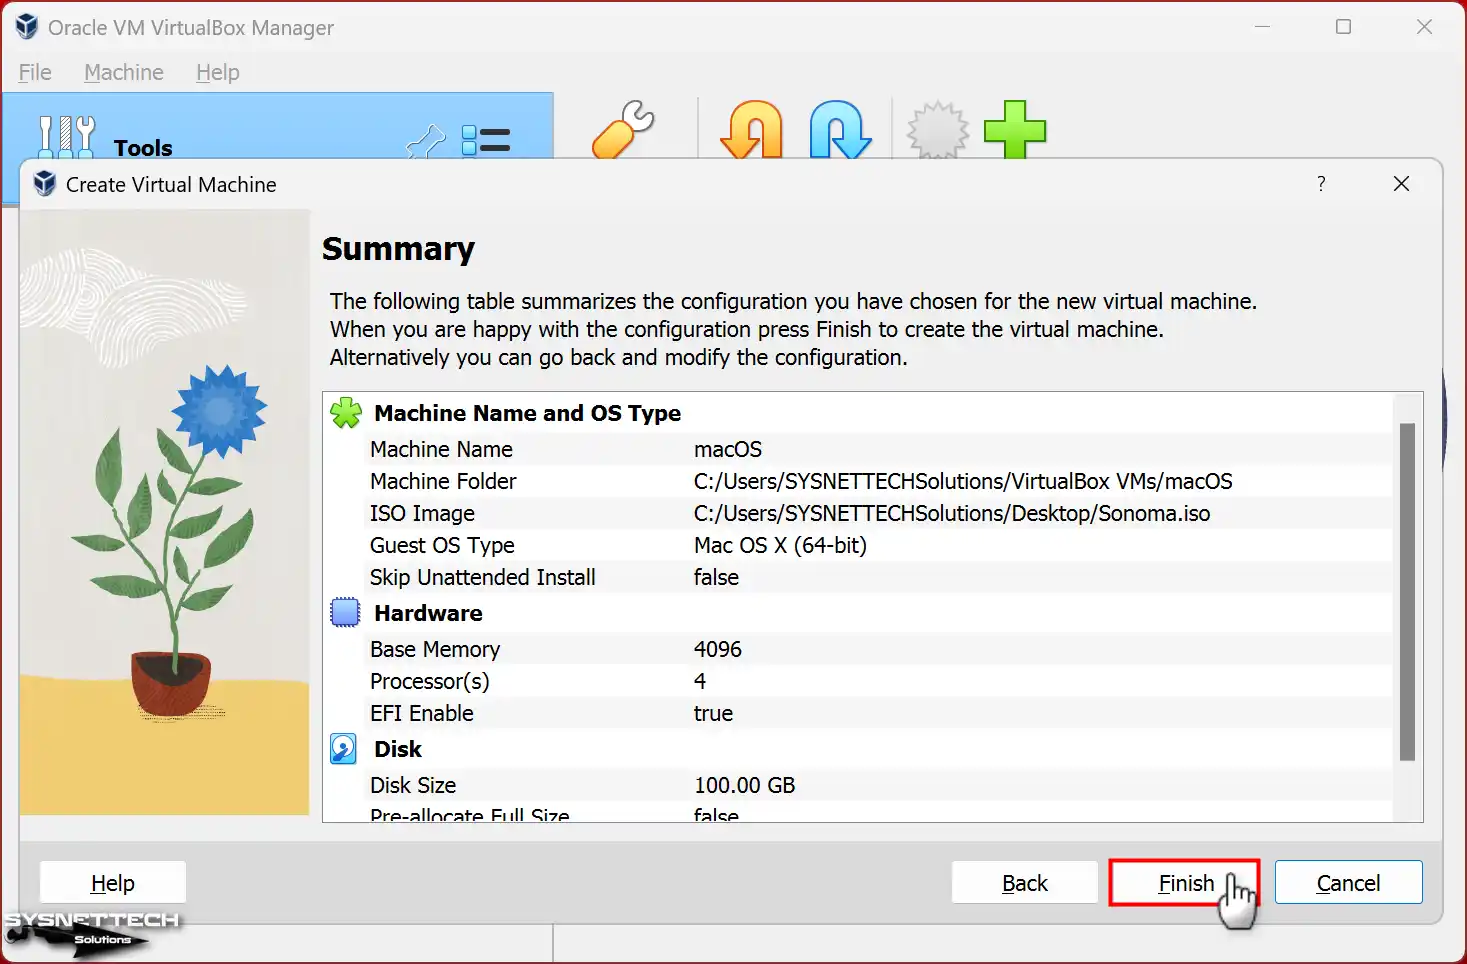
Check the settings for the fake macOS computer’s hardware and then close the wizard.
Step 8
Press the Settings button to adjust the guest computer’s setup in more detail.

Step 9
Take out the pretend floppy from the fake computer’s settings (go to System, then Motherboard, and finally Boot Order). Make the optical drive the primary device. Just adjust the settings as needed.

Step 10
Add four processors to the macOS VM in the System/Processor section. If you don’t do this, you might run into a load_init_program error while installing. Also, if you plan to use special VM software, turn on the Nested VT-x/AMD-V feature.
If you keep running into problems or things keep going in circles when you’re making the pretend Mac in VirtualBox, try turning off the virtualization feature. These issues differ for each computer, so you might have to try a few things and see what works based on your PC.

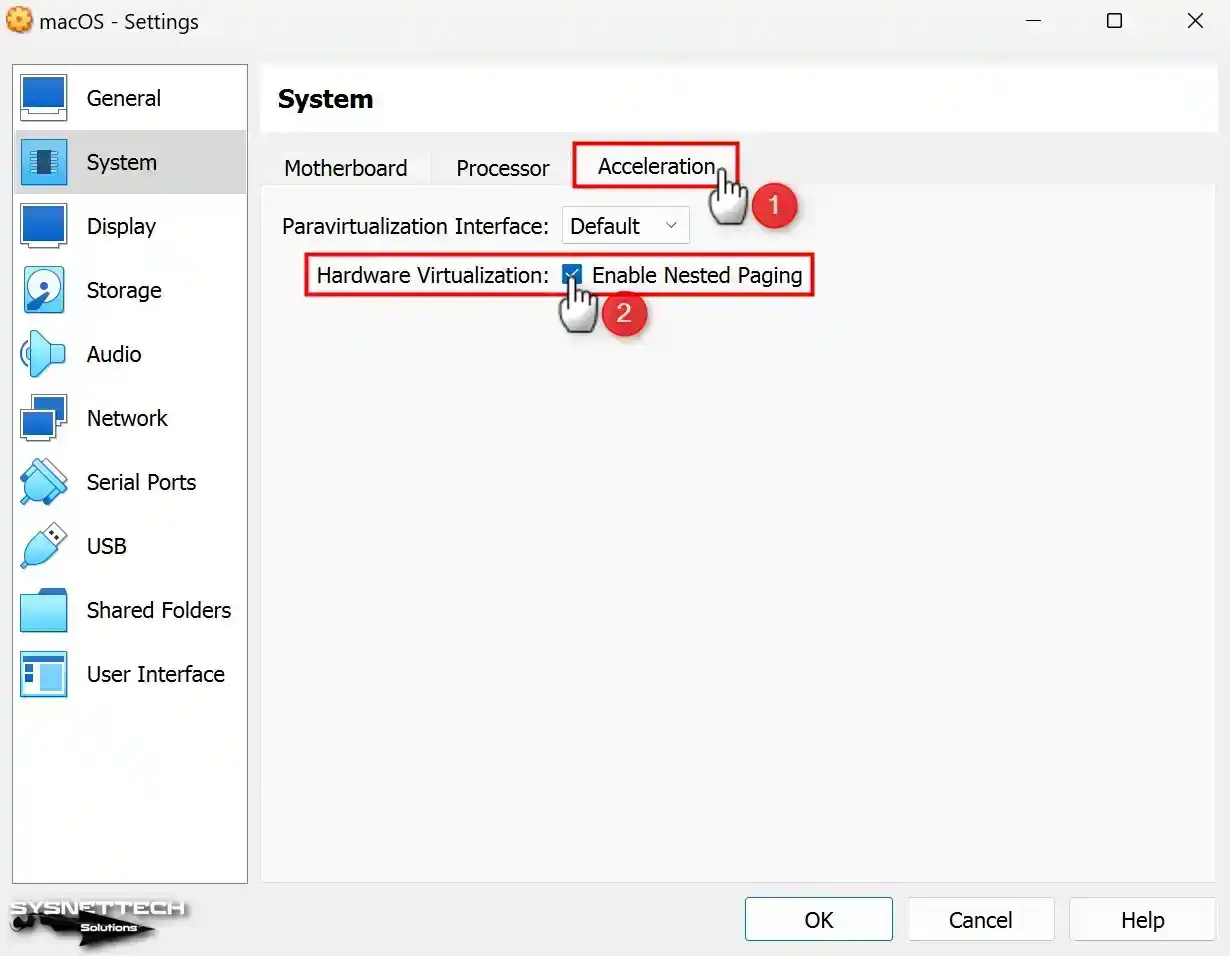
Step 11
Turning on the virtualization feature on the virtual PC makes things work faster and makes the system run better. To handle memory better between your computer and the pretend one, go to the Acceleration tab and check the box for Nested Paging in the Hardware Virtualization section.
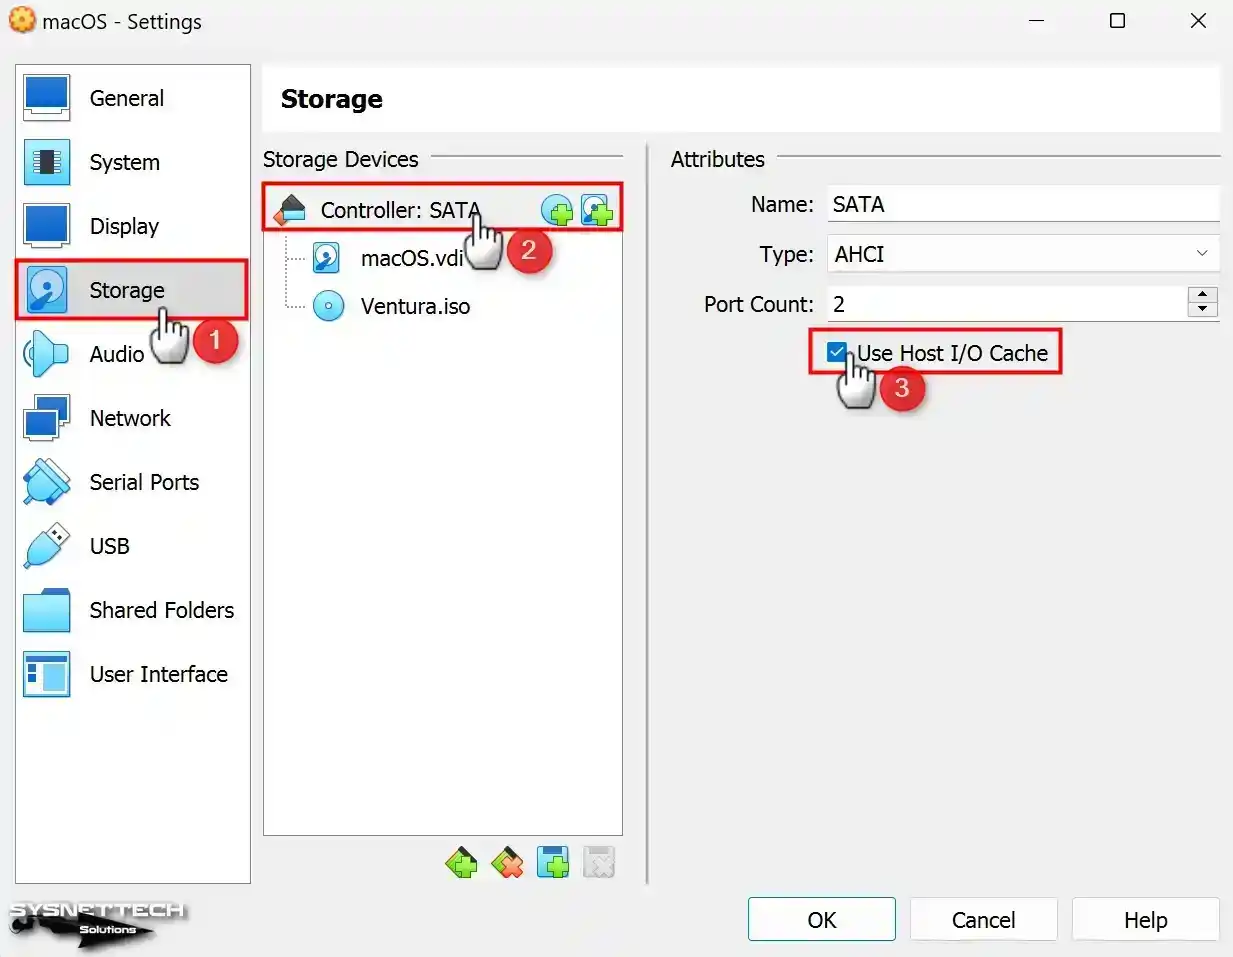
Step 12
Turn on the Host I/O Cache on the SATA Controller to make the virtual computer’s disk work faster. Thanks to this, the VM’s disk runs faster.
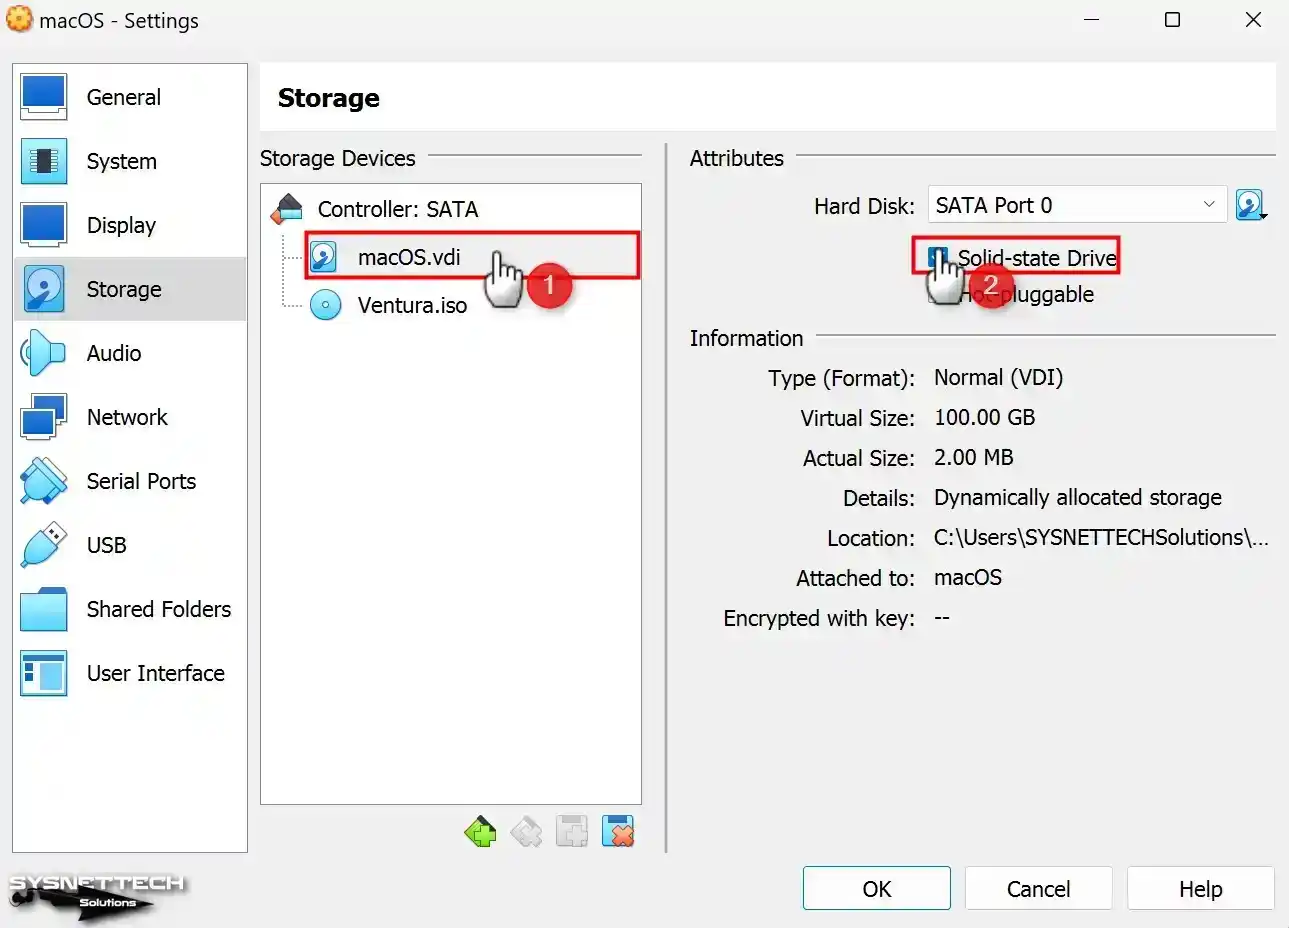
Step 13
Also, choose the Solid-State Drive (SSD) option in the macOS settings.vdi disk file.
Step 14
You must pay attention to the point here: you enabled USB 3.0. Installing it using USB 1.1 or 2.0 may result in a keyboard and mouse error.

Step 15
Before you start running macOS on the VirtualBox virtualization app, you need to make some extra settings on the virtual machine using the Command Prompt. First, close the program and open the CMD or PowerShell command prompt as an administrator.
Next, please copy and paste the codes I gave you into a text document. After that, change the virtual machine’s name as necessary. Finally, run the commands in the order I provided.
cd "C:\Program Files\Oracle\VirtualBox\"./VBoxManage.exe modifyvm "macOS" --cpuid-set 00000001 000106e5 00100800 0098e3fd bfebfbff./VBoxManage setextradata "macOS" "VBoxInternal/Devices/efi/0/Config/DmiSystemProduct" "MacBookPro15,1"./VBoxManage setextradata "macOS" "VBoxInternal/Devices/efi/0/Config/DmiSystemVersion" "1.0"./VBoxManage setextradata "macOS" "VBoxInternal/Devices/efi/0/Config/DmiBoardProduct" "Mac-551B86E5744E2388"./VBoxManage setextradata "macOS" "VBoxInternal/Devices/smc/0/Config/DeviceKey" "ourhardworkbythesewordsguardedpleasedontsteal(c)AppleComputerInc"./VBoxManage setextradata "macOS" "VBoxInternal/Devices/smc/0/Config/GetKeyFromRealSMC" 1./VBoxManage setextradata "macOS" "VBoxInternal/TM/TSCMode" "RealTSCOffset"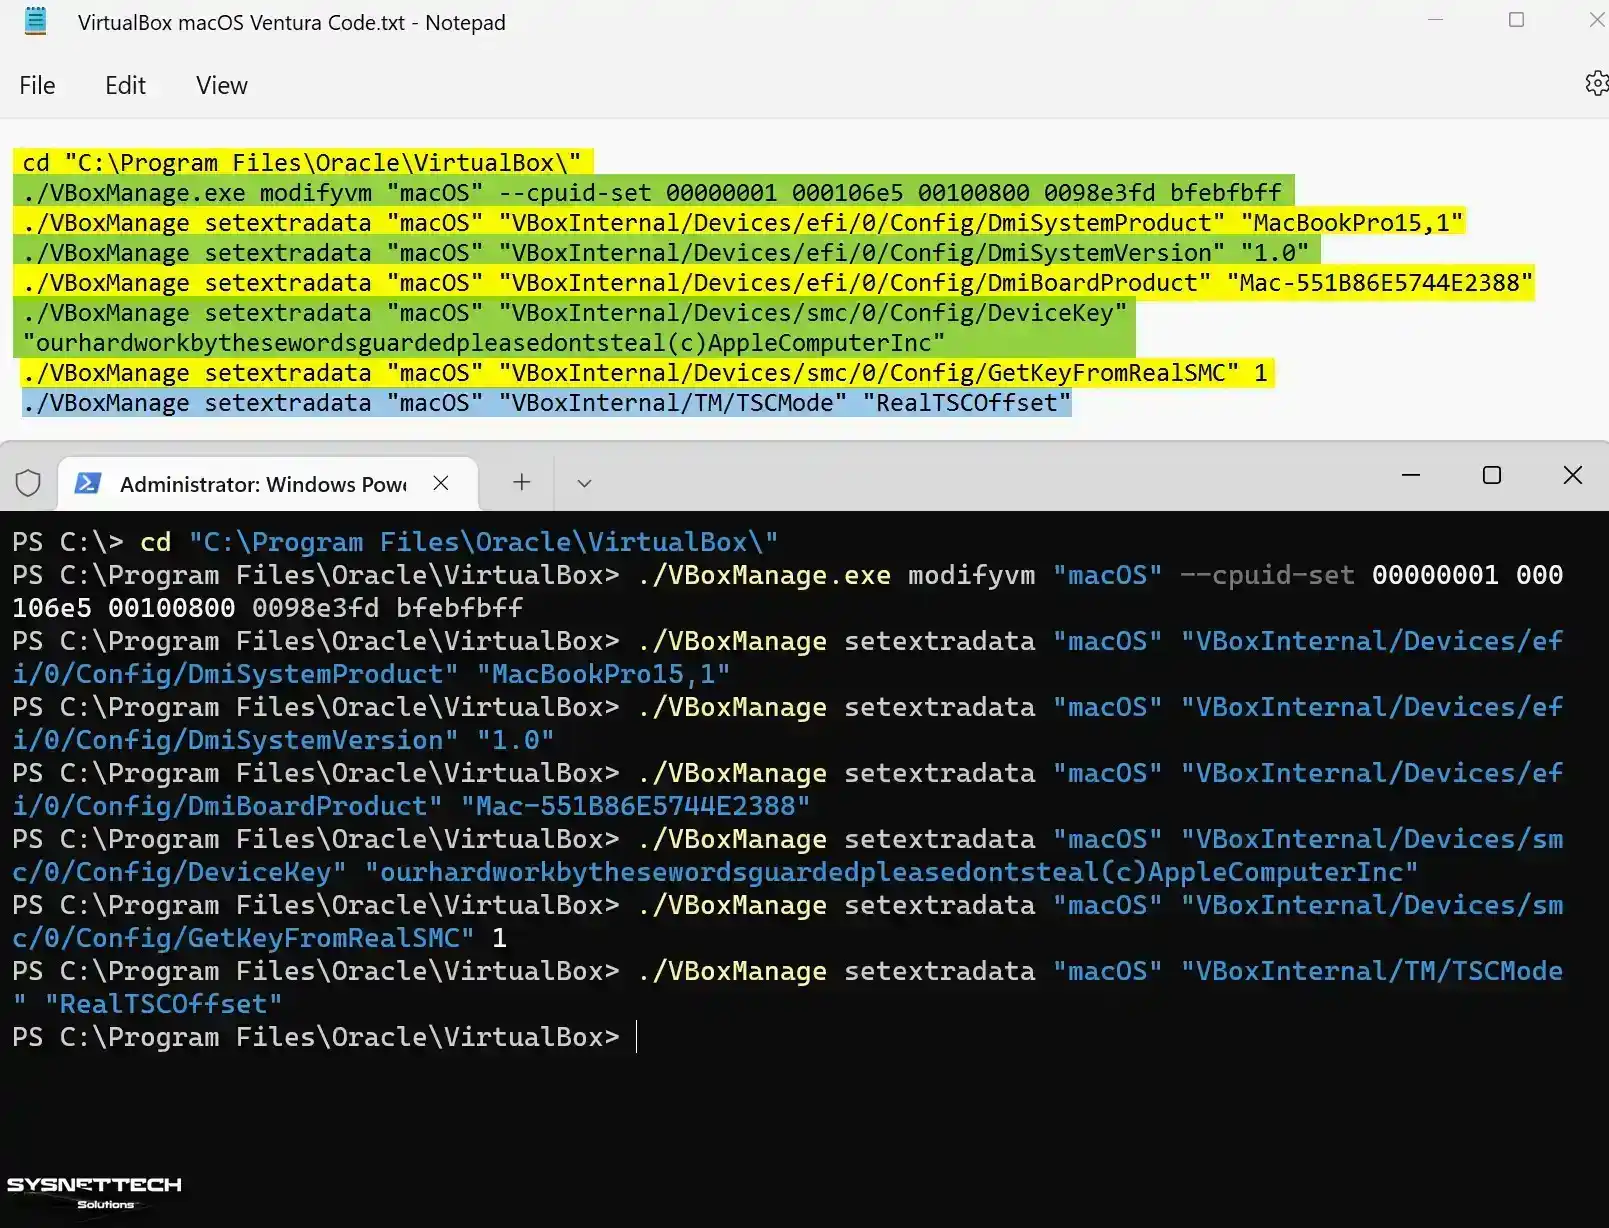
Step 16
Once you’ve set up everything for the macOS VM using VirtualBox, start it for the installation.

How to Install macOS Sonoma 14 on Oracle VirtualBox
Once you’ve done all the setup to install the Mac OS on VirtualBox, start the virtual PC and complete the installation, just like you would on an honest Mac.
Step 1
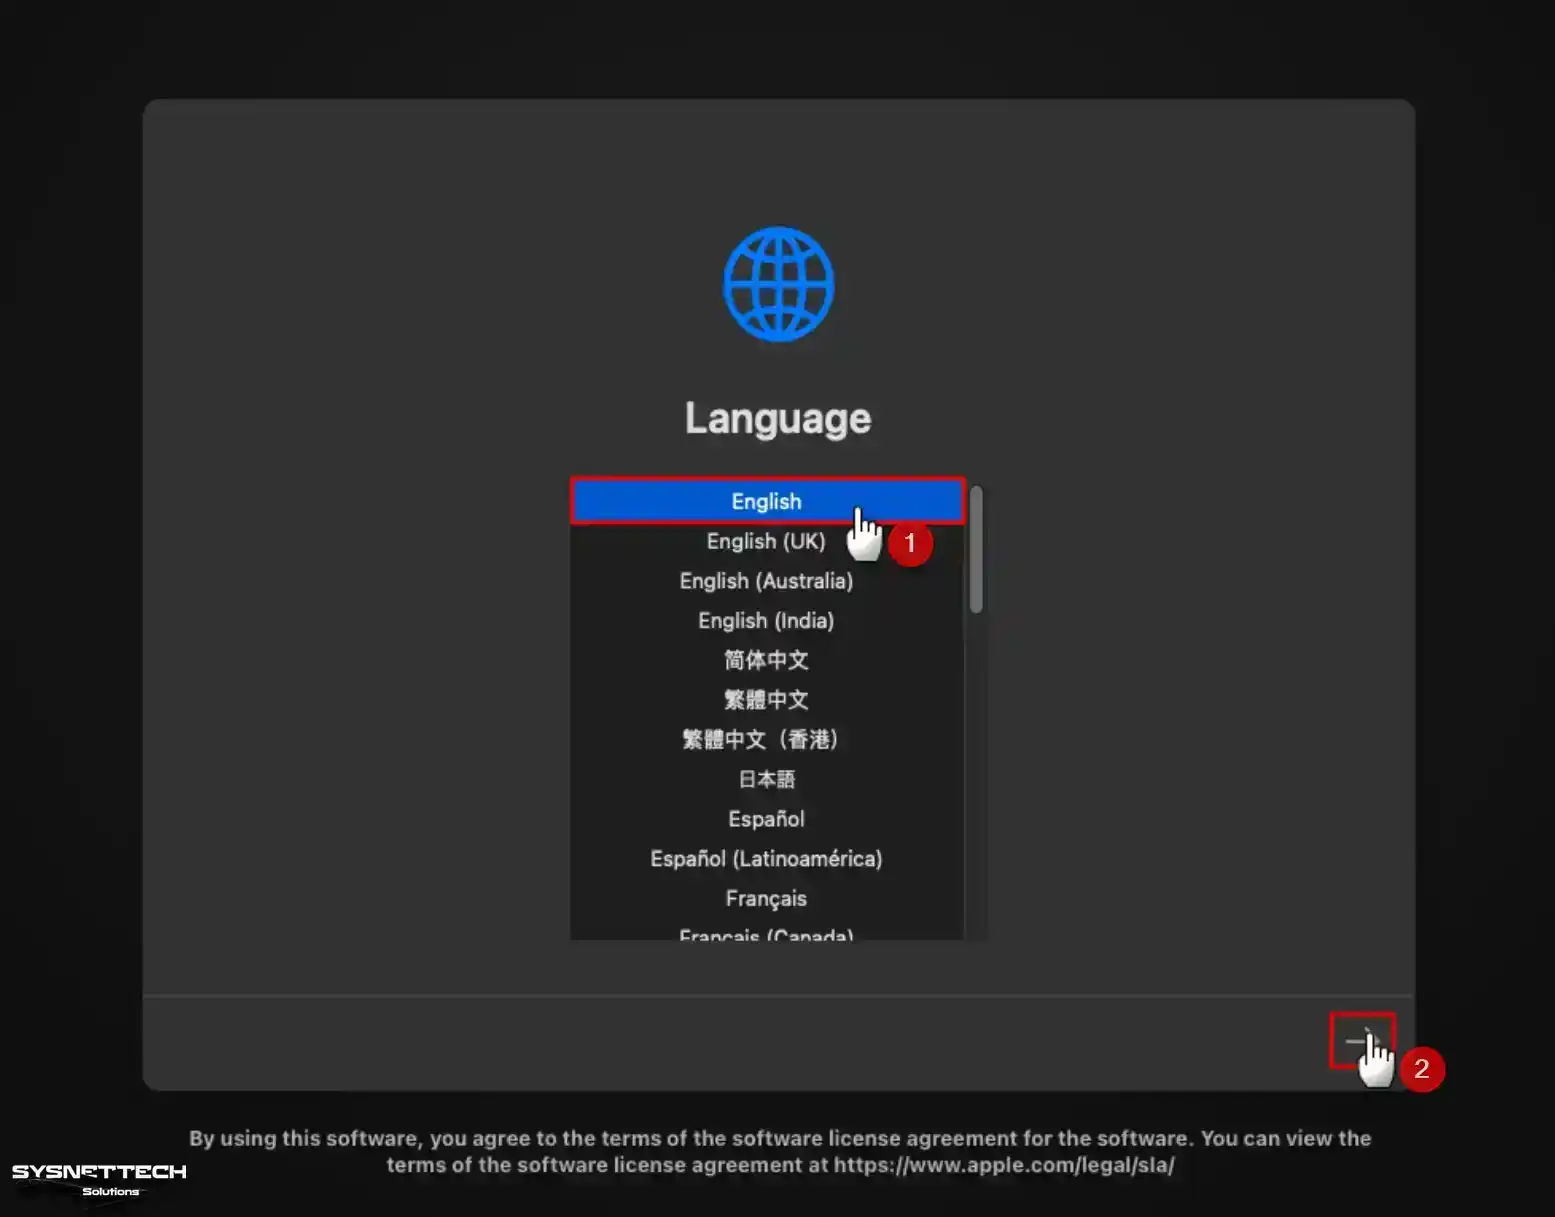
Wait for the virtual machine to start from the ISO image. Subsequently, choose the language you want to use in your macOS VM and keep going.
Step 2
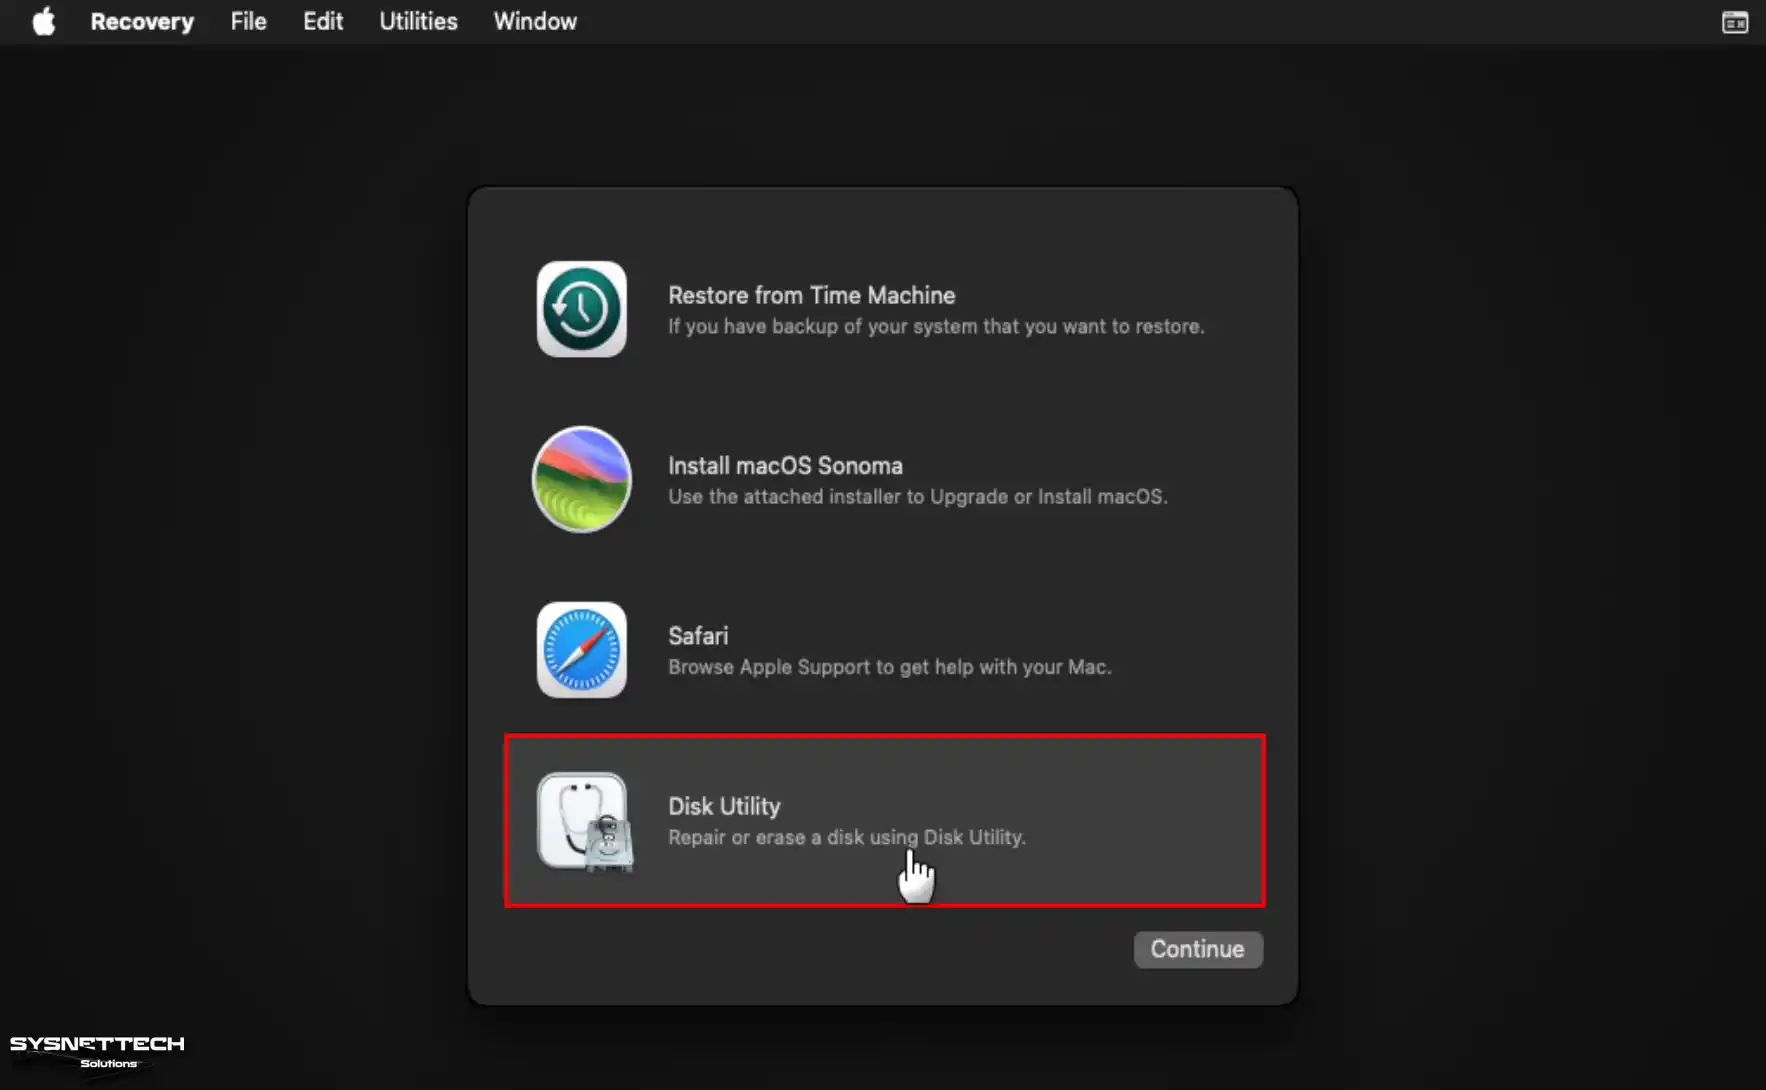
Before setting up the system, you must format the pretend disk. To do this, choose Disk Utility on the Recovery screen and click the Continue button.
Step 3
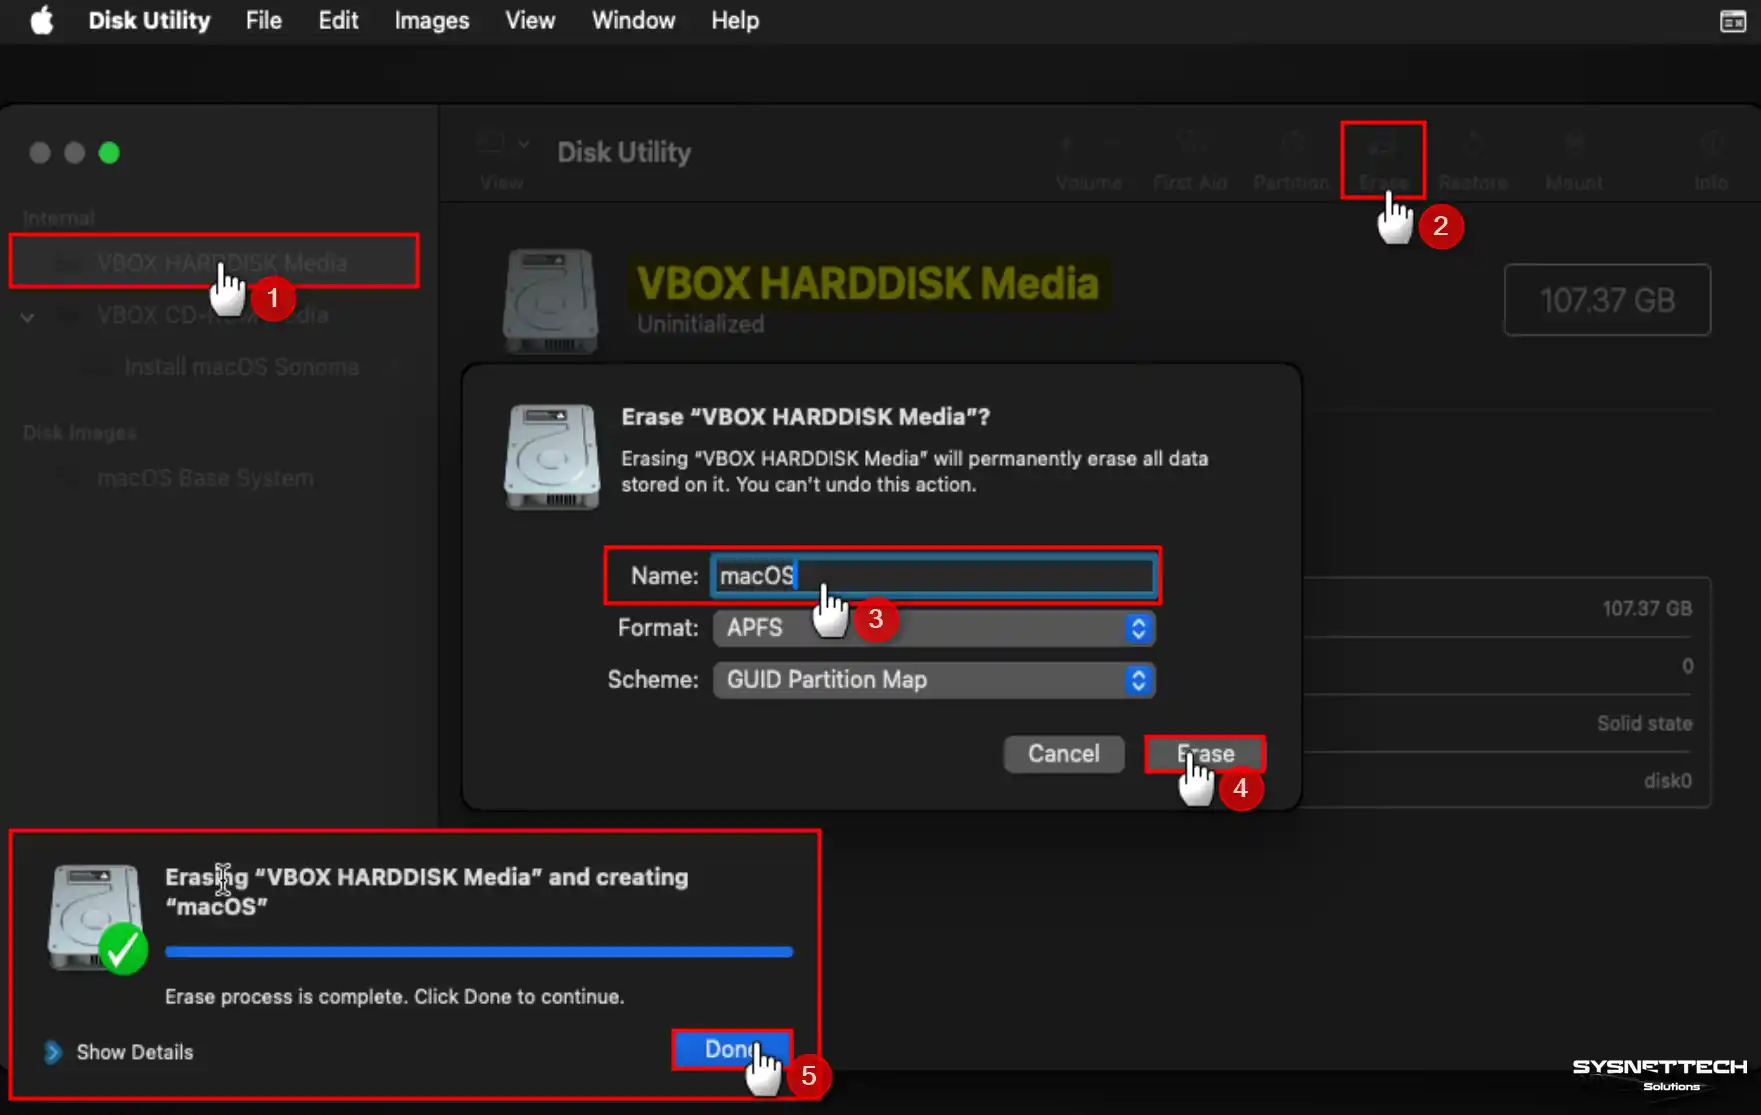
Choose the VBOX HARDDISK Media vdisk and press Erase. Once you click Erase, set up the disk’s name, format, and structure like this, and click Erase again. After the VBOX HARDDISK Media is formatted, click Done.
- Name: macOS
- Format: APFS
- Scheme: GUID Partition Map
Step 4
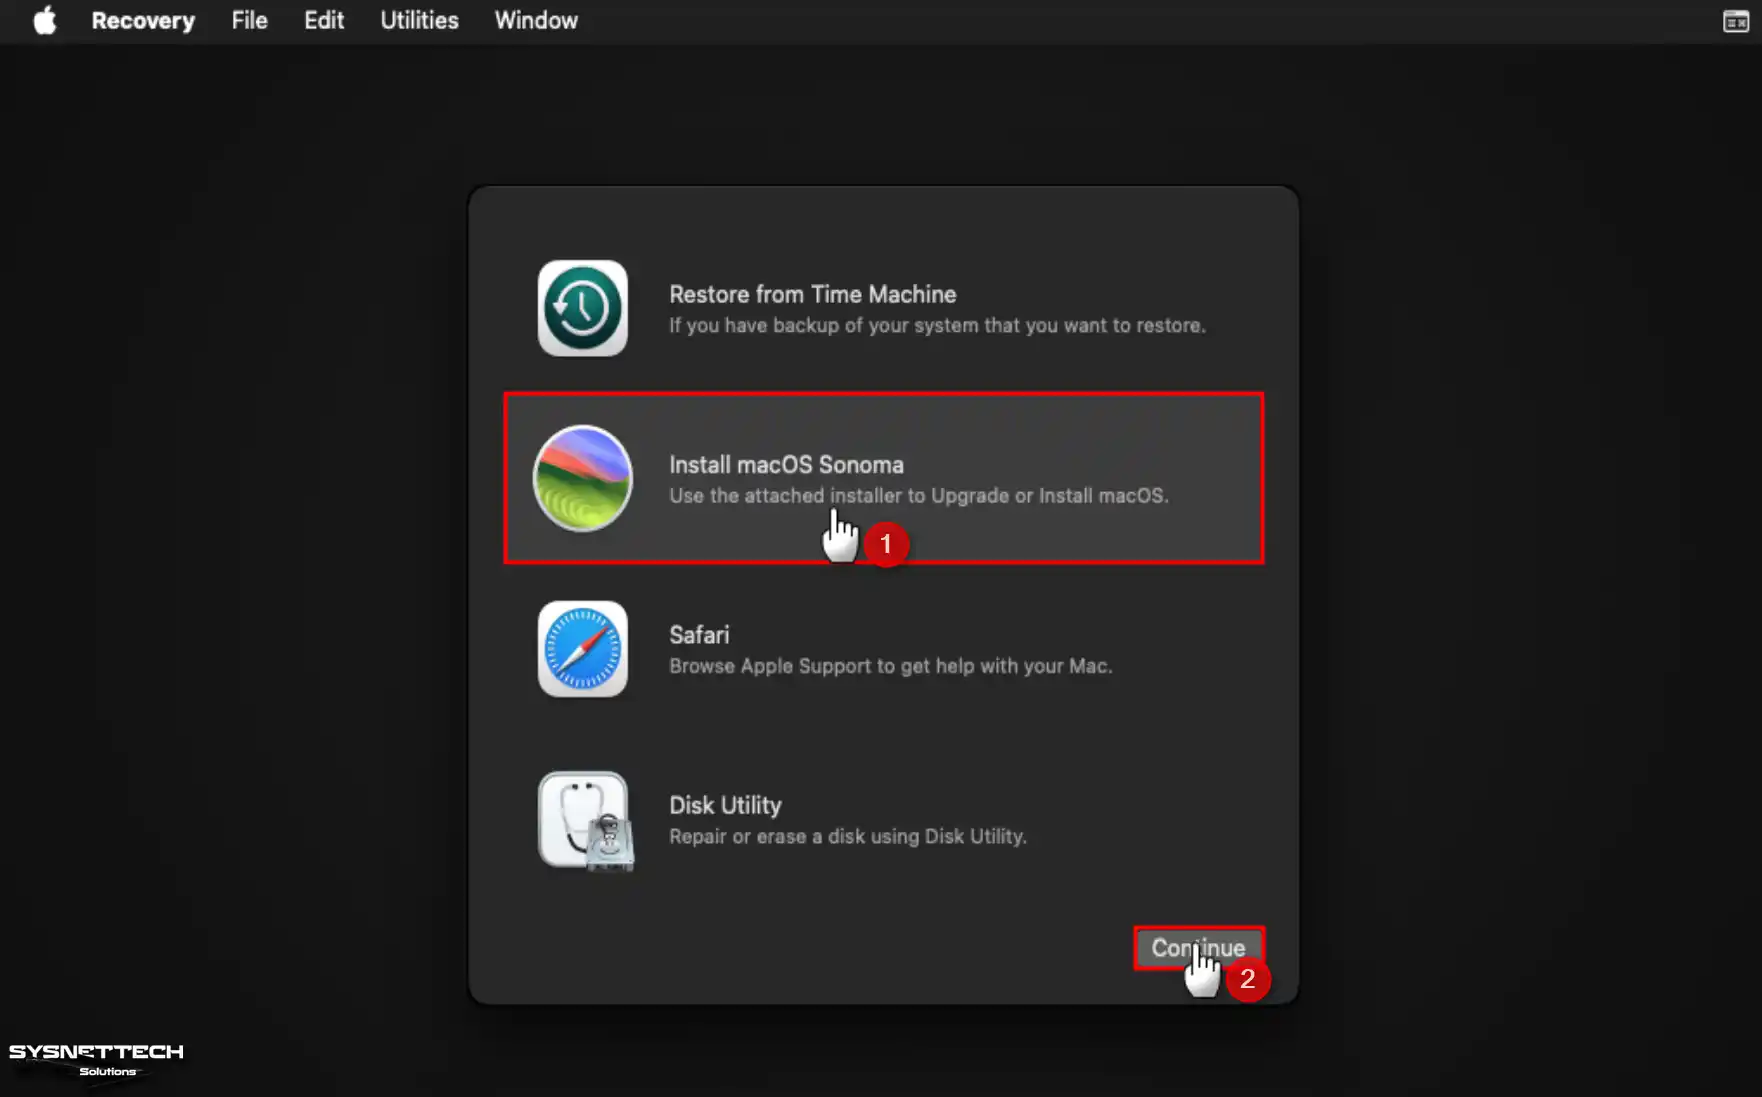
Choose Install Sonoma and click Continue to start installing the system.
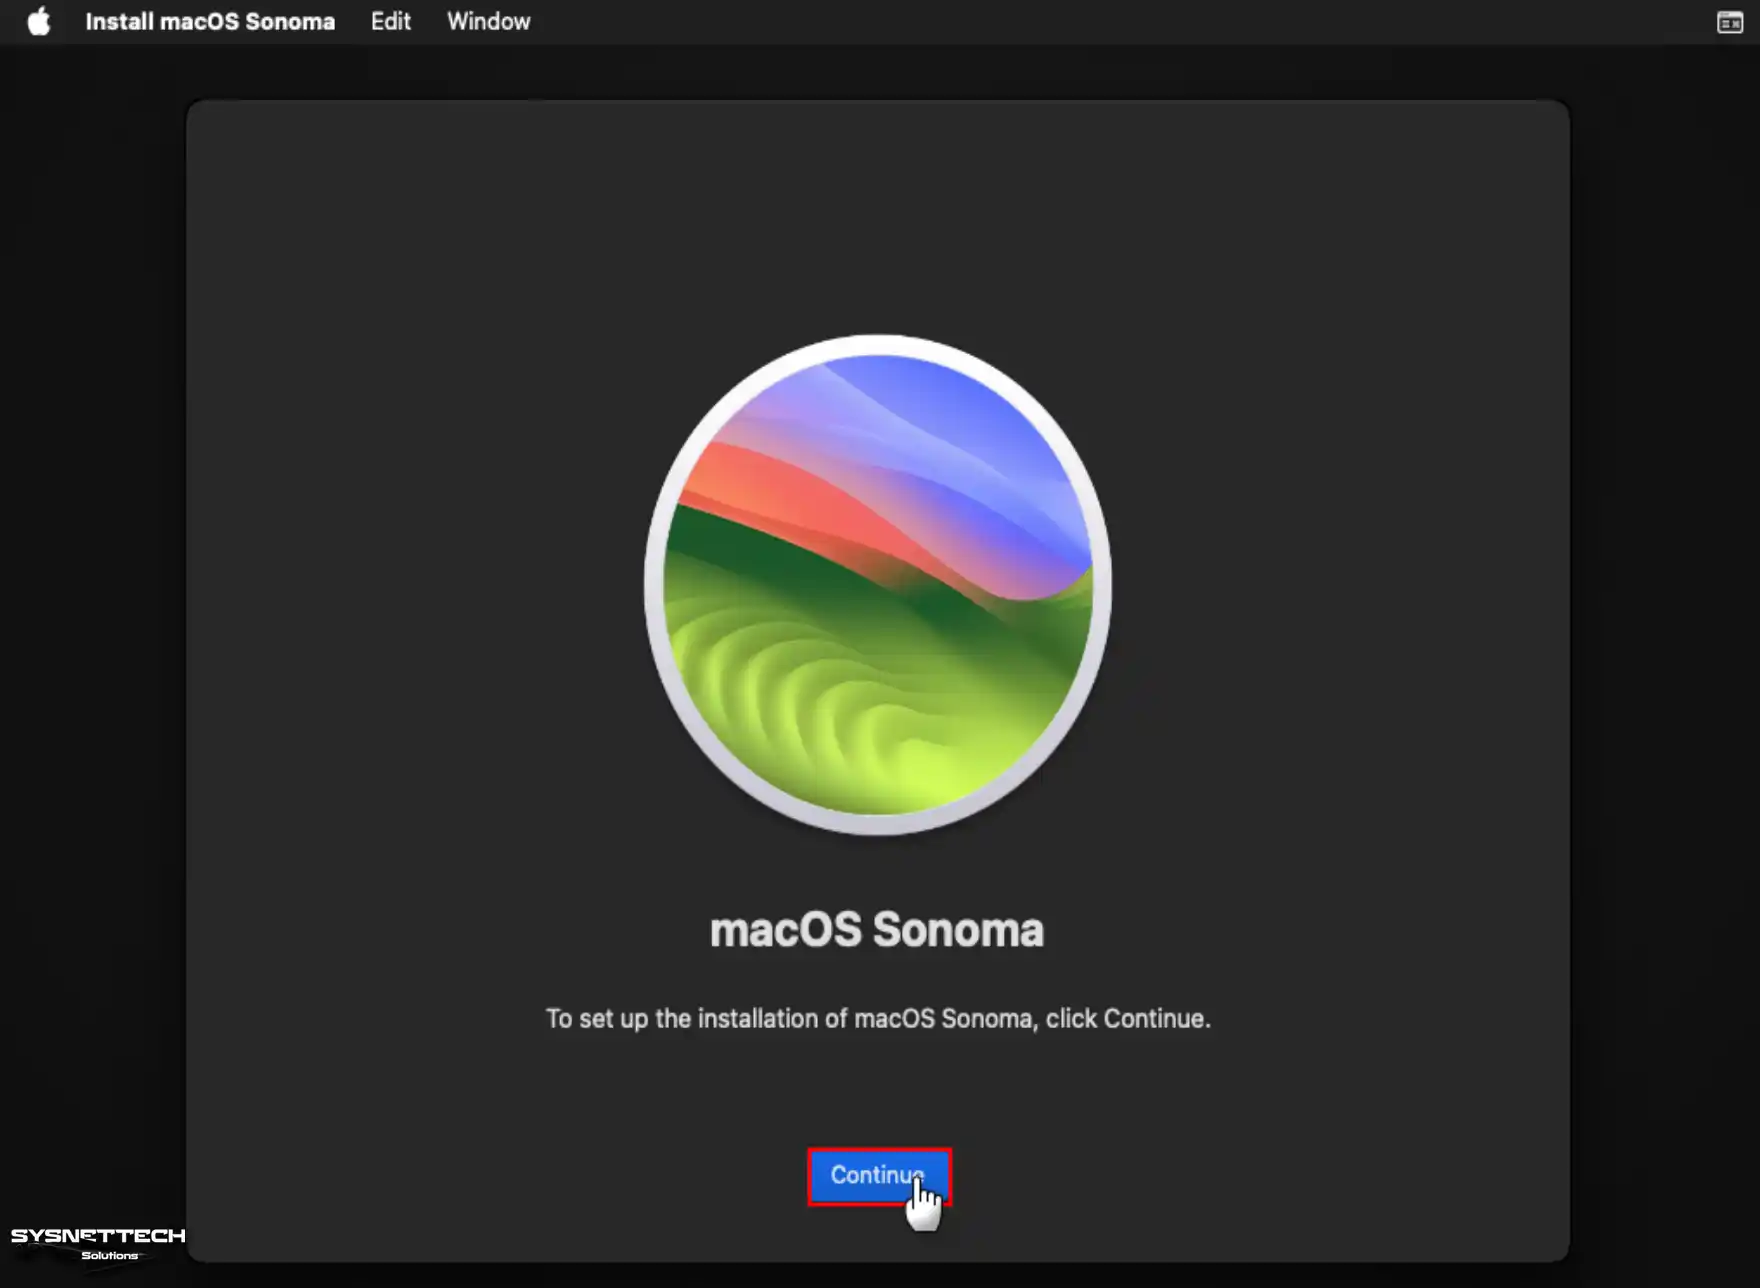
Step 5
When the system setup wizard shows up, click the Continue button.
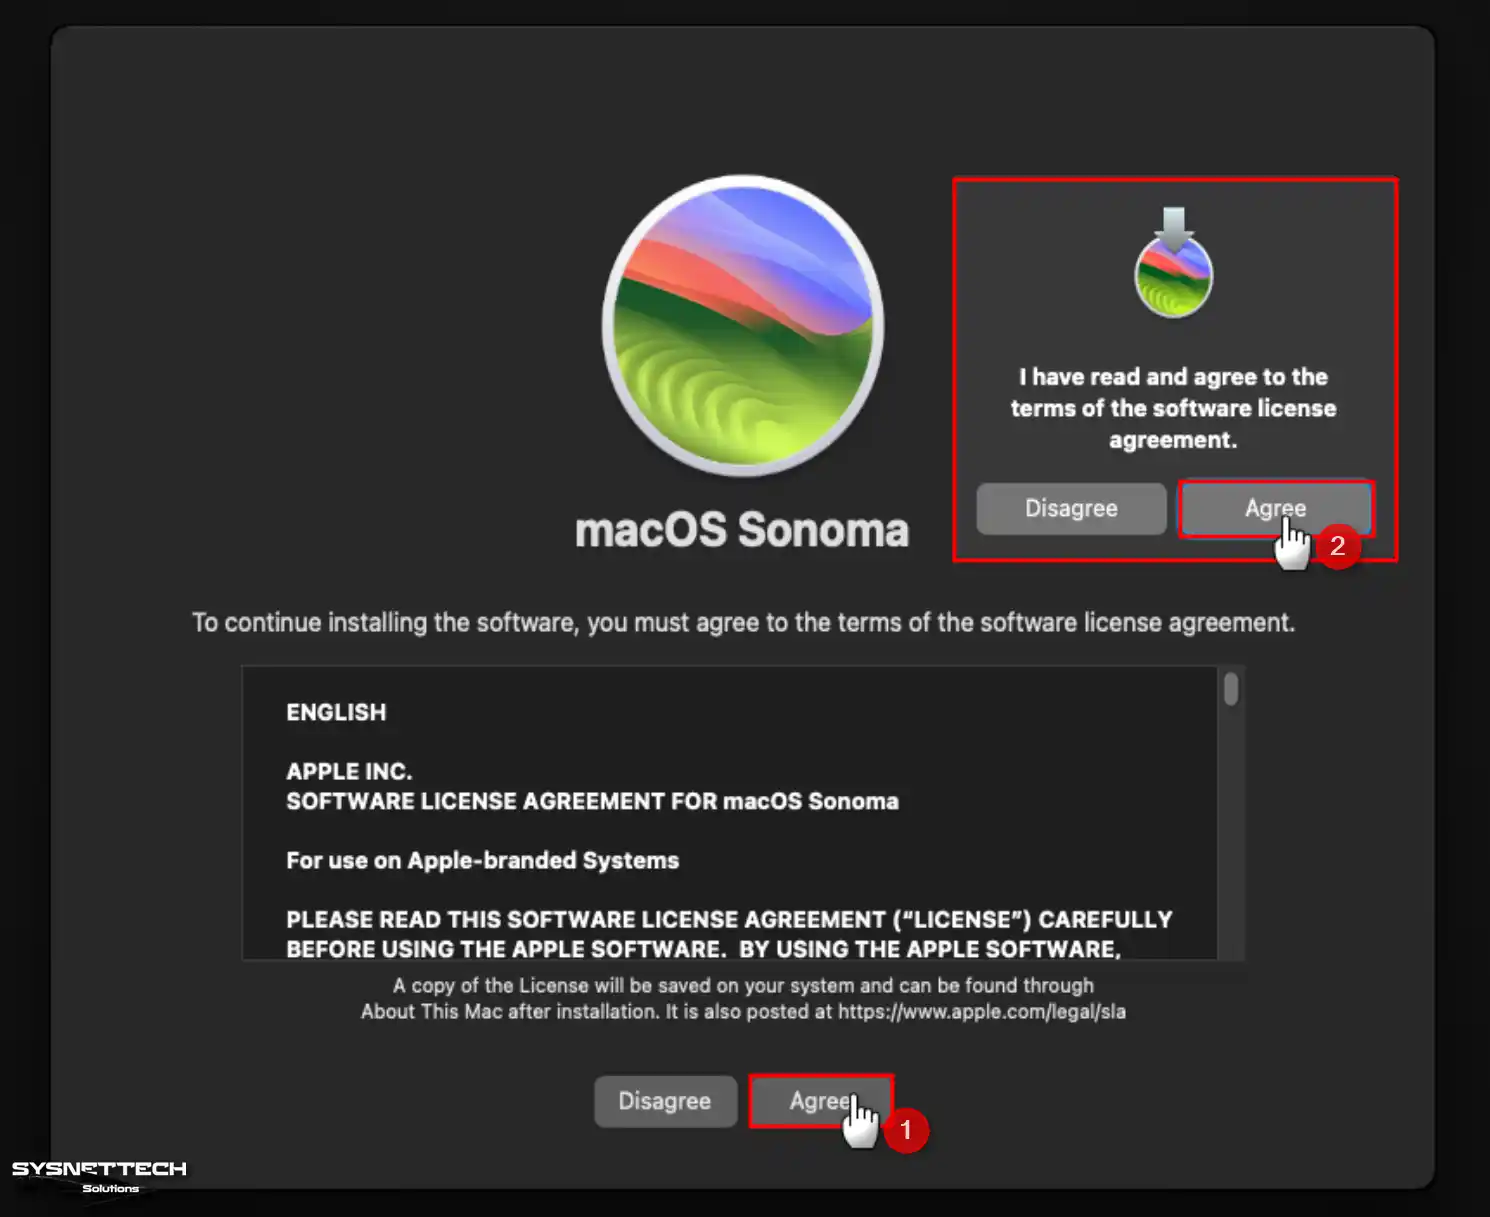
Step 6
After reading the macOS Sonoma terms of use, click Agree to accept.
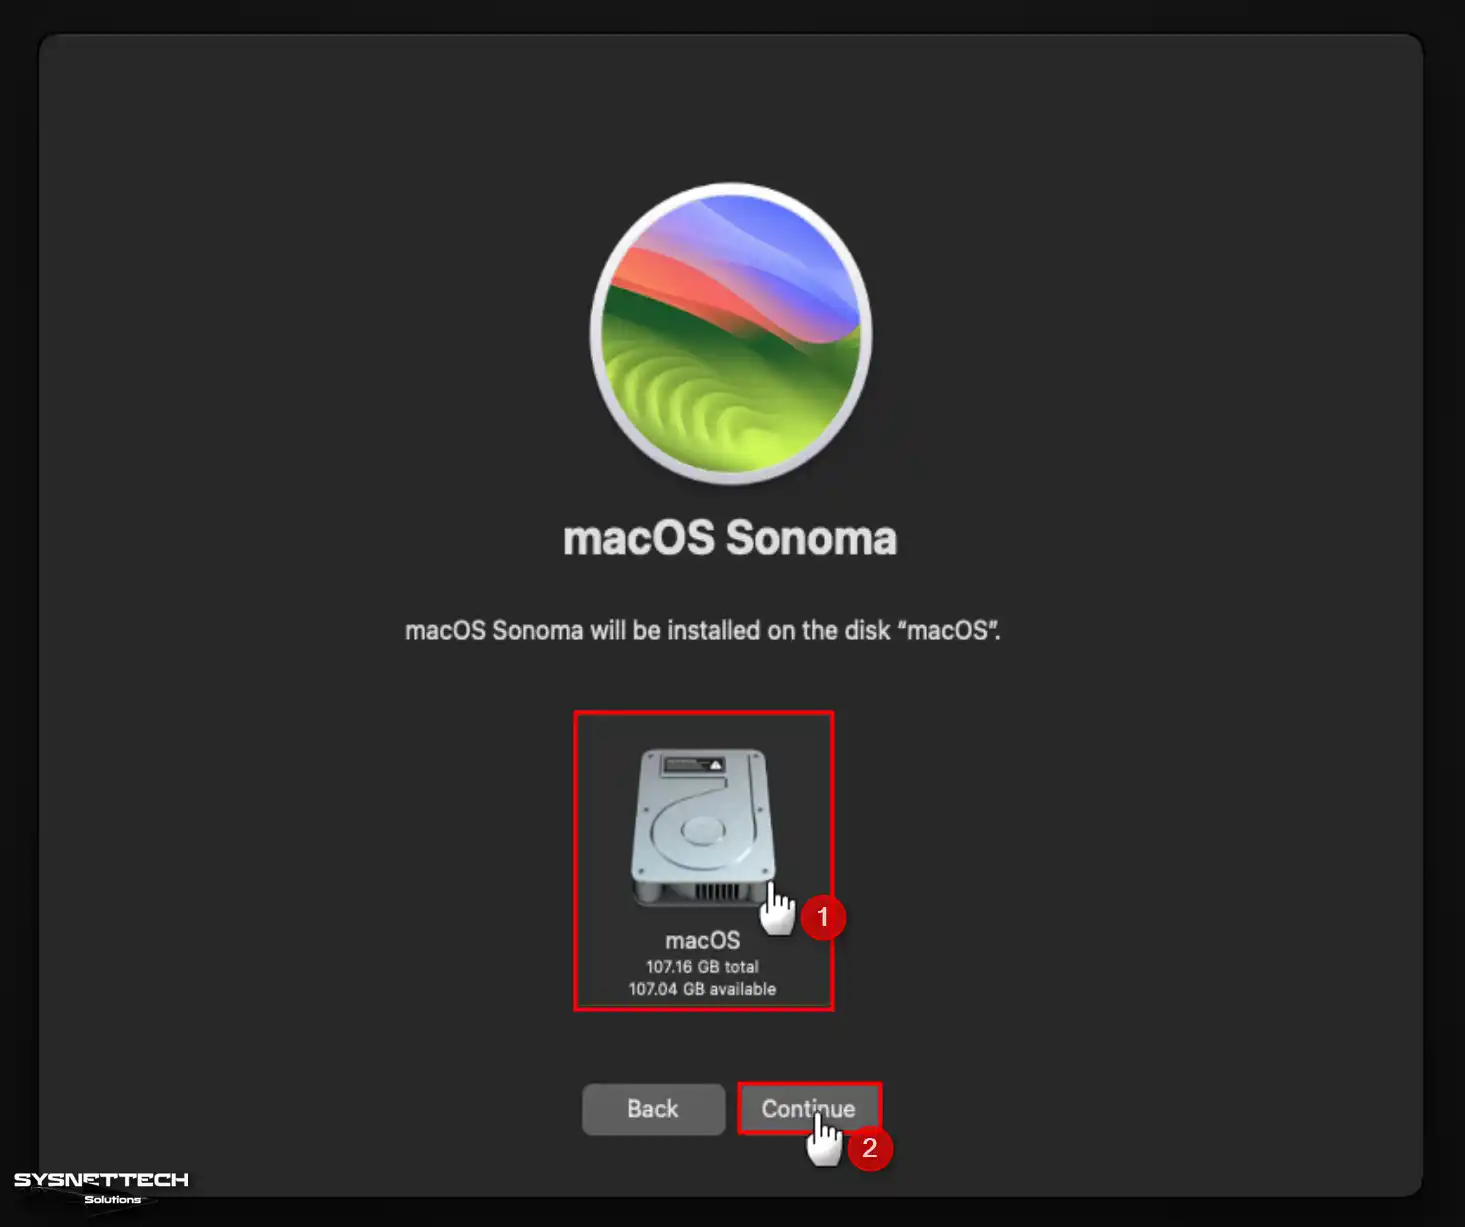
Step 7
Select the virtual disk you set up and press Install.
Step 8
Wait for the wizard to copy the installation files.
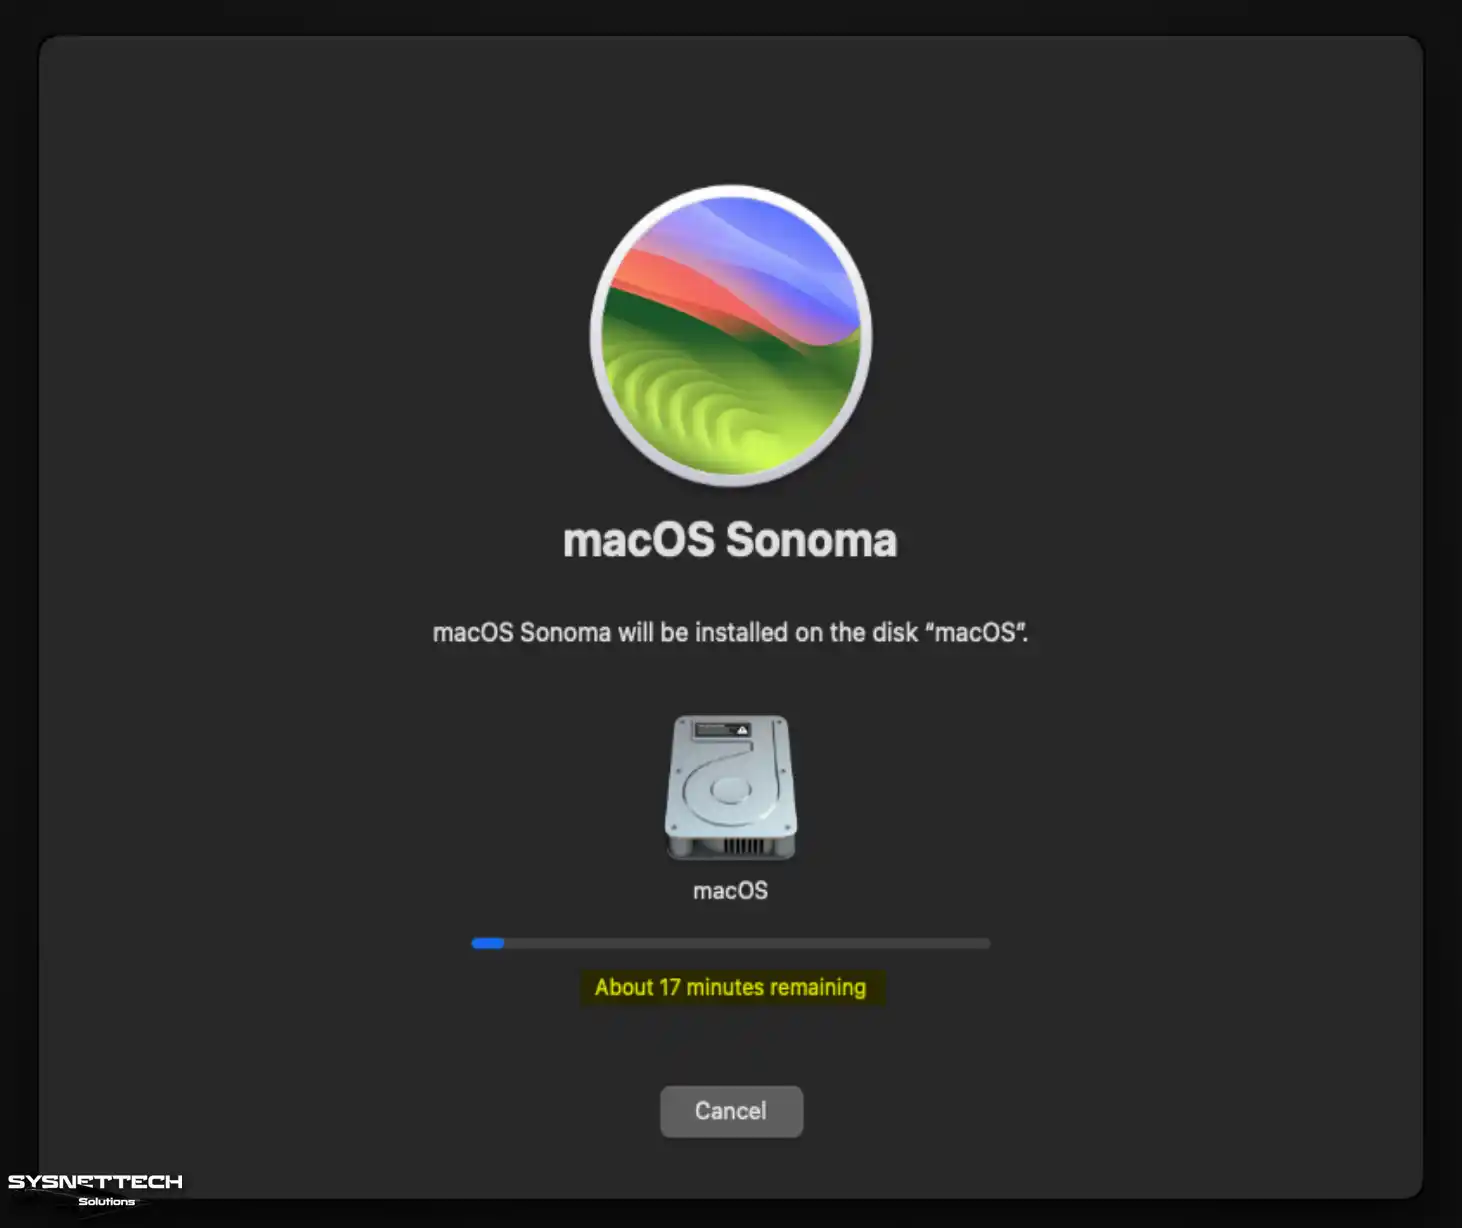
Step 9
When the guest macOS restarts, the setup wizard will continue where it left off. It might take a bit, especially if your computer isn’t super fast, so be patient if it says a minute remaining.

Step 10
Once you select your country or region, click Continue.

Step 11
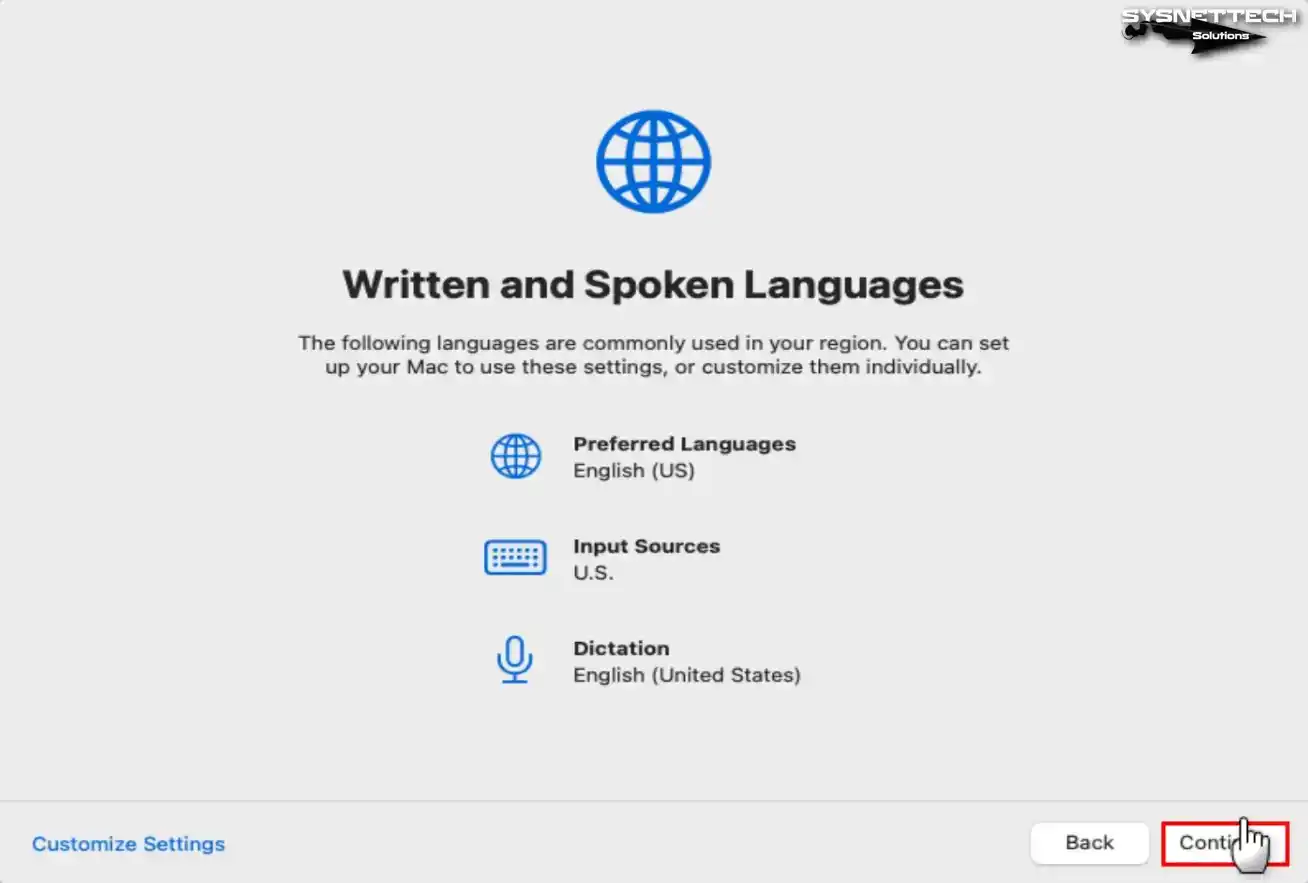
Choose the keyboard style and language you want to use in the VM, then click Continue.
Step 12
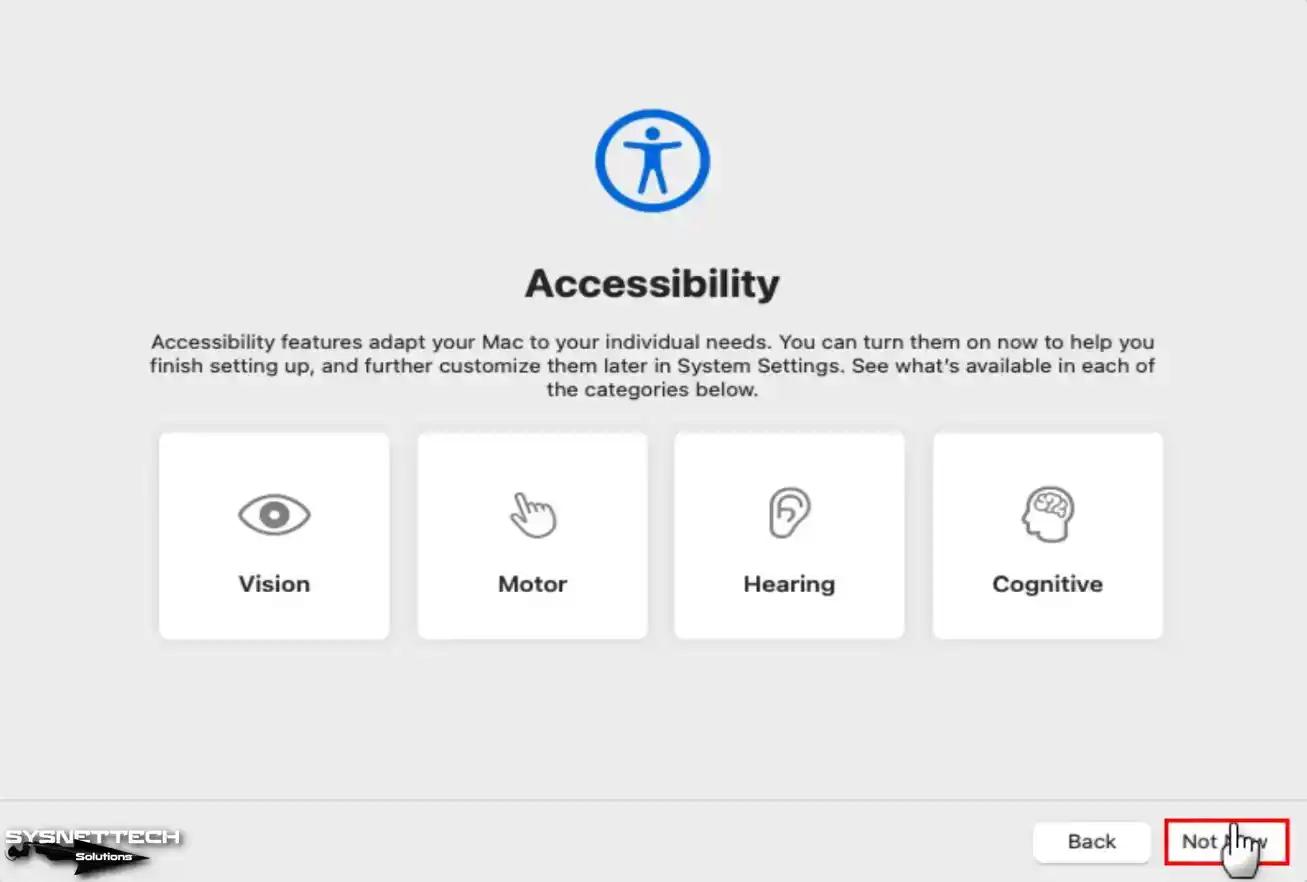
On the Accessibility screen, you can change various settings to suit your liking, making your system behave how you want. You can always tweak these settings later in System Preferences.
Step 13
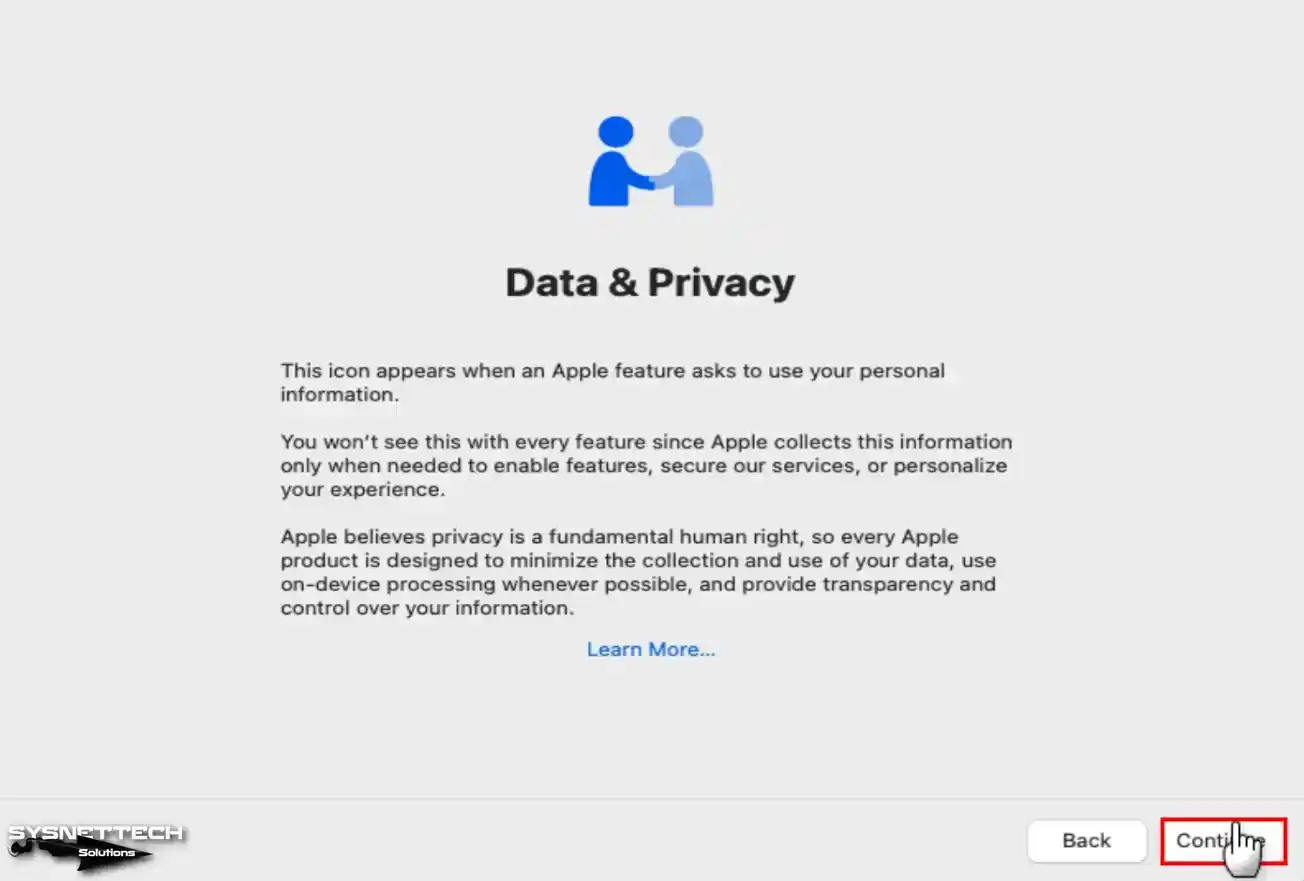
On the Data & Privacy screen, click Learn More if you want more information, or click Continue to move forward.
Step 14
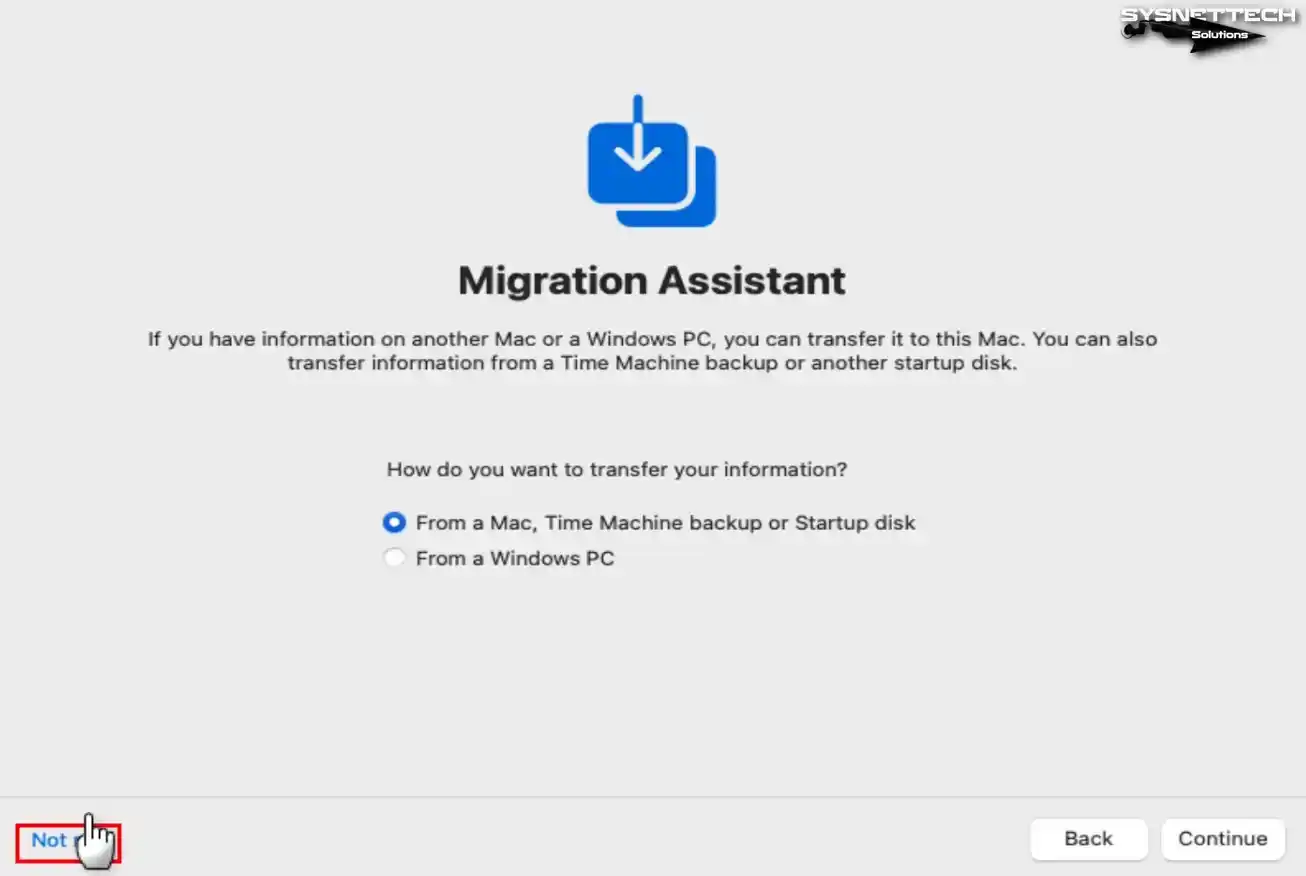
You can quickly transfer your data from a Windows PC or a MAC computer on this screen. However, if you do not hold any data or want to share the files later, click Not Now.
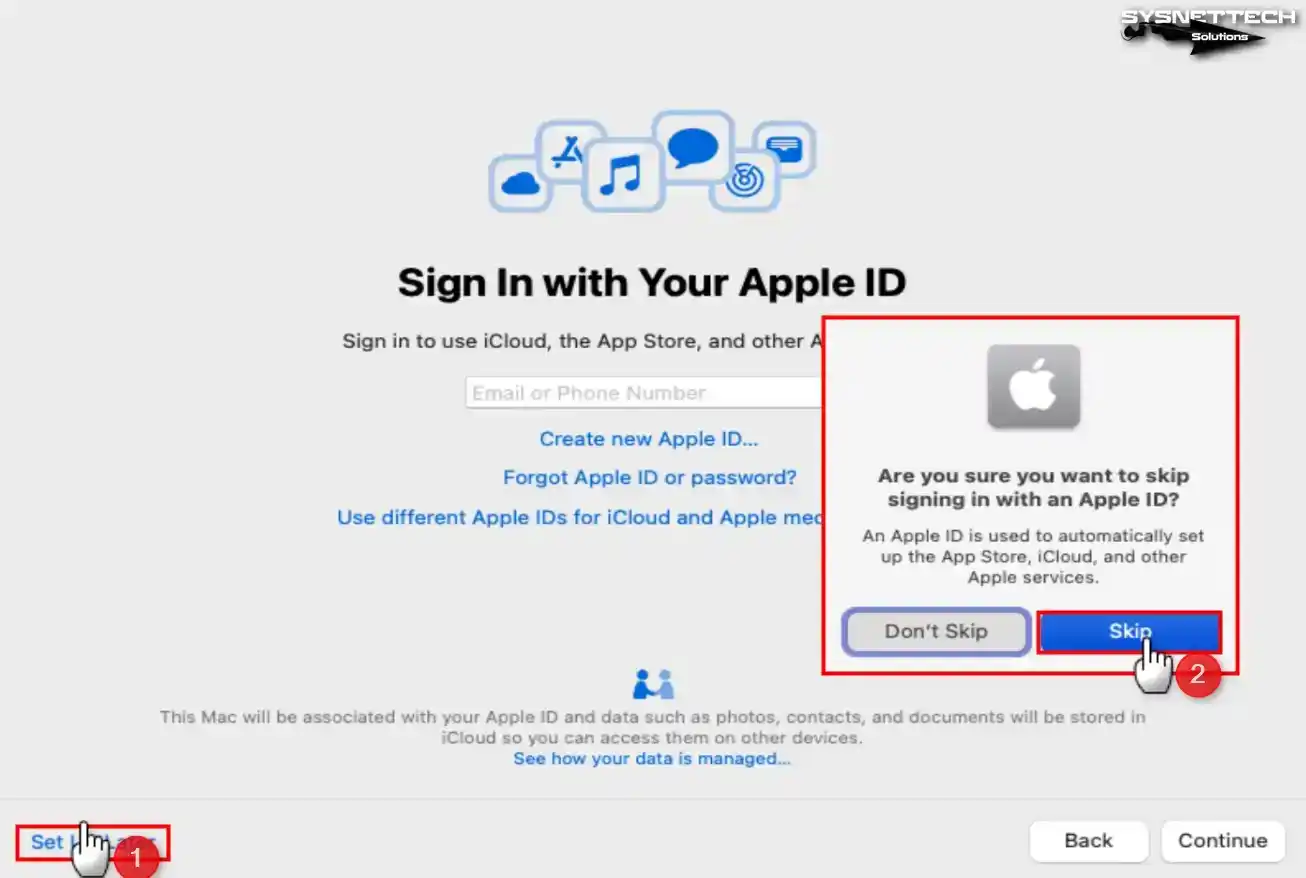
Step 15
To access your ID, input your login information on the designated screen. If you don’t include an existing account, generate one by clicking the “Create New Apple ID” option. If you do not desire to sign in to the macOS VM, click Set Up Later.
Step 16
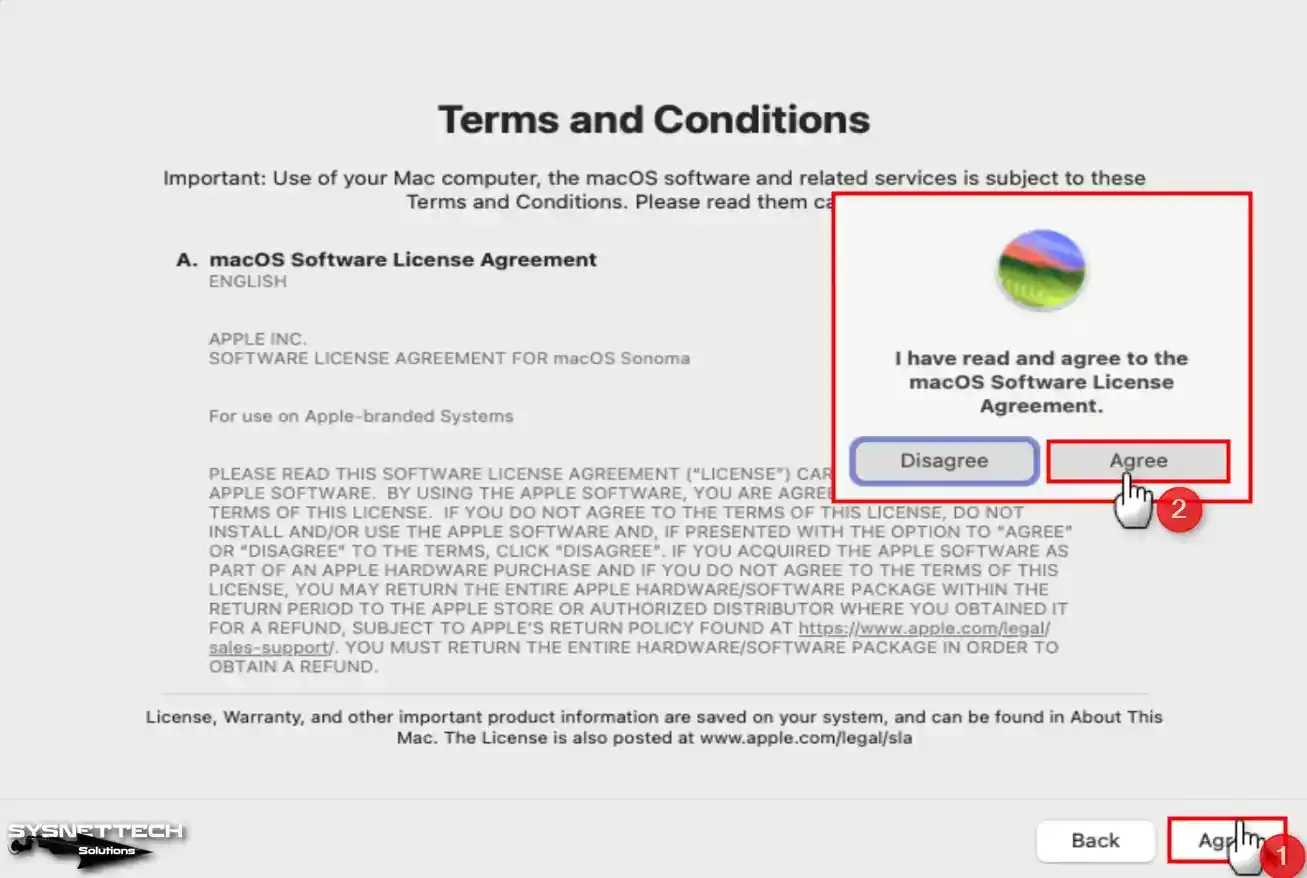
Accept the license terms of macOS Sonoma 14.
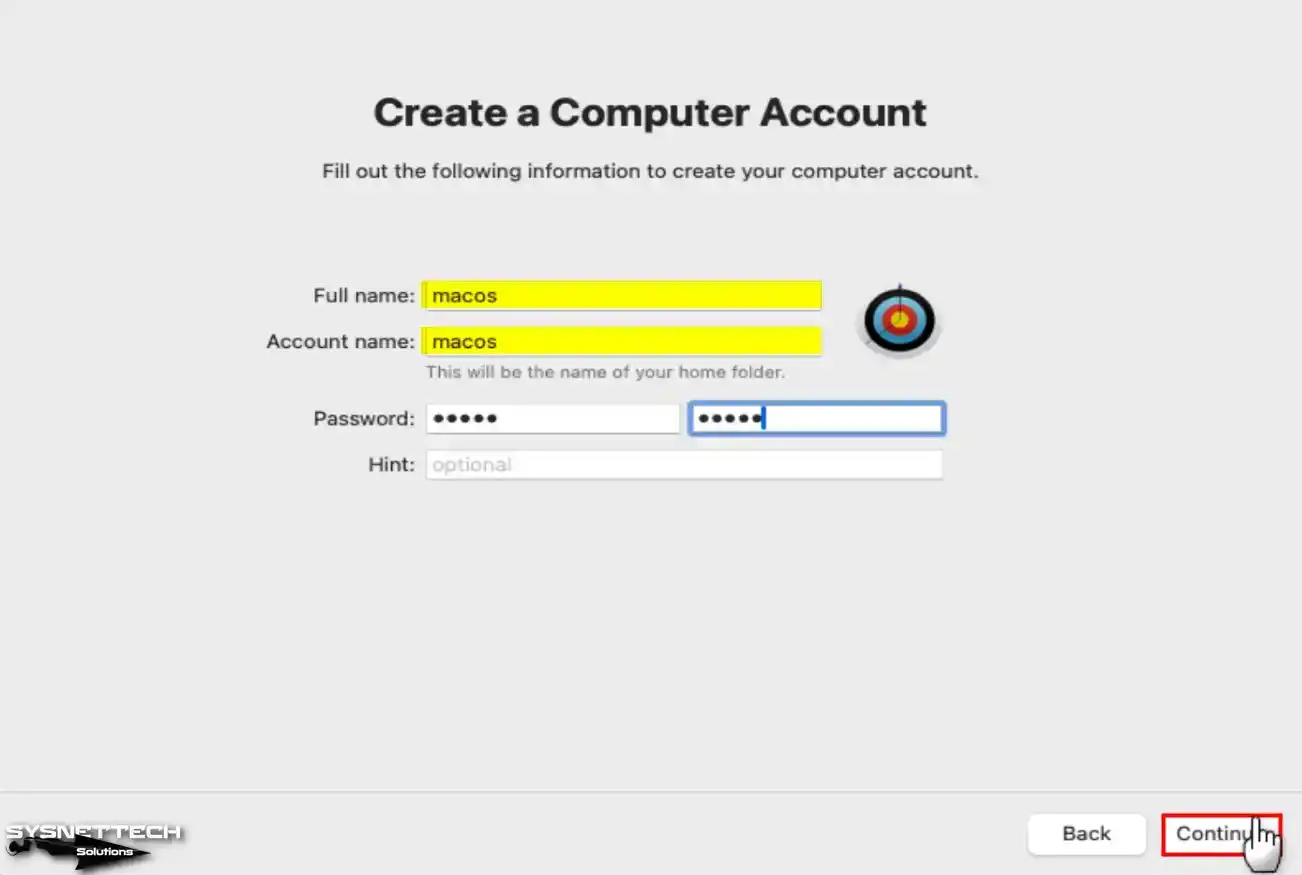
Step 17
Enter your info for the virtual PC’s user account, then click Continue.
Step 18
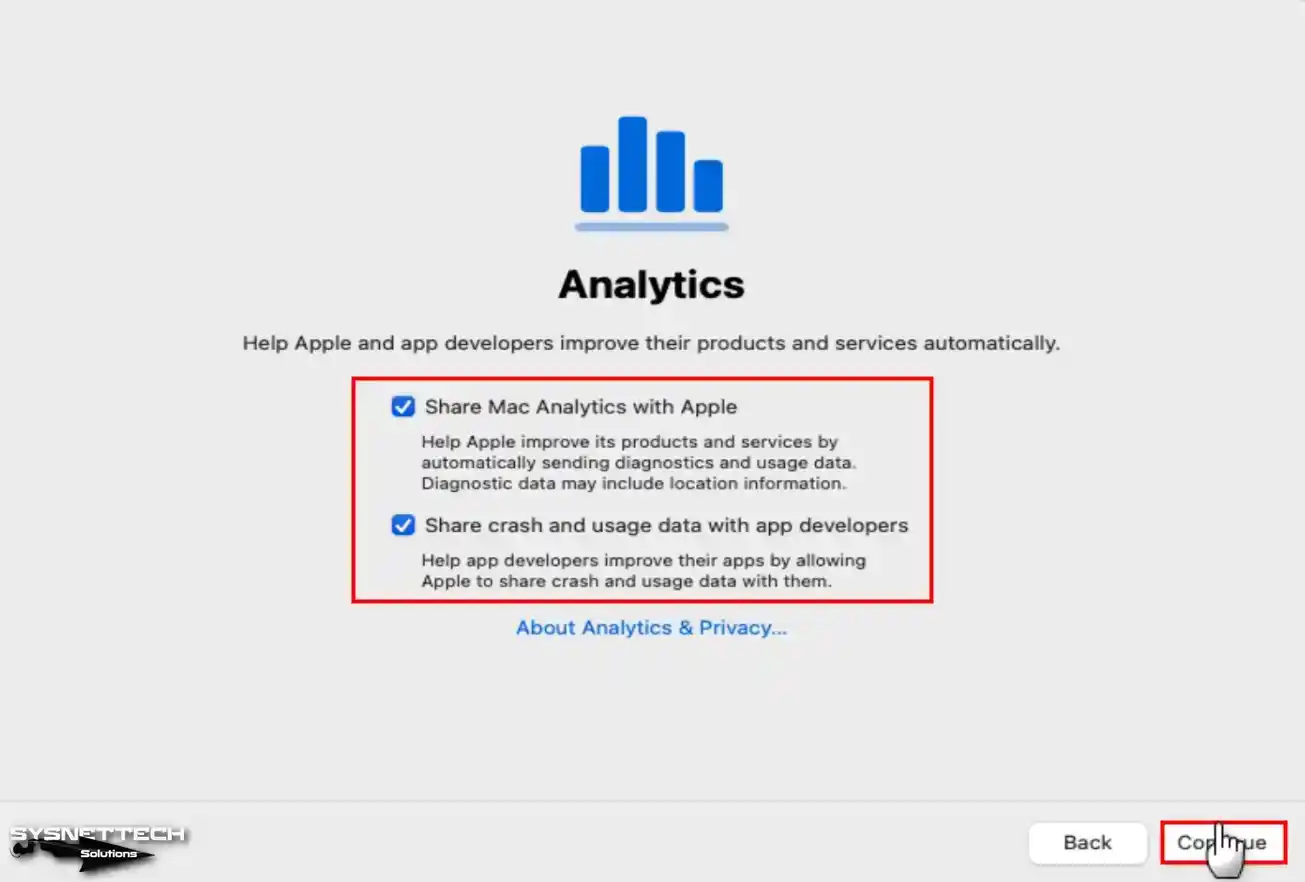
If you want Apple services like Find My Mac to know where you are and get data about app problems, click Continue. If you want to change these settings, click Customize Settings to go through the steps and set them up as you want.

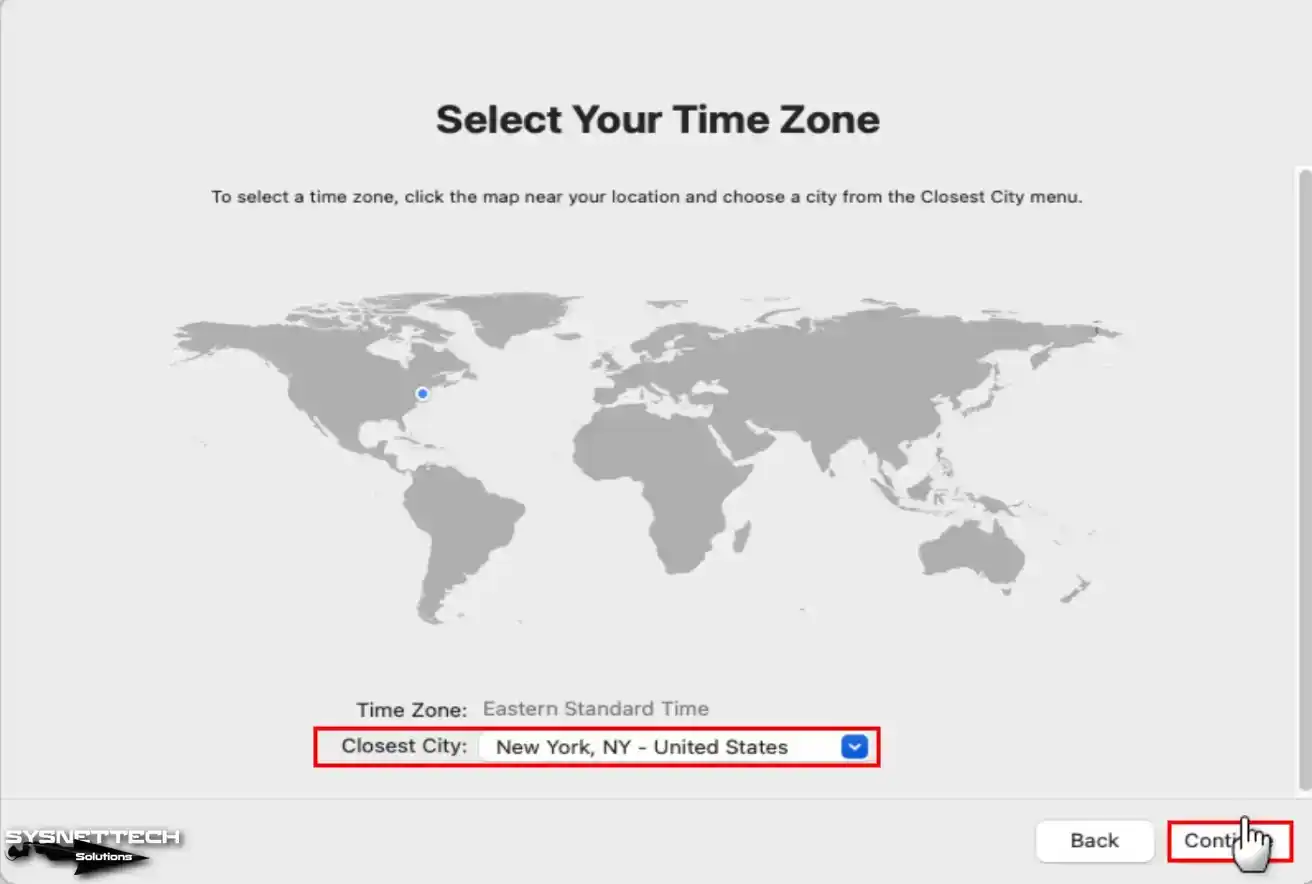
Step 19
To set the clock right, select the region closest to you and keep going.
Step 20
You can make macOS better by letting the developers of the apps you use see data about how you use them and if there are any errors.
Step 21
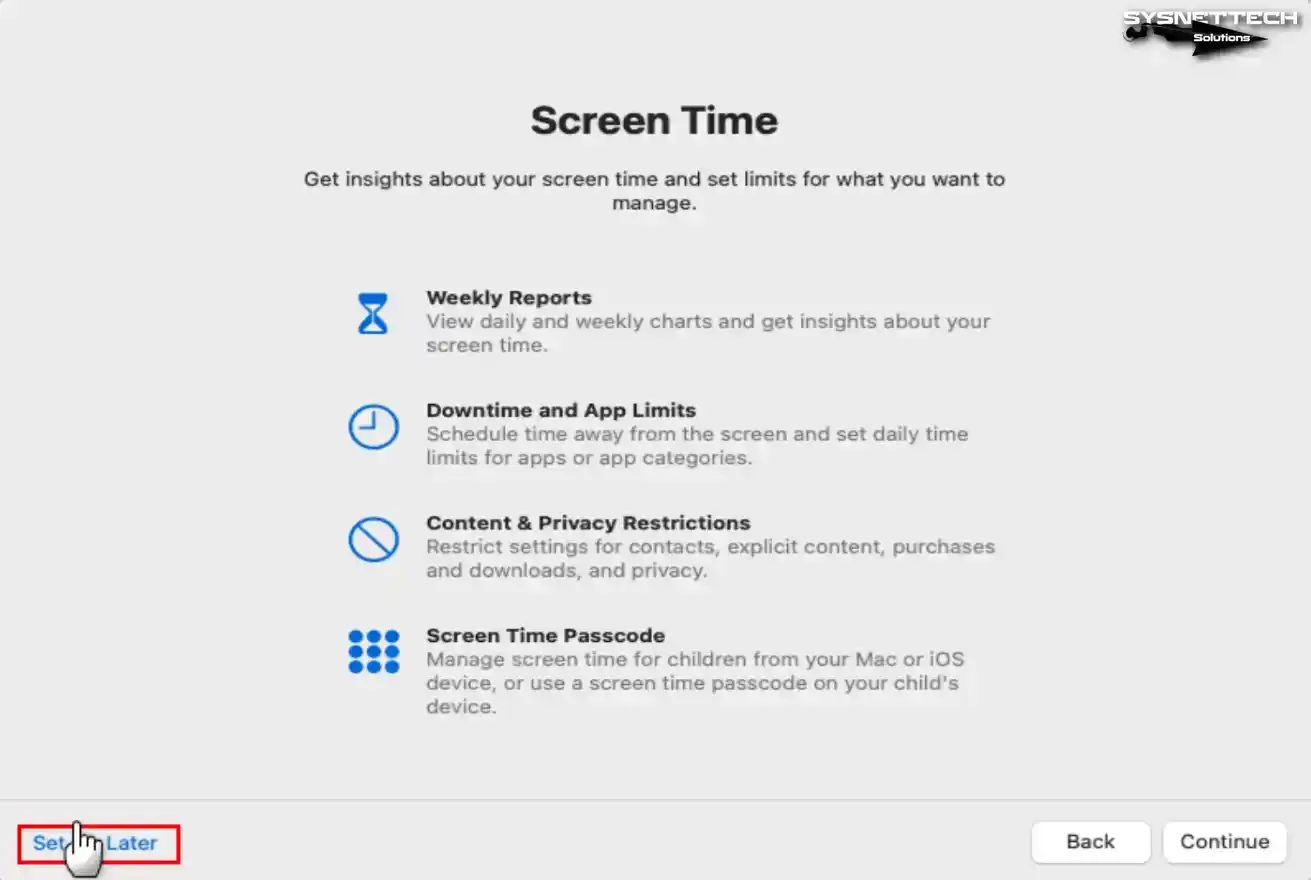
Screen Time details how much you use your favorite apps or visit websites. It’s also handy for parents who want to set up profiles for kids of different ages.
Any tweaks you make in Screen Time will automatically appear on your Mac, iPhone, or iPad if you use the same Apple ID.
Step 22
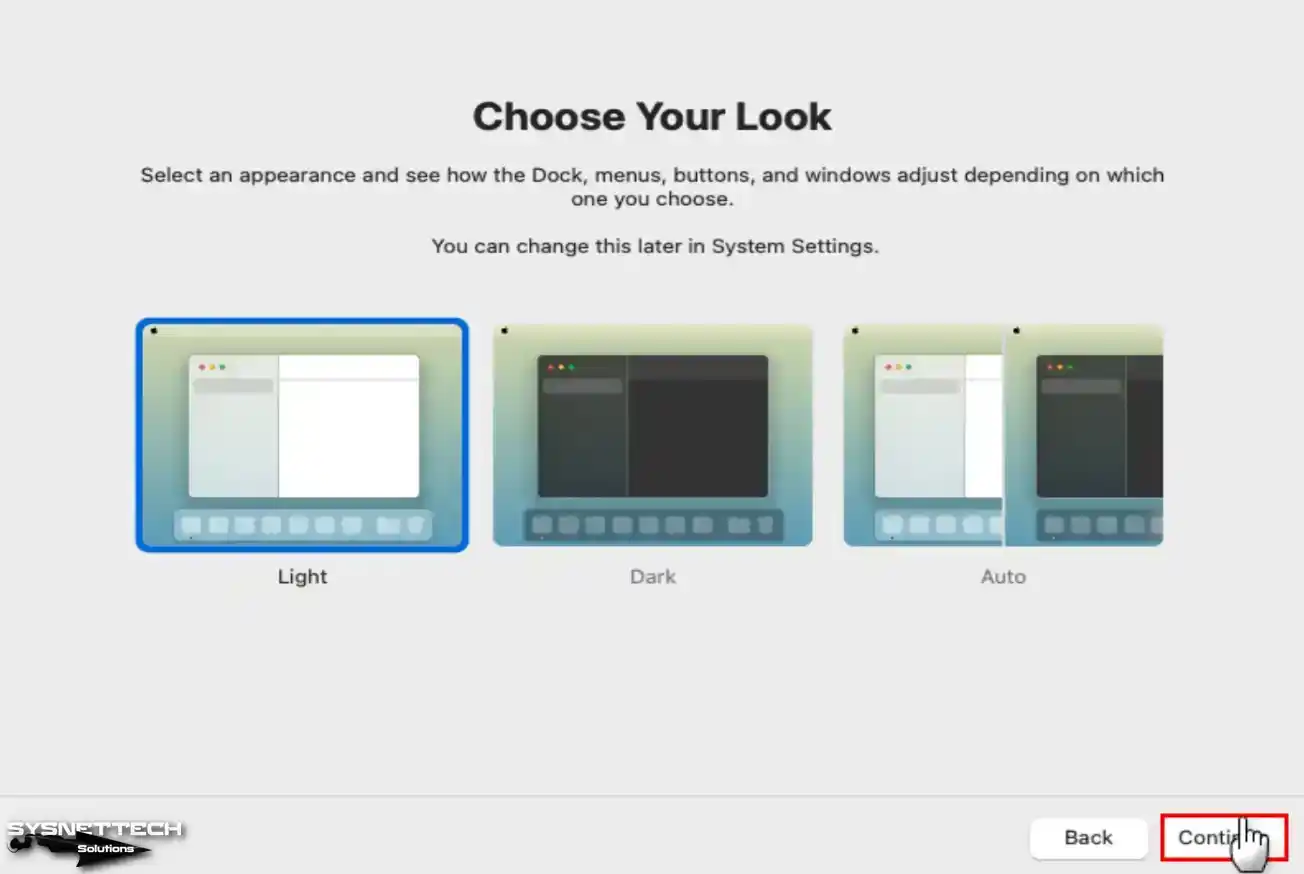
On the Choose Your Look screen, you can change how the Docks, menus, buttons, and windows appear to Light, Dark, and Auto.
Step 23
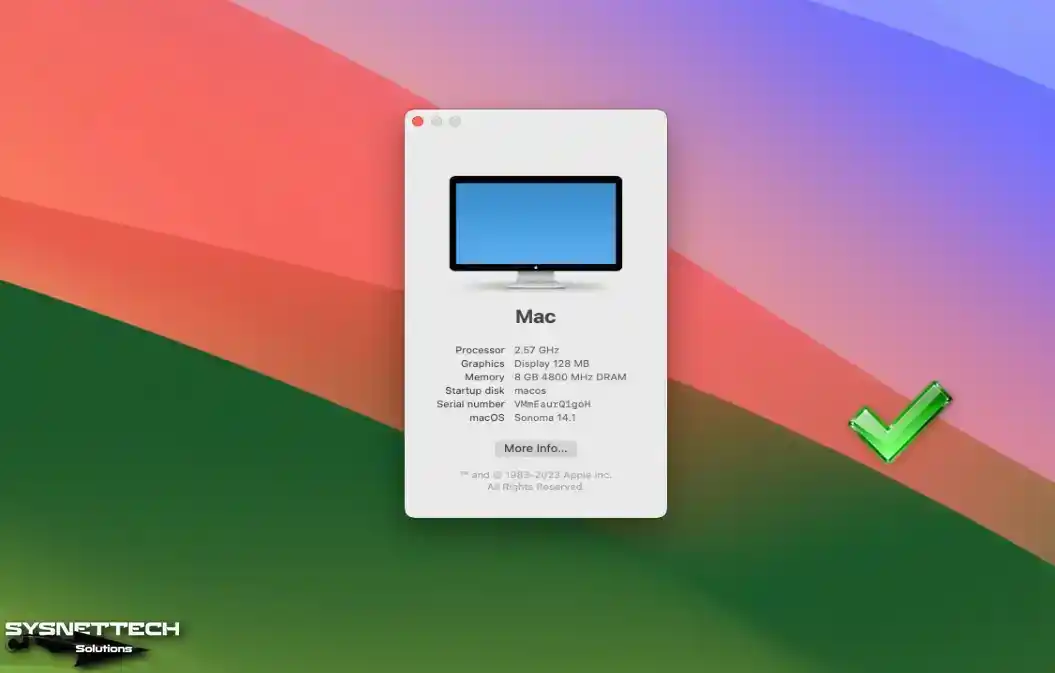
After installing the virtual macOS system, open the Finder app and click About This Mac to determine the system version.
How to Change the Screen Resolution of macOS Sonoma
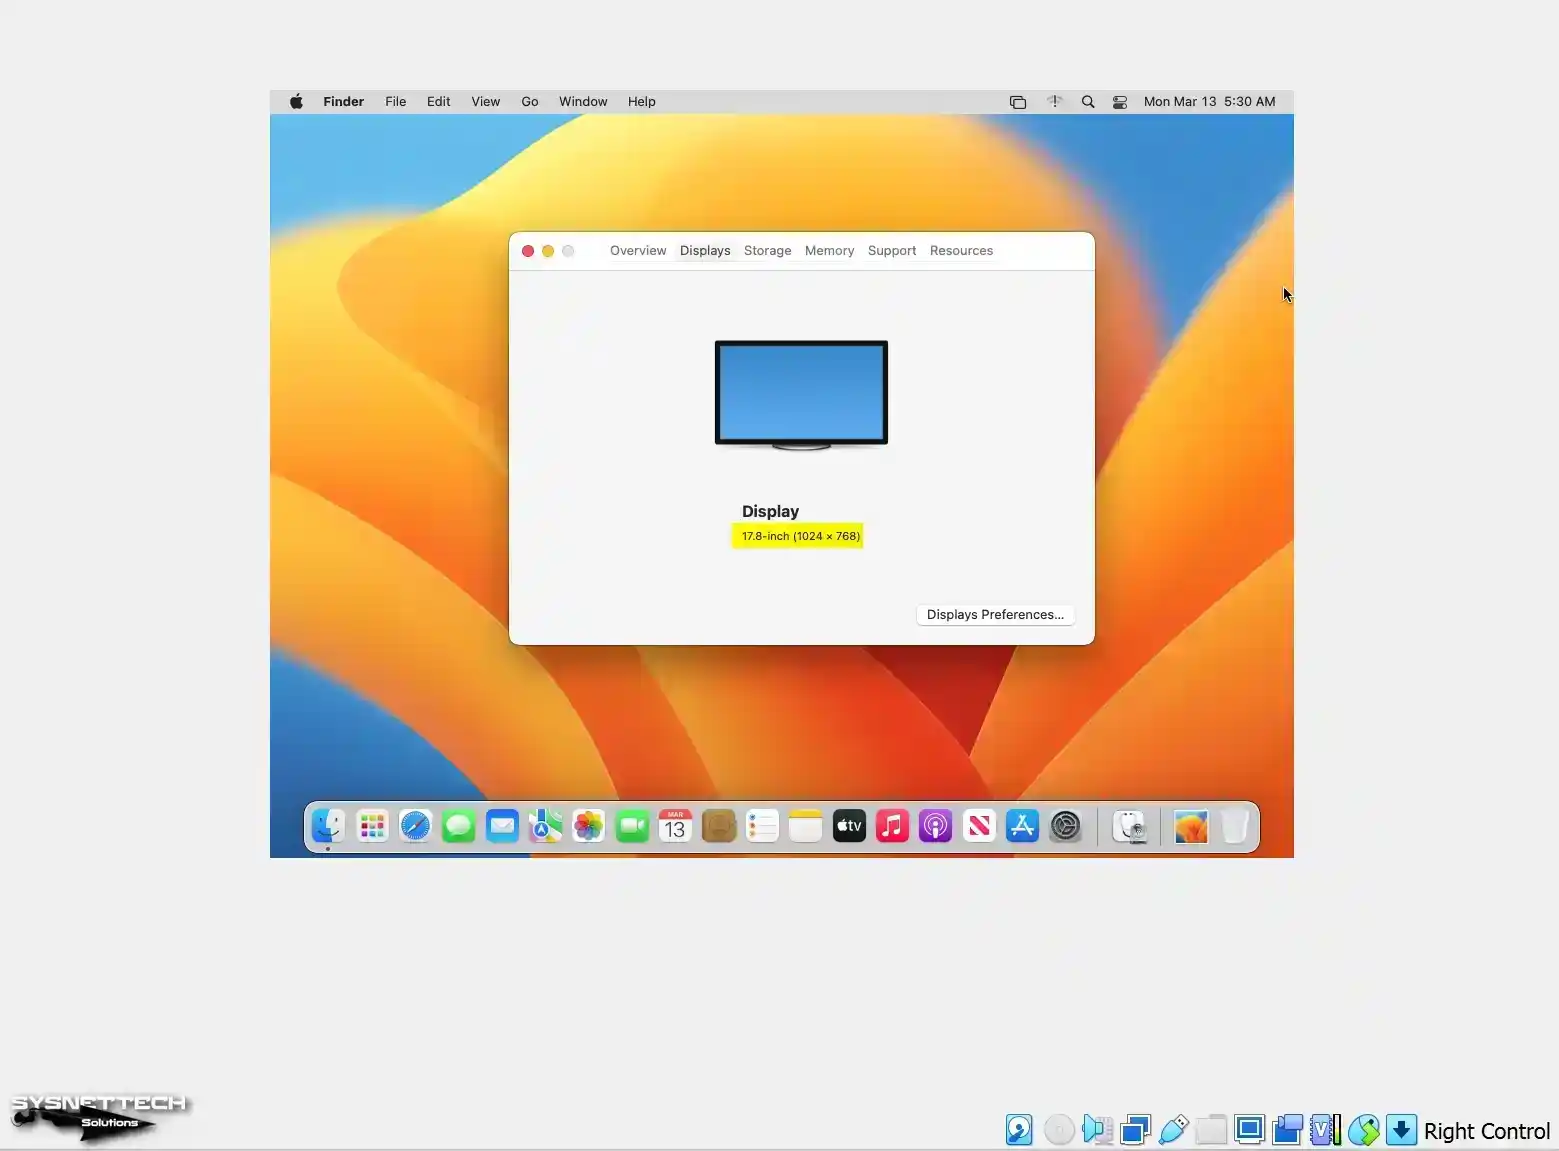
After you install macOS Sonoma using VirtualBox, the default screen resolution is 1024×768. So, it would be best if you changed it for better visibility. Adjust the VM screen dimensions with Ctrl+C, but look for more efficient ways. Additionally, you can explore other methods to improve screen adjustments.
Due to the Guest Additions, there is a problem with the screen resolution in macOS. So, explore alternative methods to enhance the display effectively. This way, you can optimize your virtual machine display for better performance.
Step 1
To find out the size of your Mac screen, follow these easy steps. First, click on ‘About This Mac’ in the Finder tool. Then, look for the Displays tab in the window that pops up. You’ll see the screen size value right there.
Step 2
Once you turn off the VirtualBox macOS system, open Command Prompt (CMD) as an administrator. Then, type in the following commands to change the screen resolution.
cd "C:\Program Files\Oracle\VirtualBox\"./VBoxManage setextradata "macOS" VBoxInternal2/EfiGraphicsResolution 1920x1200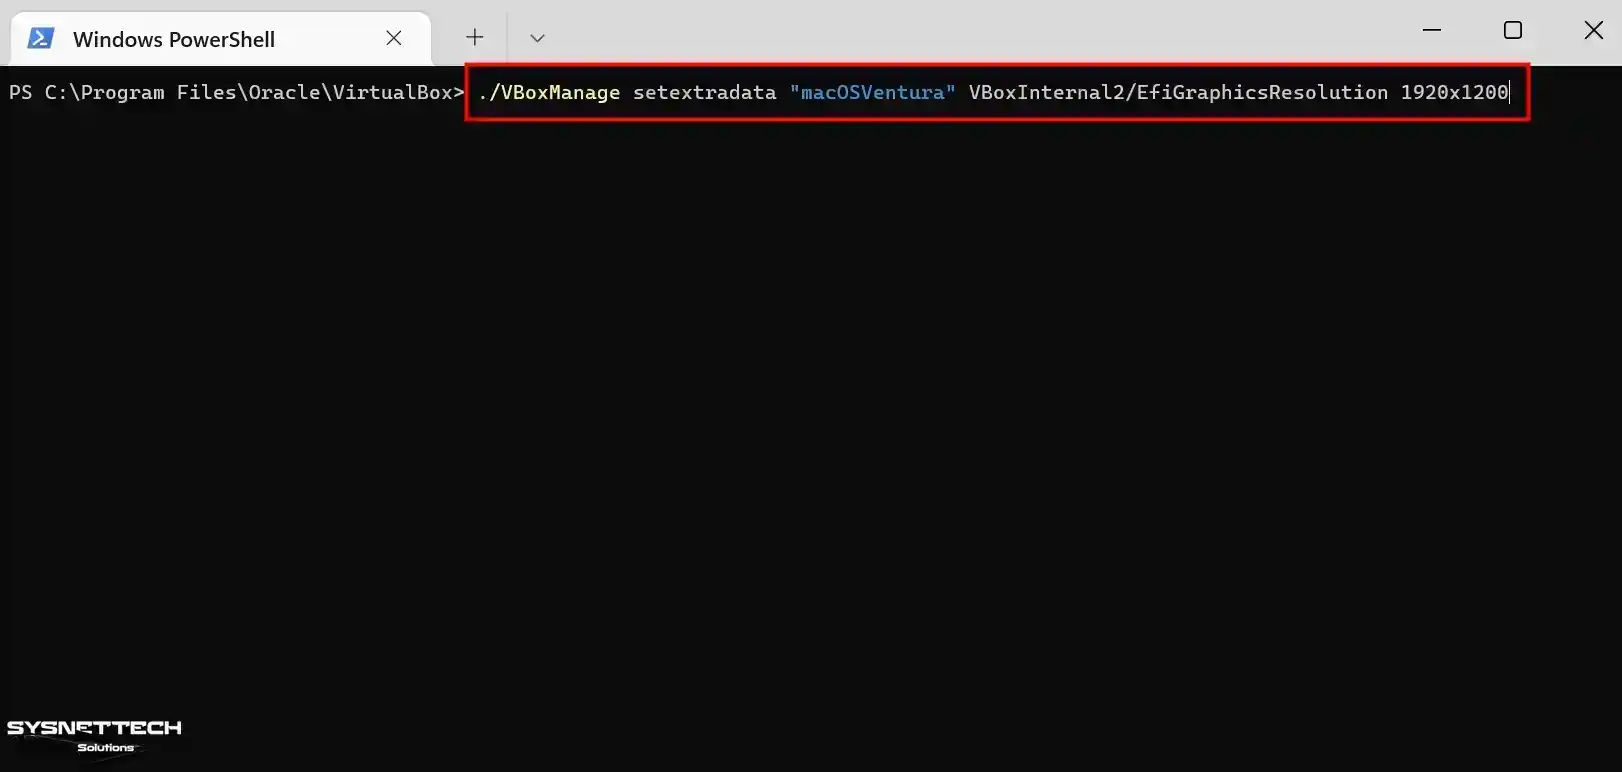
Step 3
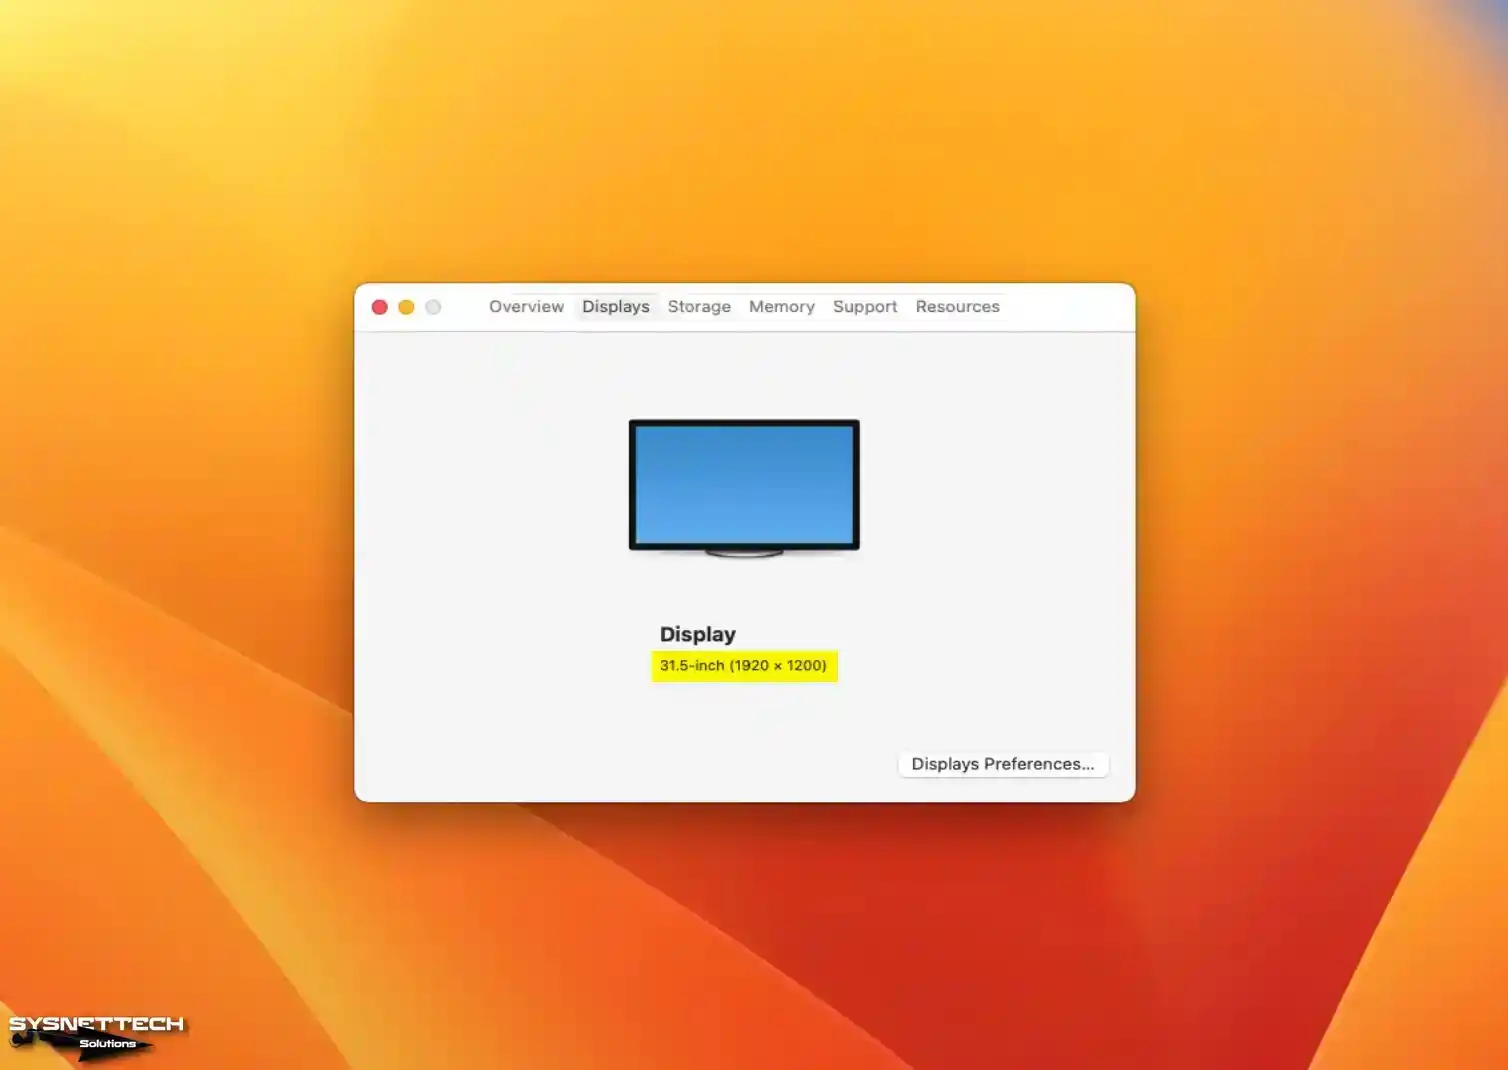
After you reopen macOS in VirtualBox, the resolution is 1920 x 1200.
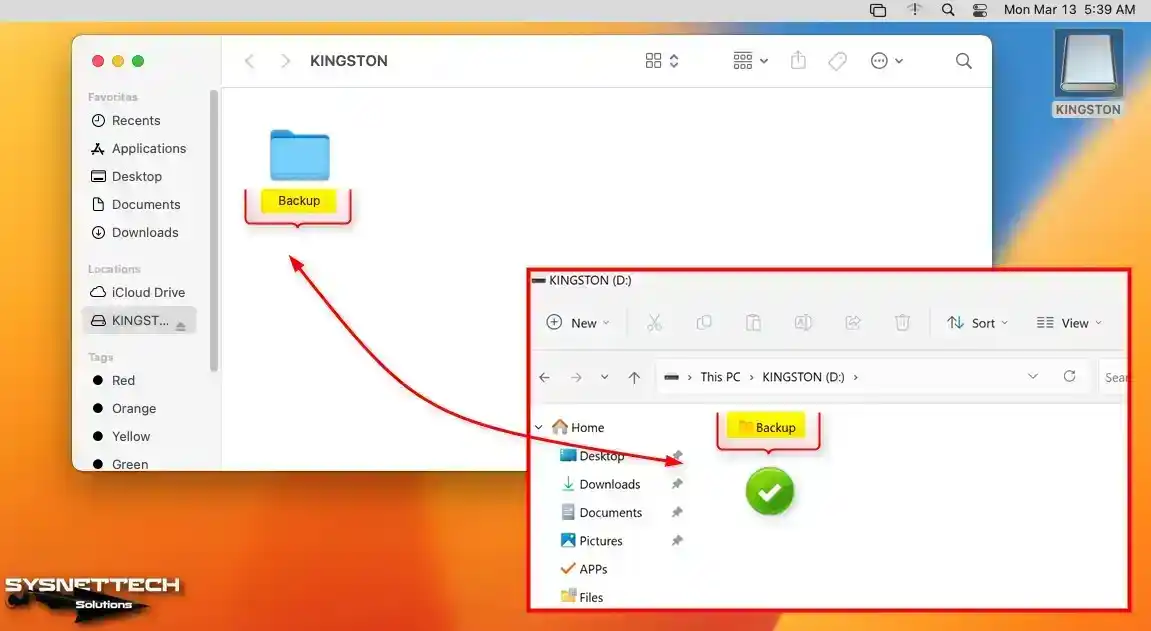
How to Use USB Flash Memory in macOS
I can’t drag files; the macOS guest machine has no guest additions. Instead, share files easily using a USB flash drive. Consequently, it enhances virtual computer functionality with straightforward file transfers.
Step 1
Plug the USB into the host computer, and click “Devices/USB/Name of your USB” in Oracle. As a result, you can easily link your USB flash drive to the virtual machine.

Step 2
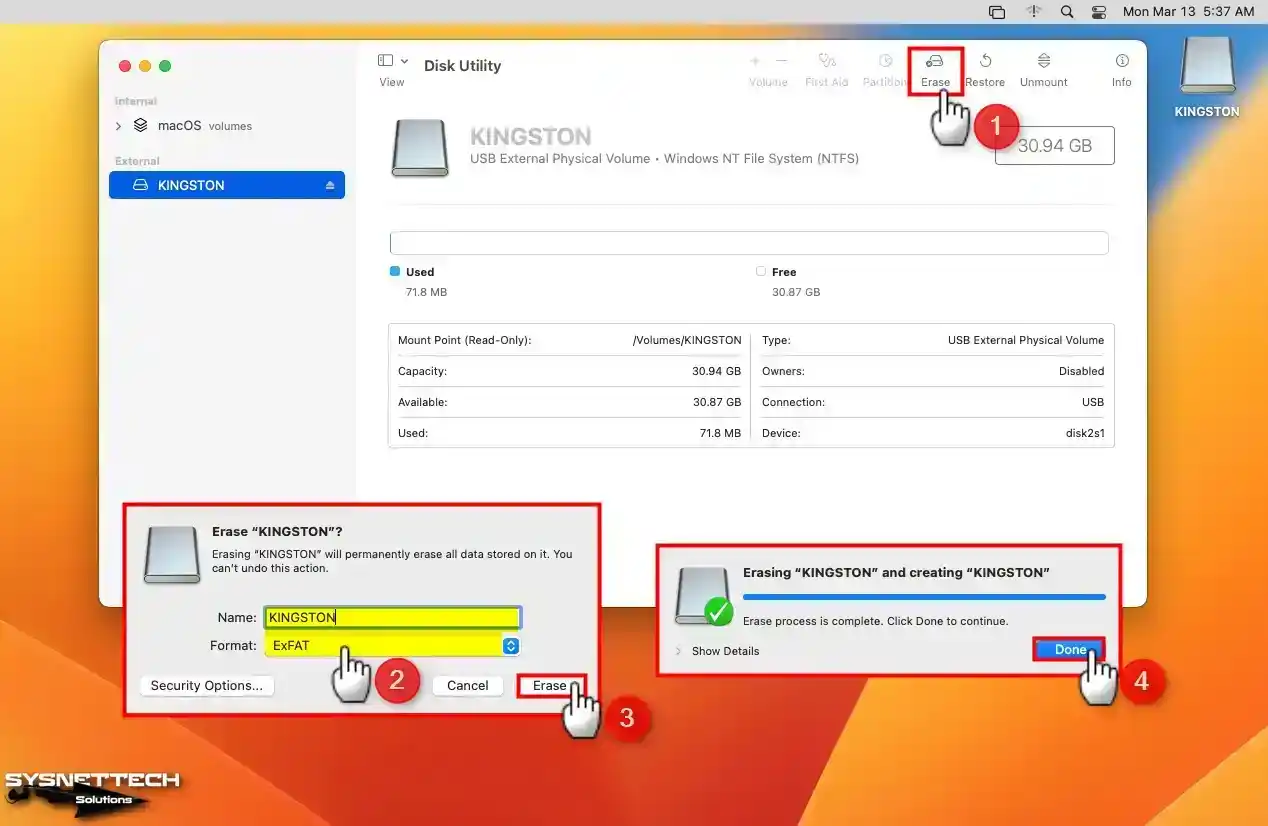
Open Disk Utility, select your flash disk from the External section, and click Erase. In the window, type USB brand in Name, and choose ExFAT. Afterward, click Erase to complete the process successfully.
When using macOS on Oracle VirtualBox, format your USB as ExFAT. As a result, avoid using NTFS for better compatibility and performance.
Otherwise, you won’t be able to copy any folders or documents onto your disk.
Step 3
Link USB to VM: “Devices/USB/Name of your USB” in the menu. Therefore, connect the USB drive to your VM easily. Then, look at the folder or documents you made on your flash drive.
How to Increase macOS VM Performance in VirtualBox
As you know, Oracle and other virtualization software don’t wholly support Apple’s macOS. Even if your real computer is speedy, macOS won’t run smoothly. So, a pretend computer might not give you the best performance.
Some developers want to run Mac systems on virtual machines. Hence, they use virtual machines to experience them.
Depending on your planned use, you may need help with system performance. Still, you can change the system settings to minimize these problems.
So, use terminal commands to make your macOS VM work better. Therefore, apply these commands to improve your VirtualBox experience.
Turning off Spotlight for Database Operations
sudo mdutil -a -i offSpeeding Up Animations
defaults write NSGlobalDomain NSWindowResizeTime -float 0.001Reducing the Delay in the Dock
defaults write com.apple.Dock autohide-delay -float 0defaults write com.apple.dock autohide-time-modifier -float 0.5killall DockTurn Off Finder Animations
defaults write com.apple.finder DisableAllAnimations -bool truekillall FinderTurning Off the Quick Edit Window
defaults write NSGlobalDomain NSAutomaticWindowAnimationsEnabled -bool falseStopping Time Machine Backup Processes
sudo tmutil disablelocalTurning Off Automatic Check for Software Updates
sudo softwareupdate --schedule offTurning On Faster File Previews for Finder
defaults write com.apple.finder QLPanelAnimationDuration -float 0Possible Installation Errors
The setup can’t go on, and the system goes into Recovery Mode by itself
Let’s assume the VM enters recovery mode after the installation wizard copies the system files. In this case, start the operating system by typing commands in the UEFI Shell screen. Therefore, use the following steps to fix your operating system.
When you’re in the UEFI Shell, type commands until you get to boot.efi. Then, follow these easy steps to find the boot.efi command.
fs1:
cd "macOS Install Data"
cd "Locked Files"
cd "Boot Files"
Add the ISO file to the virtual device and perform the “boot.efi” command to proceed.
boot.efi
Installing Old Versions
| Version | Slide |
|---|---|
| macOS High Sierra 10.13 | View |
| macOS Big Sur 11 | View |
| macOS Ventura 13 | View |
Frequently Asked Questions (FAQ) About macOS with VirtualBox
- Can I run macOS Sonoma on a virtual machine using VirtualBox?
- Do I need any special tools to run macOS Sonoma in VirtualBox?
- How much RAM and virtual processor cores should I allocate to my virtual machine for optimal performance?
- What should I do if I encounter problems during virtual machine installation?
Conclusion
As a result, you can install macOS using VirtualBox 7 or newer on Windows 11 or 10. You can run either Sonoma 14 or the older versions in a virtual machine.
VirtualBox is a great way to experience the Mac system without purchasing a MacBook or iMac. If you follow all the things I have explained here, you can create a virtual Mac environment on your Windows PC.
Additionally, you can explore the features of the latest macOS Sonoma. Moreover, do not forget to adjust the virtual machine settings according to the specifications of your computer for optimal performance. In summary, with the development of virtualization technology, you can experience both macOS and other systems!

37 People Shared Their Experience
Top Website for ever thx…
Seems to stay stuck at step 2: wait while the macos is starting
Hello there. The wait time may vary depending on your computer’s specifications.
Please wait a little longer in step 2, the MacOS installation will continue.
I’m also stuck at step 2 where it says end randomseed. does it really take that long? or am It’s not doing anything? I notice the task manager that virtualbox has no cpu usage.
Yes it takes a little longer during the installation phase. You can try the old version of VirtualBox if you want.
STUCK on step 2. after randomseed message it won’t proceed.
It can be very specific and common problem for many users. Actually, I’ve tryed for several times to install MacOS High Sierra 10.13.4 with various builds of VB and several MacOS ISO’s. And, ya, step 2 will never ends. Try to notice one thing: text from step2’s screenshot is repeating! You can wait as long as you want, but instalation will never starts because of endless repeating of tries to install. I don’t know why does it happend (I don’t understand this log from screen). But it’s a fact.
P.S.: Sorry for my bad english
Got through the second stage of installation okay after running boot.efi but then when it restarts it just drops back to the UEFI shell again.
I’m using the ISO provided by this site and the latest version of virtual box. I’ve tried the whole process 3 times now. Any ideas?
Alsothespacebardoesn’tworkinthiscommentwindow. TotypetherestIhadtotypeitinnotpadandpaste.
Hello, Paul. Thanks for your comment.
Before running the boot.efi command, insert the ISO file on the MacOS virtual machine.
In addition, two videos were made with this ISO file. These videos are available on our YouTube channel.
Paul, can you try the processor value of your MacOS virtual machine by setting it to 1? And make sure you set a minimum RAM value of 4 GB.
Okay I’m trying re-installing again using one processor.
One thing I’ve just noticed when I’ve gone in to the disk utility is that it’s automatically become an APFS Partition.
I definitely selected Mac OS Extended (Journaled) when I created it. Is this normal?
Hello there.
Did you install MacOS with VirtualBox?
Yes, Mac OS Extended (Journaled) is automatically selected.
APFS: Apple’s new file system is more resistant to data corruption due to bugs and power failures.
The MacOS did not work for me on Virtualbox.
It kept restarting the Step 2
It start to intall back macOS after I shut down my installed macOS, where is my installed macOS?
Yes it was installed with Virtual Box exactly as described in the guide.
Every single time I’ve used Mac OS Extended (Journaled) but it’s always become an APFS partition automatically by the time I’ve done the second stage of the installation and just falls back to the UEFI shell instead.
**Your tutorial is bad and you should feel bad.**
Followed the instructions exactly; three times even.
Everyone commenting that the virtual HD is not bootable after installing is correct.
Don’t waste your time here. You did everything right; this is just a bad disk image and / or bad guide. Move along.
I certainly do not agree with your opinion. Many people are thanking me. I think you’re making a mistake during installation.
Carefully follow the MacOS installation steps again.
So I finally got this to work past Step 2 where it boot looping in the shell
After re-reading this I noticed that it had specified you MUST close VirtualBox before applying the command line changes, then reopen it. If you don’t do this you will be stuck in the same boot loop before it reaches the grey screen with the Apple logo.
I reiterate, CLOSE VIRTUAL BOX before running the command line stuff, will get you past step 2!
Do not try to use VB 5.1! You will not pass Step 2 even with some another ISO. Even if you close VB before CMD things.
P.S. Sorry for my bad english
This is not working anymore. I get the following message after setting up the installation volume:
This copy of the install MacOS High Sierra.app application is damaged. I checked the date of the system, and it’s current. I also tried to set a past date, but no,luck.
on “macOS Utilities” screen where you select install macOS, on the tool bar above is a Utilities drop down, select Terminal. Disconnect your internet connection, then type date 010101012017 and hit enter. Select Terminal drop down and select Quit terminal to return to main screen, then select install macOS and it should work this time. Can reconnect to internet after.
This worked for me, thanks.
guest: macOS 10.13.6
host: linux
I’m stuck in step 8, I erased the disk and named it exactly as you did, I even installed the EXTACT SAME iso image as you did, I followed exactly your steps, everything worked until i clicked install macOS and it says: “This copy of the install macOS High Sierra application is damaged, and can’t be used to install macOS”.
I’m using the latest VB but it really doesn’t matter, it doesn’t work and I need help please.
Open Terminal in the macOS Utilities screen and execute the “date 121401582018” command. Then quit the terminal and try the installation again.
Getting the same but with Big Sur… Must need a new date or something else changed. So far everything else is perfect and working great!
Follow on to my 20 March 2023 comment; I will upgrade my Lenovo laptop to Windows 11, try this procedure again and report results here. Thanks.
Configuration: VirtualBox 7.0.6 on Lenovo X1 Yoga 3rd Gen; Intel Core i7, 16 GB main memory, 1 TB SSD, Windows 10 Pro 22H2; all Hyper-V disabled/removed.
Update: Upgraded OS to Windows 11 Pro, 22H2, Build 22621.1413
Attempt: Install MacOS Ventura (macOS 64 bit VM) as guest system, following this post and using the .iso file from your website link.
Result: reboot multiple times, ending back at Recovery window.
This is the same result as I obtained prior to the Windows 11 update.
Suggestions welcomed.
I am facing the similar behavior and not moving further. Tried multiple time install and after multiple restart it reaching to the recovery or say installation window
I followed all instructions exactly as showed and I have an error.
I am on windows 11 and when I try to run the VM for the first time I have the error:
Failed to query SMC value from the host (VERR_INVALID_HANDLE).
Result Code:
E_FAIL (0X80004005)
Component:
ConsoleWrap
Any idea how I can fix it?
as alex, the same wih me:
Failed to query SMC value from the host (VERR_INVALID_HANDLE).
Result Code:
E_FAIL (0X80004005)
Component:
ConsoleWrap
Interface:
IConsole {6ac83d89-6ee7-4e33-8ae6-b257b2e81be8}
Any sugestions?
VBoxManage setextradata “macOS” “VBoxInternal/Devices/smc/0/Config/GetKeyFromRealSMC” 0
You should make the value at the end of this command 0 like this, not 1.
Hello every one!
I get the issue in step 9. ” About 9~10 minute remaining… ”
in the end installer rebooting and give me the error
System reboot after panic !
and starting a lot times of rebooting till recovery screen.
what exactly moment I need to do this steps:
fs1:
cd “macOS Install Data”
cd “Locked Files”
cd “Boot Files”
boot.efi
Also, how I could get fs1: command prompt?
Hello everyone.
I followed all steps of this guide.
I am using windows 11 on my computer and I want to use mac os sonoma on oracle virtualbox 7.
I use macOS Sonoma ISO by techrechard.com for ISO image.
But I get errors as following:
BdsDxe: failed to load Boot0001 “UEFI VBOX CD-ROM VB1-1a2b3c4d” from PciRoot(0x0)/Pci(0x1F, 0x2)/Sata(0x1, 0xFFFF, 0x0): Not Found.
BdsDxe: failed to load Boot0001 “UEFI VBOX HARDDISK VBf3339b74-aa1c39c9” from PciRoot(0x0)/Pci(0x1F, 0x2)/Sata(0x1, 0xFFFF, 0x0): Not Found.
BdsDxe: No bootable option or device was found.
BdsDxe: Press any key to enter the Boot Manager Menu.
Then I access Boot Manager and select boot option to UEFI VBOX CD-ROM VB1-1a2b3c4d.
But I can’t continue installing mac os.
How should I do?
Same problem for me.
If your Getting This
Failed to query SMC value from the host (VERR_INVALID_HANDLE).
Result Code:
E_FAIL (0X80004005)
Component:
ConsoleWrap
Change this command from 1 to 0
VBoxManage setextradata “MacOS Sonoma” “VBoxInternal/Devices/smc/0/Config/GetKeyFromRealSMC” 0
also if Panic error occurs change PRocessor Numbers from 4 to 1
For anyone who has *successfully* installed Sonoma on VirtualBox, what physical CPU do you have? I am running 13900K, and for me everything goes fine until the installation is done and reboot happens. Then there is a reboot/kernel panic loop.
I get a boot loop after the GUI part of the install. VirtualBox 7.0.20, both with Sonoma Beta ISO and 14.7 boot USB (with OpenCore) I created on a real Mac mini.
This isn’t my first Mac OS installation on VirtualBox so I know and understand the steps. Just no luck with Sonoma at all.
I even tried running the Sonoma install from the Mojave VM, that too resulted in a boot loop.
i7-13700F
Yep. Boot loop on 13700F. I too suspect it’s the processor. There’s a way to mask processor registers. I already tried the 6700K profile in VirtualBox but perhaps it could be taken a step further.