
In this article, I will tell you how to install Debian 12 Bookworm with a bootable USB stick. I will also show you how to do this process on a desktop or laptop computer.
First of all, let me say that Debian was created in 1993 by the efforts of Ian Murdock. This system provides a solid platform for thousands of developers around the world. In addition, it has pioneered other distributions, such as Ubuntu. Now, I will first teach you how to get the ISO file and create a USB media with Rufus. Finally, we will perform the Debian installation step by step. Let’s get started!
How to Install Debian 12 from Scratch on a PC using a USB Flash Drive
The Debian distribution is the result of an attempt by Ian Murdock in 1993 to encourage software developers to contribute their ideas on issues related to the separation and distribution of free software from nonfree software.
Debian is the original version of Linux and has thousands of developers around the world. In short, it is well-developed and was the starting point for other versions like Ubuntu.
You can start experiencing the Debian operating system by installing it on your host computer or a virtual machine. However, we recommend that users with basic knowledge use this distribution in a VM first. Users who develop themselves above the average can install this distribution on their personal computers.
When you compare Windows and Linux distributions, you can see that there is a big difference in terms of performance. Linux uses less hardware resources. As a result, you can prefer it in terms of performance. However, you may not be able to install some of your frequently used Windows software.
To install Debian Linux on a PC, you need to get the ISO image file from the official website according to your processor architecture. To prepare the installation media, you can burn the ISO file on CD/DVD media. Or you can burn it to your USB flash drive using a 3rd party program such as Rufus.
Debian 12 System Requirements
- Processor Requirements
Debian 12 supports 64-bit PC (amd64), 32-bit PC (i386), ARM, and more. Also, make sure that your processor architecture is compatible with version 12. This is important for smooth performance.
- Memory Requirements
You must have a minimum of 512 MB of RAM to install Debian 12. However, I recommend a minimum of 4 GB of RAM because you may need more RAM for graphical desktop environments or servers.
- Storage Requirements
A minimum of 10 GB of disk area is sufficient for installing the base system. However, you should have more space for your applications, data storage, and updates.
- Graphics Requirements
Debian 12 supports a wide range of graphics hardware. It provides drivers for significant graphics card manufacturers. In short, you can also take advantage of open-source graphics drivers from the Debian repositories.
- Network Requirements
You don’t need a network connection to install version 12. However, I recommend it for access to online repositories. Obviously, if you are connected to the Internet, you will be able to install and update programs.
- Compatibility with Existing Hardware
I strongly recommend checking the compatibility of your existing hardware before installing Debian. This is very important for network adapters, sound cards, and other peripherals. Plus, you can check the hardware compatibility list and community forums.
How to Download the Debian ISO File
You can download Debian ISO media from different platforms, but downloading it from the official website is essential for file reliability. That’s why we recommend downloading images of this OS or other Linux distributions from their official community websites.
Step 1
To download the Full Debian AMD64 (64-bit) ISO image for your 64-bit architecture PC, visit this website. Then click the Download button under THE OPERATING SYSTEM heading.

Step 2
For 64-bit PCs, you can download the ISO file, which does not include software or packages, directly from this website.
However, suppose you plan to install this distribution on computers in locations with a slow Internet connection or no infrastructure. In that case, we recommend that you download the Complete ISO image, which includes all software and packages.
Click the Getting Debian link under the Other Installers title to download the installation media for systems without an internet connection.

Step 3
Click the Complete Installation Image link on the Getting Debian website.

Step 4
Click the Download CD/DVD Images using the HTTP link to get the image file using a web browser.

Step 5
You can download both CD and DVD installation media on the official CD/DVD images on the “Stable” release website. You need to download the appropriate image file according to a CD or DVD writer hardware type on your computer.
Click on the amd64 link for your 64-bit PC from the options listed in the DVD title.

Step 6
Scroll down the ISO DVD website a little bit and click on the link debian-11.3.0-am64-DVD-1-iso and download the file to your computer.

How to Create a Bootable USB Setup Media with Rufus
After you download DVD media to your disk, you can burn it to an empty DVD with the Nero program. However, in our article, we will use the Rufus program since we will prepare a bootable flash memory.
Step 1
To download the Rufus program, visit https://rufus.ie/ and download the Portable or Setup file to your computer.

Step 2
Plug a USB flash stick into your PC and run Rufus. Select the downloaded ISO file by clicking the SELECT button from the Rufus driver options.

Step 3
After checking the ISO file name and Partition Scheme settings in the Boot Selection section, click START to start the burning process.

Step 4
Check ISO Image Mode in the options for burning the image file and click OK. Rufus software needs a Syslinux file because you prepared Linux installation media. If a new version of this file is available, click Yes to download it.
Finally, click OK again to delete all the data in the contents of the USB disk you inserted into your PC and start copying the system files.

Step 5
Close the Rufus software as soon as it copies the Debian system files to your flash drive.

How to Install Debian Linux Step-by-Step
After getting the USB ready, plug it into an empty USB socket on your computer and start your system from the USB drive.
Opening the boot menu may differ depending on the brand and model of the PC you are using. So check your PC’s manufacturer’s website or user manual.
To boot a PC with a USB stick, you can usually do this from the BIOS or the Boot Menu. However, you can try one of the F2, F8, F10, F11, or ESC keys from your keyboard while restarting your PC.
Steps:
Step 1
After entering the boot menu of your host PC, select your USB drive. Also, you can see the option of “Removable Devices.” Then, boot the system with the USB by pressing Enter. As a result, the installation process will start.

Step 2
When the Debian GNU/Linux Installer Menu opens, that is, when you boot your PC with a flash disk, press Enter in the Graphical Install option.

Step 3
To set the default system language that you want to use during the installation process, select your language in the Select a Language window.

Step 4
The location you select in the Select your location window will be used both for your system time and to help you based on your location. It will be more advantageous to choose this location as the country you live in.

Step 5
For your Debian system, choose a compatible layout according to your computer’s keyboard layout.

Step 6
If there are other computers on your current network, type a hostname that is different from other devices. The hostname selected by default is Debian, but you can change this name as you wish.

Step 7
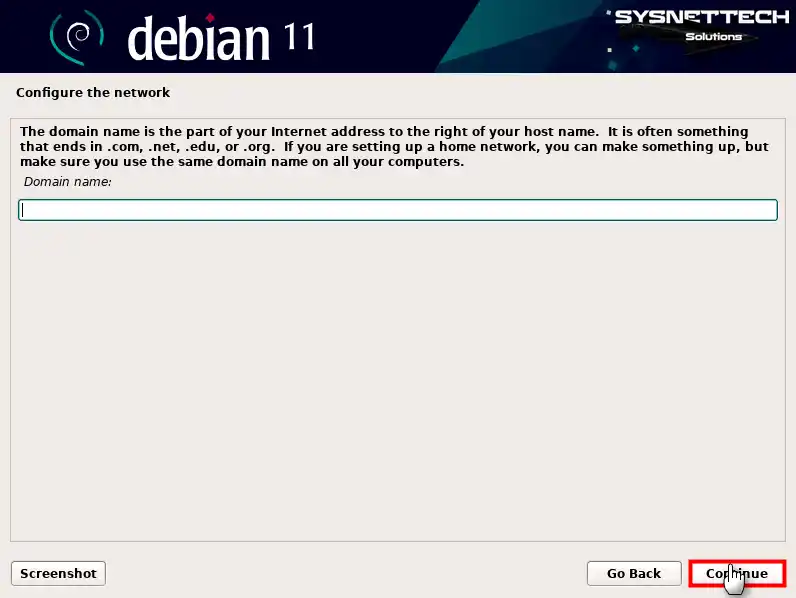
If your network has a mail server or active directory, type an appropriate domain name depending on your structure. If you don’t have it, you can leave this option blank and continue with the installation.
Step 8
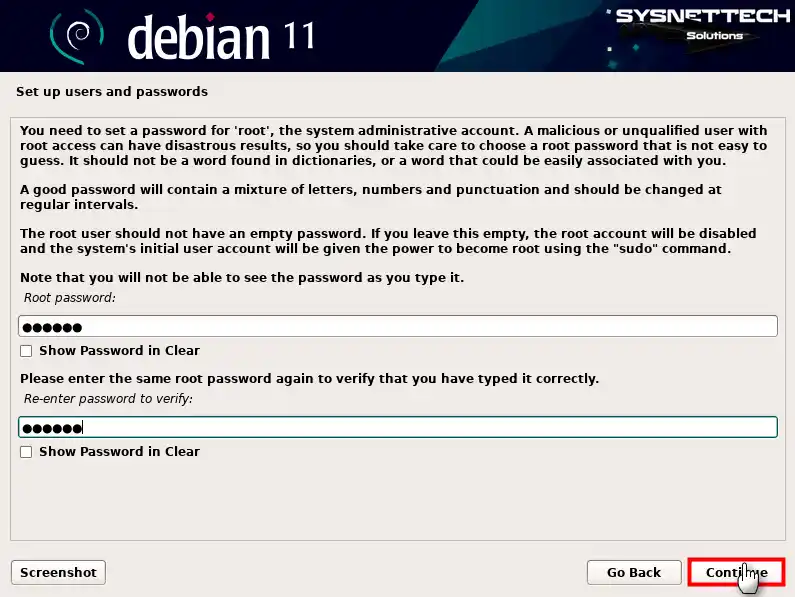
System administrators need a root account to make more advanced settings on the Debian system. Therefore, create a strong password for your root account that will be created during installation.
Step 9
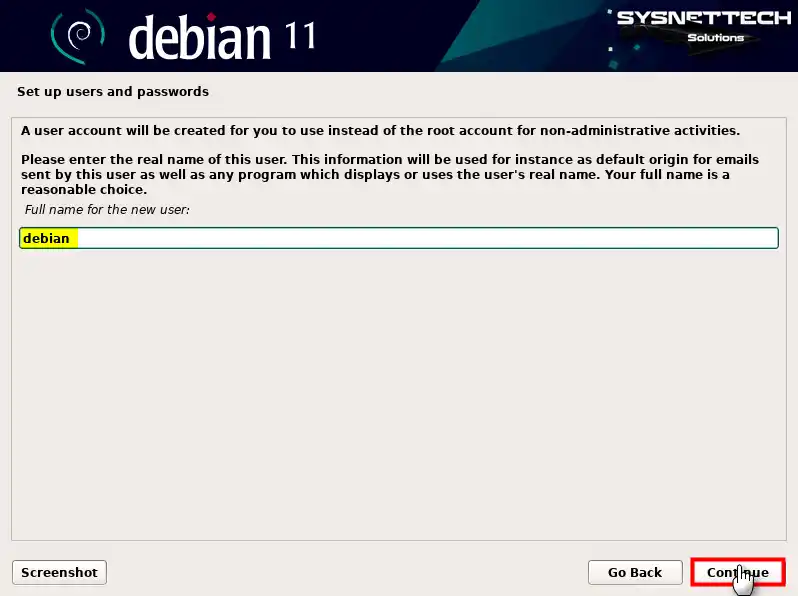
You should not use the root account for administrative operations. Also, type the full name of the user account. Plus, this step is required for non-administrative operations. In short, create your user account securely.
Step 10
Type your username for your new account in lowercase letters and continue.
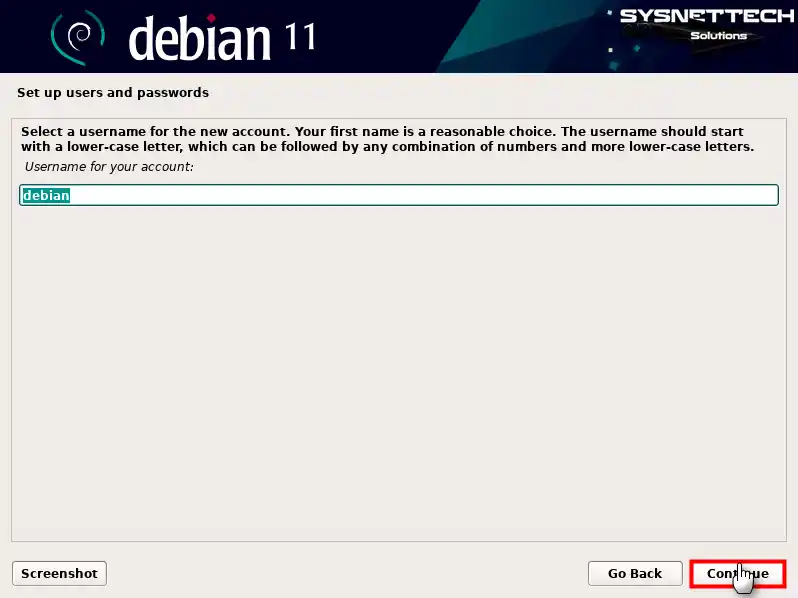
Step 11
Create a strong password for your newly created user account.

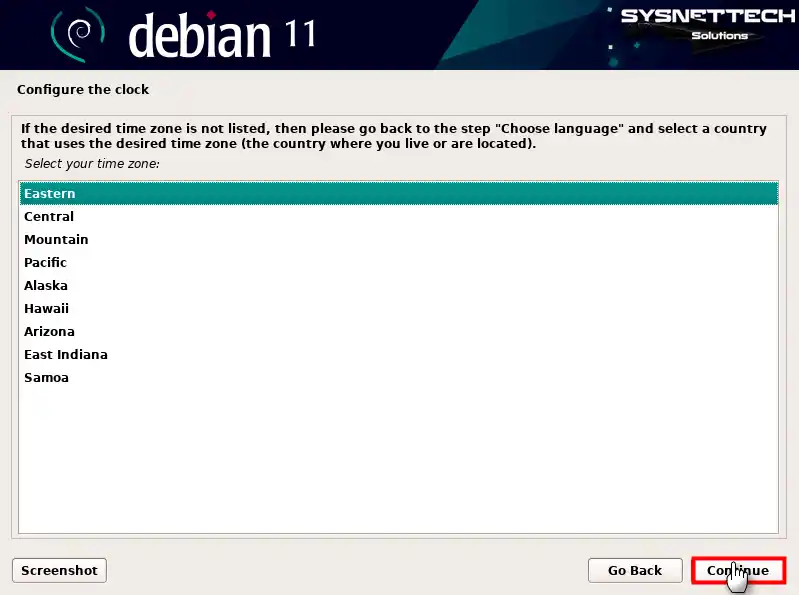
Step 12
Select an appropriate time zone for your system clock according to your location.
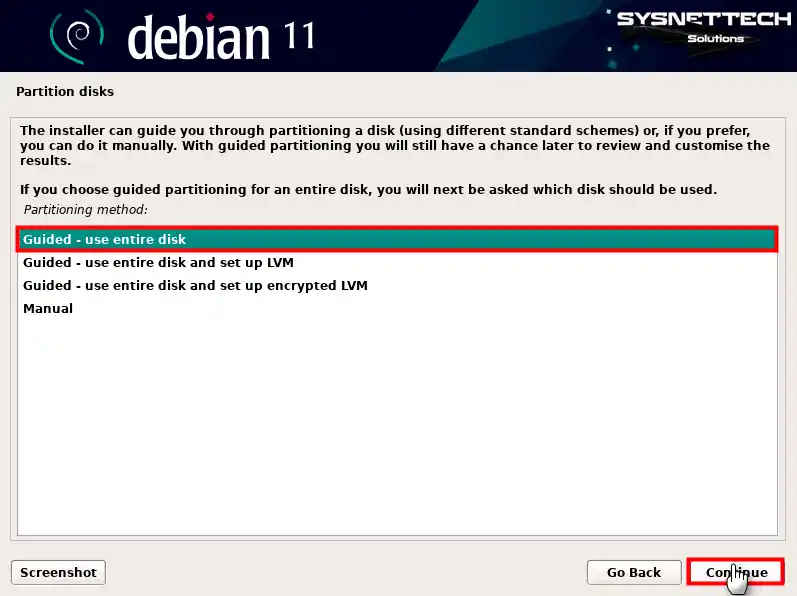
Step 13
Since we will install a clean Linux system on your computer from Scratch, choose Guided – Use Entire Disk for the basic level at this stage and continue.
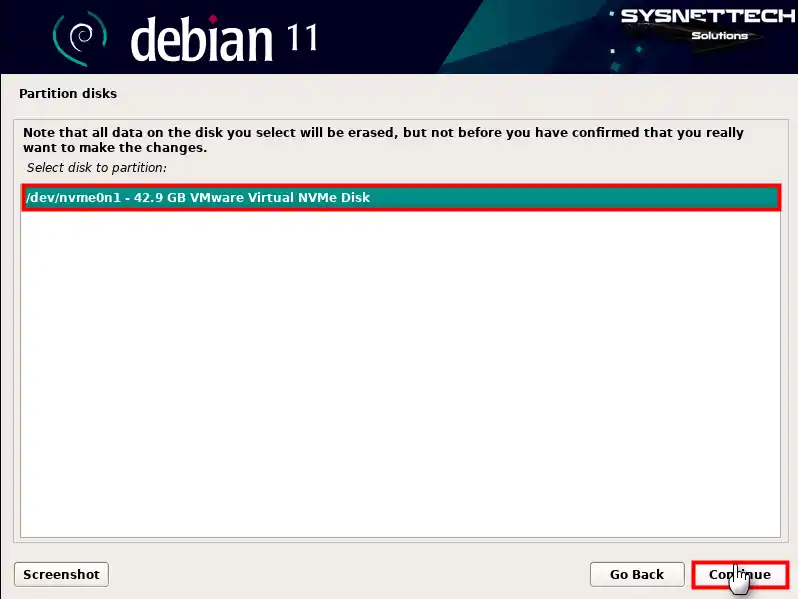
Step 14
Select your SATA or NVMe physical disk to be partitioned.
Step 15
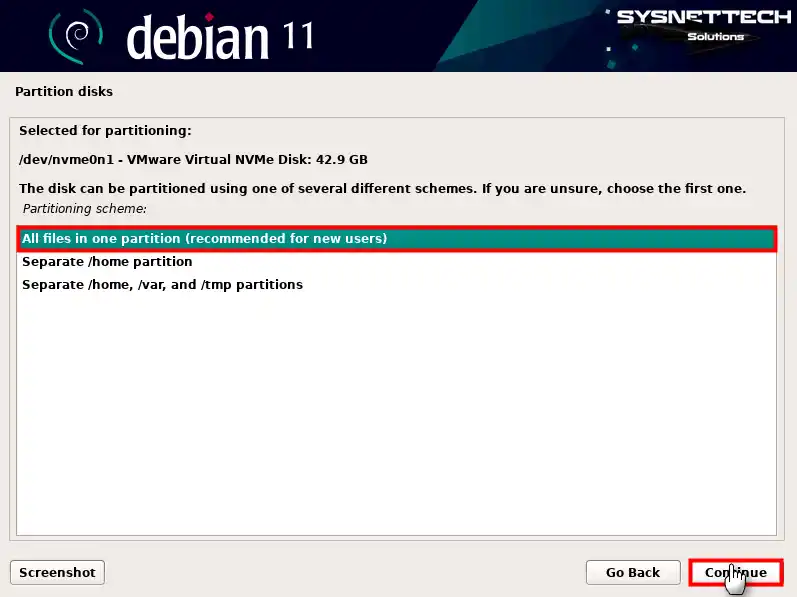
For new users, I recommend that you select the “All Files In One Partition” option.
Step 16
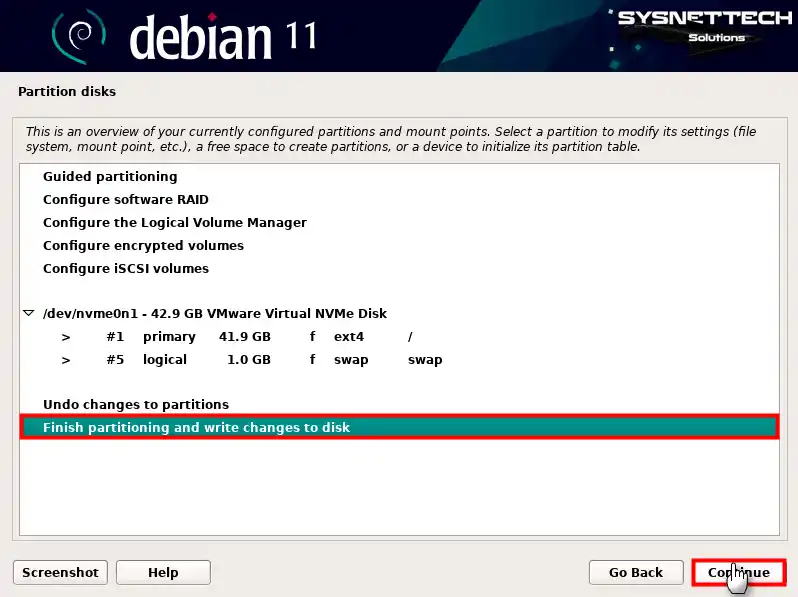
Review the Debian disk configuration and complete the partition process.
Step 17
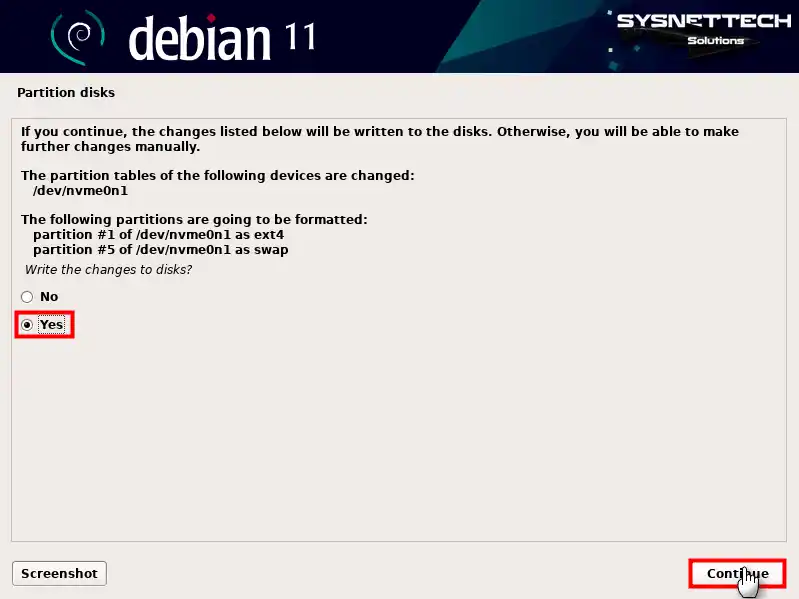
After checking the partition table, select Yes to confirm writing the changes to the disk.
Step 18
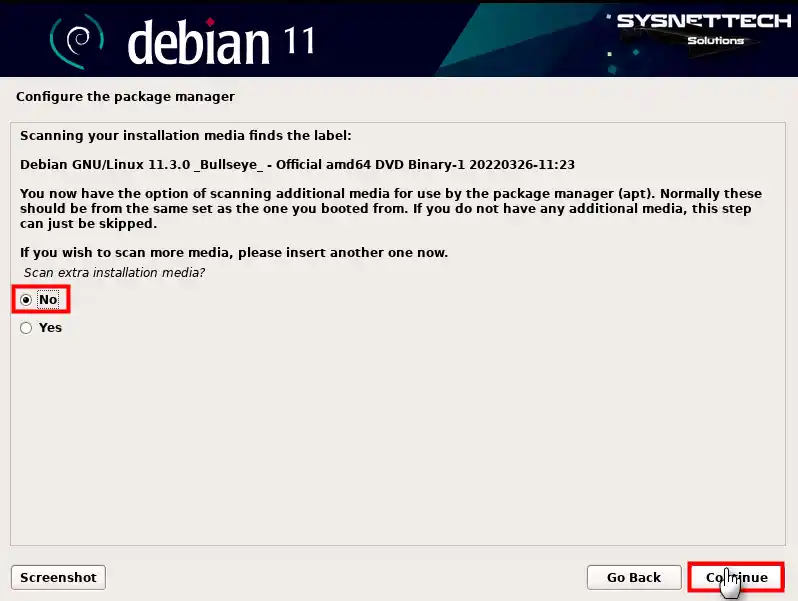
Select Yes if you want other additional media to be scanned in Package Manager edit because you downloaded the complete ISO image, or No if you don’t.
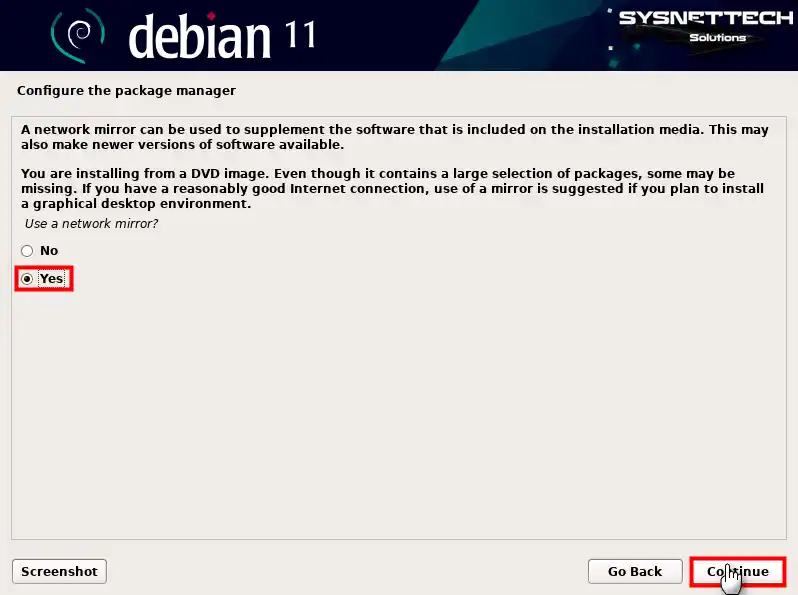
Step 19
Suppose one of the software you will install on your system is not included in the existing ISO media. In that case, you may need to use a network mirror. Therefore, select Yes to add a network mirror to the package manager.
Step 20
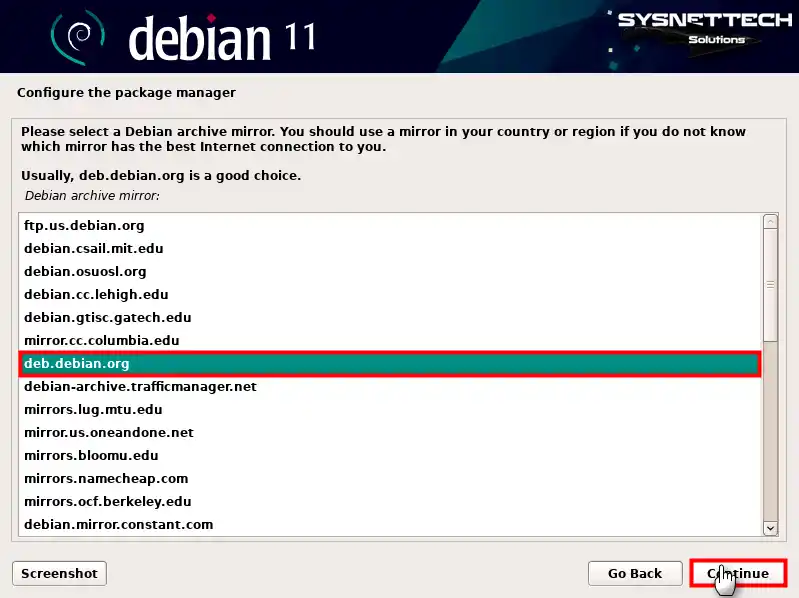
You can download packages faster by selecting the archive country closest to your network. Therefore, choose the country you live in as the archive source.

Step 21
Select deb.debian.org as the source for the Debian archive mirror, which is usually a good choice.
Step 22
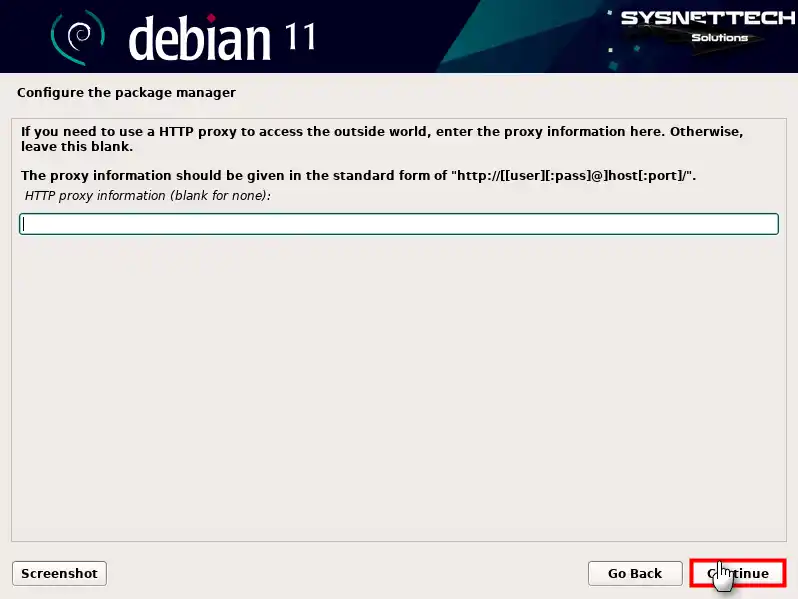
If you’re using a proxy server, enter the address in the box. If you don’t need a proxy to access the Internet, leave the box empty.
Step 23
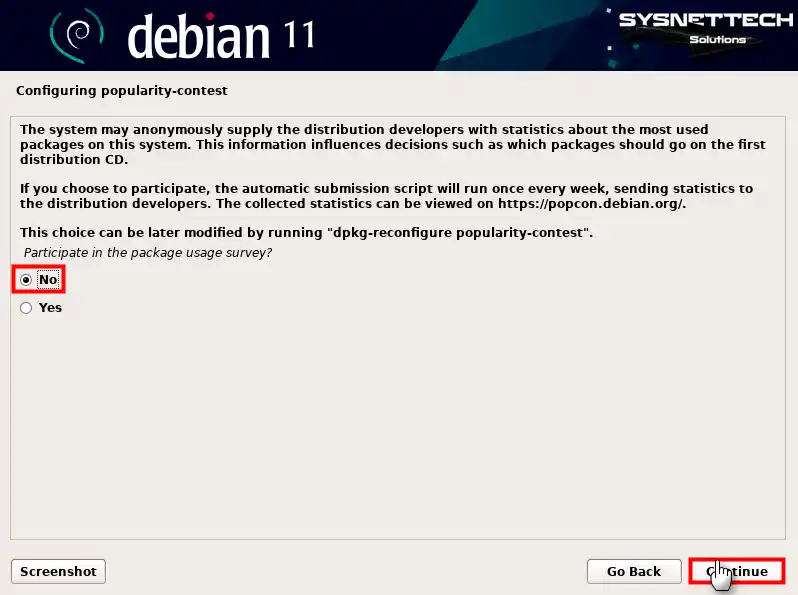
You can choose to support the better development of the system by sending the logs of the errors you encounter on your system or the hardware and other information of your PC you use to the Debian distribution developers.
However, if you prefer to research the Package Usage Survey feature further and participate later, select No and continue.
Step 24
Up to this point, only the core of the Debian system has been installed. That is, you can use your computer through the console, but it will not be a desktop environment.
If you prefer to use the predefined default Debian desktop environment, select GNOME or one of the other environments in the Software Selection window.

Step 25
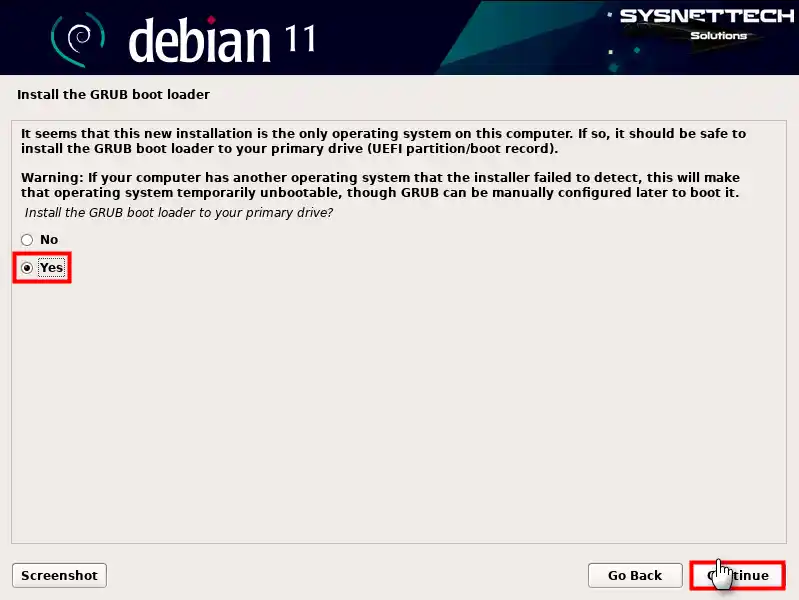
Suppose the new system you installed on your computer is a single system. In that case, it will be safe to set up the GRUB Boot Loader on the primary partition.
Step 26
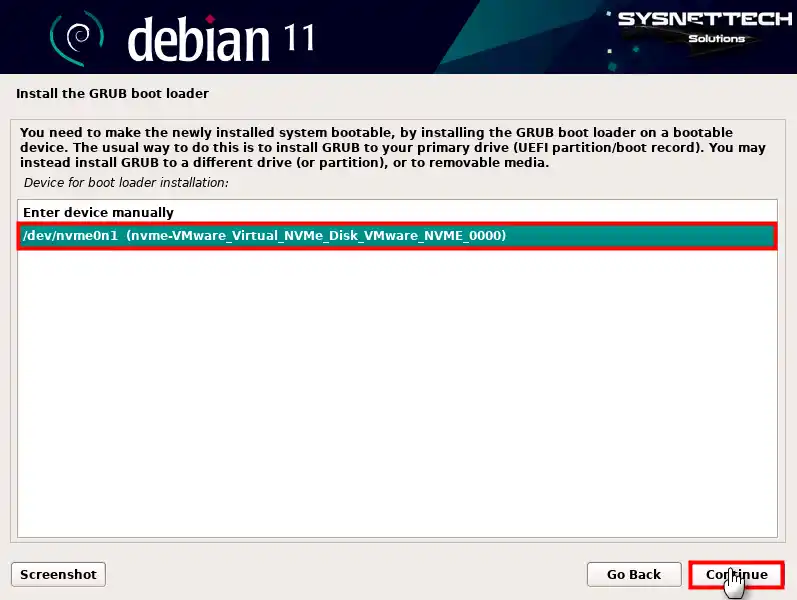
To make your newly installed system bootable, select the disk you want to install the GRUB menu.
Step 27
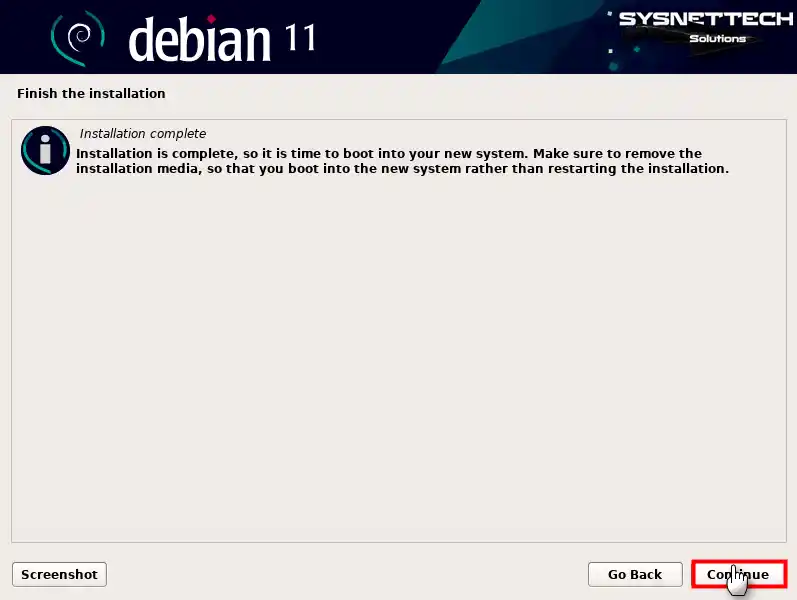
After installing your new system on your computer, remove the installation media and restart your system.
Step 28
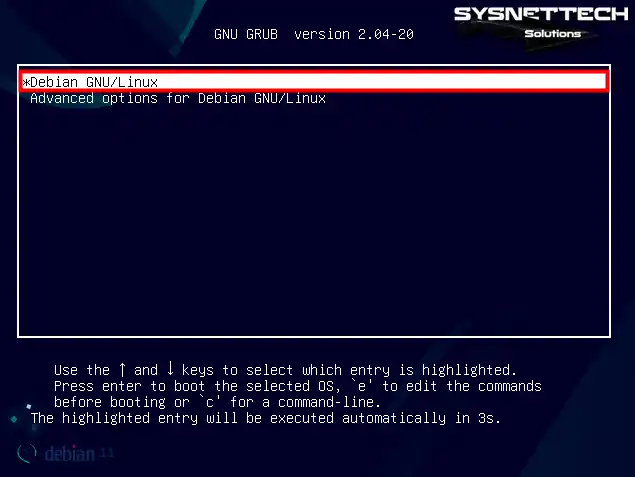
As your computer restarts, you will see the GNU GRUB menu. Here, you can start your system directly by pressing Enter in the Debian GNU/Linux option.
Step 29
Since you will be logging into your system with the user account you created instead of the root account, type your password and press Enter.
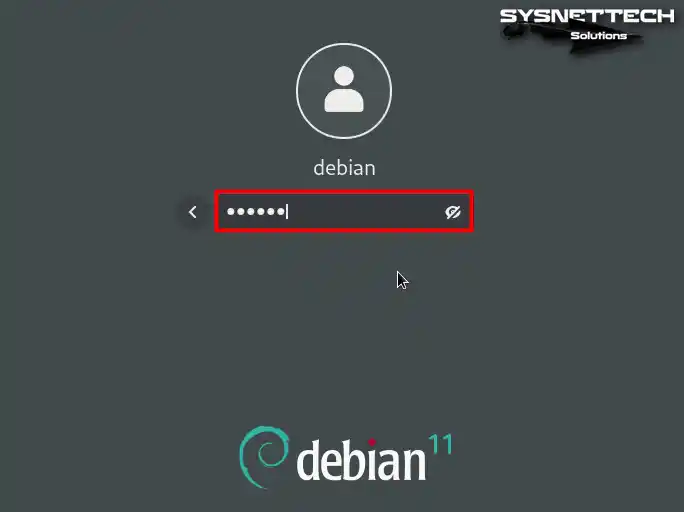
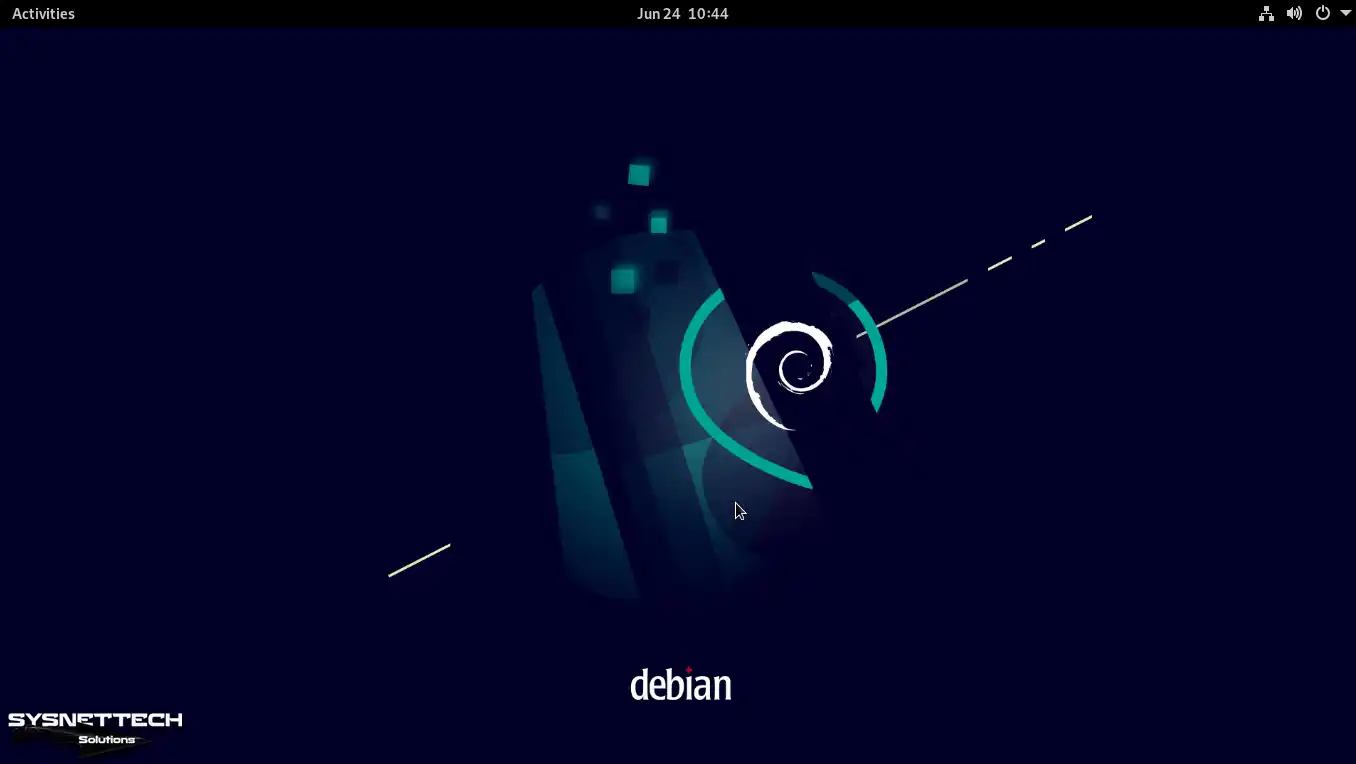
Step 30
After logging into your Debian system, you will be greeted with the GNOME desktop environment.
Step 31
After installing Debian on your computer via USB, open the terminal and execute the “lsb_release -a” command to check the version, codename, and description.
lsb_release -a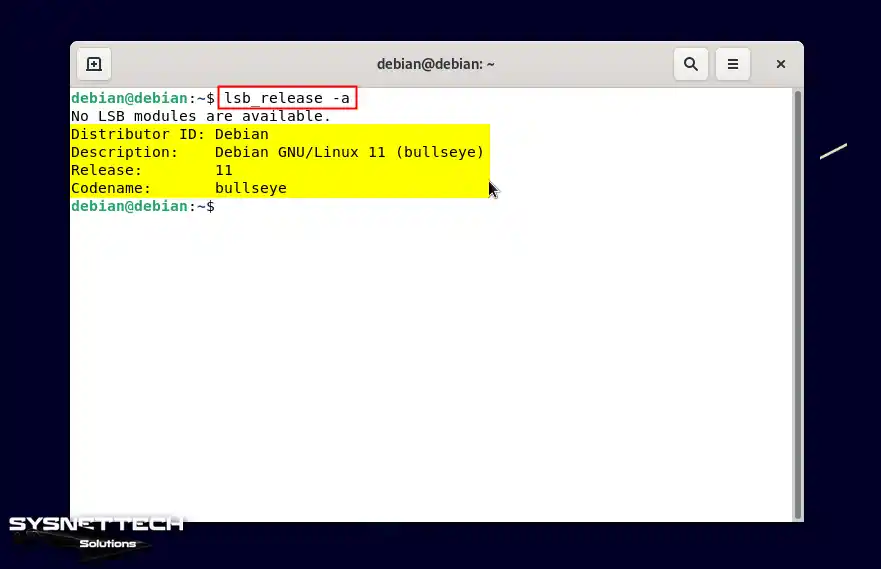
Video
Frequently Asked Questions About Debian (FAQ)
- What are the system requirements for Debian 12?
- How can I download ISO media?
- What are the different installation methods?
- How do I make a bootable USB stick?
- What are the steps to install the Debian system on a computer?
Conclusion
As a result, you can easily install Debian 12 Bookworm on your PC with a bootable USB. As a result of this process, you can start to experience Debian’s power and stability.
In short, whether you are a new or advanced user, choosing Debian will give you privilege. Thus, you can do software development, system customization, and performance optimization.
In short, you can follow the guide I provided step by step and make a safe and trouble-free installation. As a result, you can start to discover Debian’s rich free software ecosystem.

Be the first to share your comment