In this article, we will examine how to set up Windows 7 Ultimate 64 Bit on a new virtual machine using the VMware Workstation 17 Pro virtualization program on the Windows 10 64 Bit operating system.
How to Set Up Windows 7 on a Virtual Machine Using VMware Workstation 17 Pro
As you know, VMware Workstation is a virtualization program that allows you to set up and run one or more virtual machines on your physical computer. Although this program is paid, it is more powerful and stable than other software in terms of performance.
With VMware Pro, you can even install old Windows operating systems on your host computer, but sometimes with the development of new versions, some systems may experience incompatibility problems. In such cases, you can troubleshoot by downgrading or installing updates for the relevant operating system.
In our previous articles, we installed Windows 7 using other virtualization programs;
How to Create a New VM for Windows 7
You may not be able to run Windows 7-compatible software on your Windows 10 computer. Therefore, you can install a compatible operating system for the program you want to run by using virtualization software without having to install Windows 7 on your PC from scratch.
Step 1
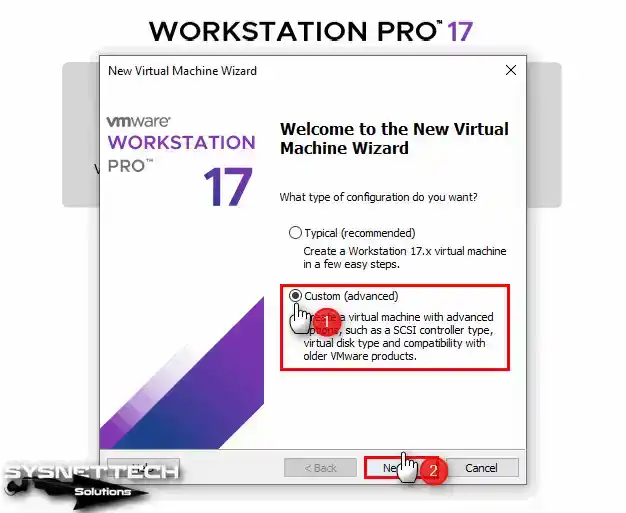
Open VMware Workstation 17 Pro and click Create a New Virtual Machine to create a new virtual computer.
Next, the New Virtual Machine Wizard window will open. In this window, select the Custom (Advanced) option to make more stable settings and click the Next button.
Step 2
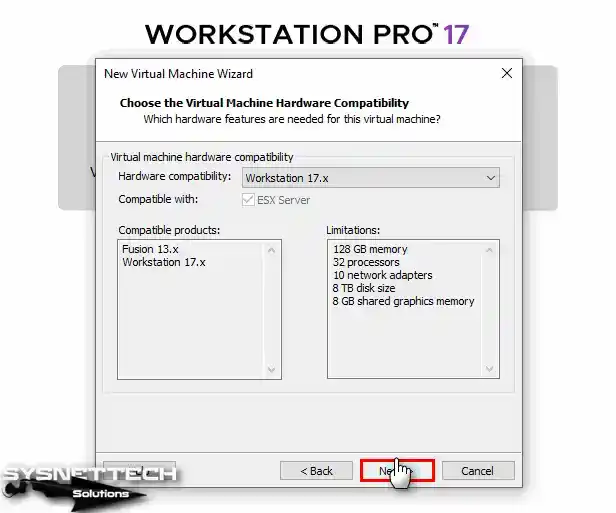
In the VMware Hardware Compatibility window, select the latest version (Workstation 17.x) and then click the Next button.
Step 3
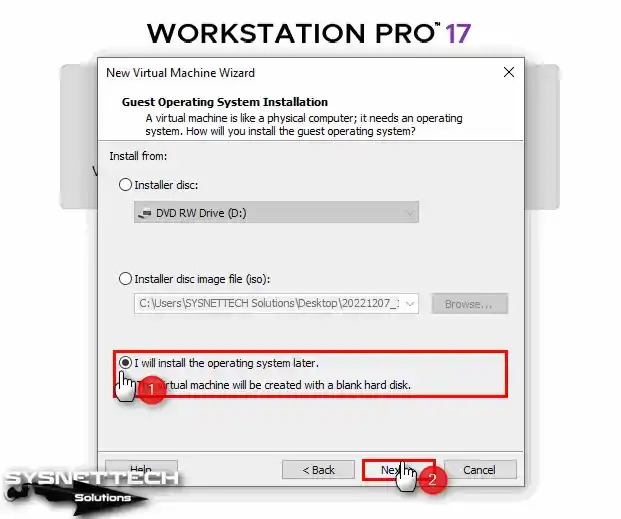
In this step, when you add the Windows 7 ISO file to the virtual machine, other settings will be automatically selected by the virtualization program, and you will also be able to configure fields such as license key or username.
To add the ISO file to the virtual machine later and start the installation later, check I will install the operating system later and click Next.
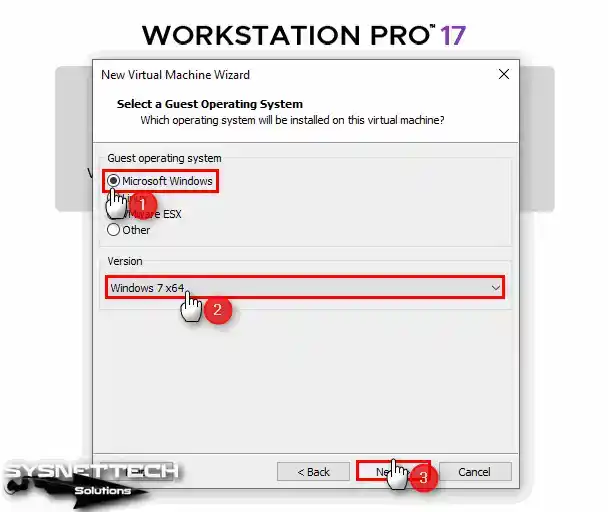
Step 4
In the Guest operating system selection window, first tick Microsoft Windows, and then select Windows 7 x64 from the Version section and click the Next button.
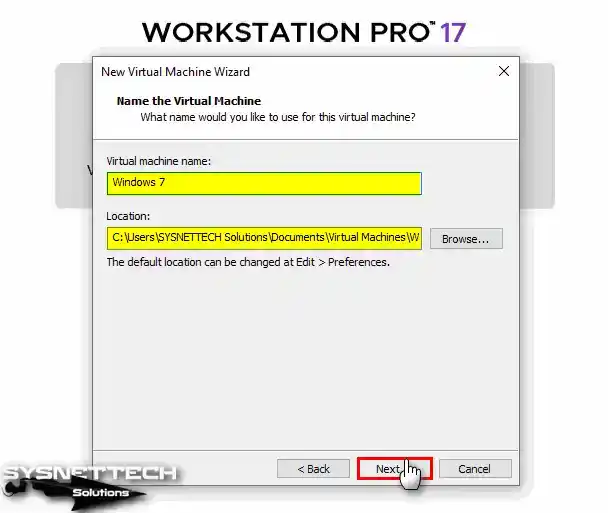
Step 5
In the Virtual Machine Name window, specify a name for your virtual machine, and select the location where you want to store the virtual machine in the Location section.
In this step, you can also store the virtual machine files on an external HDD, but if your host computer has an NVMe or SSD disk, we recommend that you install it on the existing drive.
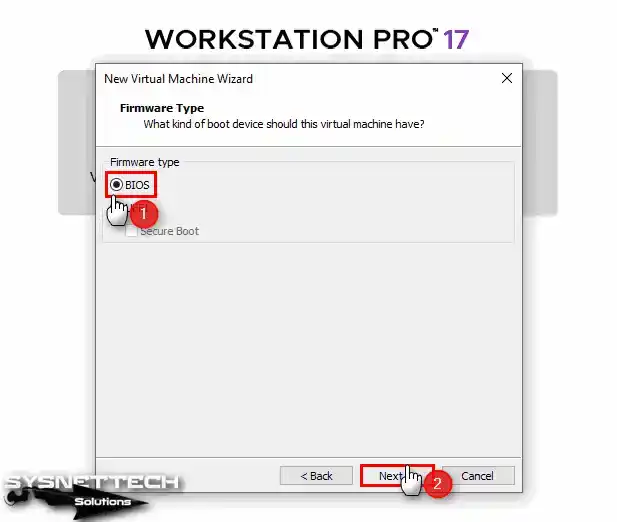
Step 6
In the Firmware Type window, select the BIOS commonly used for legacy systems and click Next.
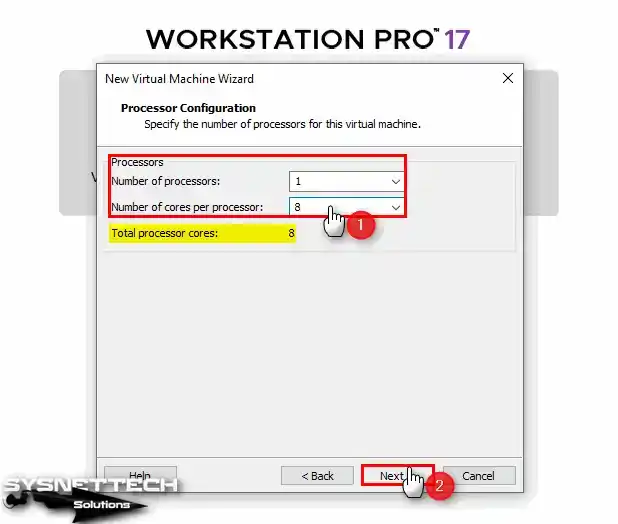
Step 7
You can set the number of processors or cores here, depending on your host’s processor hardware type and performance. For example, you can configure 1 processor and 8 cores per processor for the virtual computer.
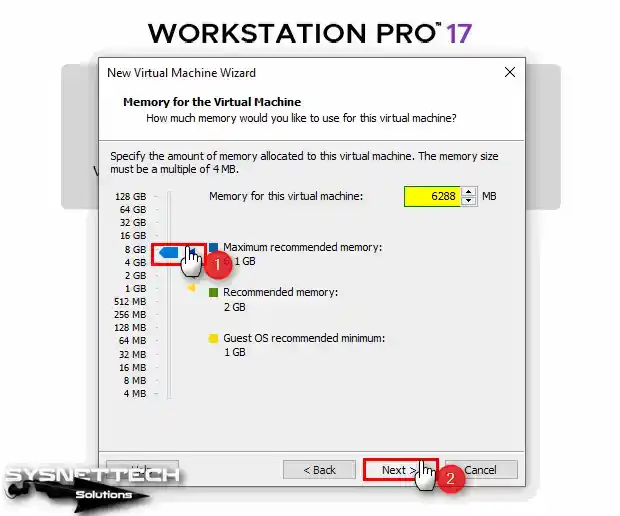
Step 8
Configure the recommended or maximum memory size for your Windows 7 virtual computer, or specify half the size of RAM installed on your host here.
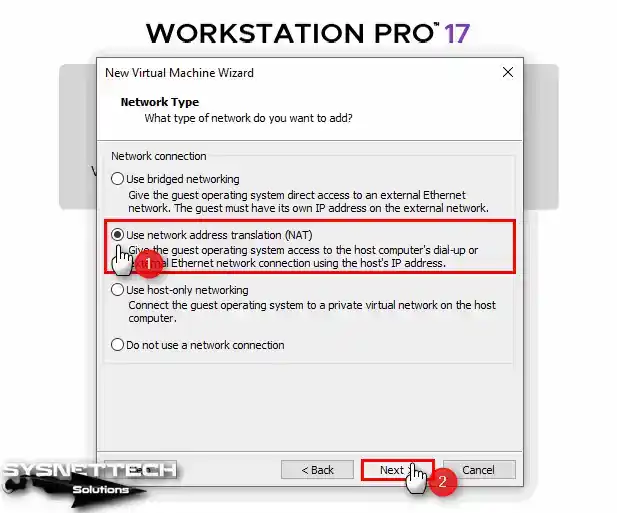
Step 9
Select NAT, which is selected by default in the Network Type window, and click the Next button.
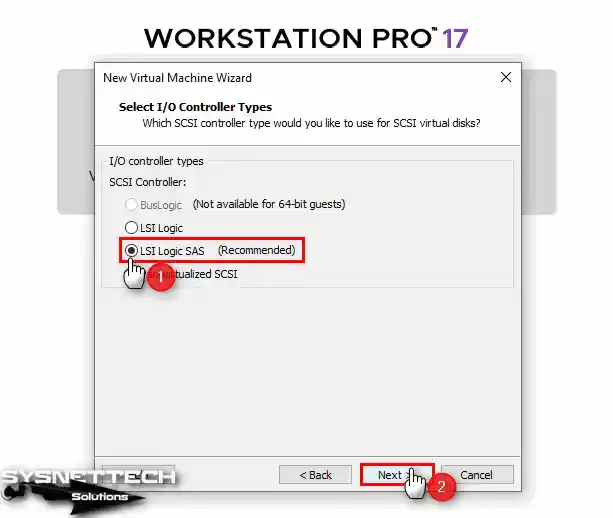
Step 10
In the I/O Controller types window, check LSI Logic SAS (Recommended) and click Next.
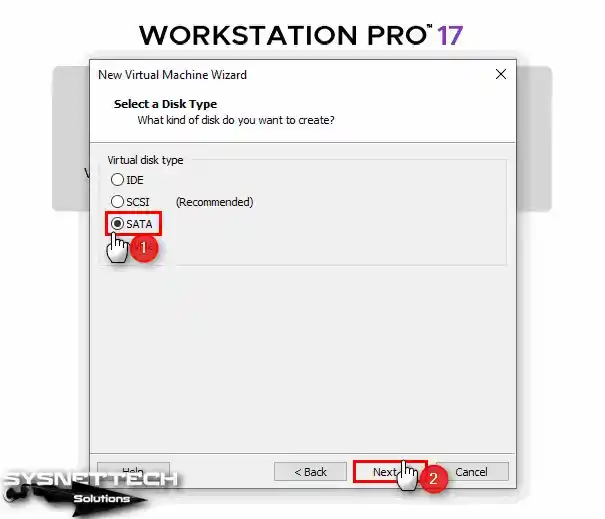
Step 11
Check SATA in the disk type window and click Next.
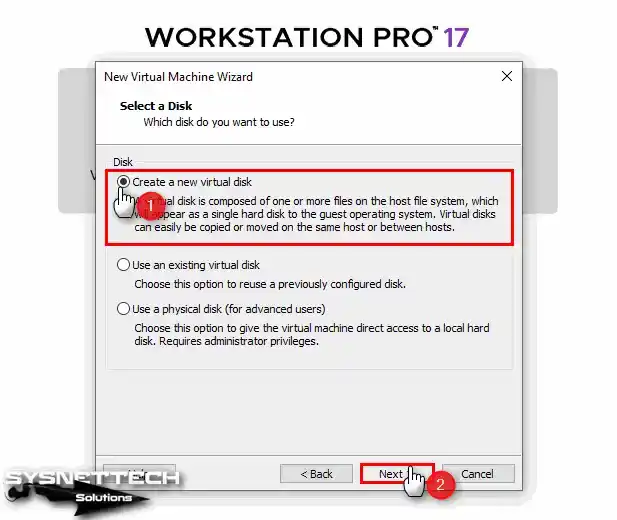
Step 12
You need to create a new virtual disk for the virtual machine. Check the Create a new virtual disk option and click the Next button to continue.
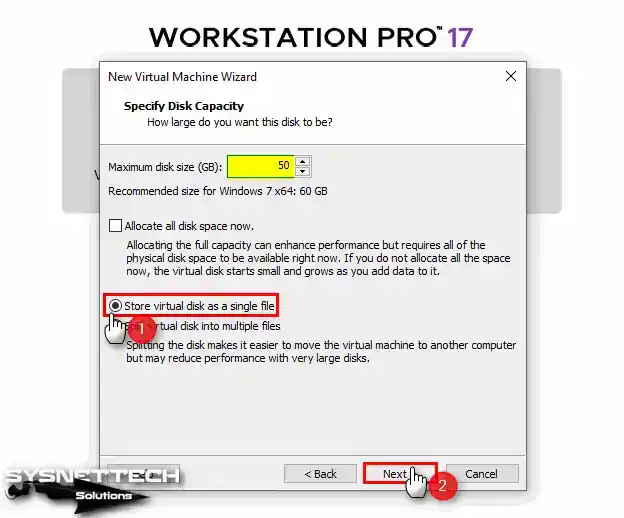
Step 13
A disk size of 50 GB will be sufficient for a Windows 7 virtual machine. However, depending on the work you will do, determine the disk size and select the Store virtual disk as a single file option.
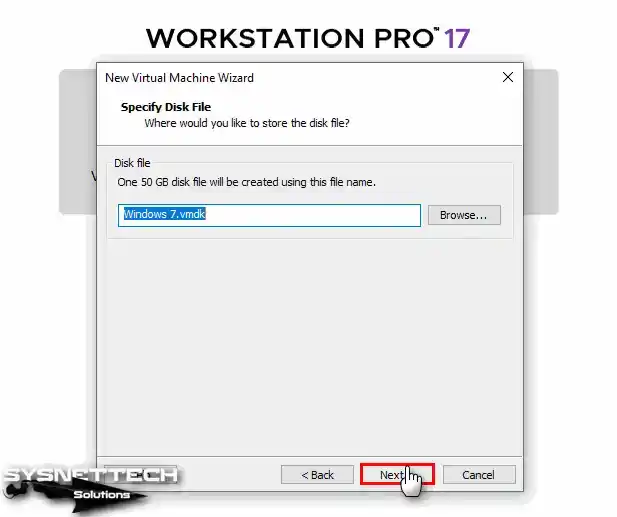
Step 14
Leave the storage location of the disk file in the default location and click Next without changing the name of the disk file.
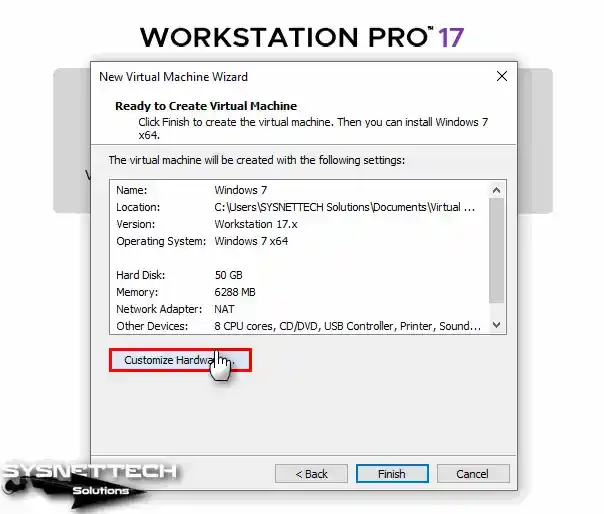
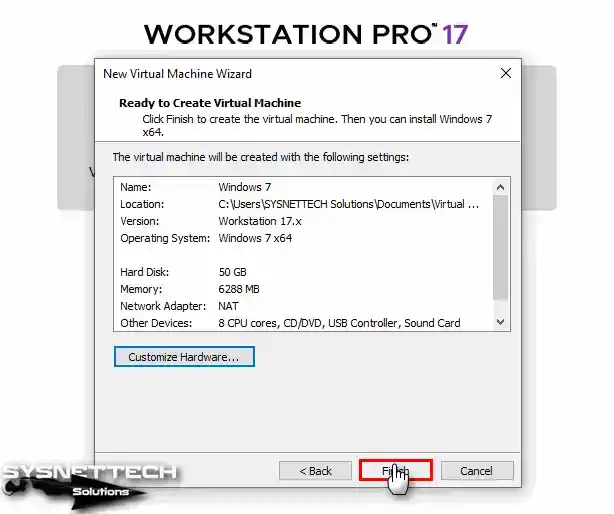
Step 15
At the final stage of creating the virtual machine, click the Customize Hardware button.
Step 16
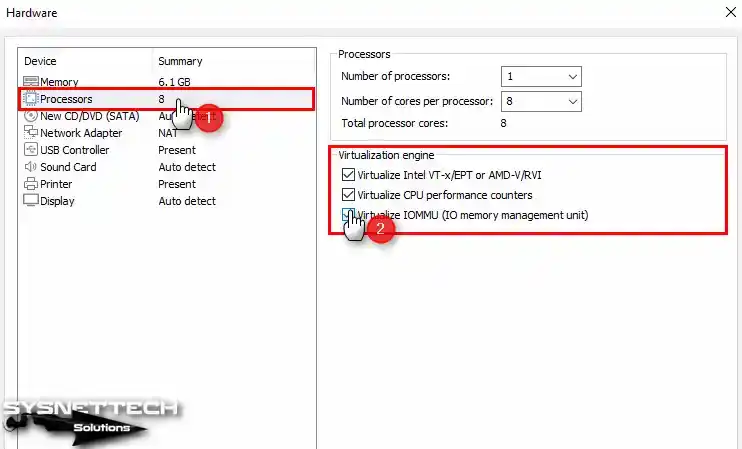
Click on the processor hardware in the virtual machine settings, and then tick the Virtualize Intel VT-x/EPT or AMD-V/RVI, Virtualize CPU Performance Counters and Virtualize IOMMU (IO Memory Management Unit) options.
Step 17
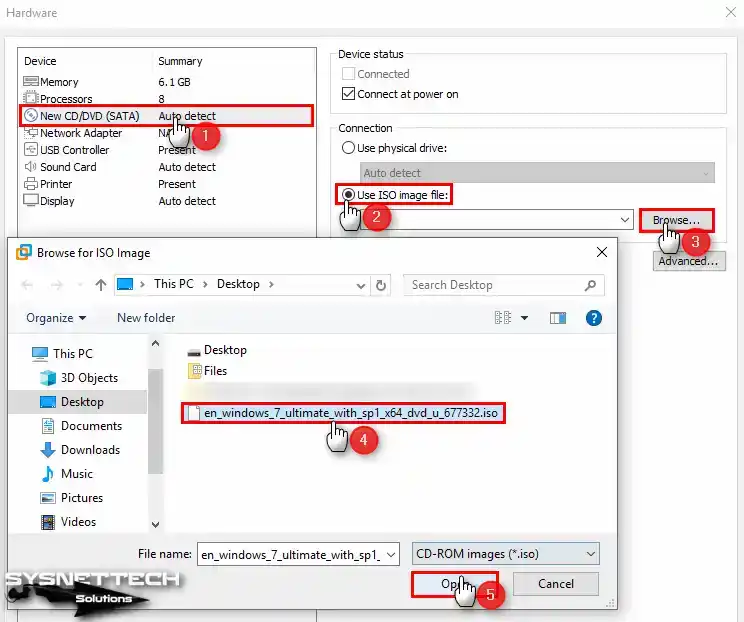
Click the CD/DVD device and click the Browse button to add the ISO file to the virtual machine to set up Windows 7. Then, download the Windows 7 ISO file that we used in this article to your computer by clicking this link, and then select the image file and click the Open button.
Step 18
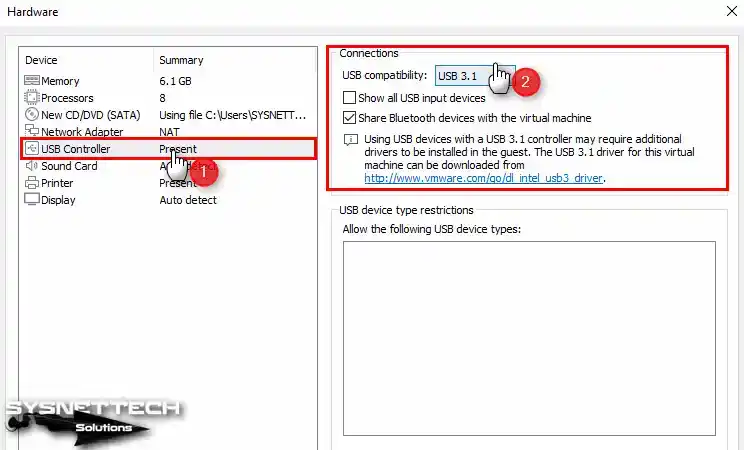
Click the USB Controller device and configure the compatibility setting to 3.1 and tick the Show all USB input devices and Share Bluetooth devices with the virtual machine options.
Step 19
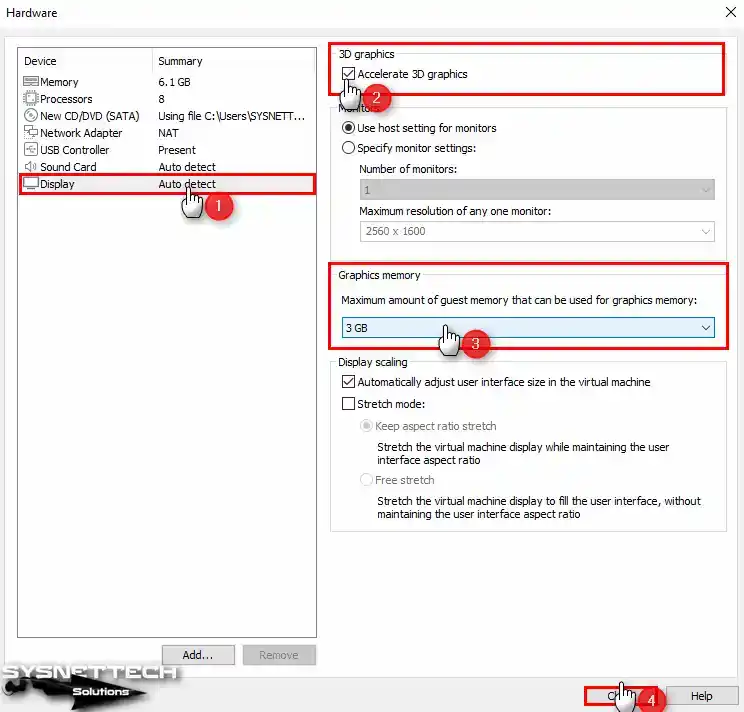
After clicking on the display device, enable 3D graphics acceleration from the options listed on the right and set the Graphics Memory value to half the amount of RAM you have specified for the virtual machine.
Step 20
To install Windows 7 on VMware, after creating a new virtual machine, click the Finish button to close the guest machine’s hardware properties window.
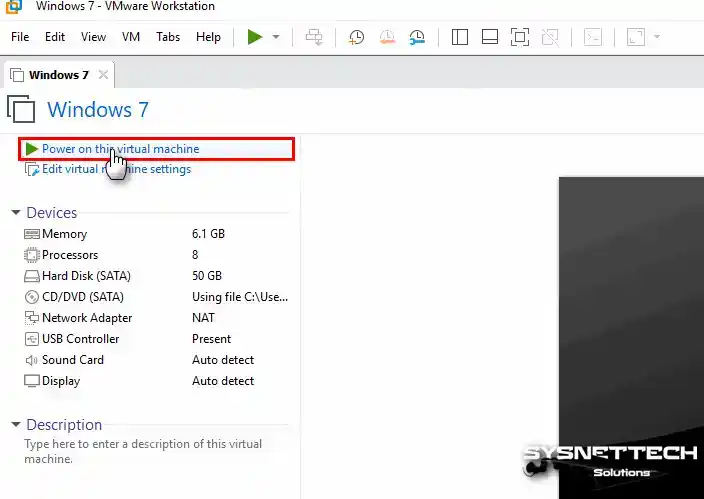
Step 21
You can now start the Windows 7 operating system installation by clicking the Power on this virtual machine button.
How to Install Windows 7
After preparing and running the Windows 7 virtual computer, when the first setup screen opens, follow the steps below for step-by-step installation.
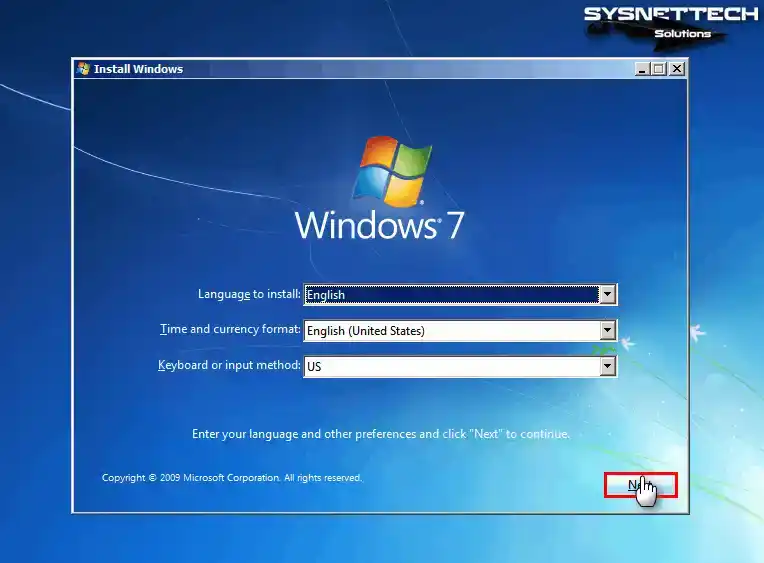
Step 1
Configure the display language, time zone, and keyboard layout for your Windows 7 operating system and click Next.
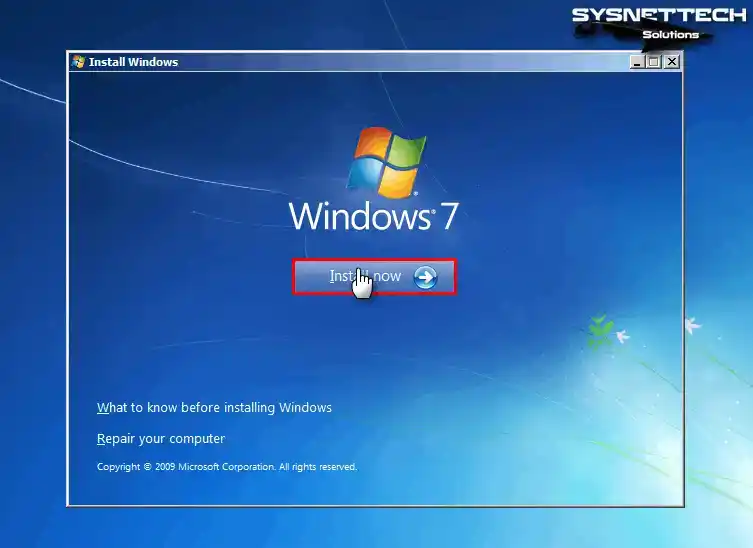
Step 2
After configuring the necessary settings, click the Install Now button.
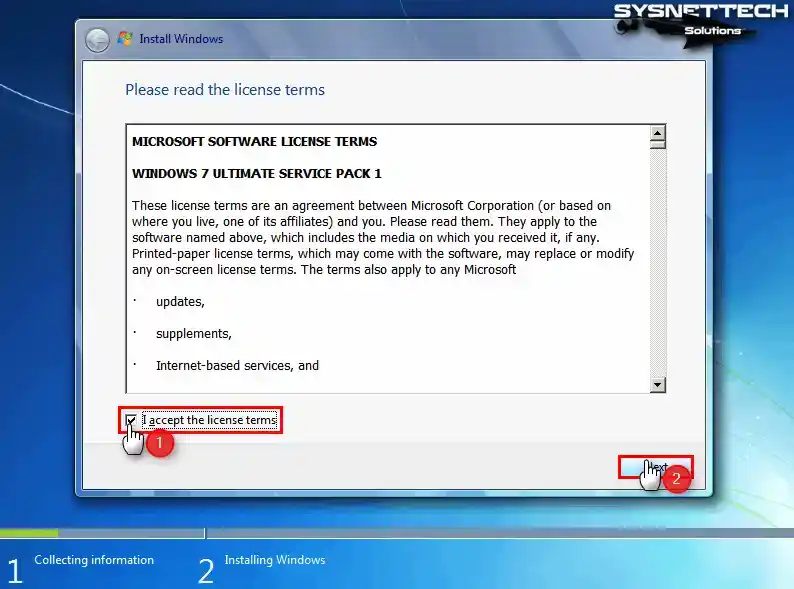
Step 3
Accept the Windows 7 Ultimate Service Pack 1 license agreement and click Next.
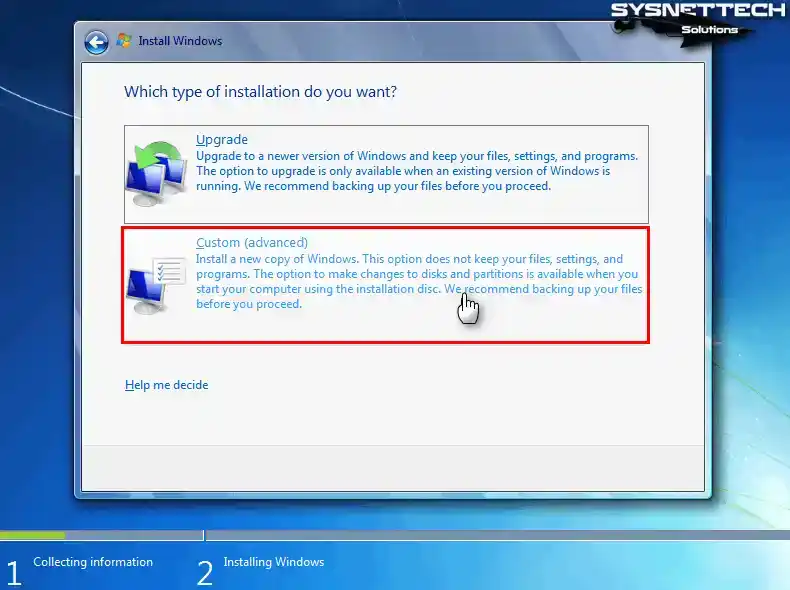
Step 4
To build a clean Windows 7 on the virtual machine, you need to choose Custom (Advanced). If you want to upgrade a previously ready system to a different version, you must continue with the Upgrade option.
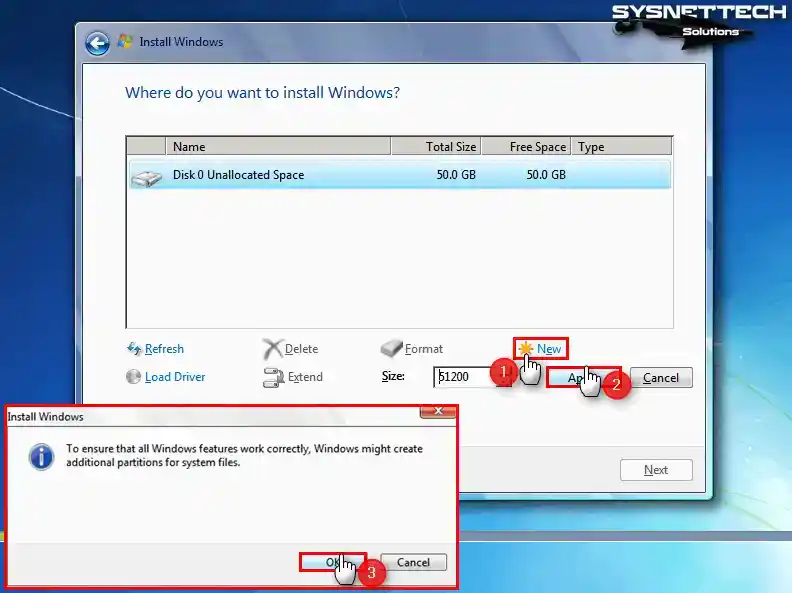
Step 5
Click Drive Options in the disk configuration window. Click the New button to create a new partition on the virtual disk. Click the Apply button to use the entire 50 GB hard disk size.
Click OK in the information window that states that additional partitions will be created so that Windows features can work properly.
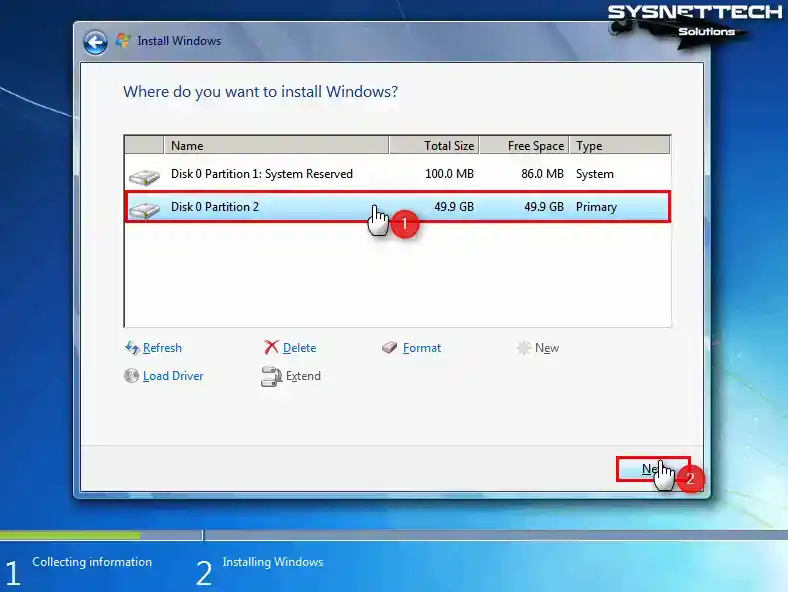
Step 6
To install the Windows system, select Disk 0 Partition 2 and click Next.
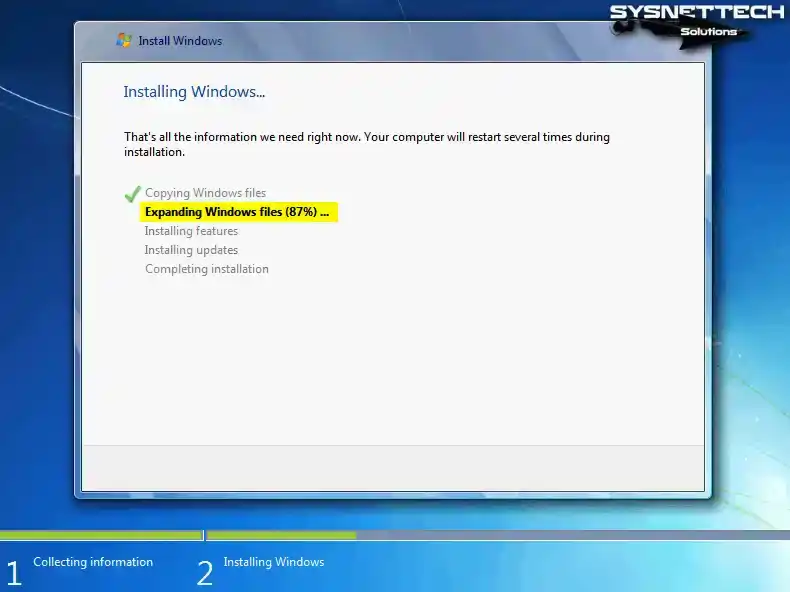
Step 7
Wait while the Windows installation files are being expanded.
Step 8
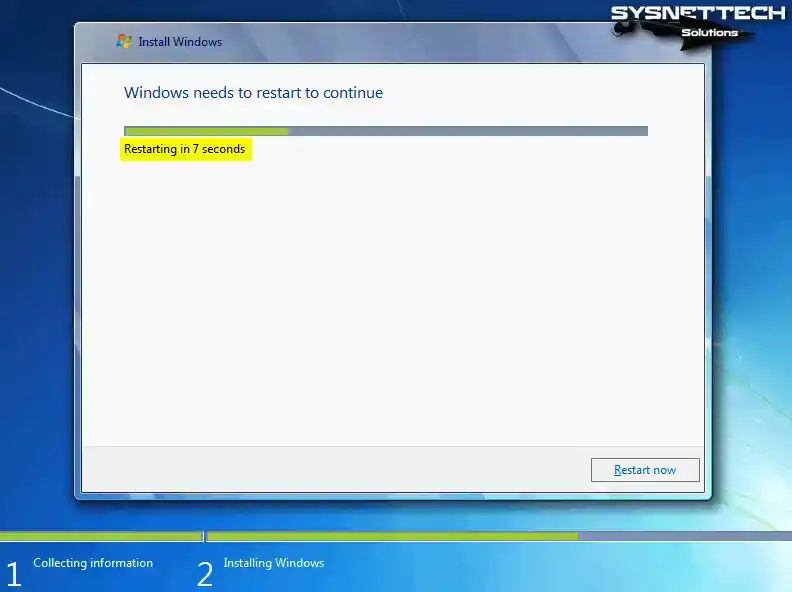
The virtual computer will restart automatically after 10 seconds when the system files are copied. If you want to start immediately, click the Restart Now button.
Step 9
While your virtual system restarts, wait while the Windows system updates the registry and other settings.
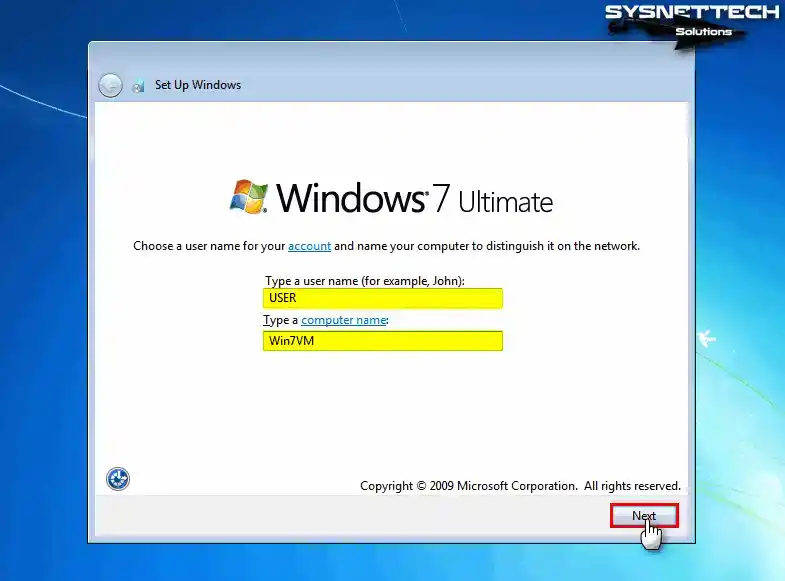
After your computer’s registry settings are updated, you will see the user account creation window. In this window, type a new username and computer name and click Next.
Step 10
If you want to set a Windows password for your user account, type the password you specified in both boxes. If you are going to create more than one user account on your system, we recommend specifying a hint.

Step 11
If you have a Windows license key, you can enter it in this window. Then click Next to enter the license key.

Step 12
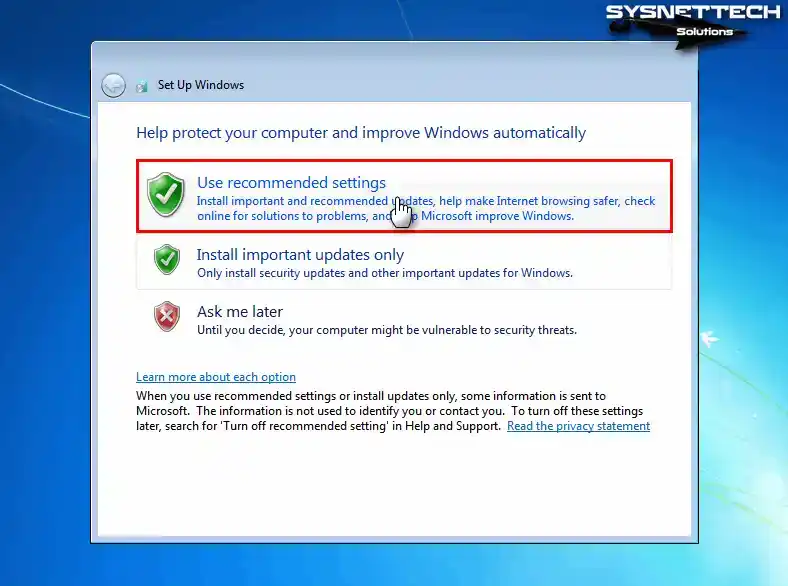
You can select Ask me later to configure the Windows firewall in detail for the software you will use later, or Use Recommended Settings to accept the settings recommended by Windows.
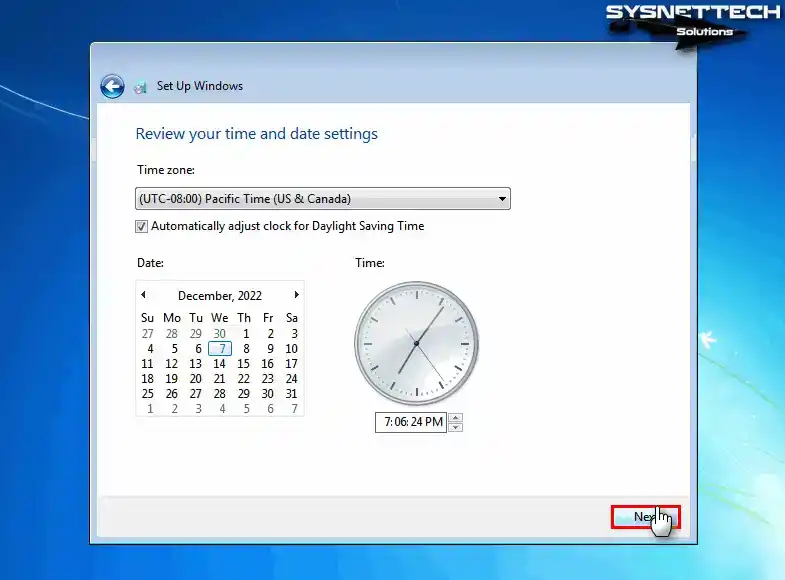
Step 13
Configure the time zone and time of your country of residence and click Next.
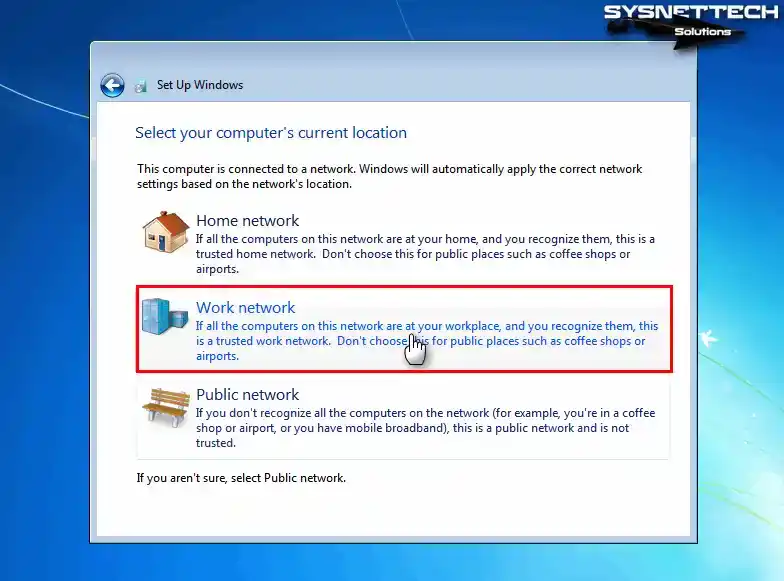
Step 14
For what purpose you are using your network structure, select one of the Home, Work, and Public options and continue.
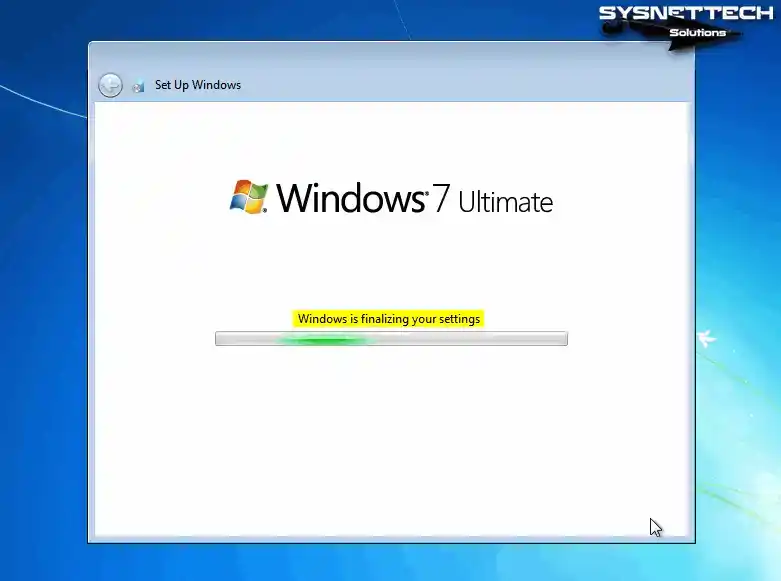
Step 15
Wait while the Windows wizard configures your system’s final settings.
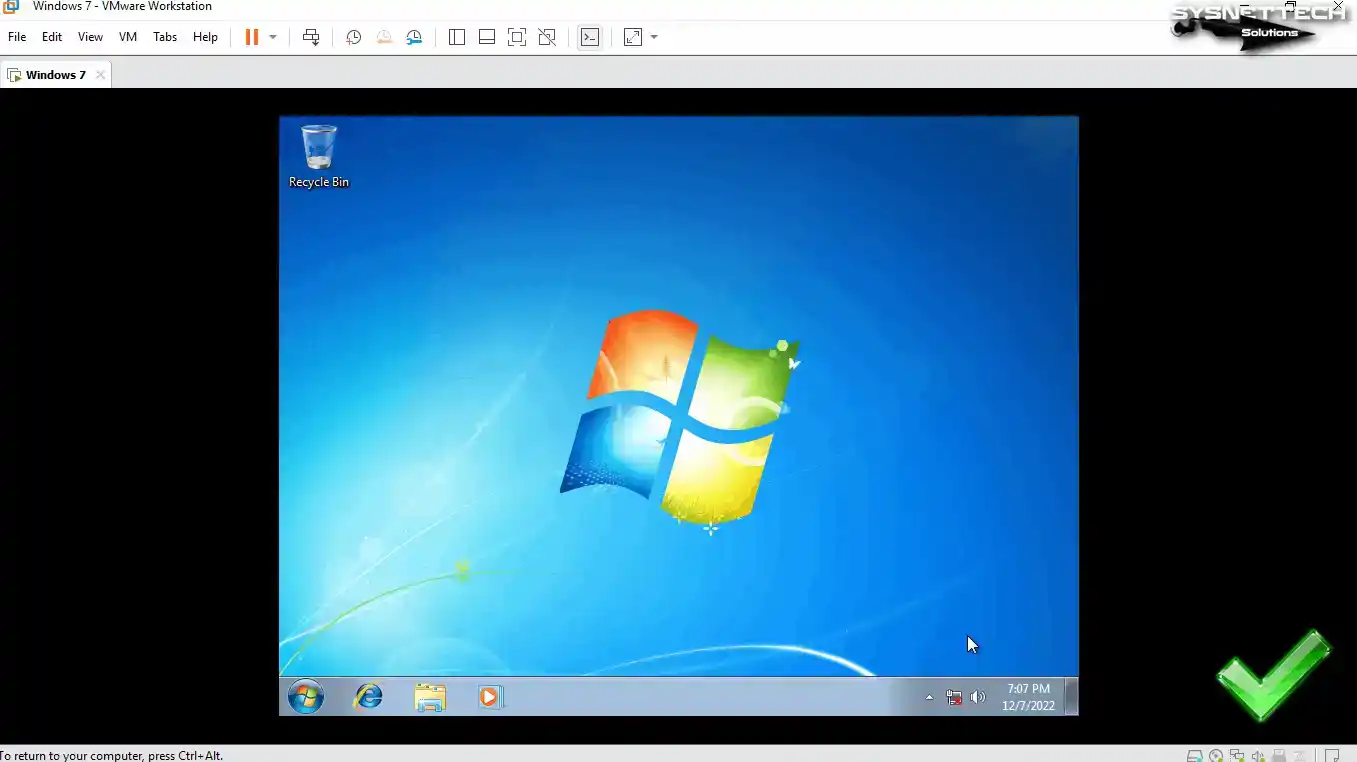
Step 16
Wait for a while your desktop is being prepared in the Windows 7 welcome window and finally you will see the desktop screen.
How to Install VMware Tools
VMware Tools for Windows 7 virtual pc was installed without any problem in old versions of Workstation Pro, but now users may encounter various errors in new versions.
VMware Tools is necessary software for your guest machine to use your host’s hardware more efficiently. With this tool, you can transfer files between host and guest, and use host hardware such as a webcam. In addition, you can share a folder on the network thanks to the Shared Folder structure.
Step 1
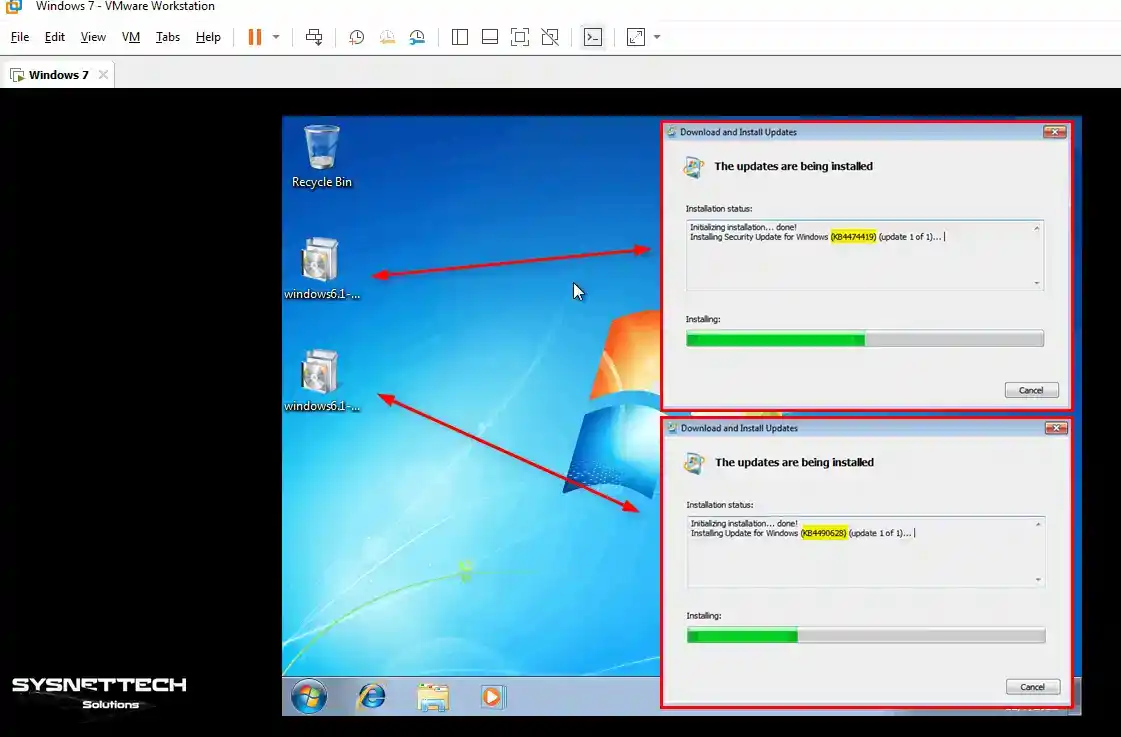
Before installing VMware Tools on your Windows 7 x64 guest machine, you need to install the kb4474419 and kb4490628 update packages on your system. If you do not install these Windows update packages on your system, you will receive the following errors during the installation phase.
Setup failed to install the VSock Virtual Machine Communication Interface Sockets driver automatically. This driver will have to be installed manually.Setup failed to install the Host Guest Shared Folders driver automatically. This driver will have to be installed manually.Click the button below to download the update packages for Windows 7 x64 to your host system. The name and extension of the file you downloaded will be “Windows 7 x64 kb4474419 kb4490628.iso”. Add this file to your guest machine and install the update packages and restart your system.
Windows 7 x64 kb4474419 kb4490628.iso
Step 2
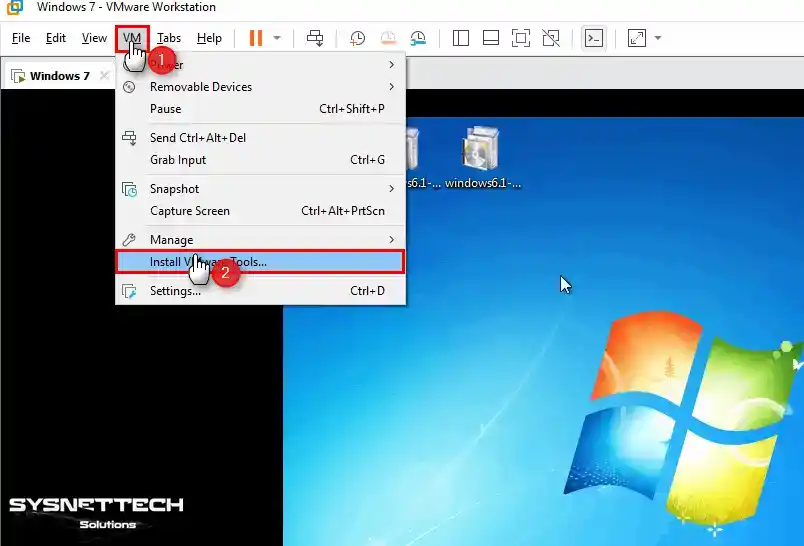
To install the virtual machine tools, click the VM from the tool menu and then click Install VMware Tools.
Step 3
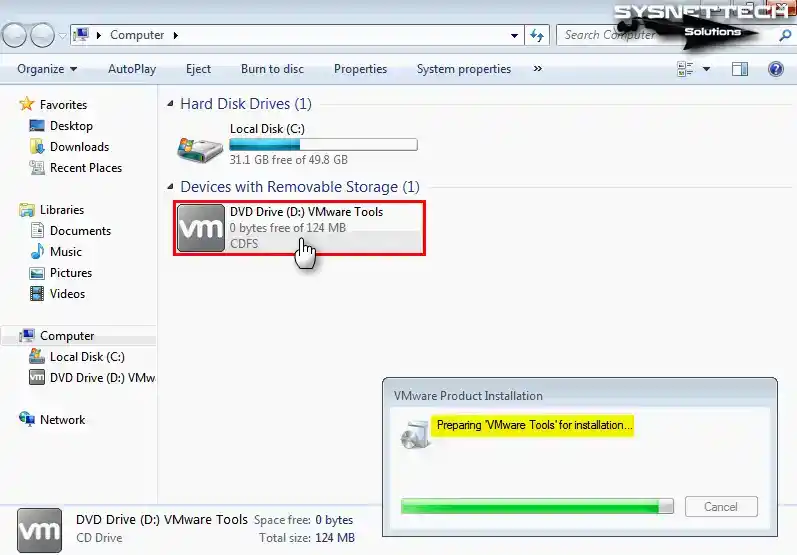
If the VMware Tools installation wizard did not start automatically and is taking too long, open My Computer and double-click on the DVD device as in the image below.
Step 4
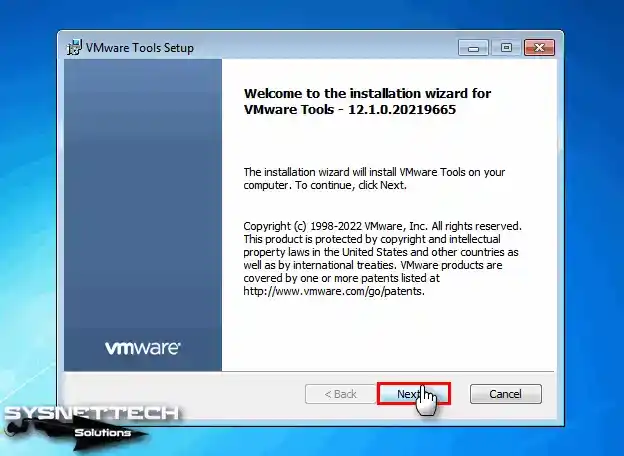
Continue by clicking Next in the VMware Tools setup wizard.
Step 5
In the Choose Setup Type window, select Complete and click Next. If you want to make a change, you can go back with the Back button.

Step 6
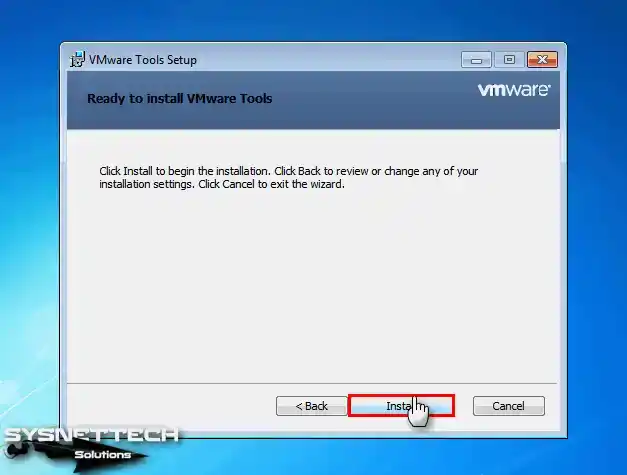
Click Install to start installing the virtual machine drivers and continue.
Step 7
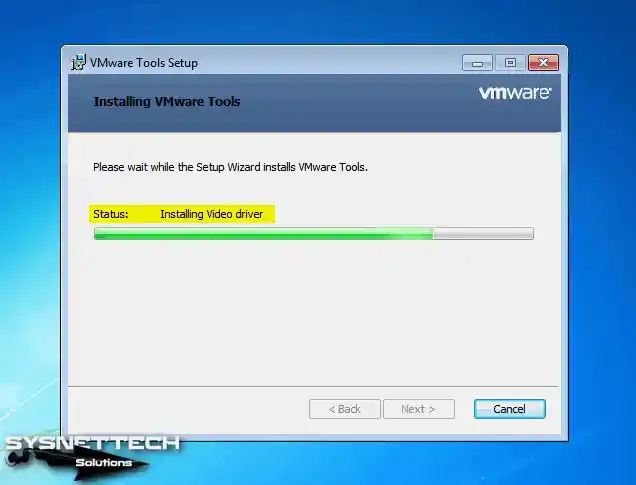
Wait while your virtual system’s graphics card or other drivers are loading.
Step 8
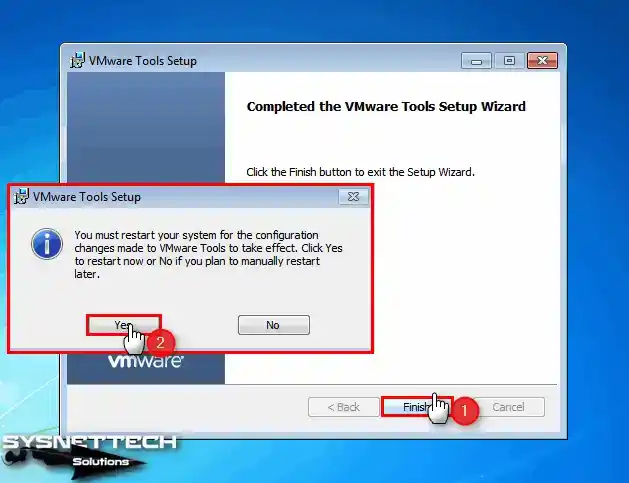
After installing the drivers for your guest system, restart your system for the changes to take effect.
Step 9
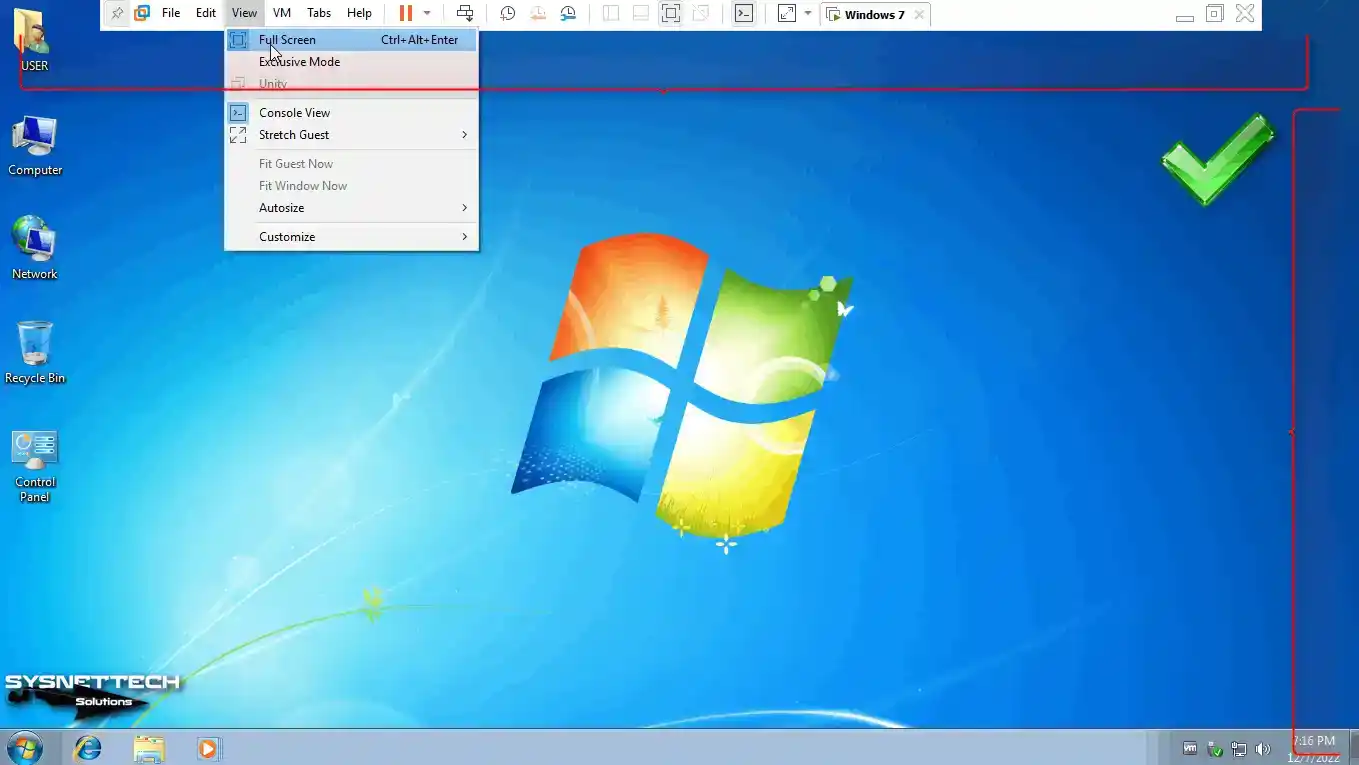
When you restart your system, you can see that the screen resolution is fit to the full screen. However, USB 3.x drivers will not be installed automatically.
Step 10
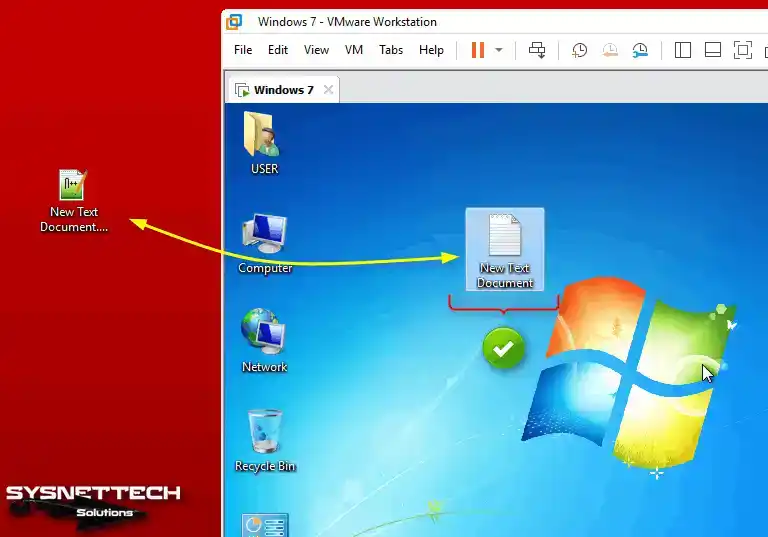
Create a text document on the desktop or other location of your host system and try to transfer files by dragging and dropping them to your VM and you will see that the operation was successful.
How to Configure Shared Folder
After installing a Windows or Linux operating system with VMware, you can use the Shared Folder structure to share files more easily between the host and the VM with a common folder you specify on your host device.
Shared Folder works with a shared folder structure on the network. You can access the shared folder you created from both Network and My Computer.
Step 1
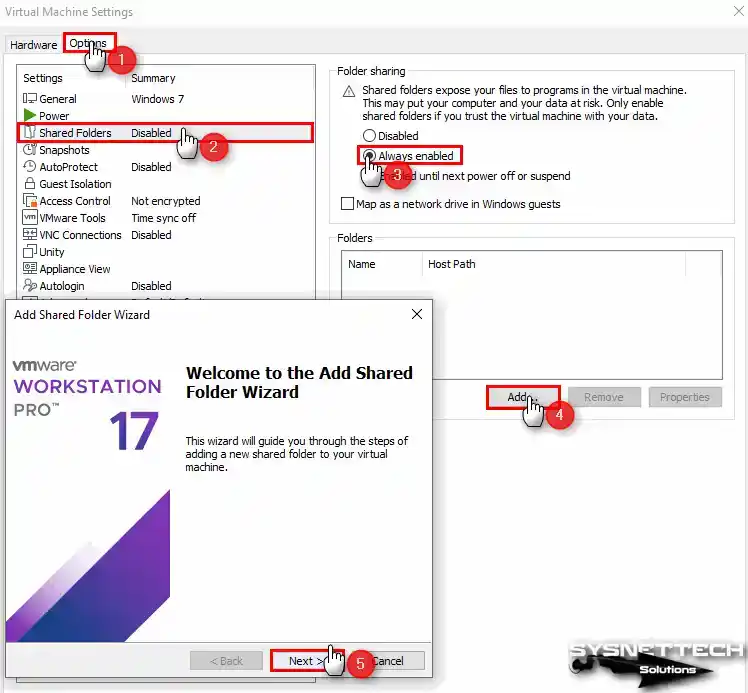
Click VM / Settings to create a new Shared Folder on the virtual computer you have installed. After opening the virtual machine settings, click Options and then click Shared Folders. Enable Always Enabled in the Folder Sharing tab and click the Add button to select and add a folder on your host.
When the Shared Folder wizard opens, click Next.
Step 2
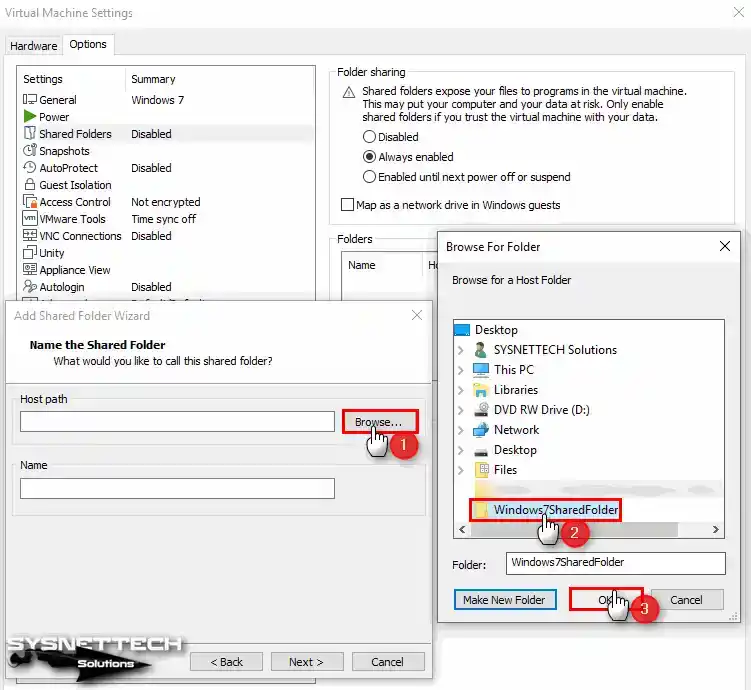
After clicking Browse to set the Host Path, create a shared folder in any location of your host computer and select it.
Step 3
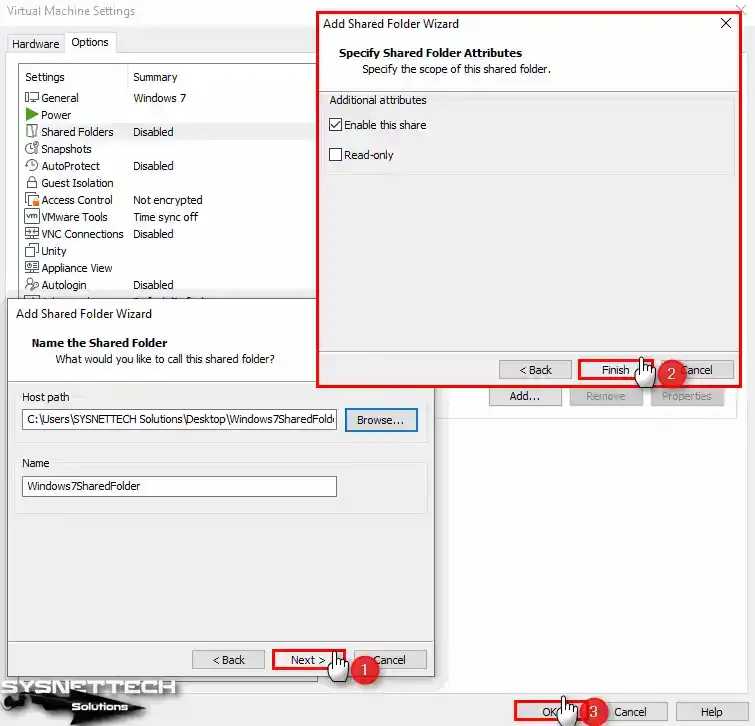
You can enable or disable folder sharing in the Additional Attributes window. In addition, if you choose Read-Only, you will not be able to make any changes to the folder you shared, but you can view the contents of the folder and open the related files.
Step 4
Open Network and check if the Shared Folder feature is working, and you can see the shared folder created between the host and the VM.
Finally, enable the Map as a network drive in Windows guests option and click the OK button to close the window.
How to Use USB Flash Memory
USB 3.0 drivers will not be installed automatically after installing VMware Tools. Because the installation media of old operating systems do not contain the drivers for this hardware. If you installed a Windows 10 machine, these drivers would be installed automatically.
Step 1
Open Device Manager in Windows 7 and check the Universal Serial Bus (USB) Controller in Other Devices, and you can see that the drivers are not installed.
To manually install USB drivers:
- To manually install the corresponding driver, first, double-click the Universal Serial Bus (USB) Controller device.
- Click the Update Driver button in the Universal Serial Bus (USB) Controller Properties window.
- Click Browse my computer for driver software.
- Select Intel’s USB driver folder and click OK.
- After selecting the driver folder, click Next to start the installation.
- When you try to install the USB 3.0 driver manually, you will be able to install it this time. You can see that the Intel(R) USB 3.0 eXtensible Host Controller has been successfully installed.
- When you examine Device Manager again, you will see Unknown Device. You have successfully installed the USB Controller driver, but not the Root Hub driver. This is because the driver provided by Intel is not fully compatible.
- Download the Intel (R) USB 3.0 Root Hub driver from this link to your computer and try to manually install the unknown driver in the same way.
- To install the unknown driver, point to the location of the downloaded folder on your computer and click OK.
- You can see the Intel(R) USB 3.0 Root Hub driver installed successfully.

Step 2
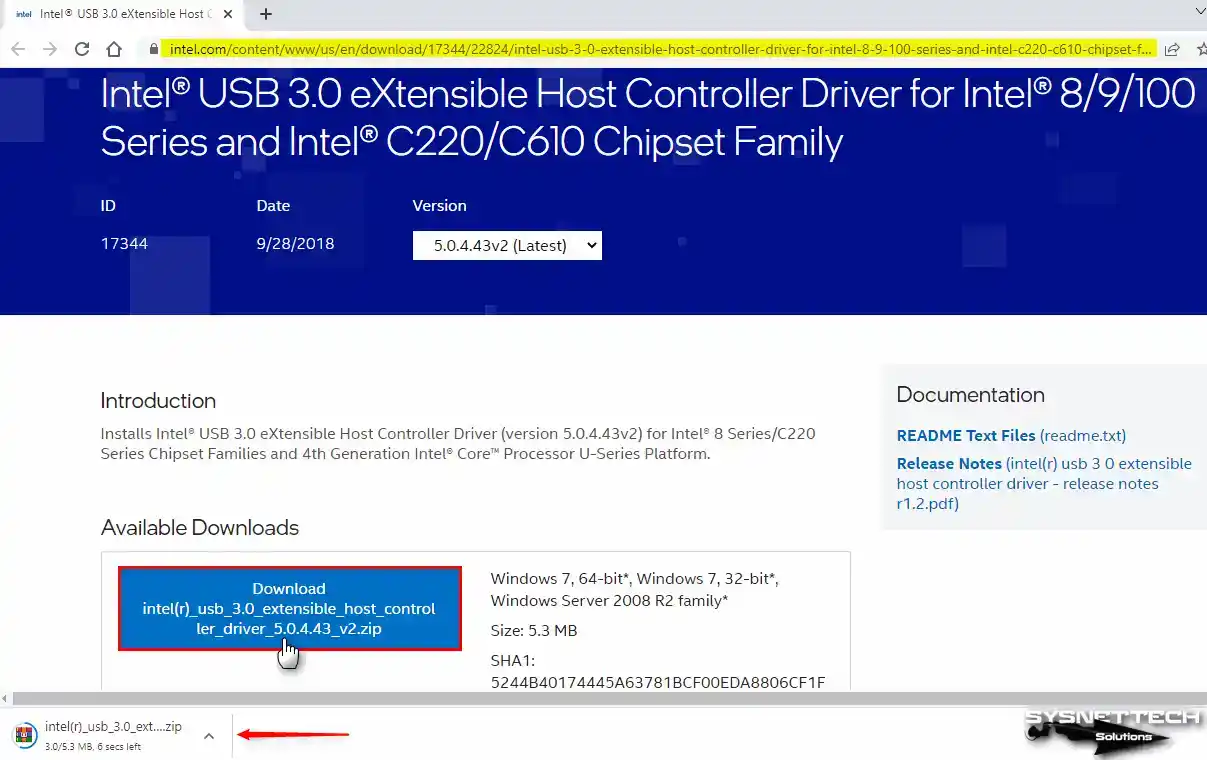
To download the necessary drivers for USB 3.0/3.1 devices to work on the virtual machine, open the guest machine settings and open the download page by clicking the link specified on the USB device or here.
Download the intel(r)_usb_3.0_extensible_host_controller_driver_5.0.4.43_v2.zip file from the Intel download website to your computer and copy it to your VM.
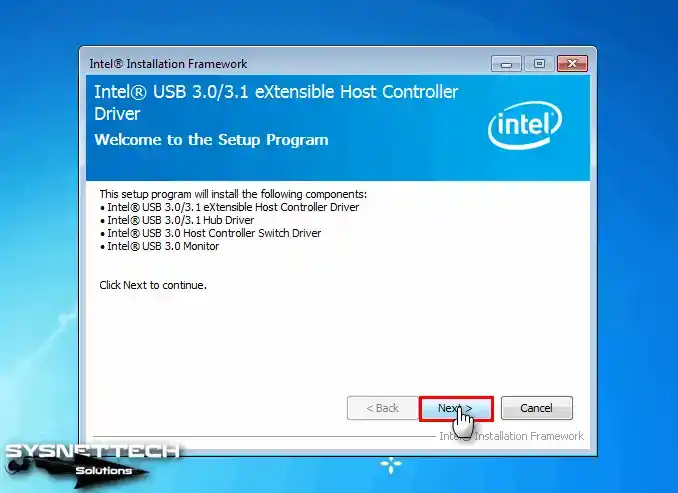
Step 3
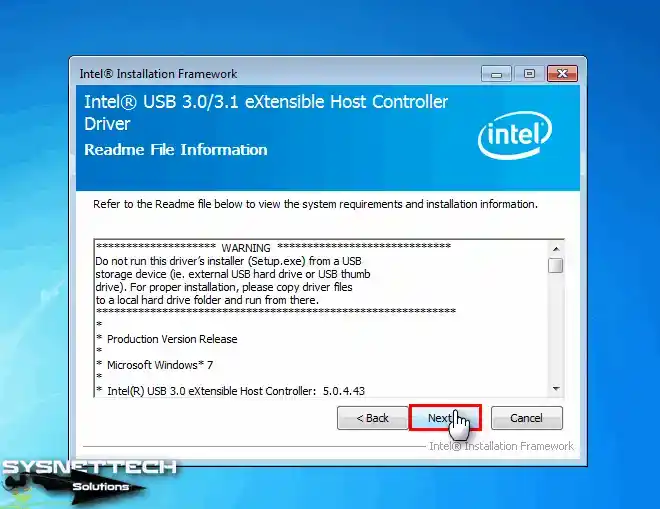
When you open the Intel USB 3.0/3.1 eXtensible Host Controller Driver wizard, check the components to be installed and click Next.
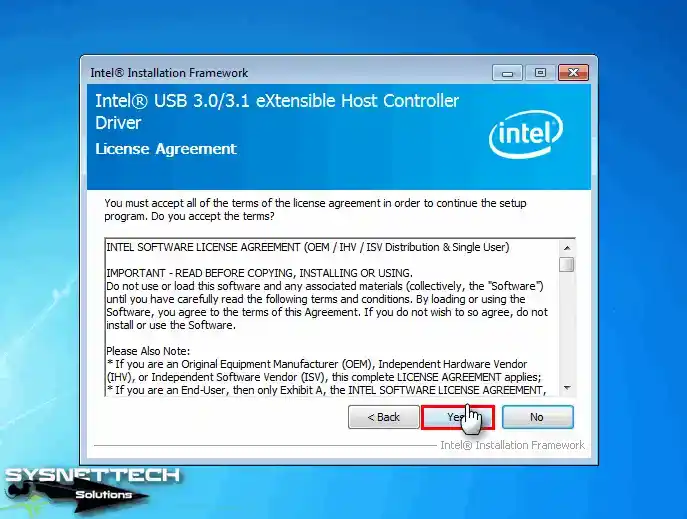
Step 4
Accept the license agreement of the Intel USB driver software.
Step 5
Click Next in the window that tells you to make sure that no external USB devices are plugged into your computer during the installation phase.
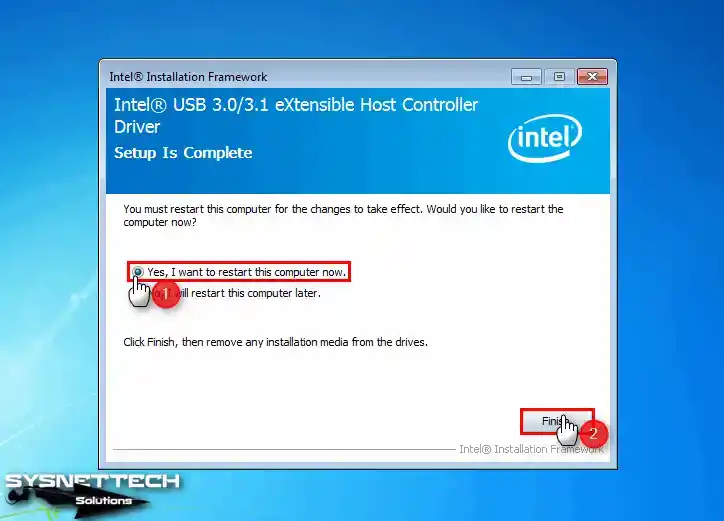
Step 6
After installing the USB 3.0/3.1 drivers in Windows 7, choose to restart your system.
Step 7
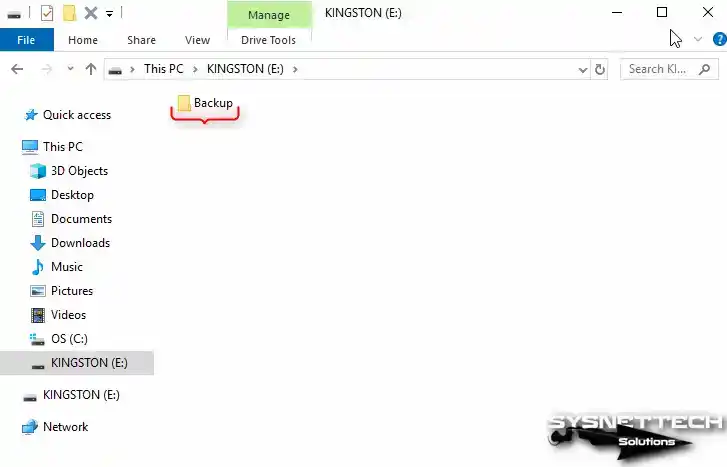
Plug a USB 3.x supported flash memory into your host and create a folder named Backup, for example.
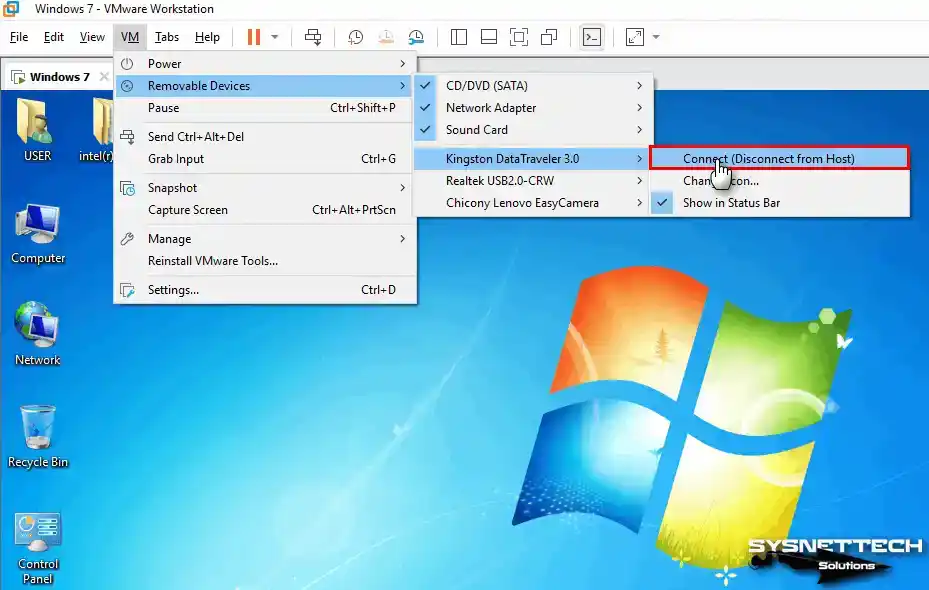
Step 8
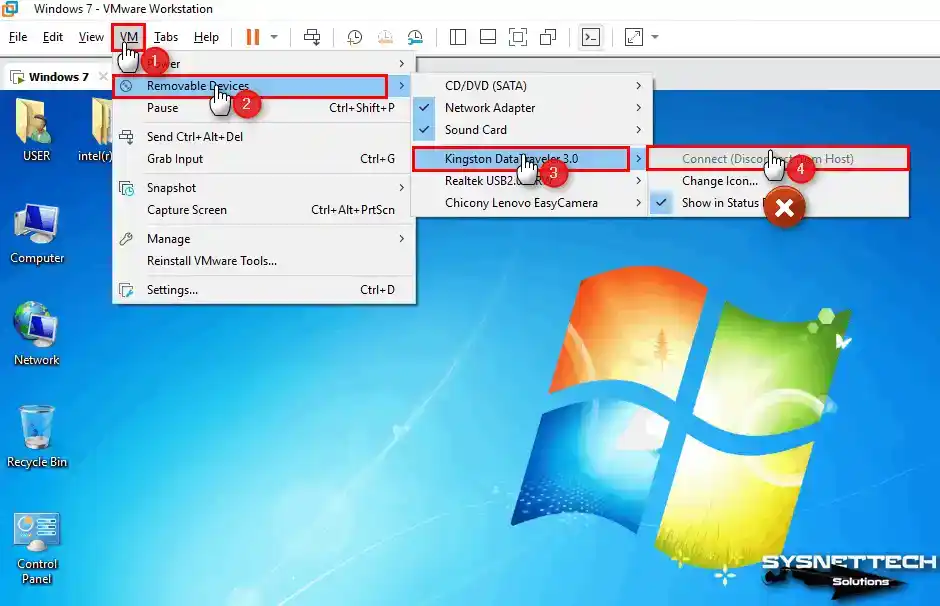
To connect the USB stick that you have connected to your host to the VM, click VM / Removable Devices / Name of Your USB / Connect from the Workstation tool menu.
If the Connect option is inactive or grayed out as in the image below, first turn off your virtual PC.
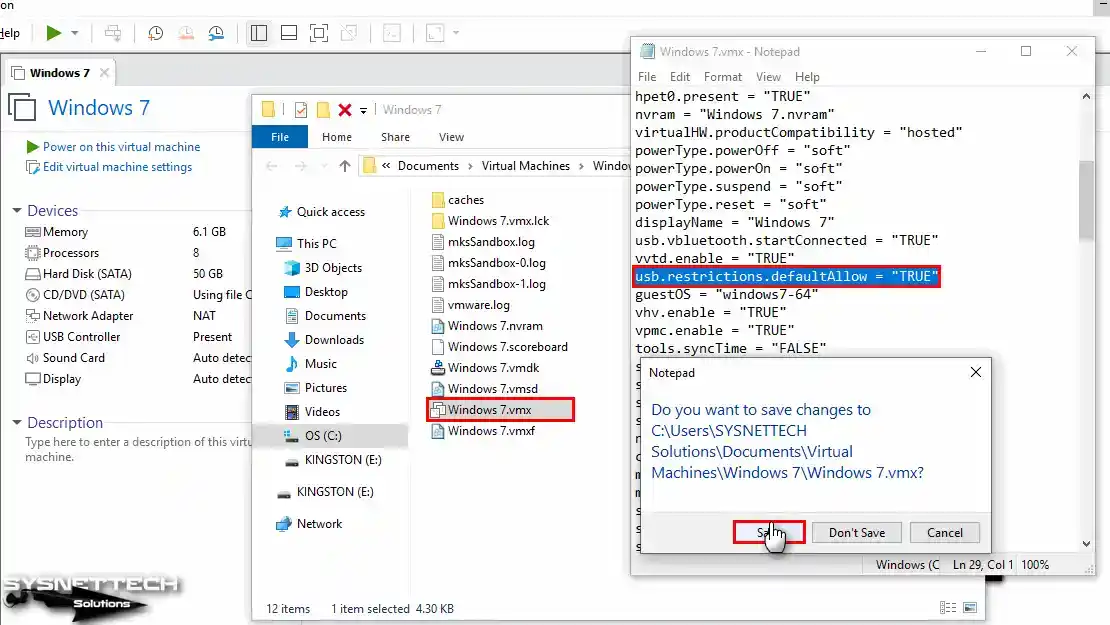
Step 9
Open the Windows 7.vmx file and change usb.restrictions.defaultAllow=”FALSE” to “TRUE” and save the file.
Step 10
When you try to plug your USB disk into your virtual computer again, you can see that the Connect option is active this time.
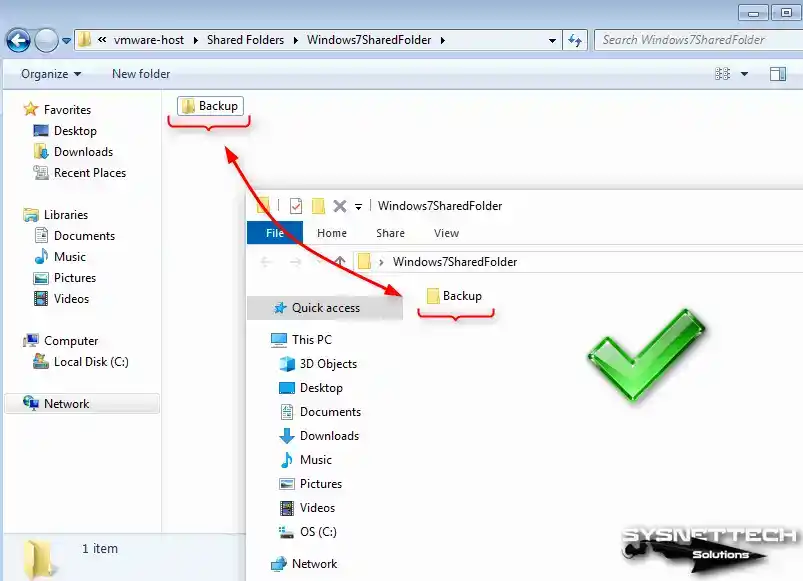
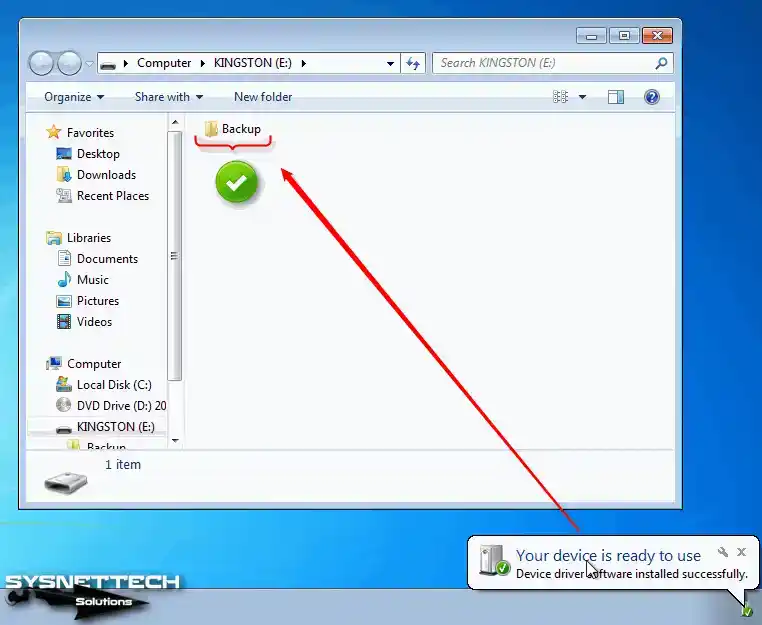
Step 11
When you insert your flash memory into your VM, you can now see the folder called Backup that you created in it.
How to Delete the Virtual Machine
It is very easy to completely remove a Windows or other operating system that you have prepared with VMware Workstation Pro from your host computer.
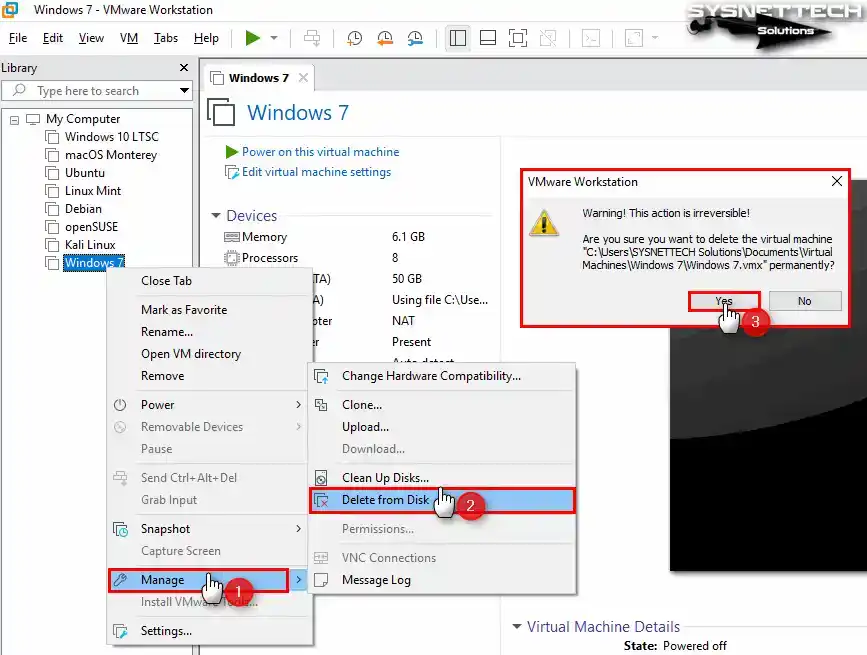
Right-click on the guest machines you want to delete from the guest machines listed on the left panel of Workstation Pro, and then click Manage / Delete From Disk and click Yes to confirm the operation in this irreversible window that opens.
Video
Installing Old Versions
Related Articles
♦ How to Increase Disk Capacity in VMware
♦ How to Use VMware on Ubuntu
♦ Download VMware Workstation Pro
♦ What is VMware Fusion?
♦ How to Update VMware Workstation

TolgaBagci
Hi, I'm Tolga, a computer expert with 20 years of experience. I help fix computer issues with things like hardware, systems, networks, virtualization, servers, and operating systems. Check out my website for helpful info, and feel free to ask me anything. Keep yourself in the loop about the newest technologies!

Your article displays the VMware Tools error message, “Setup failed to install the Host Guest Shared Folders driver”. Then you give instructions on how to set up shared folders. But since shared folders are busted the instructions don’t really help.
First of all, thank you for your comment. If you install Windows 7 Hotfixes before VM Tools installation, you won’t get any errors. The reason I installed the Hotfixes during the Shared Folder configuration phase is to show what caused the error in the VM Tools installation phase.
Really loved the detailed tutorial. Please keep it up
Thank you so much for this nice comment!
When installing Tools, I got a bunch of other warnings and things that didnt install and in the end Tools would not install. I am not sure what to do now
Before installing VMware Tools, download KB4490628 and KB4474419 updates, install them and then try to install VMTools again.
You may get errors during VMware Tools installation without hotfixes installed. That’s why I have shown the relevant errors in the steps in the article.
Thanks a lot for your tutorials regarding VMware Workstation and Win7.
I did not install an operation system for a long time but your tutorials cover everything to get it working even if I work with VMware the first time.
Thanks a lot,
Harald
Many thanks for your valuable comment.
Thank you for your great effort and step-by-step explanations.I am able to install windows 7 with a share folder on my VMWare workstation pro. Greatly appreciated .
Thank you very much for your feedback and comment.
thanks for the brief content. it has been joy following along.
You’re welcome, thanks for your comment.
perfeeeectrtttttttttttttttttttttttt
Tried to install a valid copy of Win7-64. Did not accept my valid product key stating:
“The product key does not match current Windows SKU”
u sre best