This article will examine how to set up Ubuntu 22.10 (Kinetic Kudu) on a new virtual machine using Oracle VM VirtualBox, which is widely used in the Windows 10 64 Bit operating system.

How to Set Up and Run Ubuntu 22.10 in Virtual Machine on Oracle VM VirtualBox 7.0
You can effortlessly create virtual machines on your physical computers by utilizing Oracle VM VirtualBox, a virtualization software. This allows you to run separate operating systems like Windows and Linux on your host PC without needing dual-booting.
Installing any OS on the virtual machine you created with VirtualBox works independently and virtually from your host system. So, you are a software developer or want to get experience installing Linux distributions. In such circumstances, employing virtual machines would likely be a preferable choice.
The latest version of Ubuntu, the popularity of Linux distribution, is 22.10 (Kinetic Kudu). You can run and use this Linux distribution with new features on a virtual machine without installing it on your physical computer.
How to Create a New Virtual Machine for Ubuntu
After installing Oracle software on your Windows computer, you need to correctly set some virtual hardware settings to create a new virtual computer and run the Ubuntu distribution.
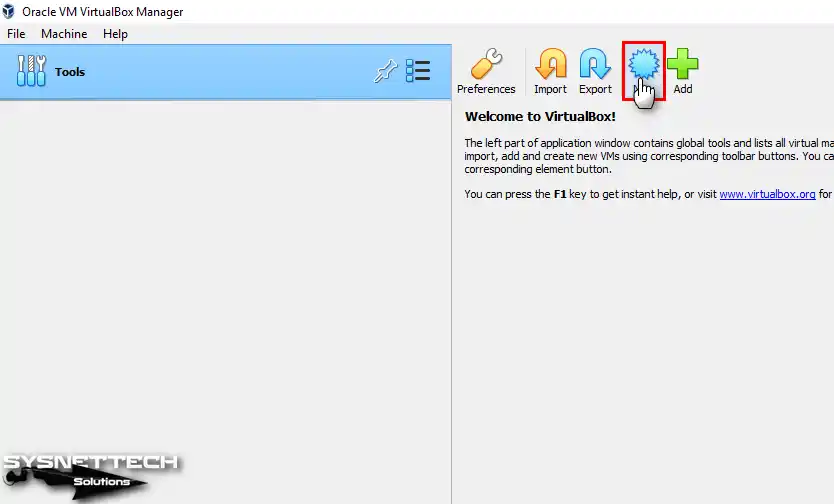
Step 1
Run the Oracle VirtualBox program and click the New button from the tool menu to open the virtual machine wizard.
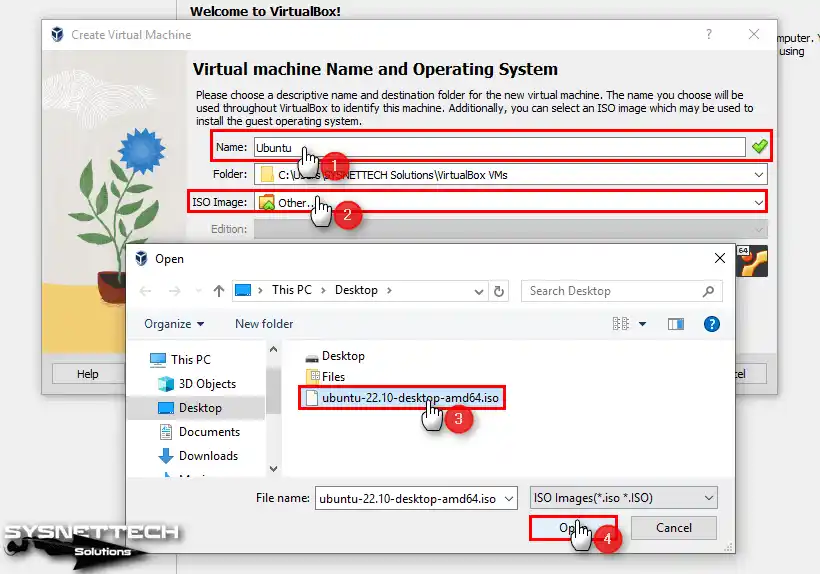
Step 2
In the Create Virtual Machine window, type the name of the operating system you will install on the virtual machine in the Name field, expand the drop-down menu from the ISO Image section and click Other.
Select the Ubuntu ISO file you downloaded in the open window and add it to the guest machine.
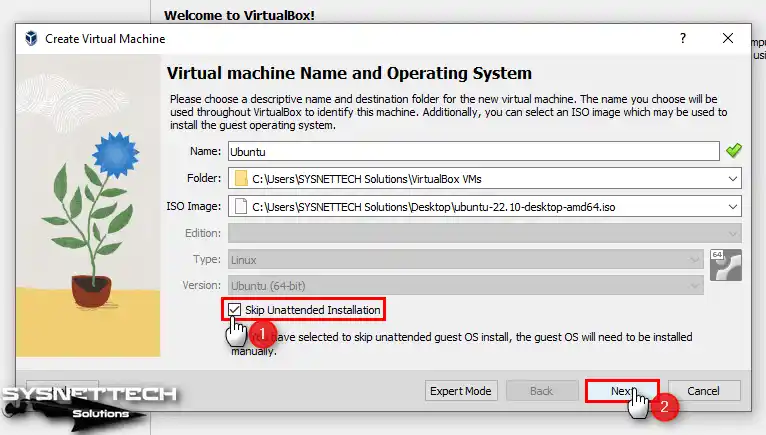
Step 3
In the new version 7.0 of VirtualBox, you can now create more simply and quickly or make more professional configurations such as product keys and user accounts for systems such as Windows.
Using the unattended setup feature, you can pre-add the system’s product key and preset your user account name and password. But if you want to do a typical installation, you can check the Skip Unattended Installation option and continue.
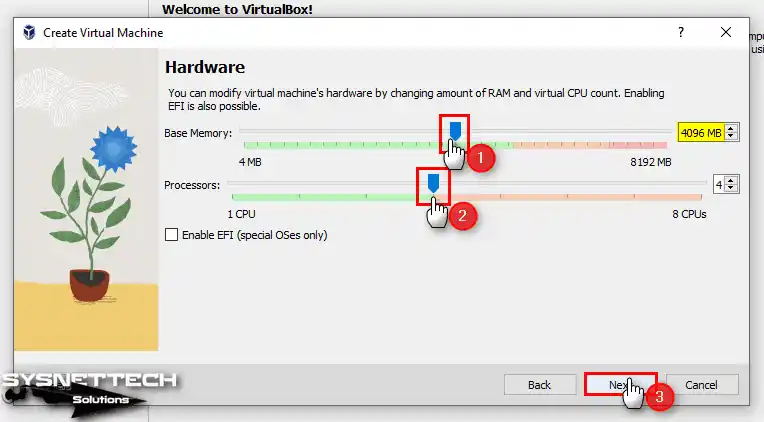
Step 4
Assign RAM size to your Ubuntu virtual machine depending on the hardware performance of your host computer. A minimum RAM size of 4GB is recommended to achieve optimal performance. However, specifying a larger size is advisable if your host system boasts 16 GB or 32 GB memory capacity.
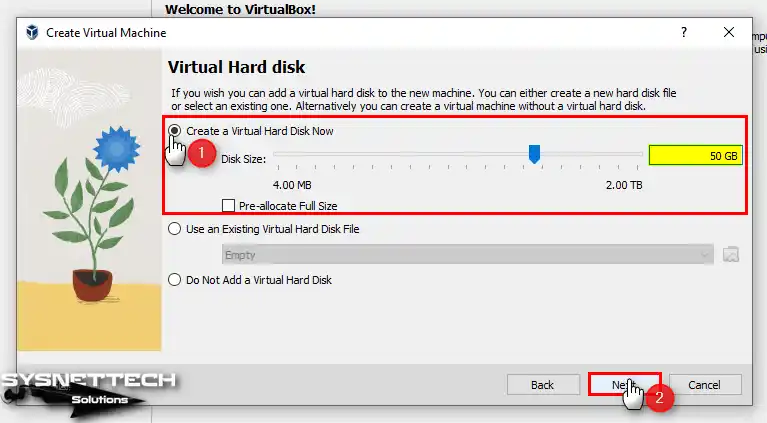
Step 5
If there is a guest operating system that you have previously installed in the Hard Disk window, you can add the VDI virtual disk file. However, check to Create a virtual hard disk now because you will establish an Ubuntu from scratch.
You can also use the Pre-allocate Full Size feature to preset the virtual disk capacity from your host computer’s disk capacity. This setting was called Fixed Size in VirtualBox 6.x versions. When you select Fixed Size, the specified disk space will be allocated from your host disk while the virtual machine is being prepared.
The Pre-allocate Full Size option may efficiently perform on older generation computers. Still, since it will unnecessarily fill the disk size, you can allocate the required space from your host disk by using the old Dynamically Allocated feature without checking this option.
Step 6
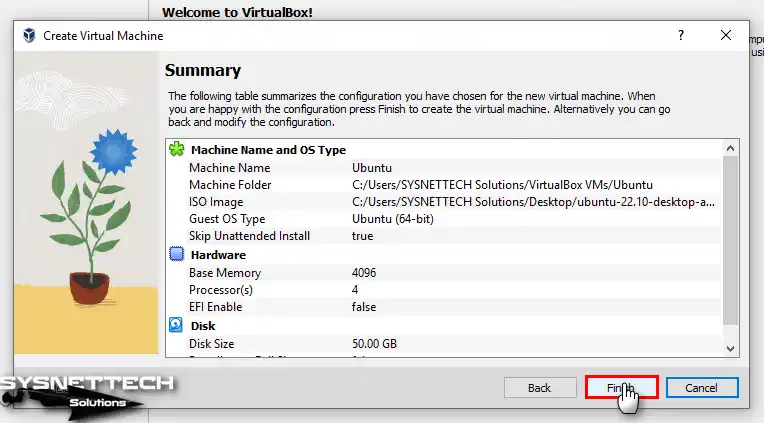
After checking the hardware properties of the guest virtual computer you created in the Summary window, click Finish to close the window.
Step 7
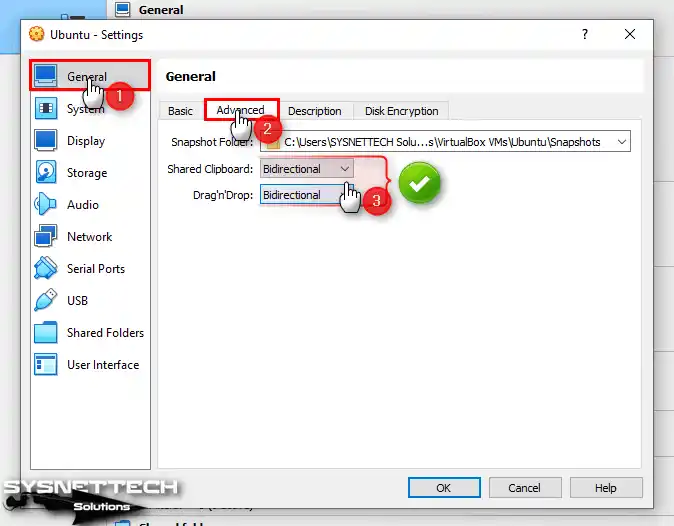
After preparing your Ubuntu virtual computer, click Settings from the tool menu to configure its settings more accurately and increase usability.

Step 8
After clicking Advanced in the General panel of the virtual machine settings, change the Shared Clipboard and Drag’n’Drop values to Bidirectional to enable file transfer between your host system and your guest machine using Drag and Drop and Copy and Paste features.
Step 9
View the Motherboard hardware settings in the System panel, disable the Floppy device from the Boot Order devices, and configure the Optical device as the first row.

Step 10
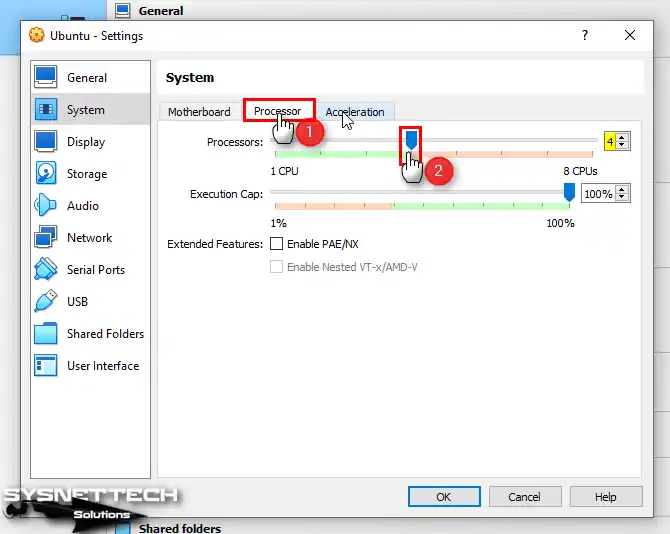
In the same panel, view the Processor hardware settings and increase the number of virtual cores according to the processing power of your host computer.
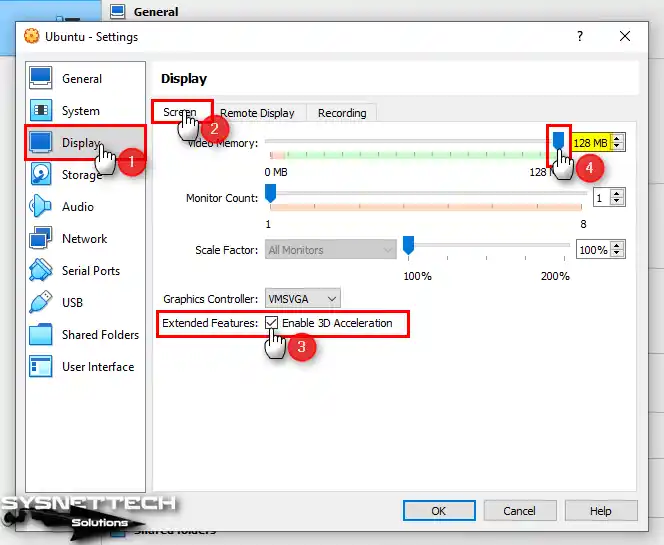
Step 11
Open the Screen settings from the Display panel, configure the Video Memory value to 128 MB, and enable 3D graphics acceleration.
Step 12
Delete the IDE Controller from the Storage hardware settings of the virtual computer.
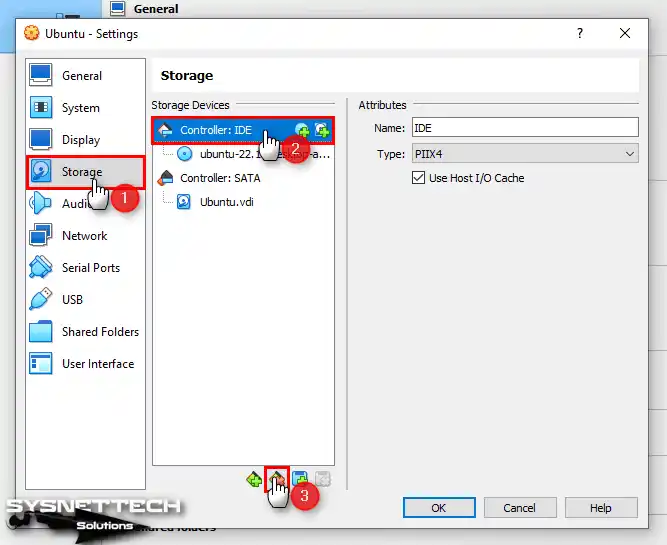
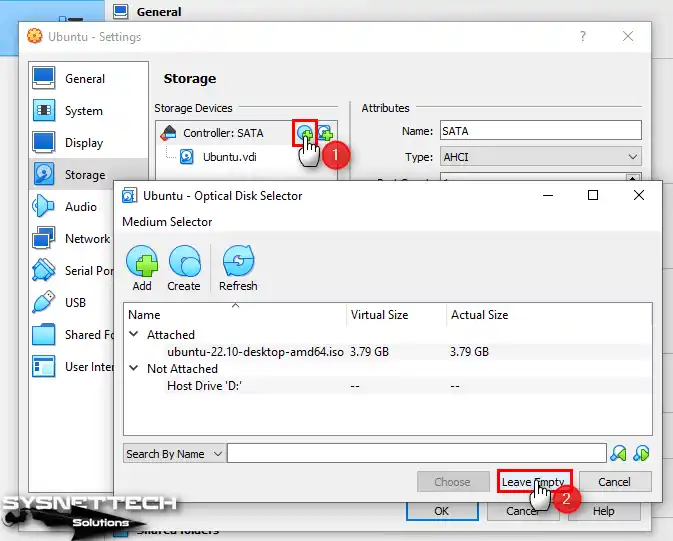
Step 13
To add a SATA optical drive, click the CD/DVD icon next to the SATA Controller and click the Leave Empty button in the Optical Disk Selector window.
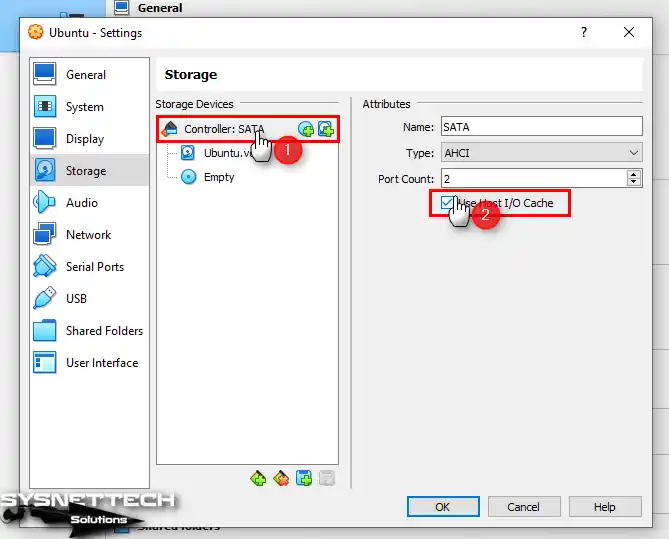
Step 14
Select the SATA controller and enable Host I/O Cache for guest machine performance.
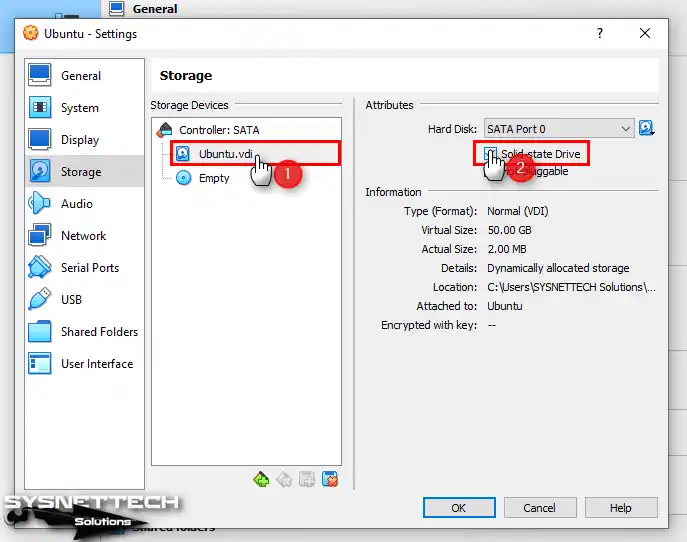
Step 15
Select the Ubuntu virtual disk file and enable the Solid-State Drive feature to improve disk performance.
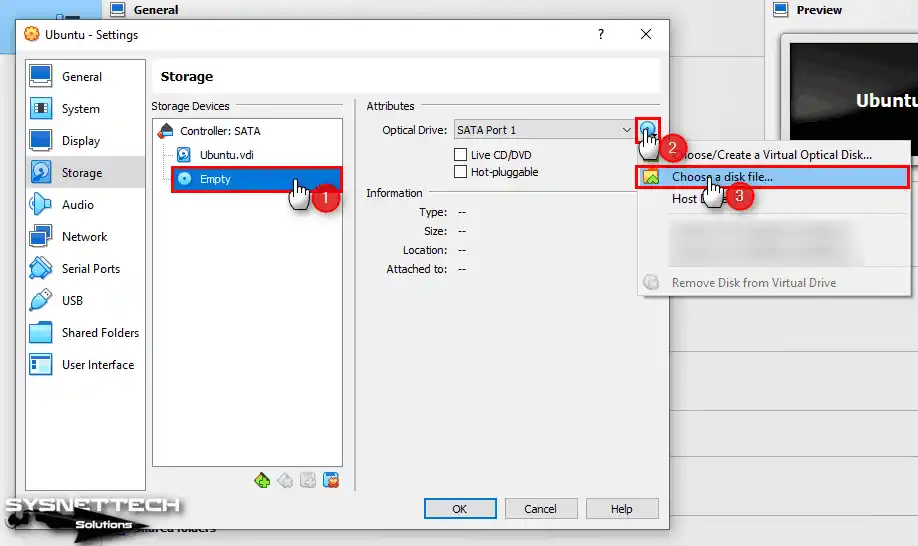
Step 16
Finally, click the DVD icon and Choose a disk file to add the Ubuntu ISO file to the SATA optical drive.
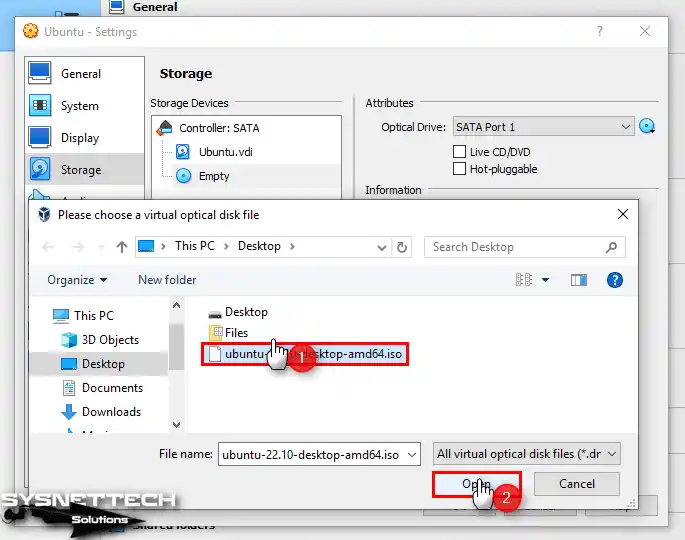
Step 17
Select and open the ISO installation media you downloaded from the Ubuntu website.
Step 18
To utilize USB 3.0/3.1 flash memories or storage devices within your Ubuntu virtual machine, enable the xHCI Controller option within its hardware settings.

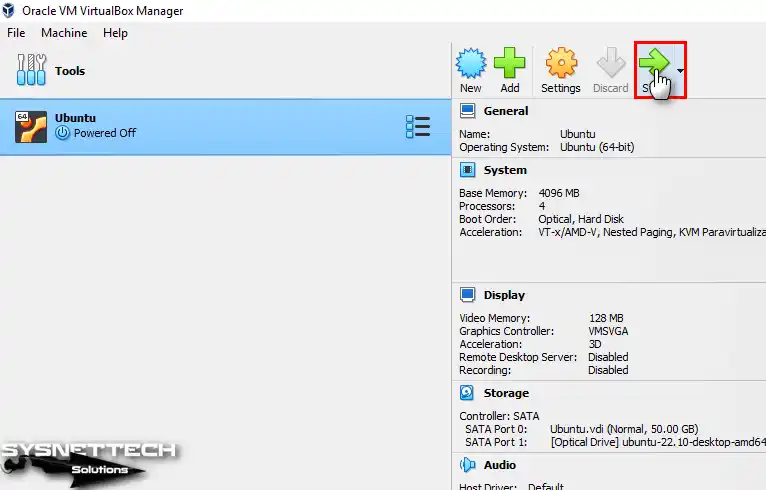
Step 19
Run your Ubuntu guest operating system after making and verifying all the settings.
How to Install Ubuntu in VirtualBox VM
Once you have prepared and launched the Ubuntu guest operating system, you can proceed with the building actions as you would on a physical computer.
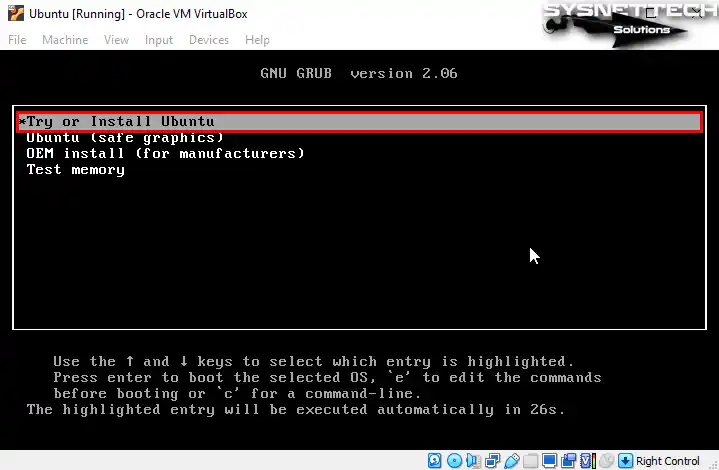
Step 1
After booting the guest machine using the ISO file, click Enter on the Ubuntu option from the GNU GRUB menu.
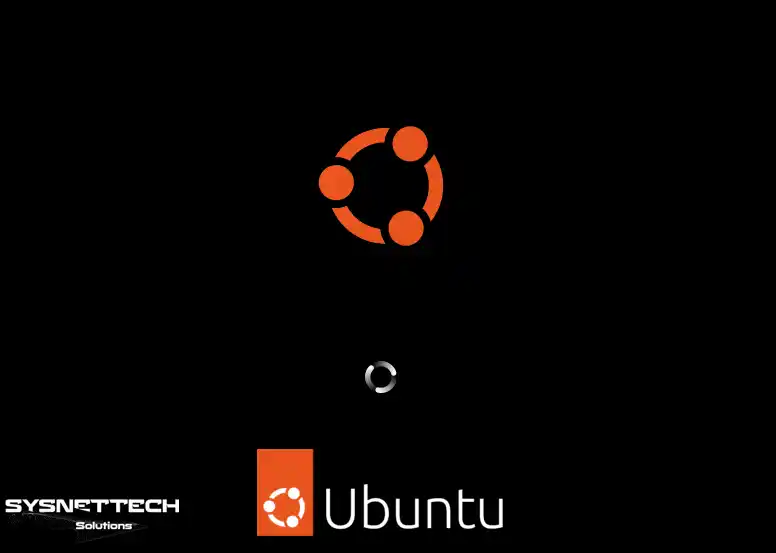
Step 2
Wait while the Ubuntu installation wizard opens.
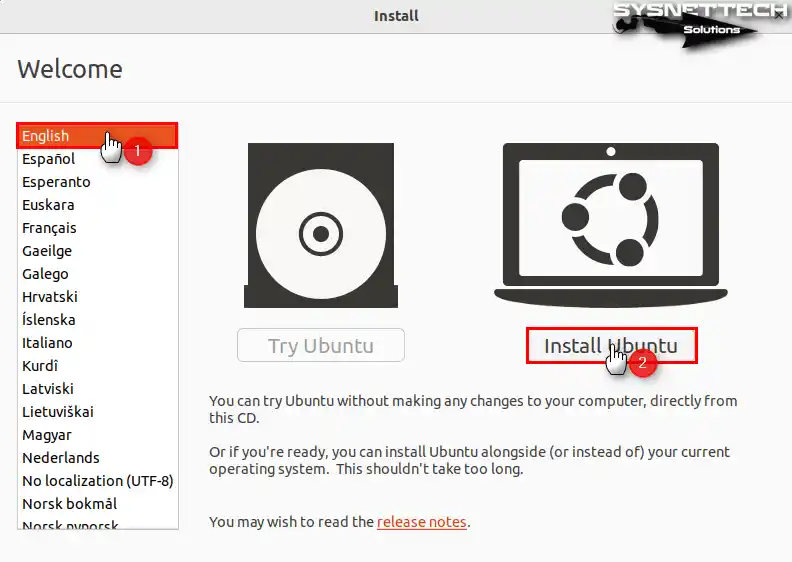
Step 3
When the installation wizard opens, select your system display language from the left panel and click the Install Ubuntu button.
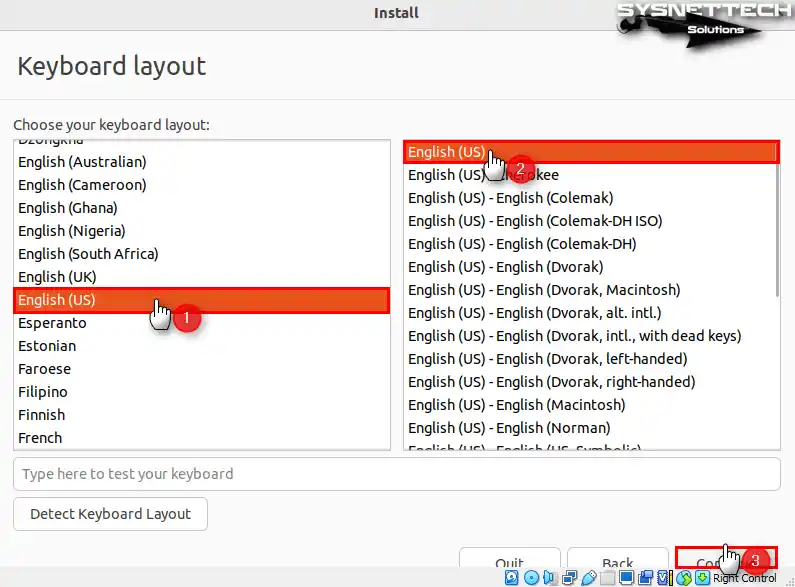
Step 4
According to the keyboard layout of your host computer, select the same layout for the guest machine and click Continue.
Step 5
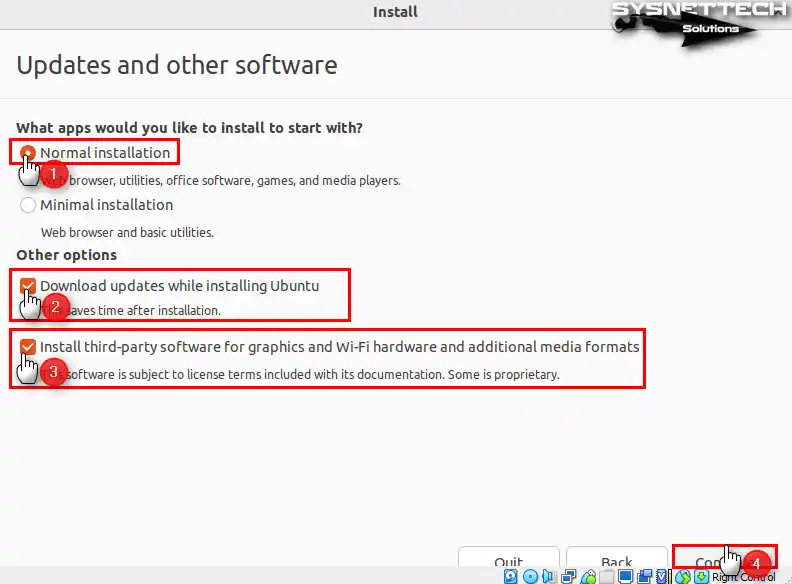
In the Updates and another software window, you must choose an appropriate installation type according to your needs.
If you continue with Normal Installation, you can install essential software such as Office or media players on your system, or if you want to install this software manually later, you can continue with the Minimal Installation type.
Step 6
In the Installation Type window, select the Erase disk and install Ubuntu option to install a clean Ubuntu on the virtual disk, and then click the Install Now button and click Continue to confirm the changes on the disk.

Step 7
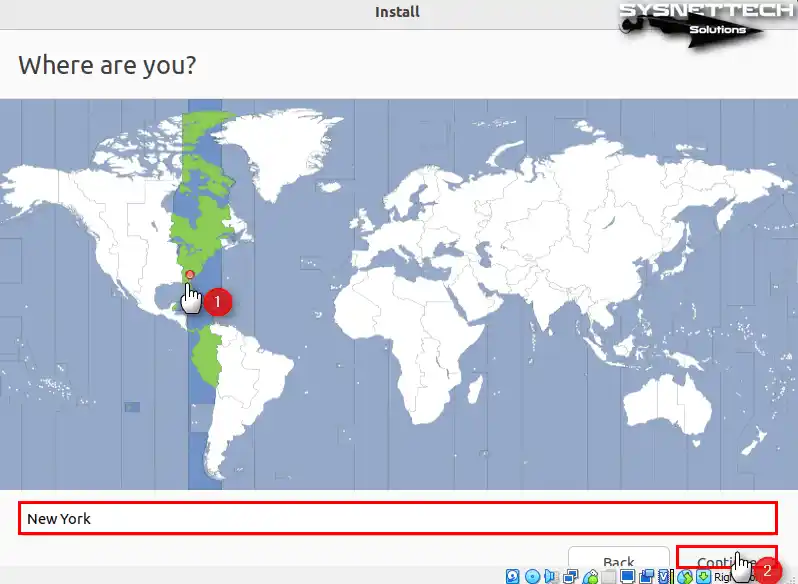
In the “Where are you” window, choose your place and click the Continue button.
Step 8
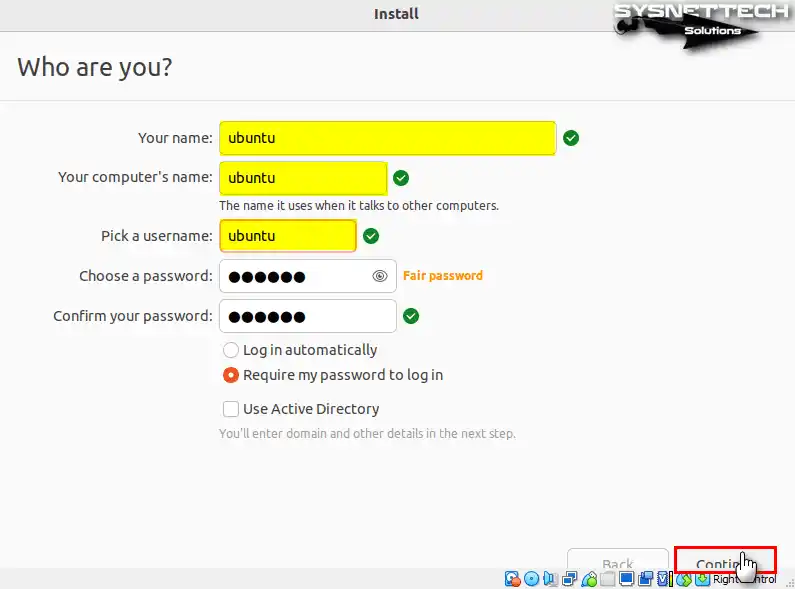
In the “Who are you” window, enter your name, virtual computer name, and user name. Subsequently, generate a strong password for your root account.
Step 9
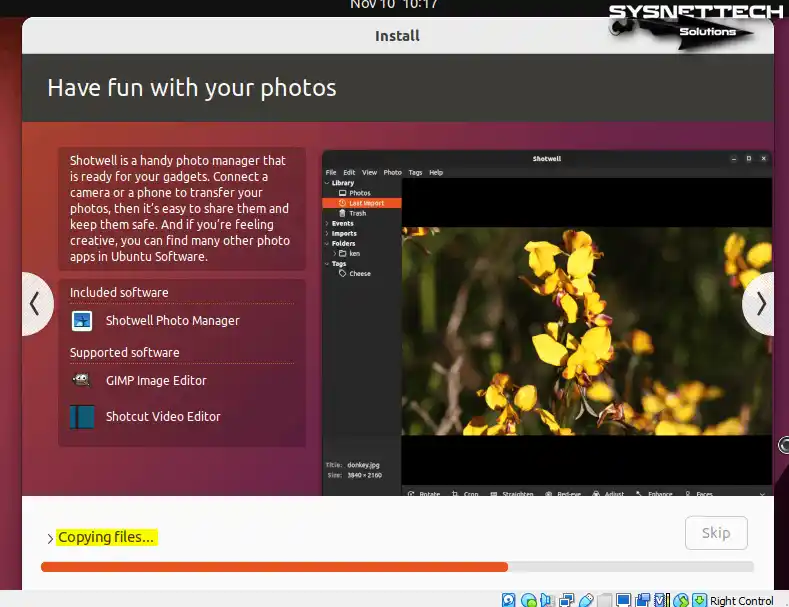
Wait while the Ubuntu system files are copied, and the necessary software is downloaded.
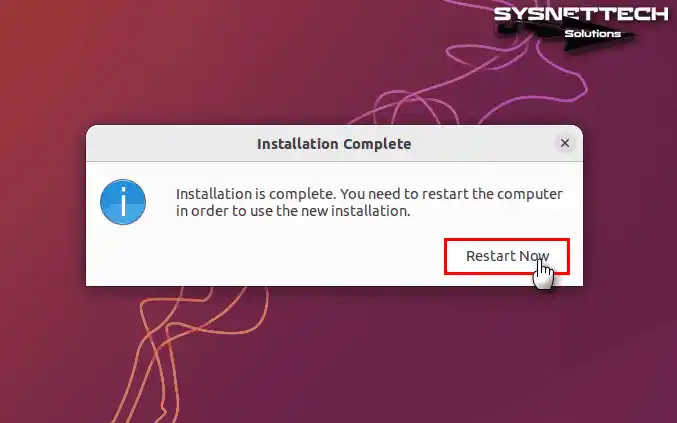
Step 10
After the setup wizard completes the Linux installation, click Restart Now.
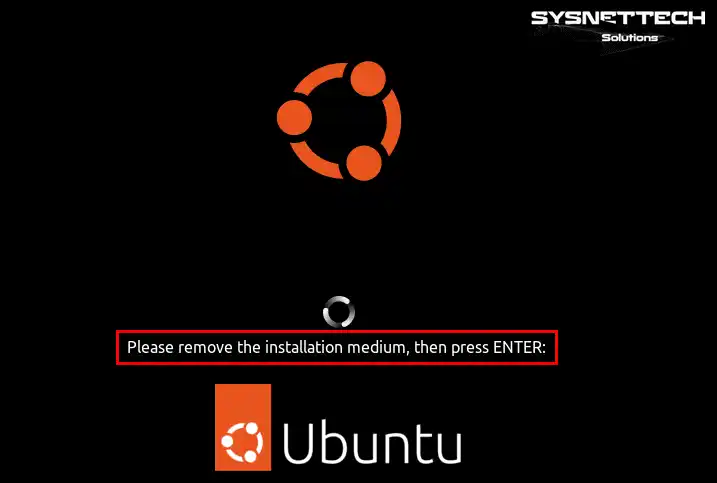
Step 11
As you restart your system, press Enter to eject the installation media from the virtual machine.
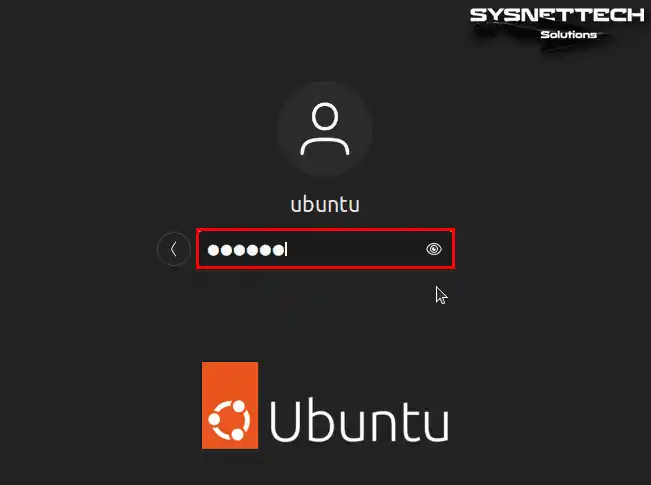
Step 12
After restarting your virtual device, input the password you generated on the login screen and press Enter.
Step 13
When your Ubuntu system boots up, you can sign in to your Google ID or other accounts in the Online Accounts window to adjust some system settings.

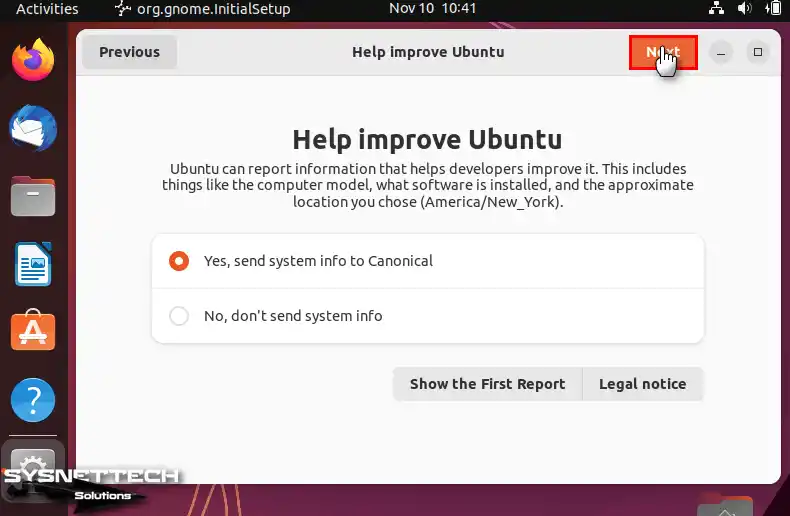
Step 14
If you agree to submit information such as your computer model or installed software version to Canonical to help develop Ubuntu, select Yes and continue.
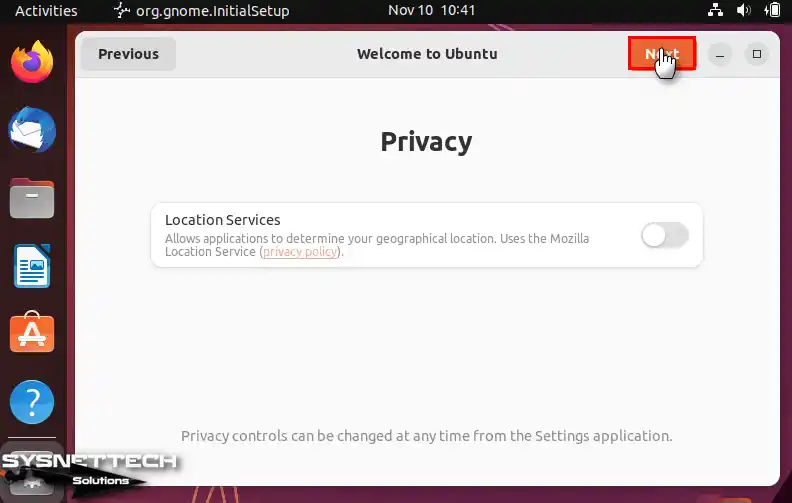
Step 15
You can enable the service if you consent to grant access to your location for specific software applications like the Mozilla web browser.
Step 16
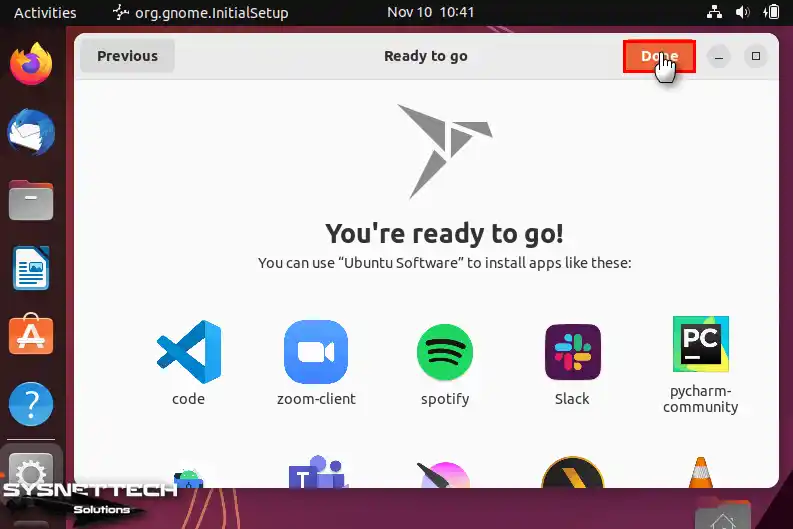
After making the relevant system settings, click Done in the window that states that you can use the Software application for the programs you want to install.
How to Install Guest Additions
After installing Ubuntu on VirtualBox, you need to install Guest Additions to increase the screen resolution of the guest machine, improve system performance and transfer files with your host.
Step 1
Before installing Guest Additions on Ubuntu, open the terminal by pressing CTRL + Alt + T and install the necessary kernel modules by executing the command below.
sudo apt install build-essential dkms linux-headers-$(uname -r)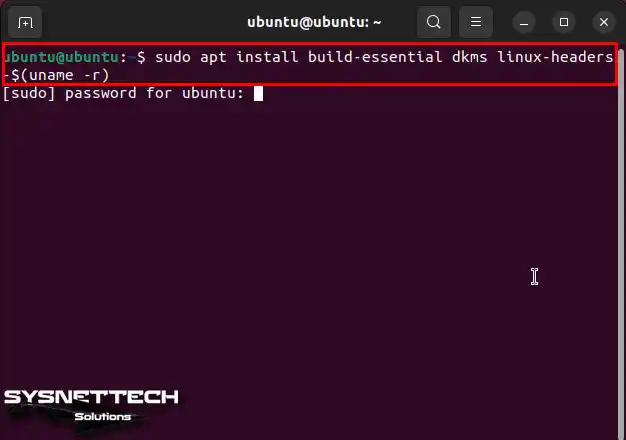
Step 2
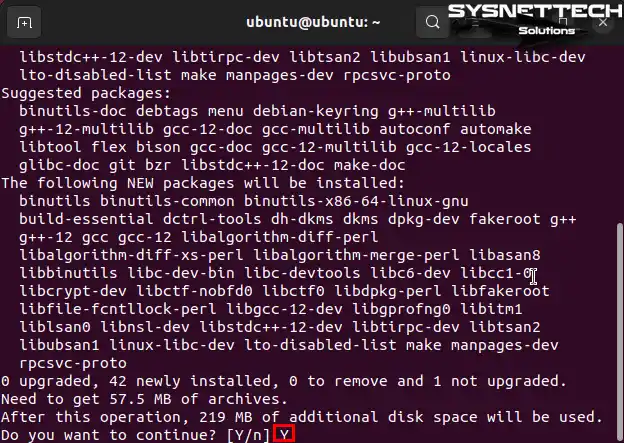
Click Y and press Enter to confirm loading the Linux kernel modules listed in the terminal.
Step 3
After installing Linux headers, restart your virtual computer by executing the sudo reboot command.
sudo reboot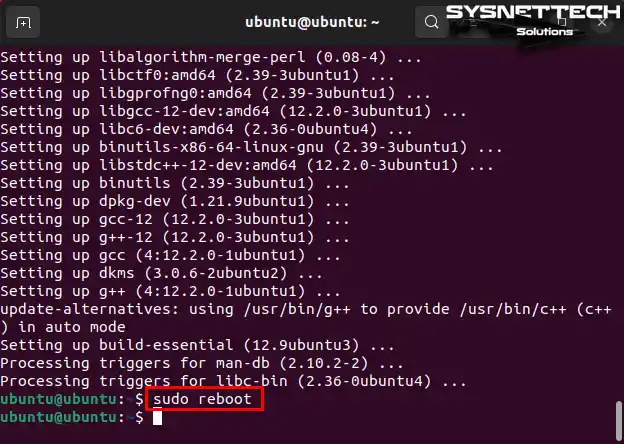
Step 4
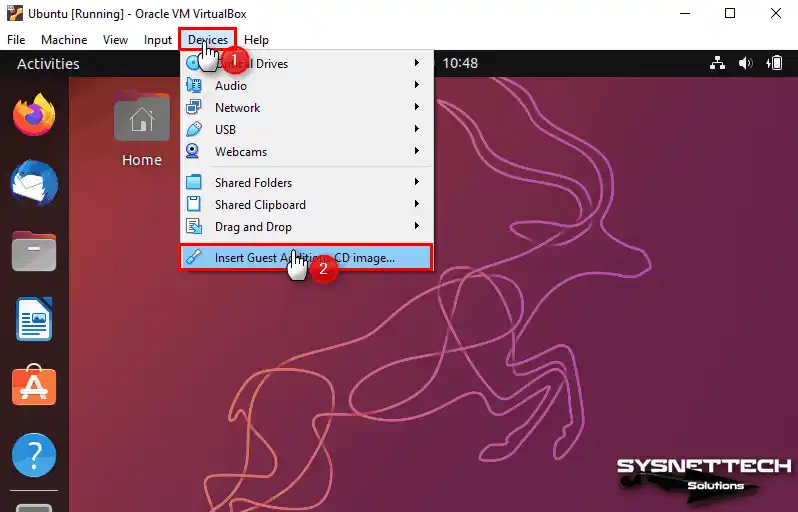
When your system boots up, click Devices / Insert Guest Additions CD Image from the tool menu to install the drivers for your Ubuntu virtual machine.
Step 5
If you trust the software, click Run when the VBox_GA window opens automatically. If the installation cannot start automatically at this stage, open the terminal in the contents of the VBox CD image.
Execute the command “sudo ./VBoxLinuxAdditions.run” to start the installation in the terminal. After installing Guest Additions, press Enter to close the window and restart your virtual machine.
sudo ./VBoxLinuxAdditions.run
Step 6
After rebooting your system, you can check your Ubuntu machine is adapted to fullscreen mode.

Step 7
In specific operating systems where Oracle software is installed, the functionality of transferring files from the host machine to the guest machine via drag-and-drop and copy-paste may be restricted.
If the drag and drop is not functioning in Ubuntu, you can try fixing it using an older Guest Additions ISO. However, you may reencounter this problem when new versions are released.
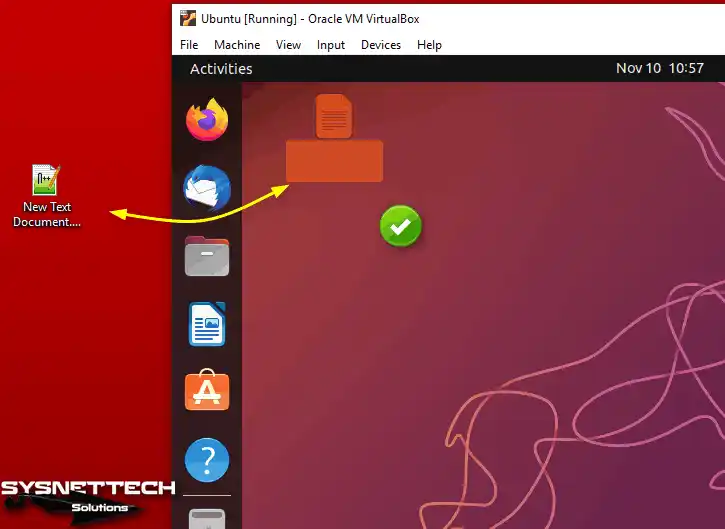
When you test to drag and drop a text document from your host’s desktop location to your Ubuntu machine, your VM will not react, or you will get an operation error. This issue is usually caused by the Nautilus file manager.
You can fix the drag-and-drop problem using the Gnome Tweaks plugin and the Nemo file manager. Execute the command below in the console to install the necessary plugin to configure the Gnome interface’s advanced features.
sudo apt install gnome-tweaksTo install the Nemo file manager after the Gnome Tweaks plugin, execute the command below in the terminal.
sudo apt install nemoTo hide Ubuntu desktop icons after opening Extensions, disable Desktops Icons NG (DING) setting. Open Startup Applications and click the Add button, then type the nemo-desktop command in the Command field in the Add Startup Program window and click the Add button again.
Name: Nemo Desktop
Command: nemo-desktop
Comment: Nemo DesktopFollowing the restart of your Ubuntu machine, you can seamlessly share files from your host operating system with the guest using the convenient drag-and-drop method.
How to Configure Shared Folder
If you expect to transfer files without resolving the drag-and-drop issue, you can utilize the Shared Folders feature.
Step 1
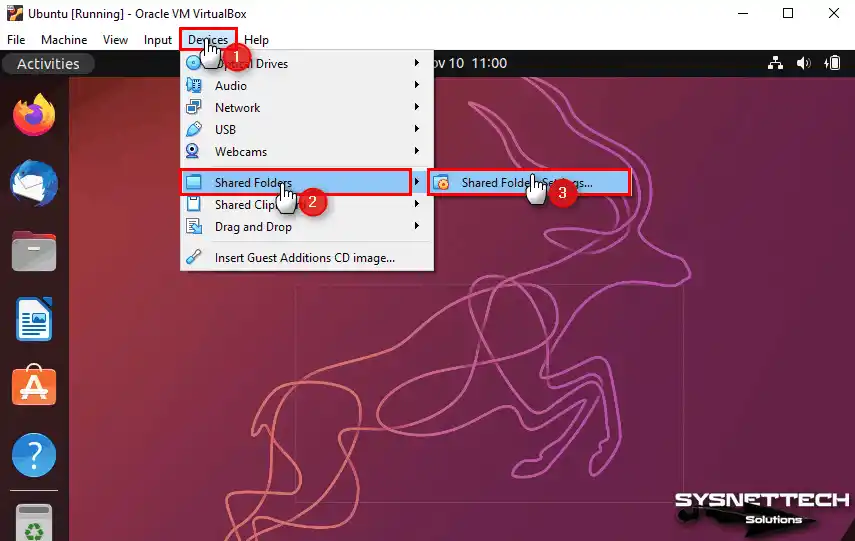
Click Devices / Shared Folders / Shared Folders Settings from the VirtualBox tool menu.
Step 2
Click the add icon in the Shared Folders window, then click Other from the Folder Path drop-down list.
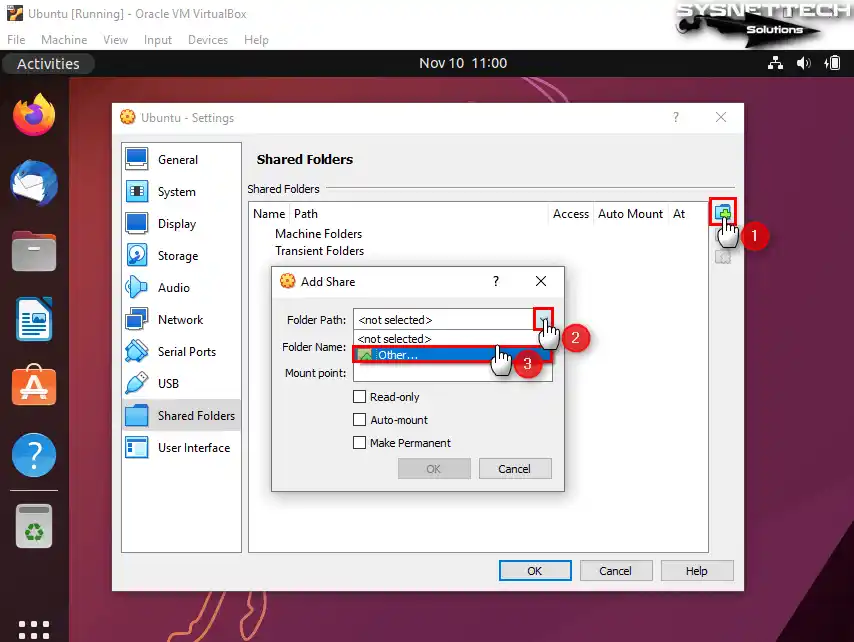
Step 3
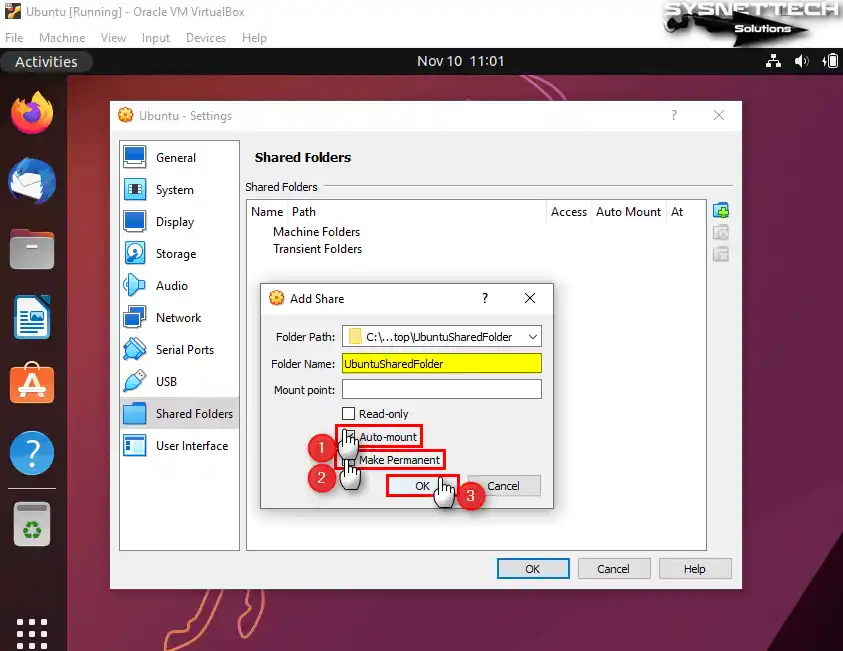
In the open window, select and add the shared folder you created on your host’s desktop or other locations. Then check Auto-mount and Make Permanent options.
Step 4
While accessing Shared Folders through the file manager, you might encounter a user permissions error, as depicted in the image below. To fix this topic, you need to make your user account a member of the Vboxsf group.
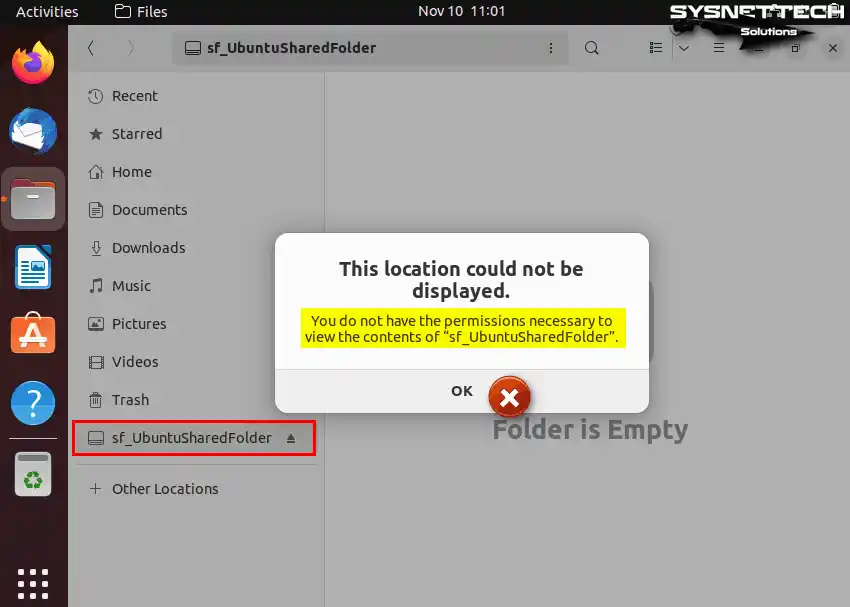
Step 5
To add your user account to the Vboxsf group, execute the below command in the terminal.
sudo adduser $USER vboxsf
Step 6
Restart your Ubuntu system, and you can now see that you can access the shared folder.
Step 7
Finally, create a shortcut on the desktop to access the shared folder from your virtual computer faster.
sudo ln -s /media/sf_UbuntuSharedFolder/ ~/Desktop/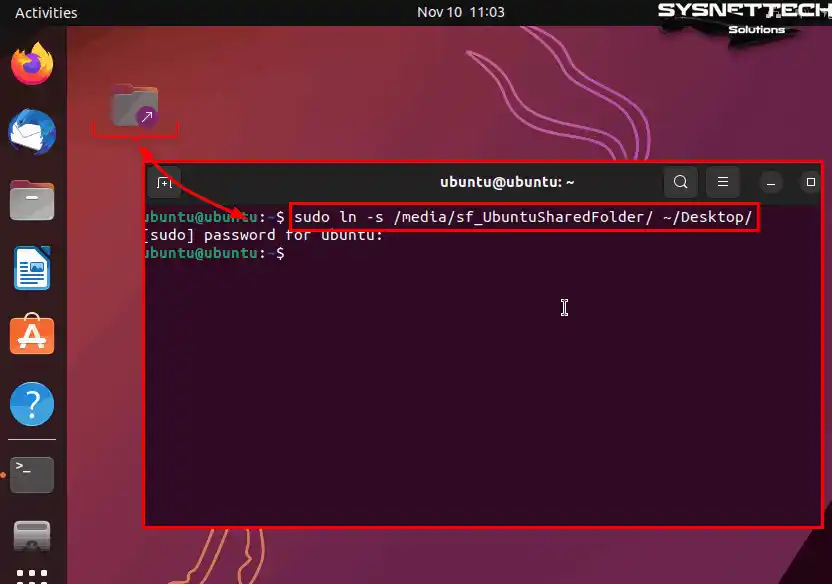
How to Use USB Flash Memory
You can transfer files faster using your USB 3.0 and USB 3.1 flash drives or external storage devices on your guest system.
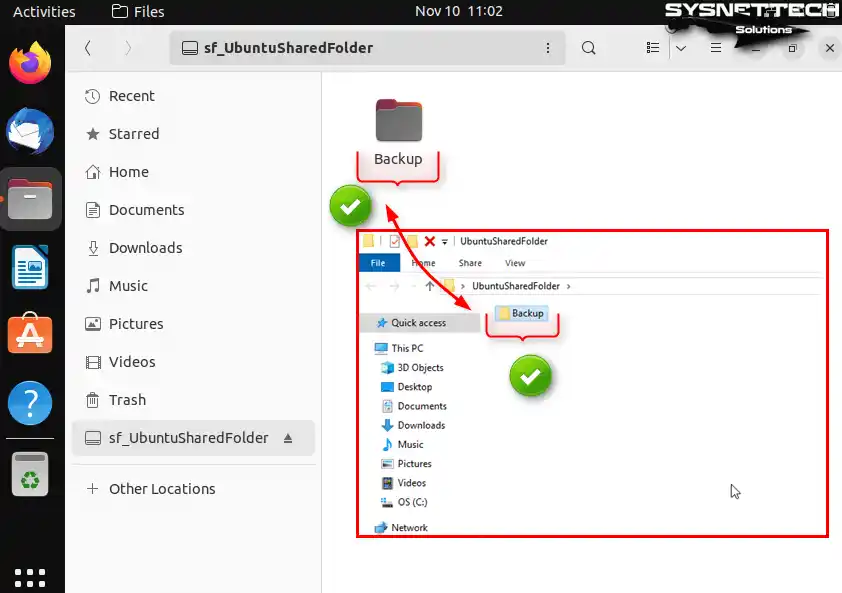
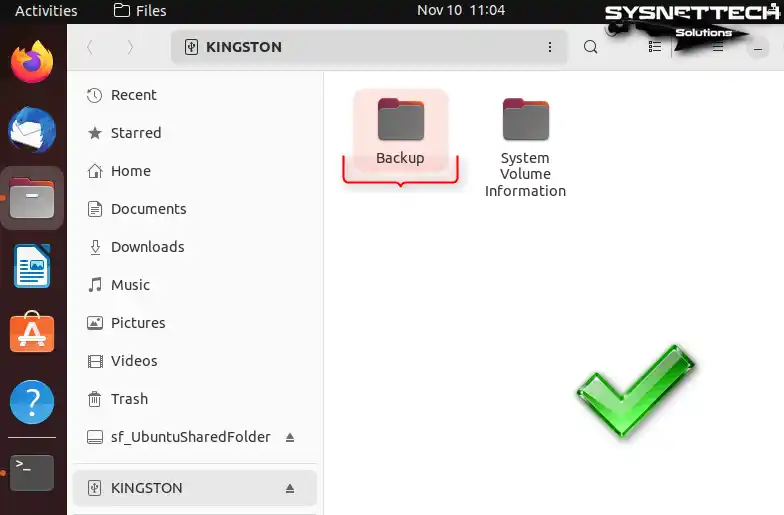
Step 1
After enabling 3.0 support in the USB hardware settings of the virtual machine, insert your flash memory into the USB 3.0 port of your host computer and create a folder called Backup, for example.

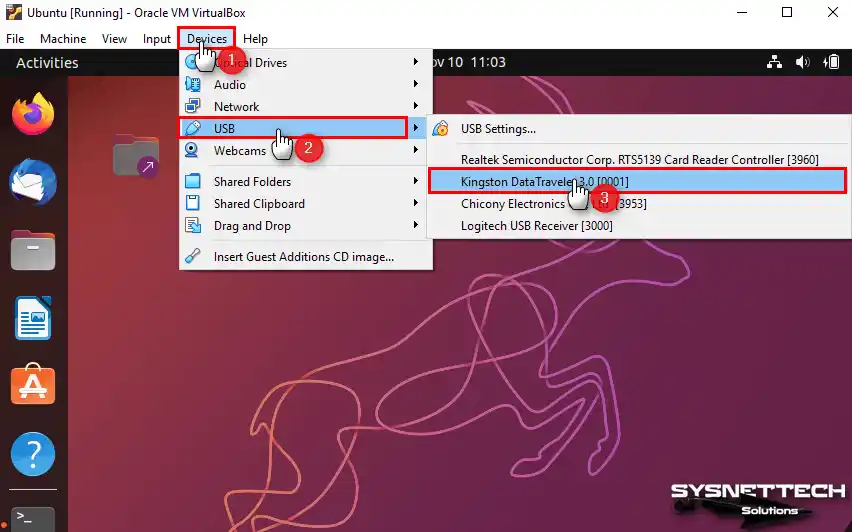
Step 2
Click Devices / USB / Your USB Memory Name from the tool menu to connect your USB stick to the virtual machine.
Step 3
When you check the contents of your USB 3.0-supported flash memory in your Ubuntu system, you can see the folder called Backup that you created.
Video
Installing Old Versions
Related Articles
♦ How to Install Guest Additions on Windows VMs
♦ How to Install VirtualBox on Kali
♦ How to Install Debian on VirtualBox
♦ How to Install Linux Mint on VirtualBox
♦ How to Install Kali on VirtualBox

TolgaBagci
Hi, I'm Tolga, a computer expert with 20 years of experience. I help fix computer issues with things like hardware, systems, networks, virtualization, servers, and operating systems. Check out my website for helpful info, and feel free to ask me anything. Keep yourself in the loop about the newest technologies!
THANK YOU FOR THIS GREAT ARTICLE. IT WALKED ME THRU INSTALLING UBUNTU STUDIO 19.10 ON WINDOWS 10, RUNNING ON AN HP DL380 SERVER (PERSONAL TOY )… WORKED LIKE A CHARM !!