
In this article, we will learn about Port Security on a network Switch with Packet Tracer. First, we will explain Port Security and why we use it. It stops unwanted access by limiting MAC addresses on a Switch port. Next, we will give an easy guide to set up port-level security.
We will show you how to choose the maximum number of safe MAC addresses. Also, we will talk about turning on sticky MAC addresses. At the end, we will show what to do during a security problem. This guide will help you understand network security and keep your network safe!
Types of Port Security Violations
Setting up Port Security on a Cisco Switch is very important. First, you should know the different types of violations.
These are Shutdown, Restrict, and Protect. Each option has a different effect. In the end, the correct choice will ensure your network is safe and always available.
1. Shutdown
Shutdown is the strongest security step. When a violation happens, the Switch instantly closes the port. This completely turns off the port.
In short, all data traffic stops. This mode protects the network from threats. But it can stop service for real users. Opening the port needs an admin to act, which requires extra troubleshooting.
2. Restrict
Restrict mode keeps both security and availability. When an unauthorized device is detected, the Switch does not close the port. Instead, it just drops the attacker’s packets.
Also, real traffic keeps flowing. The Switch also sends a warning. It also counts the number of violations. This mode keeps the network working. But, without regular checks, risks can happen because users may miss hidden threats.
3. Protect
Protect mode is the least harmful response. If the wrong device is found, the Switch drops packets. But it does not send any alerts or warnings.
So, real traffic keeps flowing without stopping. But the number of violations does not go up. Admins cannot see the events. This can give a false sense of safety because wrong access attempts are not noticed.
In the end, choosing the breach mode is very important. This choice directly affects network security and decides the user experience.
Organizations must balance strong security with keeping operations running. So, you must think about the needs of each place. Therefore, regular checks are needed for wise decisions.
How to Enable Port Security on Cisco Switch
Setting the interface control on Cisco Switches is an easy task. First, you must go to the correct port.
Then, you need to type the “switchport mode access” command. This command makes your device’s interface work as an access port. In this way, you set the right base for security.
If you do not set the port to access mode, the Switch will give a warning. So, the order of commands is critical. For this reason, you must change any interface to an access port before you set it.
After turning on port-level security, you should go to the next step. That is, you need to set a violation rule for the port. This lets you choose how the security rule will act.
Violation status consists of 3 types. These;
- Shutdown
- Restrict
- Protect
The Violation Shutdown option is the strongest security method. So, I will only use it in this guide. Simply, we will turn off our device’s interface if a violation happens.
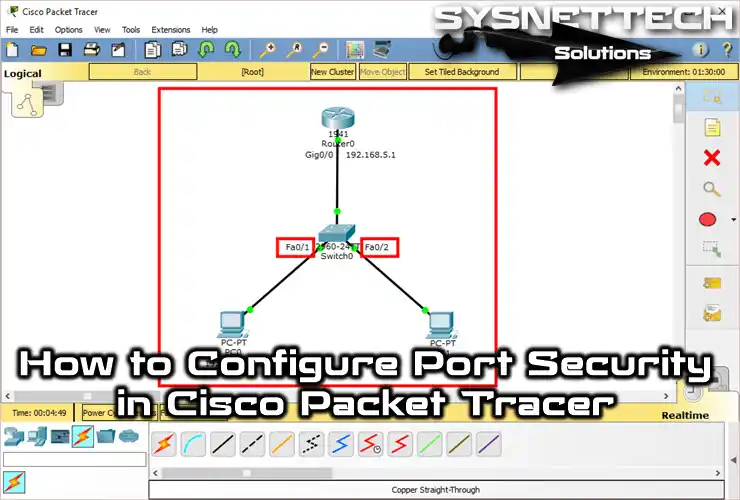
1. Topology Creation & PC Connection Testing
Now, it’s time to enable port security on a Cisco Switch! Next, let’s take a step-by-step look at how to test this configuration!
Step 1
First, open Cisco Packet Tracer and add a router to the workspace. Also, add a Switch and two computers. Next, assign an IP address to the Cisco Router.

Step 2
First, check the network before turning on port-level security. Ping the router interface from PC0. Then, ping PC1 to make sure the connection works. In short, you will make sure basic network communication is okay.
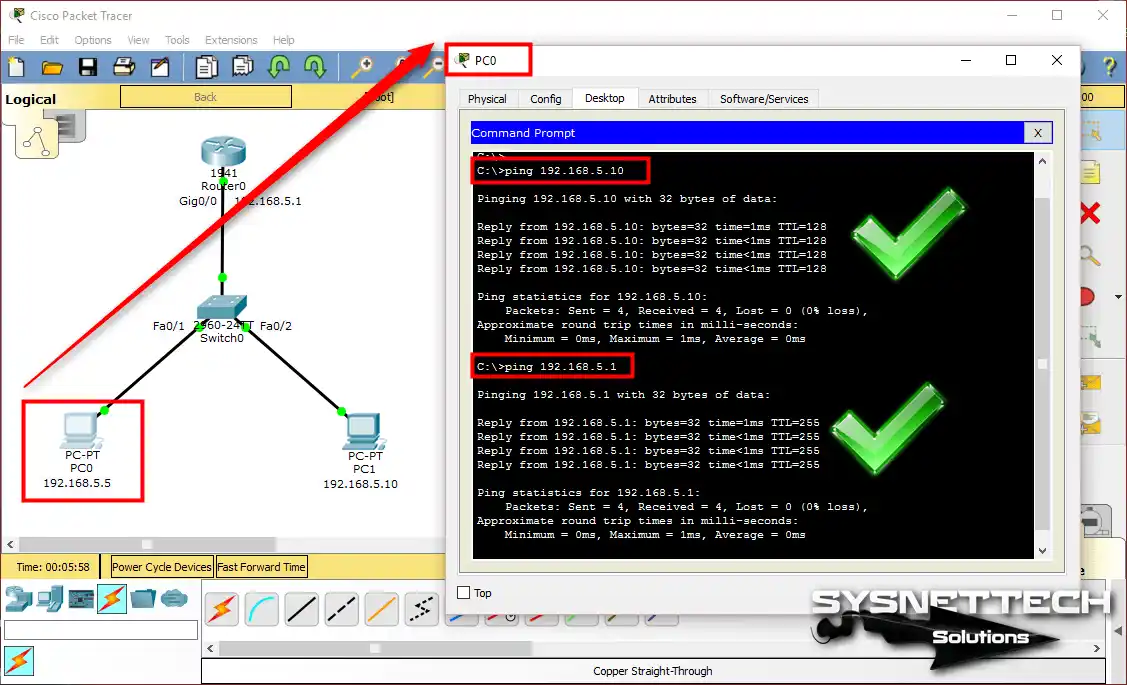
Step 3
Similarly, test by pinging from PC1. After completing the connection test, click on the Cisco Switch. This will allow you to proceed to the following configuration step.

2. Enabling Interface Security on the Packet Tracer Switch
Step 1
Click the Cisco Switch to open the CLI. Then, type the following commands in order to start setting up socket security.
Switch#configure terminal
Enter configuration commands, one per line. End with CNTL/Z.
Switch(config)#interface fastethernet0/1
Switch(config-if)#switchport mode access
Switch(config-if)#switchport port-security
Switch(config-if)#switchport port-security mac-address sticky
Switch(config-if)#switchport port-security maximum 1
Switch(config-if)#switchport port-security violation shutdown
Switch(config-if)#
Switch(config-if)#exit
Switch(config)#
Switch(config)#interface fastethernet0/2
Switch(config-if)#switchport mode access
Switch(config-if)#switchport port-security
Switch(config-if)#switchport port-security mac-address sticky
Switch(config-if)#switchport port-security maximum 1
Switch(config-if)#switchport port-security violation shutdown
Switch(config-if)#
Switch(config-if)#end
Switch#
To explain the commands above:
- I turned on Port Security on the FastEthernet0/1 and FastEthernet0/2 ports on the switch.
- I set the port to access mode with the Switchport Mode Access command.
- With the MAC-address sticky command, I saved the MAC addresses of the PCs on the ports automatically.
- Using the maximum 1 command, I made the access control store only 1 MAC address on each port.
If any rule is broken on these ports, the Fa0/1 or Fa0/2 ports will be shut down.

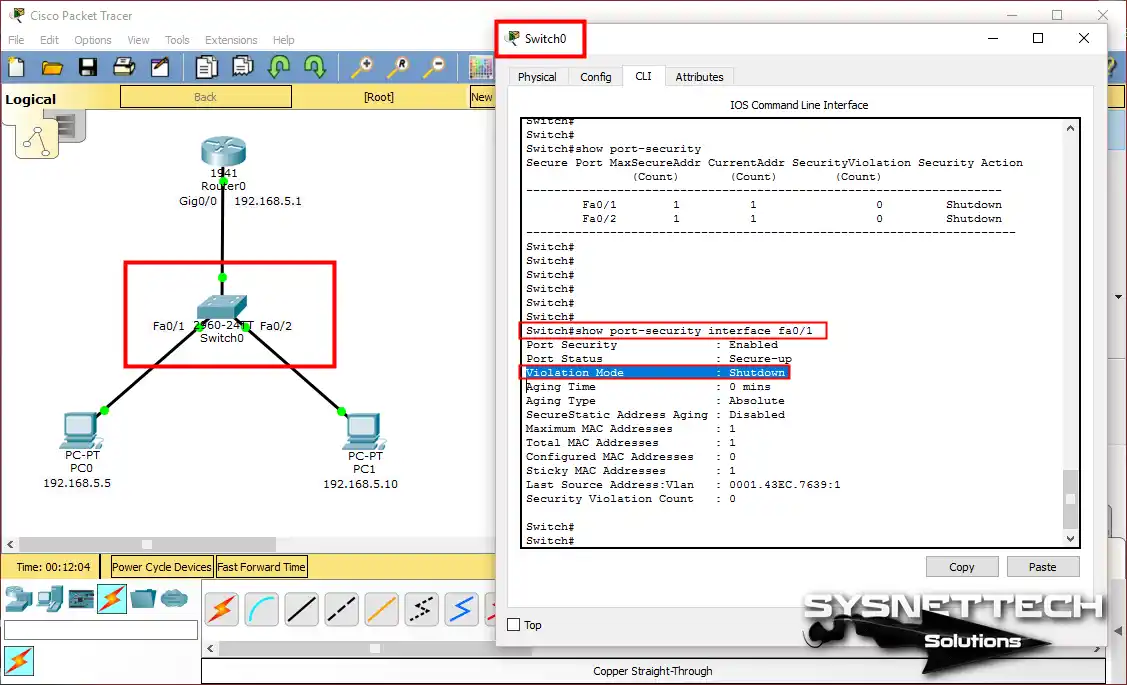
Step 2
Go into the Switch’s privileged mode. Then, run the “show port-security” command. Right now, there are no violations. So, the SecurityViolation (Count) value will show zero.

Step 3
Now, execute the “Show mac address-table” command. This will allow you to see the MAC addresses of the devices attached to the Switch.
Additionally, your device records these addresses in the table. In short, it will refer to them in case of a violation.

Step 4
You can see the details of the FastEthernet0/1 port by using the “show port-security interface fa0/1” command.
3. Checking Port by Creating a Violation in the Switch
Step 1
Now, let’s test Cisco Switch security. First, add a new PC to the workspace as an extra. Then, configure the device’s IP settings and remove the cable between PC0 and Switch0.

Step 2
After configuring PC2, connect it to Switch0. Specifically, use the Fa0/1 interface. This step is crucial for the port access test.

Step 3
Try pinging PC1 from PC2. This operation will fail because the Switch security is enabled.
The Switch found a violation on the Fa0/1 port. First, it checked the MAC address in its memory. Since the addresses did not match, it quickly shut down the port. So, the security rule worked correctly.

Step 4
After the violation on the Switch, go to the CLI. Here, run the “show ip interface brief” command. This allows you to check all interface statuses.
As you can see in the image below, the FastEthernet0/1 interface is down. It is now in the “down” state. This is the typical result of a security violation.

Step 5
Similarly, run the “show port-security” command. Then, look at the Violation Count section. You will see an increase here. As a result, you can confirm that the violation counter is 1.

Step 6
The port is currently in shutdown mode. So, an admin needs to take action. First, enter the “shutdown” command.
Then, run the “no shutdown” command. This will allow you to reopen the Fa0/1 port. In short, the port will switch to the “up” state.

Step 7
After opening the FastEthernet0/1 port, connect PC0 to the Switch. Then, do a ping to test the network. This will let you check that everything works correctly.

Show Commands for Switch Configuration
- show run
- show running-config
- show port-security
- show mac address-table
Switch#show run
Building configuration...

Current configuration : 1357 bytes
!
version 12.2
no service timestamps log datetime msec
no service timestamps debug datetime msec
no service password-encryption
!
hostname Switch
!
spanning-tree mode pvst
!
interface FastEthernet0/1
switchport mode access
switchport port-security
switchport port-security mac-address sticky
switchport port-security mac-address sticky 0001.43EC.7639
!
interface FastEthernet0/2
switchport mode access
switchport port-security
switchport port-security mac-address sticky
switchport port-security mac-address sticky 0007.EC9C.8167
!
interface FastEthernet0/3
!
interface FastEthernet0/4
!
interface FastEthernet0/5
!
interface FastEthernet0/6
!
interface FastEthernet0/7
!
interface FastEthernet0/8
!
interface FastEthernet0/9
!
interface FastEthernet0/10
!
interface FastEthernet0/11
!
interface FastEthernet0/12
!
interface FastEthernet0/13
!
interface FastEthernet0/14
!
interface FastEthernet0/15
!
interface FastEthernet0/16
!
interface FastEthernet0/17
!
interface FastEthernet0/18
!
interface FastEthernet0/19
!
interface FastEthernet0/20
!
interface FastEthernet0/21
!
interface FastEthernet0/22
!
interface FastEthernet0/23
!
interface FastEthernet0/24
!
interface GigabitEthernet0/1
!
interface GigabitEthernet0/2
!
interface Vlan1
no ip address
shutdown
!
line con 0
!
line vty 0 4
login
line vty 5 15
login
!
end
Switch#
Router#show running-config
Building configuration...

Current configuration : 620 bytes
!
version 15.1
no service timestamps log datetime msec
no service timestamps debug datetime msec
no service password-encryption
!
hostname Router
!
ip cef
no ipv6 cef
!
license udi pid CISCO1941/K9 sn FTX1524837C
!
spanning-tree mode pvst
!
interface GigabitEthernet0/0
ip address 192.168.5.1 255.255.255.0
duplex auto
speed auto
!
interface GigabitEthernet0/1
no ip address
duplex auto
speed auto
shutdown
!
interface Vlan1
no ip address
shutdown
!
ip classless
!
ip flow-export version 9
!
line con 0
!
line aux 0
!
line vty 0 4
login
!
end
Router#
Switch#show port-security
Secure Port MaxSecureAddr CurrentAddr SecurityViolation Security Action
(Count) (Count) (Count)
--------------------------------------------------------------------
Fa0/1 1 0 0 Shutdown
Fa0/2 1 0 0 Shutdown
----------------------------------------------------------------------
Switch#
Switch#show mac address-table
Mac Address Table
-------------------------------------------

Vlan Mac Address Type Ports
---- ----------- -------- -----

1 0001.43ec.7639 STATIC Fa0/1
1 0001.c7a9.d501 DYNAMIC Gig0/1
1 0007.ec9c.8167 STATIC Fa0/2
Switch#
Port Access Control Configuration YouTube Tutorial Video
For a deep look at how it works, I suggest watching our training video. You will see how our security steps keep operations safe.
You will also learn how to keep ports safe. If you find this content helpful, please support us by subscribing to our YouTube channel. This way, you’ll be notified of our new Packet Tracer videos!
Conclusion
In short, Port Security is vital on Cisco switches. It defends your network from unauthorized access and protects against possible threats.
Learn the Shutdown, Restrict, and Protect modes well. This way, you can protect your network and keep services running by making wise choices.
You can use the Packet Tracer simulator for the virtual setup. In this guide, I have given you a simple, basic process.
Also, you need to do regular checks and updates. Keep improving your security to protect your network from new threats.
Help your organization by focusing on both security and availability. This way, you can build a strong network!
Think about extra features when setting up Cisco Port Access Control. For example, PortFast is very helpful. If you want to make your network better, follow our guide. Our resource, “Configuring PortFast in Packet Tracer,” will show you. This way, your devices will connect quickly and safely.

Be the first to share your comment